In the world of electrical wiring and electronics, there are many types of connectors available – from simple terminal lugs to sophisticated multi-pin plugs. But what is the most common connector used today? In general electrical work (especially for splicing wires), one connector style stands out in widespread use: the butt splice connector (often simply called a butt connector). In fact, the butt splice connector is frequently cited as the most commonly used connector for joining wires. This article will explore why butt connectors are so ubiquitous, how they compare to other connector types, and best practices for installing them. Along the way, we’ll also discuss different varieties (from basic vinyl butt connectors to advanced heat shrinkable butt connectors) and include tips to ensure a reliable connection.
Whether you're an automotive enthusiast fixing a wiring harness or a DIYer working on home or marine electronics, understanding butt connectors and their alternatives will help you make safe, durable electrical connections. Haisstronica – a brand known for quality wire connectors – offers a wide range of butt connectors and related tools, which we’ll reference for examples and illustrations. By the end of this deep dive, you’ll know what makes butt connectors the go-to solution for most wiring jobs today, and how to use them like a pro.
Common Electrical Connector Types (and Why Butt Connectors Reign Supreme)
It’s helpful to first understand the landscape of common electrical connectors. Different connector types are designed for specific purposes in wiring. Here are some of the most widely used ones:
-
Ring Terminals: A ring terminal (sometimes called a ring terminal connector) has a round ring shape that can be bolted or screwed down to a stud or screw. They are typically used to attach wires to grounding points or battery posts. For example, a ring terminal connector is often found at a car’s ground wire attachment or on a battery cable. It provides a secure, bolted connection.
-
Spade Terminals: Spade connectors (also known as spade lugs or fork connectors) have a fork or blade shape. They come in male and female pairs (the male spade is a blade, and the female spade is a receptacle). Spades are extremely common for connecting wires to components like switches, relays, and speakers. In fact, a female spade terminal is one of the most common connector types for plugging wires onto device terminals. The forked spade variant can be quickly secured under a screw and removed easily, making it convenient for serviceable connections.
-
Bullet Connectors: Bullet connectors consist of a round male bullet and a female socket. They join two wires together in a detachable way (the bullet plugs into the socket). These were frequently used as factory connectors in older cars (e.g. classic Ford and Mercury vehicles). Bullet connectors allow wires to be unplugged, but they are less common today and can be a bit fiddly – they’re harder to separate without pulling on the wire, and not as prevalent in modern wiring. Still, you may encounter them in motorcycles or older automotive wiring harnesses.
-
Quick-Disconnects and T-Taps: These include various insulation-displacement connectors (like the plastic T-tap connectors that let you tap into an existing wire without cutting it). They’re used for convenience, but often not as reliable as a solid crimped connection. Quick disconnect terminal pairs (like spade or bullet connectors) allow components to be serviced or replaced without cutting wires.
-
Wire Nuts (Twist-on Connectors): In building and household wiring, twist-on connectors (often called wire nuts) are extremely common. These are plastic caps that twist over two or more stripped solid-core wires to hold them together. Wire nuts are popular in residential AC wiring (e.g. connecting house wires in junction boxes) because they’re quick and code-approved for solid copper house wire. However, they are generally not used in automotive or electronics projects with stranded wire – vibration can shake them loose, and they aren’t as secure on fine-stranded conductors. For those applications, crimp connectors are preferred.
-
Barrel Splices / Butt Connectors: This category is our main focus. Butt splice connectors (aka butt connectors) are short cylindrical connectors intended to join two wires end-to-end inside a crimped barrel. One wire is inserted into each end of the butt connector, and the metal barrel is crimped to hold the wires securely – effectively splicing the wires in a continuous line. Butt connectors are incredibly common for repairing or extending wires because they are simple, inexpensive, and create a reliable inline connection. As we’ll explore, they are arguably the most common connector for wire splicing in automotive, marine, and general electrical use.
Each connector type above serves a specific purpose. For instance, ring and spade terminals are best for attaching wires to components (studs, screws, blades), while butt connectors are best for joining wires together. In fact, butt splice connectors are considered the go-to solution for splicing a cut or broken wire.
It’s worth noting that while female spade connectors might be the single most common connector to hook a wire to a component (like plugging a wire onto a speaker terminal), when it comes to connecting wire-to-wire, butt connectors dominate. Given their importance and popularity, let’s take a closer look at what butt connectors are and why they’re so widely used.

What Are Butt Connectors (Butt Splice Connectors)?
A butt connector is a short tube-like electrical connector used to splice two wires together end-to-end. The name “butt splice” comes from the idea of “butting” two wire ends together inside the connector. Essentially, it’s a cylindrical crimp connector with an opening at each end for the wires. The middle of the connector is just a solid crimp barrel (sometimes with an internal stop to center the wires). When you crimp both sides onto inserted wires, it holds them in a continuous electrical path.
In construction, a typical butt connector is a metal tube (usually copper alloy, often tin-plated) with an insulating sleeve over it. The metal barrel provides the electrical connection once crimped, and the insulation (vinyl, nylon, or heat shrink material) covers the exposed splice to prevent shorts and provide strain relief. As a source succinctly describes: “It is generally a copper tube covered with a PVC insulator.” This simple design makes butt connectors easy to use even for beginners.
How butt connectors work: You start by stripping the ends of the two wires you want to join (typically about 1/4 inch of bare wire). One stripped end is inserted into one side of the butt connector, and the other wire is inserted into the other side. The wires ideally meet in the middle of the connector. Then, using a crimping tool, you compress (crimp) the metal barrel tightly onto each wire end. The crimp essentially cold-welds the connector onto the wires, creating a solid electrical connection. The joined wire can carry current almost as if it were a continuous wire, and the connector’s insulation covers the bare metal. Butt connectors are inline connectors, meaning the wire continues in a straight line – this makes it easier to bundle or loom the spliced wire with others, compared to connectors that make a 90° turn.
Other names: Butt connectors may also be called butt splice connectors, butt splices, or barrel connectors. (Some people even refer to them as butt splicers, but this is just a colloquial term for the same thing – a connector that splices wires.) In writing, you might see “butt-splice connector” with a hyphen, or even the concatenated term “buttsplice”. Rest assured, all of these terms refer to the same basic device. In essence, a butt connector wire splice is one of the simplest ways to join two wires.
Because butt connectors are so common, they are a fundamental item in any electrician’s or mechanic’s toolkit. If you open up a wiring repair kit, you’ll almost certainly find an assortment of butt connectors. For example, Haisstronica’s Wire Connector kits include many butt splices of various sizes, often color-coded by gauge. A popular option is the Heat Shrink Electrical Crimp Butt Connectors Kit (330/420/580 PCS), which provides an assortment of insulated butt connectors covering wire gauges from AWG 26 to 10 in a convenient case – ensuring you have the right size for nearly any job (more on heat-shrink types soon).
Why Are Butt Connectors So Common?
So, what makes the butt splice the most common connector for so many applications? Several key reasons explain why butt connectors are ubiquitous in electrical work:
-
Versatility for Wire Repair and Splicing: Butt connectors are ideal for repairing a broken wire or extending the length of a wire. Instead of running an entirely new wire, you can splice in a new section using two butt connectors (one at each end of the new piece) or join a single cut with one connector. They work for copper wires of all types – stranded or solid (though stranded wire is more typical in automotive/marine). Whenever you need to join two conductors in-line, a butt connector is a go-to solution. They can even join more than two wires (by crimping multiple conductors into one side) in a pinch, though specific multi-wire connectors or larger gauge butt splices are better for that.
-
Simplicity and Ease of Use: Butt connectors are very straightforward to use. You don’t need special skills like soldering or complex assembly – just a wire stripper and a crimp tool. This makes them accessible to professionals and hobbyists alike. A proper crimp is easy to achieve with an inexpensive crimping tool, and even easier with a quality ratcheting crimper. Because installation is so quick (strip, insert, crimp), butt connectors enable fast repairs and installations. In fact, using a butt connector is often faster and cleaner than soldering when joining wires, especially for quick fixes or field work.
-
Reliability and Strong Electrical Connection: A correctly crimped butt connector provides a low-resistance, secure connection that is resistant to vibration and mechanical stress. The crimp essentially forms a solid bond with the wire. In automotive and industrial settings, vibration-resistant connections are crucial – and butt connectors excel here. Unlike a simple twisted-and-taped wire joint, a crimped splice won’t easily pull apart or deteriorate. Butt splices also maintain a straight inline profile, making it easy to secure the spliced section along with the wiring harness so it doesn’t flex independently. A durable crimp can often outlast the rest of the wiring if done properly.
-
Wide Usage Across Industries: Butt connectors are used virtually everywhere: automotive wiring, marine and boat wiring, aerospace, appliances, electronics, industrial machinery, solar energy systems, and more. In vehicles, for example, butt splices are used to install aftermarket stereo systems, to repair broken wires in a harness, or to add accessories. They are popular in marine and outdoor applications (especially heat shrink butt connectors) because they can be made waterproof and resist corrosion. In household appliance repair, butt connectors provide a compact, permanent fix for broken leads. Their sheer presence across these domains contributes to their “most common” status – they are a universal solution for joining wires.
-
Cost-Effectiveness and Availability: Butt connectors are very inexpensive, especially when bought in bulk kits. A single butt connector might cost only a few cents. There’s no reason to attempt a risky “twist and tape” splice when you can crimp on a proper connector so cheaply. Because they’re so widely used, you can find butt connectors at any hardware store, auto parts store, or online easily. This availability means people reach for them first. They also come in packs with assorted sizes and quantities (like 100-packs of common sizes), so you can always have some on hand.
-
Neat, Insulated Finish: Using a butt connector gives a clean look to a splice. The connector’s insulation (especially if you use color-coded types) covers the joint nicely. There’s no sticky tape unwinding or bulky wire nut; the profile of a butt-spliced wire is slim and can be covered with heat shrink tubing or wrap for extra protection if desired. Many butt connectors, especially butt connectors with heat shrink, provide built-in insulation that shrinks and seals, resulting in a professional-looking finish.

Because of these benefits, butt connectors have become a default solution for joining wires in many scenarios. It’s often said that “crimping, done correctly, is as reliable as soldering” – and butt splice connectors are a prime example of this reliability in practice. Automotive experts note that most modern wiring repairs specify crimp connectors rather than solder, due to the reliability under vibration. In summary, butt connectors hit the sweet spot of being easy, cheap, and effective, which is why they are arguably the most common connector in use for electrical splices today.
To illustrate their versatility: butt connectors are used in automotive wiring because they create durable, vibration-proof splices for things like audio system installs or sensor repairs. In marine/outdoor applications, waterproof heat-shrink butt connectors maintain reliability even when exposed to moisture and corrosion. In industrial machinery, butt splices hold up to constant motion and won’t loosen under stress. They’re also great for household electronics or appliances, providing a quick fix in tight spaces without needing to solder. And in solar or renewable energy systems, heavy-duty butt connectors join large gauge cables in junctions, handling high currents and weather exposure. Few other connectors have such broad utility.
Types of Butt Connectors (Insulated, Heat Shrink, Solder, etc.)
Not all butt connectors are identical – there are several types of butt connectors designed for different needs and preferences. Below we’ll outline the main categories, which include variations in insulation, materials, and special features:
-
Non-Insulated Butt Connectors: These are simply bare metal butt splice barrels with no insulation pre-installed. They are often made of copper or tinned copper. Non-insulated butt splices are typically used when the splice will be inside a junction box or sleeve, or when high-temperature performance is needed (since there’s no plastic to melt). They’re also used if you plan to add your own insulation later (like sliding heat shrink tubing over after crimping). The advantage is they’re very cost-effective and versatile – you can crimp and then use whatever insulator you prefer. However, using them without adding insulation is not suitable for any exposed wiring because the splice would be a bare metal joint (risk of shorting). Use non-insulated connectors only in dry, protected areas or with added insulation.
-
Vinyl-Insulated Butt Connectors: These are the most basic insulated butt connectors. They have a PVC/vinyl sleeve (often colored red, blue, or yellow by wire size) over the metal barrel. Vinyl insulation is somewhat stiff and not as durable as other types, but it is economical. These are common in low-cost connector assortments. They work fine for many general-purpose indoor or automotive connections, provided they are not in a high-stress environment. The limitations are that vinyl can crack under extreme cold or degrade with heat over time, and it doesn’t form as tight a seal around the wire as other insulations. Still, vinyl butt connectors electrical applications include general wiring in appliances or vehicles where conditions are moderate. They provide basic insulation and strain relief. Example: those red/blue/yellow crimp connectors you find in auto stores are often vinyl insulated.
-
Nylon-Insulated Butt Connectors: Nylon insulation is a step up from vinyl. It is more flexible and resistant to heat and solvents, which means it won’t crack as easily and can handle vibrations better. Nylon insulated butt connectors often have a semi-translucent appearance (so you can see the wire inside to check engagement). They may also have a flared entry for the wire to make insertion easier. Nylon butt connectors are a good choice for “rough conditions” or if you want a more reliable connector than basic vinyl. They cost slightly more, but the improvement in durability is often worth it for automotive and marine use. Nylon doesn’t shrink like heat-shrink types, but it generally grips the wire insulation well and holds up to higher temperatures.
-
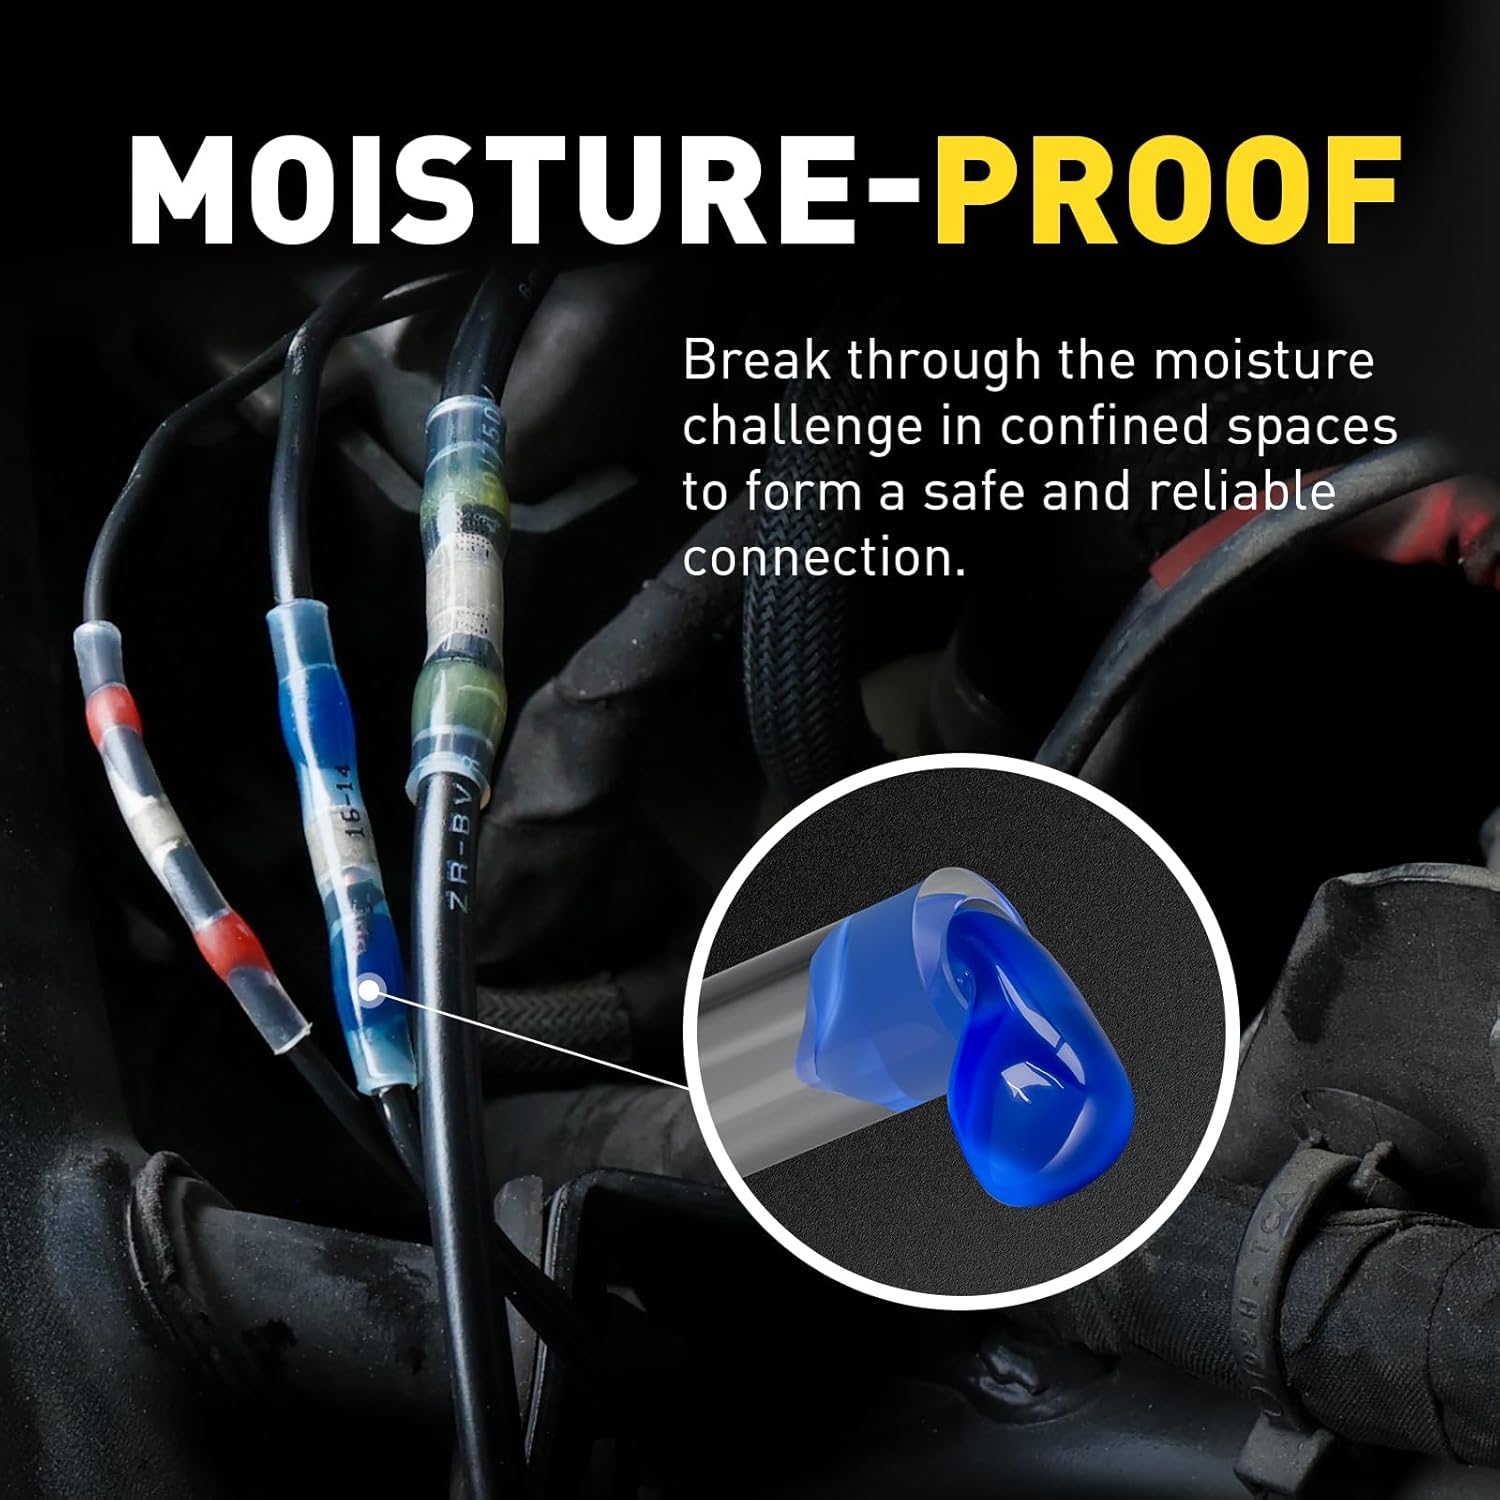
Heat-Shrink Butt Connectors: These are extremely popular nowadays, especially for outdoor, marine, or automotive wiring. A heat-shrink butt connector has a polyolefin heat shrink tube as its insulation. After crimping the connector onto the wires, you apply heat (using a heat gun or torch) to the connector. The tubing then shrinks in diameter, tightly sealing around the wire insulation and the connector. Many heat-shrink connectors also have an adhesive lining on the inside that melts and flows when heated – creating a waterproof seal around the wire. The result is a splice that is not only electrically secure but also environmentally sealed against water, salt, and dust. These are sometimes just called shrink tube butt connectors or heat-shrinkable butt connectors. Heat-shrink butt connectors are ideal for any application exposed to moisture or where maximum reliability is needed. They essentially combine the crimp connection with the sealing capability of glue-lined heat shrink. For example, in marine wiring, waterproof butt connectors with adhesive-lined heat shrink are standard – they ensure no water intrusion into the splice. The only downsides are a slightly higher cost and the need for a heating tool to shrink them, but those are small trade-offs for the benefits. Heat-shrink connectors usually come in the same color codes (red/blue/yellow for gauge ranges) but often the tubing is transparent enough to see the internal color-coded ferrule.
-
Adhesive-Lined vs. Non-Adhesive Heat Shrink: It’s worth noting that some heat-shrink butt connectors have adhesive lining (often marketed as dual wall tubing), whereas some cheaper ones might just be plain (single wall) heat shrink without glue. The adhesive provides a better seal (essential for truly waterproof splices) by melting and filling any gaps. If you need water resistance, make sure to use adhesive-lined heat shrink butt connectors. They will be labeled as such (and usually are marine grade). Haisstronica’s heat shrink butt connectors, for instance, use a 3:1 shrink ratio tubing with hot-melt adhesive to create a IP67 waterproof seal when shrunk. The adhesive bond is so effective that a properly crimped and shrunk connector can hold against significant strain (some product tests show holding 150N of force without failure).
-
Waterproof and Marine-Grade Butt Connectors: As an extension of heat-shrink connectors, marine-grade butt connectors typically refer to connectors that are both heat-shrink insulated and made of high-grade materials (tinned copper) to resist corrosion. These are essentially waterproof heat-shrink butt connectors designed for the harsh marine environment. They offer a secure, watertight seal against saltwater and moisture, and the tinned copper prevents corrosion over time. If you’re working on a boat, trailer wiring, or outdoor lighting, these are the best choice. Marine butt splices usually have adhesive-lined tubing (often with a thicker wall) to ensure longevity. They might also be labeled for operating temperature ranges and meet marine certifications. In summary: all marine-grade butt connectors are heat-shrink types, but with added robustness for water and corrosion – perfect for butt connectors with heat shrink that need to survive the elements.
-
Solder Seal Butt Connectors: This is a relatively newer type of connector that has gained popularity among DIYers. A solder seal butt connector (also called a butt connector with solder) looks like a heat-shrink butt connector, but with a twist: instead of crimping the wires, a low-melt solder ring in the center of the tube melts when heated to solder the wires together. These connectors are typically transparent tubes with colored bands indicating size, and a ring of solder (and usually two rings of adhesive) inside. The idea is you insert stripped wires from each end so they overlap in the middle, then heat the connector with a heat gun. The solder ring melts and fuses the wires, while the tube shrinks and the adhesive seals it – achieving both a soldered joint and a sealed insulation in one step. Solder seal connectors are marketed for their ease (no crimping tool needed, just heat). They can be very convenient, especially if you don’t have a good crimper. However, there is some debate in the community about their reliability versus crimped connectors. A properly melted solder joint can be strong, but if not heated adequately or if the wires aren’t clean, the joint might be cold or weak. Additionally, without a physical crimp, the tensile strength relies on the solder bond and adhesive – which may not be as strong as a crimp’s mechanical hold. Many professionals still prefer crimped butt connectors (heat shrink type) for critical uses, but solder seal connectors have their place for quick fixes and are quite popular in DIY circles. If you use them, just follow the instructions carefully: ensure the wires are overlapped under the solder ring and use a heat source that can adequately melt the solder without charring the tubing. Done correctly, they create a secure electrical bond. Tip: Support the wire so it doesn’t move while the solder cools. Solder seal connectors are also known by brand names or as “solder & seal” connectors. Haisstronica offers heat shrink solder seal wire connectors as well, which some hobbyists like for convenience in tight spots where crimping is awkward.
-
High-Temperature Butt Connectors: These are specialized connectors usually made with high-temp nylon or teflon insulation, intended for environments that get hotter than standard connectors can handle. For example, wiring near an engine or in an appliance that gets hot might use high-temp butt splices. They often are rated for higher operating temperatures and may use materials that resist melting or deformation. Unless your project specifically calls for it (like wiring in an oven or engine bay sensors), standard connectors are fine, but it’s good to know high-temp options exist.
-
Heavy-Duty and Large Gauge Butt Connectors: Most common butt connectors handle, say, 22 AWG up to 10 or 8 AWG wires. But for very large wires (like 4 AWG, 2 AWG, etc., used in battery cables or welding cables), there are heavy-duty butt splice connectors available. These might be longer barrels made of thick copper, often requiring a hammer crimper or hydraulic crimper to crimp due to the size. They may or may not come insulated (often you’ll use separate heavy-wall heat shrink tubing to insulate these large splices). If you’re, for example, extending a car battery cable or solar panel cable, you might use a large butt splice (or a mechanical splice block). Heavy-duty butt connectors are less common simply because large gauge splices are less common, but they do exist for when you need them.
-
Step-Down Butt Connectors: A special subtype worth mentioning is the step-down butt connector. This type of butt splice is designed to join two different gauge wires (one end of the barrel is sized for a larger wire, the other for a smaller wire). They’re great when you need to splice, say, a 12 AWG wire to an 18 AWG wire seamlessly. The connector “steps down” in size internally. These are also called reducer butt splices. They are commonly insulated with heat shrink or nylon. If you have an application bridging two wire sizes, using a step-down connector ensures a tight crimp on both sides appropriate to each wire. Terminal manufacturers like AMP, Molex, or others produce these, and they’re included in some assortment kits. They aren’t used as frequently as standard butt splices, but they solve a tricky problem neatly.
As you can see, butt connectors come in many flavors – from plain metal tubes to high-tech heat-shrink solder combos. Your choice depends on the requirements of your project. For most automotive and outdoor projects, heat-shrink adhesive-lined butt connectors are considered the best practice because they offer a strong crimp plus environmental sealing. If water isn’t a concern and cost is a major factor, vinyl-insulated butt splices will do the job in benign conditions. If you lack crimping tools, solder seal connectors can be a handy alternative.
For those looking for a one-stop solution, assortment kits can be very helpful. The earlier mentioned Haisstronica kit, for example, contains a mix of red (22-16 AWG), blue (16-14 AWG), and yellow (12-10 AWG) heat shrink butt connectors to cover common wire sizes, all with adhesive lining for waterproofing. It’s an easy way to get a full set of butt connectors electrical supplies for various tasks. (Product link: You can find the Haisstronica Heat Shrink Butt Connectors Kit (330/420/580 PCS) on their website, which offers multiple piece counts and covers AWG 26-10 with high-quality shrink connectors.)
And if you want to explore all options including ring terminals, spades, and butt connectors, feel free to browse Haisstronica’s full collection of wire connectors – they have a comprehensive range of connector types (butt connectors, terminals, ferrules, etc.) for different wiring needs.

Butt Connectors vs Other Connector Methods: Comparisons
With a good understanding of butt splice connectors, let’s compare them to some other ways of connecting wires. When should you use a butt connector, and when might another method or connector be more suitable? Below we’ll compare butt connectors to a few alternatives and connector types:
Butt Connectors vs. Soldering Wires
One of the classic debates in electrical work is crimp vs. solder. Butt connectors represent the crimp method (mechanically crimping a connector to join wires), whereas the traditional alternative is to solder wires together and insulate them (usually with tape or heat shrink tubing).
-
Strength and Reliability: In high-vibration environments (like cars, boats, aircraft), a properly crimped connection is often more reliable than a soldered joint. Crimping creates a solid mechanical bond without heat. Soldering, if not done perfectly, can result in a stiff joint that may crack under vibration or cause the wire to break at the edge of the solder (solder wicks into the wire, making it inflexible at that point). Many automotive and aerospace standards actually prohibit soldered splices in harnesses in favor of crimps for this reason. As one discussion noted, soldered connections are fine in theory, but they can be “slightly less reliable than crimping” under typical automotive conditions. Crimped butt splices also avoid the introduction of solder, which can corrode if flux is not cleaned or if moisture ingresses.
-
Electrical Conductivity: A quality crimp done with the correct size connector and tool can achieve very low resistance and essentially gas-tight connection. Solder obviously also provides a low-resistance bond when done right. In terms of pure electrical performance, both methods are good if executed properly – differences in resistance are negligible for practical purposes when comparing a good crimp vs a good solder joint. The key is proper execution.
-
Ease and Convenience: Using butt connectors is generally faster and easier for most people than soldering. To solder, you need a soldering iron, solder, possibly flux, and a steady hand – plus you still need to insulate the joint after (with heat shrink or tape). With a butt connector, you strip and crimp, and you’re essentially done (especially if using pre-insulated or heat-shrink connectors). There’s no warm-up time or risk of accidentally melting nearby components. In the field (e.g., fixing a trailer wire by the roadside), a butt connector and crimper are far more convenient than trying to solder in windy or wet conditions. Butt connectors also work better on larger gauge wires where soldering would require a very high heat iron.
-
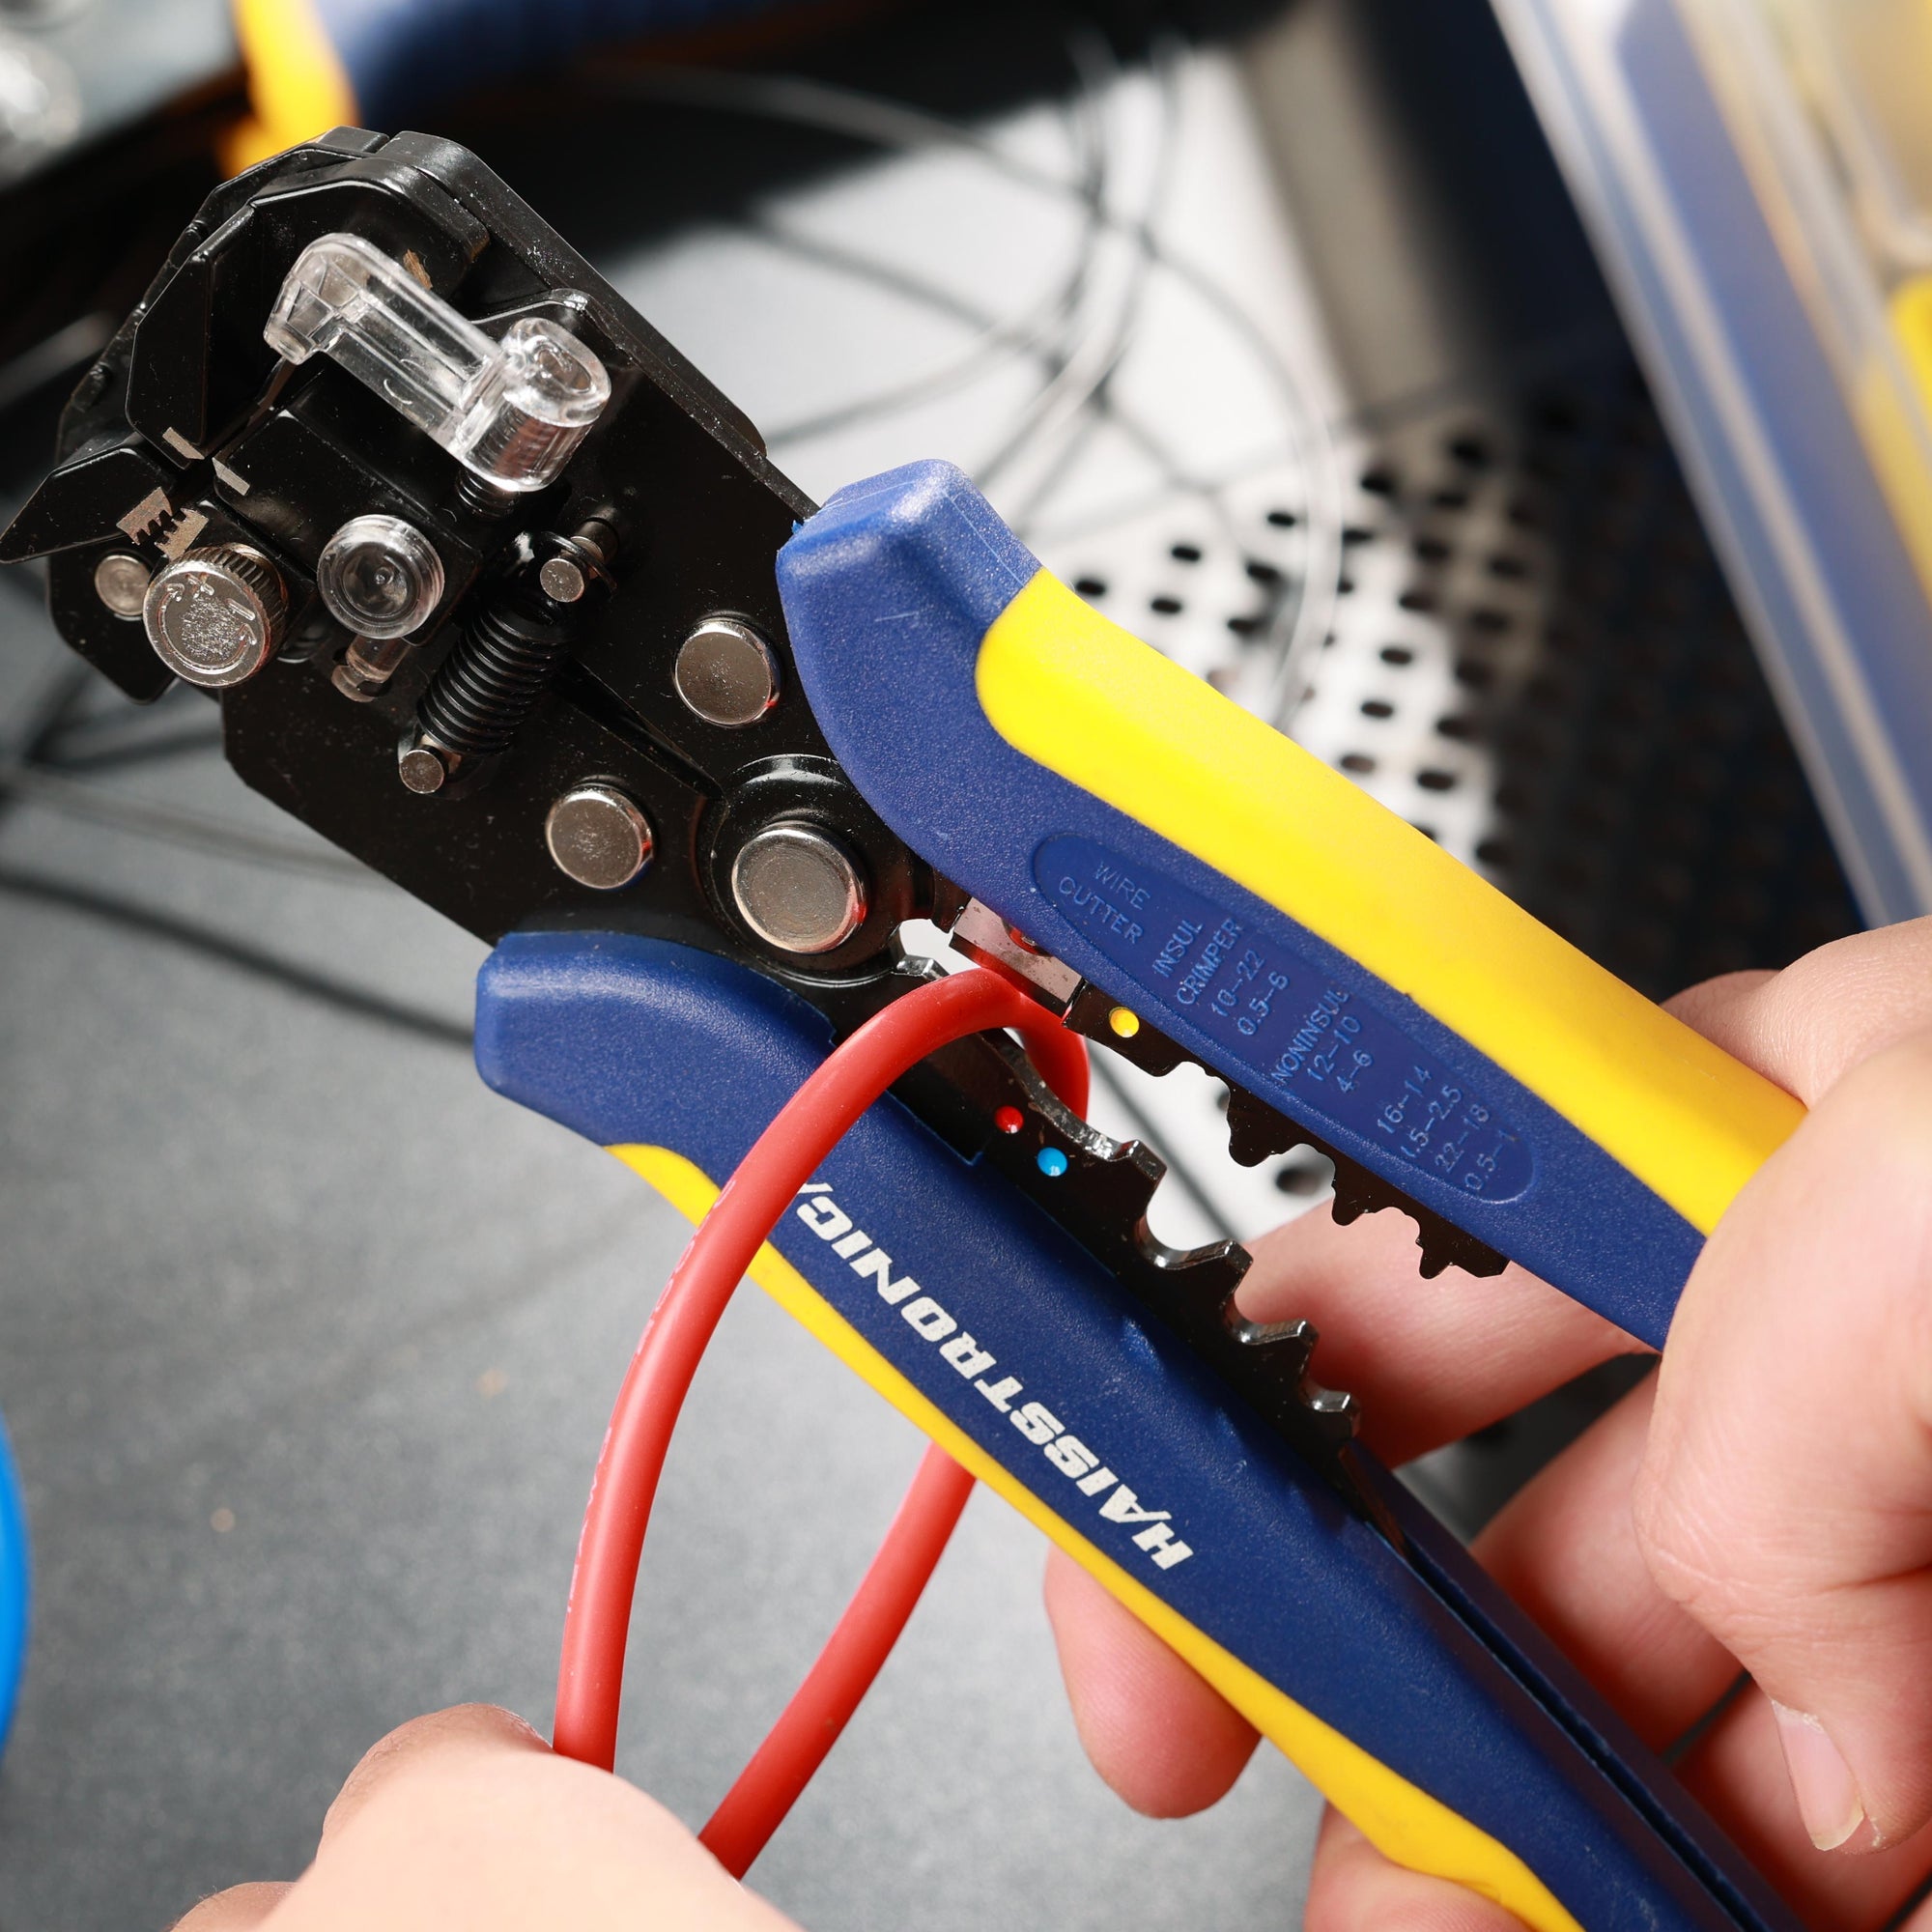
Tools Required: Soldering requires an electrical supply or open flame (for a soldering iron or torch), which might not be available everywhere. Crimping just requires a hand tool. However, a proper ratcheting crimp tool is recommended for consistent, strong crimps. If you use a cheap stamped crimper or pliers, you may not get as good a crimp – that’s where some people have trouble. Investing in a decent crimp tool is worthwhile if you’ll be doing a lot of wiring. Haisstronica, for instance, offers quality ratcheting crimpers specifically designed for insulated terminals, which ensure the crimp is applied with correct pressure every time. Soldering, on the other hand, requires skill and practice to get right (avoiding cold joints, etc.).
-
Environmental Sealing: A butt connector, especially the heat shrink butt connector type, offers built-in environmental protection. The shrink tubing will seal the splice from moisture. A hand-soldered joint must be protected by separate heat shrink tubing (assuming you remember to slide it on before soldering!) or tape, and even then it might not be as robustly sealed as an adhesive-lined connector. Water getting into a soldered joint can lead to corrosion wicking under the insulation. Butt connectors have an edge in creating a sealed, weatherproof connection when using the right type.
In summary, both methods can produce a good electrical connection, but butt connectors have become more popular in modern practice due to their speed and reliability in adverse conditions. Soldering is still a great skill and can be useful for bench work or when adding components to a PCB or such. However, for joining wires in a harness, crimped butt splices are often the preferred method by professionals. As one LinkedIn discussion on automotive wiring put it: “Most applications use crimp terminals as they are reliable and efficient.” Even NASA guidelines for wiring emphasize crimping over solder splices for reliability.
Bottom line: If you have a quality butt connector heat shrink style and a good crimp tool, choose that for splicing wires, especially in vehicles or other vibration-prone settings. If you do solder wires, make sure to secure them so they don’t flex at the joint, and insulate well. Interestingly, the rise of solder seal butt connectors attempts to offer the best of both worlds – a soldered joint that is also sealed and strain-relieved by the shrunk tubing. Opinions vary, but they can work if properly heated. Traditionalists still prefer a crimp every time, as do we in most cases.
Butt Connectors vs. Wire Nuts (Twist-On Connectors)
As mentioned earlier, wire nuts are common in household AC wiring. They allow multiple solid-core wires to be twisted together inside a plastic insulated cap. But how do they compare to butt connectors?
-
Usage Scenarios: Wire nuts are only suitable for solid core wires (like the single-strand copper in house wiring) or a solid with a stranded combo in some cases. They rely on twisting action to hold wires, which works well when the wire is stiff. For stranded wire (like in cars), wire nuts are generally not ideal – the strands can deform and not grip well, and vibration can undo the connection. Butt connectors excel with stranded wire, providing a crimped compression that captures all those fine strands securely. In automotive or low-voltage electronics, you’ll virtually never see wire nuts used; butt connectors or other crimp terminals are far more common (and often required by code in marine applications).
-
Connection Security: A properly installed wire nut can actually be very secure for indoor solid wires – it’s approved by electrical codes for building wiring and can handle substantial current (depending on the size). However, if a wire nut is improperly sized or not twisted tight, wires can slip out. Butt connectors, when crimped, physically deform the metal around the wires – it’s not going to loosen unless the crimp was poor or the wire was pulled extremely hard. For a permanent inline splice, butt connectors provide a more locked-in connection. Wire nuts do allow easy rework (untwist to open the splice), whereas butt splices are considered permanent (you’d have to cut it out to disconnect).
-
Insulation and Safety: Both wire nuts and insulated butt connectors provide insulation over the splice. Wire nuts typically cover the bare wire ends completely if sized right, but occasionally a stray strand might stick out if done sloppily – which can be a hazard. Butt connectors encase the stripped wire ends fully inside the barrel, so there’s less chance of an exposed conductor if crimped correctly. For added safety, you can even double insulate a butt splice with heat shrink over it, but that’s usually not needed if the connector’s insulation is intact. In high-voltage AC wiring (120V household), wire nuts are standard and butt connectors aren’t used partly due to certification reasons. But for low voltage DC wiring, butt connectors are safer in that context.
-
Environmental Factors: Wire nuts offer no sealing or moisture protection. They are meant for dry locations (or if used outdoors, they must be inside a weatherproof box). If you tried to use wire nuts in an automotive or outdoor context, moisture could corrode the connection easily. By contrast, you can use butt connectors with heat shrink to create a weatherproof splice suitable for wet or corrosive environments (like trailer wiring that gets dunked in water).
-
Physical Size: Wire nuts are a bit bulky and require space (like a junction box) to contain them safely. Butt connectors are slim and inline, which is advantageous in tight spaces or when running wiring bundles. For example, inside a car’s wire loom or under a dash, you don’t have room for a bunch of wirenut caps – butt splices integrate neatly. Also, when splicing two wires, a wire nut often needs the wires to come together at a single point, then cap, which can be awkward if you’re splicing a new segment into a run. Butt connectors keep the line straight.
Overall, wire nuts have their place (mainly residential or commercial building wiring with solid wires in an electrical box). But for automotive, marine, or hobby electronics, butt connectors are the preferred method for splicing wires. Many of us have seen what happens when someone uses a household wirenut on a car: it often vibrates loose or corrodes, causing intermittent issues. Stick to butt splices or other crimp connectors for vehicle repairs to avoid those headaches.
Butt Connectors vs. Other Crimp Terminals (Spade, Bullet, etc.)
It’s also useful to distinguish butt connectors from other crimp-on terminals like spade, ring, or bullet connectors. We touched on their uses before, but here the comparison is about when to use a butt splice versus a different connector style:
-
Permanent Splice vs. Quick Disconnect: Use a butt connector when you want to permanently join two wires end-to-end. If instead you want a connection that can be disconnected in the future (for example, wiring a removable component), you might choose bullet connectors or spade connectors in a male/female pair. For instance, connecting LED lights on a motorcycle might use bullet connectors so you can unplug the lights later, whereas repairing a cut wire to a fuel pump would use a butt splice since it’s not meant to be disconnected regularly. Butt connectors do not allow easy disconnection; the wires are effectively fused until cut. So for serviceable connections, a pair of bullet connectors or a two-pin plug is better.
-
Connecting to Devices: Butt connectors are not used to connect wires directly to device terminals (since they splice wire-to-wire). For connecting a wire to, say, a battery post, starter solenoid, or speaker terminal, you would use a ring terminal, spade terminal, or specialized connector that mates with the device. For example, to wire an amplifier, you might crimp ring terminals onto the power wires to bolt them down, rather than a butt connector. The butt connector would come into play if you had to extend that power wire by splicing on another piece.
-
Joining Multiple Wires: Butt connectors typically join two wires (one on each end). If you need to join 3 or 4 wires together, butt splices aren’t designed for that (though one can jury-rig by crimping two wires into one side, one in the other, it’s not ideal). In cases of multiple wire junctions, alternatives include a crimp cap (a larger cap that you crimp over several stripped ends, mentioned in the NAPA guide), a soldered pigtail, or using a terminal block / distribution block. There are also specialty multi-wire butt connectors (like parallel splices that accept multiple wires). But for a simple one-to-one join, butt connectors are king.
-
Wire Gauge and Current: For very high current connections (like the main car battery to starter cable), butt connectors exist but are not commonly used in the field – usually those are one-piece cables to avoid any splice, or if a splice is needed, a bolted mechanical clamp connector or properly crimped heavy lug is used. Butt connectors on extremely high current cables might introduce an additional point of resistance or failure. So, butt splices are most common on wires in the lower current ranges (from tiny signal wires up to mid-range power wires). Again, heavy-duty butt connectors can handle large gauge, but it’s a more specialized case.
-
Solderless vs Soldered Connectors: We already discussed soldering wires directly, but note there are also solderless connectors beyond crimp types – like the new style lever connectors (e.g., Wago lever nuts) for low voltage, or spring clamps. Those see use in certain DIY applications (like wiring LED strips or home automation gadgets) where reusability is needed. However, those aren’t as robust for automotive use due to vibration. A butt connector still provides a more secure, permanent fix for critical wiring.
In short, use butt connectors when you need a robust, permanent splice in a wire run. Use other connector types when you need to attach wires to components (ring/fork terminals) or to allow disconnection (bullets, blade disconnects). It’s common to actually use a combination: for example, you might crimp a butt connector to repair a broken wire going to a ring terminal. The butt splice fixes the break in the wire, and the ring terminal end attaches to the device. Both work together in the system.
Are There Better Ways to Splice Wires?
Butt connectors are popular, but one might ask: are there any scenarios where butt connectors shouldn’t be used or where another splicing method is superior? A few considerations:
-
For critical aerospace or racing applications, sometimes inline solder splices with proper strain relief are used, or proprietary crimp splice connectors with inspection windows (which are basically advanced butt splices). Butt connectors used in those fields need to be high quality and correctly crimped with calibrated tools. But the general method is still a form of butt splice (just higher grade).
-
For temporary or prototype setups, using butt connectors can be a pain if you need to change things, since you have to cut them out. In such cases, using plug connectors (like Molex connectors, screw terminals, or lever connectors) might be more convenient. Once the design is final, you could replace with butt splices for permanence.
-
For very tight or concealed spaces where even crimping is impossible in place, sometimes twisting wires together and soldering may be the only option (for instance, repairing a wire deep in an engine bay where crimp tools won’t reach, but you can manage to solder with a small iron). Those are rare cases though; generally you can find a way to crimp with the right tool shape.
-
For joining extremely dissimilar metals or wires with special insulation, specialized connectors might be needed (this is uncommon in general DIY; butt connectors handle copper to copper just fine, which is 99% of cases).
By and large, the butt connector is the all-around champion for splicing electrical wires under most conditions. When using quality connectors and tools, you can trust a butt splice to be as good as an intact wire in terms of function and longevity.
How to Crimp and Install Butt Connectors (Step-by-Step Guide)
Installing a butt connector is straightforward, but doing it properly will ensure a safe, long-lasting connection. Here is a step-by-step guide on how to crimp butt connectors the right way:
-
Prepare the Wires: Make sure the power is off on any circuit you’re working on. Cut the wires to the desired length for splicing. They should have clean, non-frayed ends. Strip off the insulation from each wire end – about 1/4 inch (6mm) or as needed to match the connector’s barrel length. Important: Do not strip too much; you don’t want excess bare wire exposed beyond the connector. Conversely, stripping too little means the wire’s insulation could end up under the crimp, preventing a good metal-to-metal contact. A good rule is to strip enough so that the bare wire will reach about halfway into the butt connector barrel. Use a quality wire stripper to avoid nicking the conductors.
-
Select the Right Butt Connector: Choose a connector that matches the wire gauge. Butt connectors are typically color-coded: Red for 22-16 AWG, Blue for 16-14 AWG, Yellow for 12-10 AWG (those are common ranges). For very small wires (24-26 AWG) you may need specialized connectors, and for larger (8 AWG, etc.) use the appropriate size (often not color-coded). Using the wrong size butt connector can lead to a weak crimp – too large and the wire won’t be compressed properly, too small and the wire won’t fit or will only partially crimp. If you’re unsure, read the connector’s packaging or label which gauges it supports. For example, the butt wire connectors in the Haisstronica kit are conveniently sorted by size in compartments labeled with their AWG ranges, making selection easy.
-
Insert Wire into the Connector: Push one stripped wire end into one side of the butt connector until the insulation on the wire is nearly even with the connector’s edge (and/or until it hits the internal stop, if the connector has one). Do the same on the other side with the other wire. Ideally, the stripped bare conductors from each side should be overlapping or butting against each other in the center of the connector. Tip: If your connector has transparent insulation (like many nylon or heat shrink types), you can visually verify that the wires are inserted correctly and the strip length is good – you should see bare wire reaching roughly the middle, not barely in the end, and not poking out past the center. If using an opaque connector, double-check your strip lengths and insertion by feel. It’s also wise to twist stranded wire ends lightly before insertion to keep strands together.
-
Position the Crimp Tool: Use a proper crimping tool that matches the connector type. For insulated terminals, most crimpers have a colored jaw or label (red/blue/yellow) corresponding to those connectors. For example, a ratcheting crimper might have a slot marked for red connectors (22-16 AWG), etc. Place the butt connector in the crimp tool’s appropriate notch before crimping, aligning the crimping die with the metal barrel (usually you crimp near the center of the connector length on each side). Many butt connectors have a stripe or imprint indicating where the crimp should be made. Important: Ensure you crimp one side at a time – the side with the first wire – not across the entire connector at once (unless you have a specialized die that does both simultaneously). Typically, you’ll make two crimps: one over each wire’s part of the barrel.
-
Crimp the Connector – First Side: Squeeze the crimp tool firmly and evenly until it completes the crimp (ratcheting crimpers will release when fully compressed). This deforms the metal barrel tightly onto the wire, pinching it between the die’s curvature. If using a non-ratcheting crimper, use both hands to ensure a tight crimp – you cannot “over-crimp” with a hand tool; the goal is to compress as much as possible without cutting the connector. Once done, give the wire a gentle tug on that side to verify it’s locked in – it should not pull out. A proper crimp will hold the wire securely by the conductor (and sometimes also grab the insulation slightly, depending on connector design).
-
Crimp the Other Side: Now repeat the crimp on the other side of the butt connector for the second wire. Align the tool and crimp just as firmly. Afterward, tug the second wire to ensure it’s secure. When both sides are crimped, neither wire should move or wiggle in the connector. You’ve now made the electrical connection. Visually inspect that the crimp indents look correct (not off-center or crimped on the very edge of the connector). If something went wrong – e.g., a wire was not fully inserted and pulls out – do not re-crimp the same connector; cut it off and use a fresh connector, as the integrity of the metal barrel will be compromised by the first crimp attempt.
-
Heat Shrink (if applicable): If you are using heat shrink butt connectors or added a separate heat-shrink sleeve earlier, now is the time to shrink it. For heat-shrink butt connectors, simply take a heat gun (preferred) or a butane torch/lighter (with caution) and apply heat evenly around the connector. You’ll see the tubing begin to shrink and tighten around the wire. With adhesive-lined connectors, you might notice a bit of adhesive oozing out at the ends when it’s fully shrunk – that’s a good sign that you have a seal. Make sure to heat all sides; keep the heat gun moving to avoid charring any one spot. The tubing should fully conform to the wire insulation with no air gaps. Note: It’s best to use a proper heat gun because an open flame can burn the insulation or solder (in solder seal types) before it properly shrinks. If you must use a lighter, use the blue part of the flame, keep it moving, and don’t actually touch the connector – and be extra careful not to overheat. The goal is an even shrink, not to melt the connector into oblivion.
-
Let It Cool: Allow the connector to cool for a few seconds after heating (especially for solder seal connectors, to let the solder solidify). Avoid yanking or bending the joint while it’s still hot, as that’s when it’s somewhat pliable. Once cool, the heat shrink will harden and the adhesive will set, giving a solid strain relief.
-
Test the Connection: Optionally, you can test the integrity electrically by using a multimeter to check continuity or resistance across the splice – it should show near 0 ohms if the connection is good. Also give the wire a moderate pull test – a correctly crimped and shrunk butt connector should be very strong (the wire should break before the crimp comes loose in many cases!). If it’s a critical connection, you could even do a stress test by slightly bending it back and forth; nothing should feel loose or crackly.
-
Secure the Wire (Cable Management): This final step is often overlooked. After making the splice, secure the wire run so that the splice isn’t bearing much mechanical stress. For example, use zip ties or tape to bind the repaired wire to a harness or nearby support point. This way, vibrations or pulls on the wire are not directly straining the new joint. A butt splice is strong, but it’s always good practice to strain-relieve any connection in a moving environment by anchoring the wires. In marine or automotive use, also consider adding split loom or conduit if the wire bundle was originally protected, to restore that protection over the new section.
Following these steps will yield a solid splice that should last for years. If you’re new to using butt connectors, it may help to practice on a scrap piece of wire first to get a feel for the crimping pressure and verify your tool is crimping correctly. A good crimp often results in a slight impression in the insulation (for insulated connectors) and you might see a slight flare at the ends where the wire insulation is, but the connector should not crack or deform unevenly.
Best Practices and Tips for Using Butt Connectors
Before we conclude, here’s a quick rundown of best practices and tips to keep in mind when working with butt connectors (some we’ve touched on above, but they bear repeating):
-
Use Quality Connectors: Not all connectors are equal. Cheap, off-brand butt connectors might use thinner metal or poor plating, leading to weak crimps or corrosion over time. It’s worth investing in reputable brands (like 3M, TE Connectivity, or Haisstronica, etc.) for critical work. The difference in cost is small, but the difference in reliability can be large. For example, marine-grade connectors from a good brand will have proper adhesive and thick tin plating that cheap ones might lack.
-
Use the Right Tool: A dedicated ratcheting crimping tool for insulated connectors will vastly improve your success. These tools ensure consistent pressure and won’t release until the crimp is properly made. They also typically have the correct jaw profile to indent the crimp without cutting. Avoid simply smashing the connector with pliers or using the wrong part of a multipurpose stripper tool – those methods often result in a subpar crimp (either too loose or cutting into the connector). If you do a lot of wiring, you might even have separate crimpers for insulated vs non-insulated terminals, as they have different die shapes. Haisstronica’s crimp tool sets, for instance, come with multiple dies for different connector styles to guarantee a good crimp profile.
-
Match Wire Gauge and Connector Size: It’s worth stating again: using a connector outside of its intended wire gauge range can lead to failure. If a wire is too thin for the connector, the crimp may not actually press on the wire – it’ll crimp mostly on insulation or leave a gap. If a wire is too thick, you may not fully crimp the barrel around it or the wire strands might not all fit, causing some to shear off or stick out. If you’re in between sizes (like a 16 AWG wire can sometimes go in either a red or blue connector), generally choose the connector that snugly fits the stripped wire. When in doubt, test a crimp and see if it holds in a tug.
-
Don’t Double-Up Wires in One End (unless connector is rated for it): Occasionally people try to put two wires into one side of a butt connector (effectively making a “T” splice). This can work if the connector is large enough and the total circular mil area of the two wires fits the crimp range, but it’s not ideal. There are better connectors for joining three wires (like Posi-Lock connectors or three-way butt splices). If you must do it, try to twist the two stripped wires together and treat them as one thicker conductor, then crimp. However, know that this may compromise the crimp quality. A step-down or parallel splice connector is preferable for multi-wire joins.
-
Mind the Environment: If your splice will be exposed to water, oil, or other harsh conditions, choose an appropriate connector (heat-shrink, adhesive-lined) or plan to encase the splice in additional protection. Standard vinyl connectors in a wet environment will eventually allow corrosion into the joint, causing a failure. In automotive underhood areas, use heat shrink or at least nylon insulated terminals, and consider adding a second layer of heat shrink tubing over vinyl connectors for extra protection.
-
Routing and Strain Relief: After splicing, ensure the wire is routed or secured such that there is no constant tension on the splice. For instance, if you repair a wire in a door harness, secure it so that door opening/closing stress isn’t directly on the splice. Similarly, avoid having a splice flex at a hinge point. If a wire must flex (like a robot arm or a moving appliance part), use a flexible strain relief and perhaps a different connector type that can handle flex (or relocate the splice to a stationary part of the wire).
-
Testing and Inspection: Especially for critical connections (like brake lights, engine sensors, etc.), test the circuit after making your splice. If it’s an automotive connection, test that the component works and perhaps do a resistance check. For high-current splices, monitor that the connector doesn’t run hot under load – a warm connector could indicate a high resistance crimp (not tight enough). A properly crimped butt connector typically doesn’t get any warmer than the wire itself under load.
-
Multiple Connections: If you have to make many splices close together, try to stagger them along the wire length rather than all in one spot (this is a common wiring harness technique). That way you don’t end up with a big bulge of connectors in one location, and it reduces the chance of any two connectors possibly shorting if their insulation failed (since they won’t be side by side). Staggering splices also keeps the harness more flexible rather than one stiff section.
-
Cut, Don’t Uncrimp: If you ever need to redo or undo a butt splice, do not reuse the old connector. Cut it off, strip the wire fresh, and use a new connector. Once crimped, the metal insert is deformed and won’t crimp reliably a second time. They’re one-time use parts.
-
Mark or Label if Needed: In complex wiring, consider labeling the spliced area (with a piece of heat shrink that you write on, or a label tape) so you know later that a splice is present and what it connects. This can be useful for future troubleshooting. For example, on a trailer wiring repair, a small label near the butt splice could indicate it’s the tail light power splice done on X date. Not mandatory, but a professional touch in some cases.
Adhering to these best practices will ensure your butt connector electrical connections are safe and durable. Many electrical issues in vehicles and devices come down to poor connections – by using good butt splices and techniques, you eliminate a big chunk of potential troubles.
Conclusion
So, what is the most common connector used today? When it comes to joining electrical wires, the humble butt splice connector certainly takes the crown as one of the most widely used connectors. Its combination of simplicity, reliability, and versatility makes it the go-to choice for countless electrical projects – from car repairs and marine wiring to home electronics and beyond. We’ve seen that butt connectors, especially in their modern forms like heat-shrink butt connectors, provide a clean, strong, and protected connection that often outperforms a simple soldered joint in practical scenarios.
We also explored how butt connectors compare with other connectors: they serve a different role than ring terminals or spades, they offer more long-term reliability in many cases than a solder-and-tape splice, and they are more suitable for stranded wiring than wire nuts. In essence, if you have two wires to connect in-line, you’ll likely reach for a butt connector – and millions of electricians and installers do just that every day.
For those looking to get started or to upgrade their wiring toolkit, having a variety of quality butt connectors on hand is essential. You might consider an assortment like Haisstronica’s butt connector kit, which ensures you have the right size connector when you need it, complete with high-quality heat shrink insulation for peace of mind. (See the product link above for details on that kit.) Additionally, ensure you have a good crimp tool – it makes all the difference in turning a good connector into a great connection.
In closing, remember that even the best connector is only as good as its installation. Take the time to do it right: strip correctly, use the proper connector, crimp firmly, and seal appropriately. If you follow the guidelines and tips outlined in this article, your butt splice connections will be rock-solid. No more flickering lights due to a loose crimp, no more corroded twist-and-tape joints – instead, you’ll have confidence in the integrity of your wiring.
Electrical projects can be intimidating to newcomers, but with connectors like these and some practice, even complex wiring can be managed safely. The next time someone asks “connector butt splice – is that the best way to fix this wire?”, you’ll not only know the answer, but you’ll be able to show them exactly how it’s done!