Crimping wires may seem straightforward, but achieving professional results takes know-how and the right approach. A professionally crimped wire connection is electrically reliable and mechanically solid – essentially as good as a factory-made connection. In this guide, we’ll break down what “professional” means in the context of wire crimping, how to pick the right crimping tools and dies for the job, and a playbook of tips for various use-cases. By the end, you’ll be crimping like a pro and ensuring every wire connection is safe and long-lasting (using quality crimpers from Haisstronica will make this even easier and more effective).

What "Professional Results" Means in Wire Crimping
When we talk about professional-grade wire crimps, we mean connections that meet the same standards an experienced electrician or technician would expect. A proper crimp isn’t just about squeezing a connector onto a wire – it’s about forming a gas-tight, cold-welded bond between the wire and connector that resists corrosion, vibration, and stress. In a professional crimp, the metal of the terminal barrel is deformed around the strands of the wire so tightly that there are virtually no air gaps. This excludes oxygen and moisture, preventing oxidation of the metals and ensuring low resistance over time. In other words, the wire and connector become almost a single solid piece, which is why a well-executed crimp can be as strong or stronger than a soldered joint. Using a high-quality wire crimper helps achieve this level of compression and reliability, which is why Haisstronica’s crimping tools are designed for solid, gas-tight crimps every time.
Mechanical strength is another hallmark of a professional result. A good crimp will withstand tugging and vibration without the wire pulling out or coming loose. Industry standards often require crimps to pass a pull test of a certain force based on wire gauge. There should be no loose strands visible, and the insulation (if an insulated connector) should be snug under the connector’s strain relief. The crimped connection should also look neat: the barrel of the connector is evenly compressed without cracks, and the wire insulation is not cut or pinched. Essentially, it should appear like it was done with precision and care, not with makeshift tools. Professionals aim for crimps that are uniform in shape and fully sealed – often described as “molded” around the wire. Achieving this consistency is difficult with just ordinary pliers; it requires the right crimping tool and technique. By choosing Haisstronica’s professional crimping pliers or ratcheting wire crimper, even DIY users can replicate that uniform, firm crimp that experts expect, ensuring every connection is safe and tidy.
A “professional result” also means reliability over the long term. Poor crimps cause a host of problems: higher electrical resistance (leading to voltage drop or heat buildup), intermittent connections, or corrosion creeping in and causing failure. In critical applications like automotive, aerospace, or industrial equipment, an improper crimp could lead to system failure or safety hazards. That’s why professionals emphasize doing it right. They use ratcheting crimpers, correct dies, and often inspect crimps with tools or even microscope cross-sections for mission-critical projects. While your DIY project may not need aerospace-level inspection, the same principles apply if you want pro-grade outcomes. The bottom line: a professional crimp is gas-tight, mechanically strong, and consistent, giving you confidence that the connection will perform flawlessly for years. Investing in a quality ratchet crimping tool from Haisstronica can help any user consistently achieve these high standards, so your wiring jobs won’t let you down.
(Haisstronica’s heat shrink crimp connectors and tools are designed to deliver gas-tight, vibration-resistant crimps – exactly the kind of professional results we’re talking about, every time.)

Pick the Right Crimping Tool & Die
One of the biggest factors in crimping success is using the right tool for the job. Not all crimpers are created equal – and using the wrong one (or worst of all, using improvised tools like pliers) can result in a weak or uneven crimp. In fact, relying on plain pliers instead of a proper crimping tool is a common mistake that professionals avoid: pliers cannot apply even, controlled pressure around the connector, so the crimp may end up loose or not fully formed. For professional wire crimping, a dedicated crimping tool is a must. The most recommended type is a ratcheting crimping tool (also called a ratchet crimper or ratcheting crimping pliers). These tools have an internal mechanism that locks the jaws as you squeeze and won’t release until the crimp is fully compressed to the preset pressure. This ensures consistency – every crimp is completed with the same force, eliminating human guesswork or hand strength variability. It also prevents under-crimping (not squeezing enough) as well as over-crimping (squeezing too much and damaging the connector or wire) because the tool is calibrated for the connector size. By using a Haisstronica ratchet crimping tool, even beginners can get identical, properly-compressed crimps every time, with less effort and no risk of over-crushing the terminal – a huge boost for DIYers aiming for pro quality.
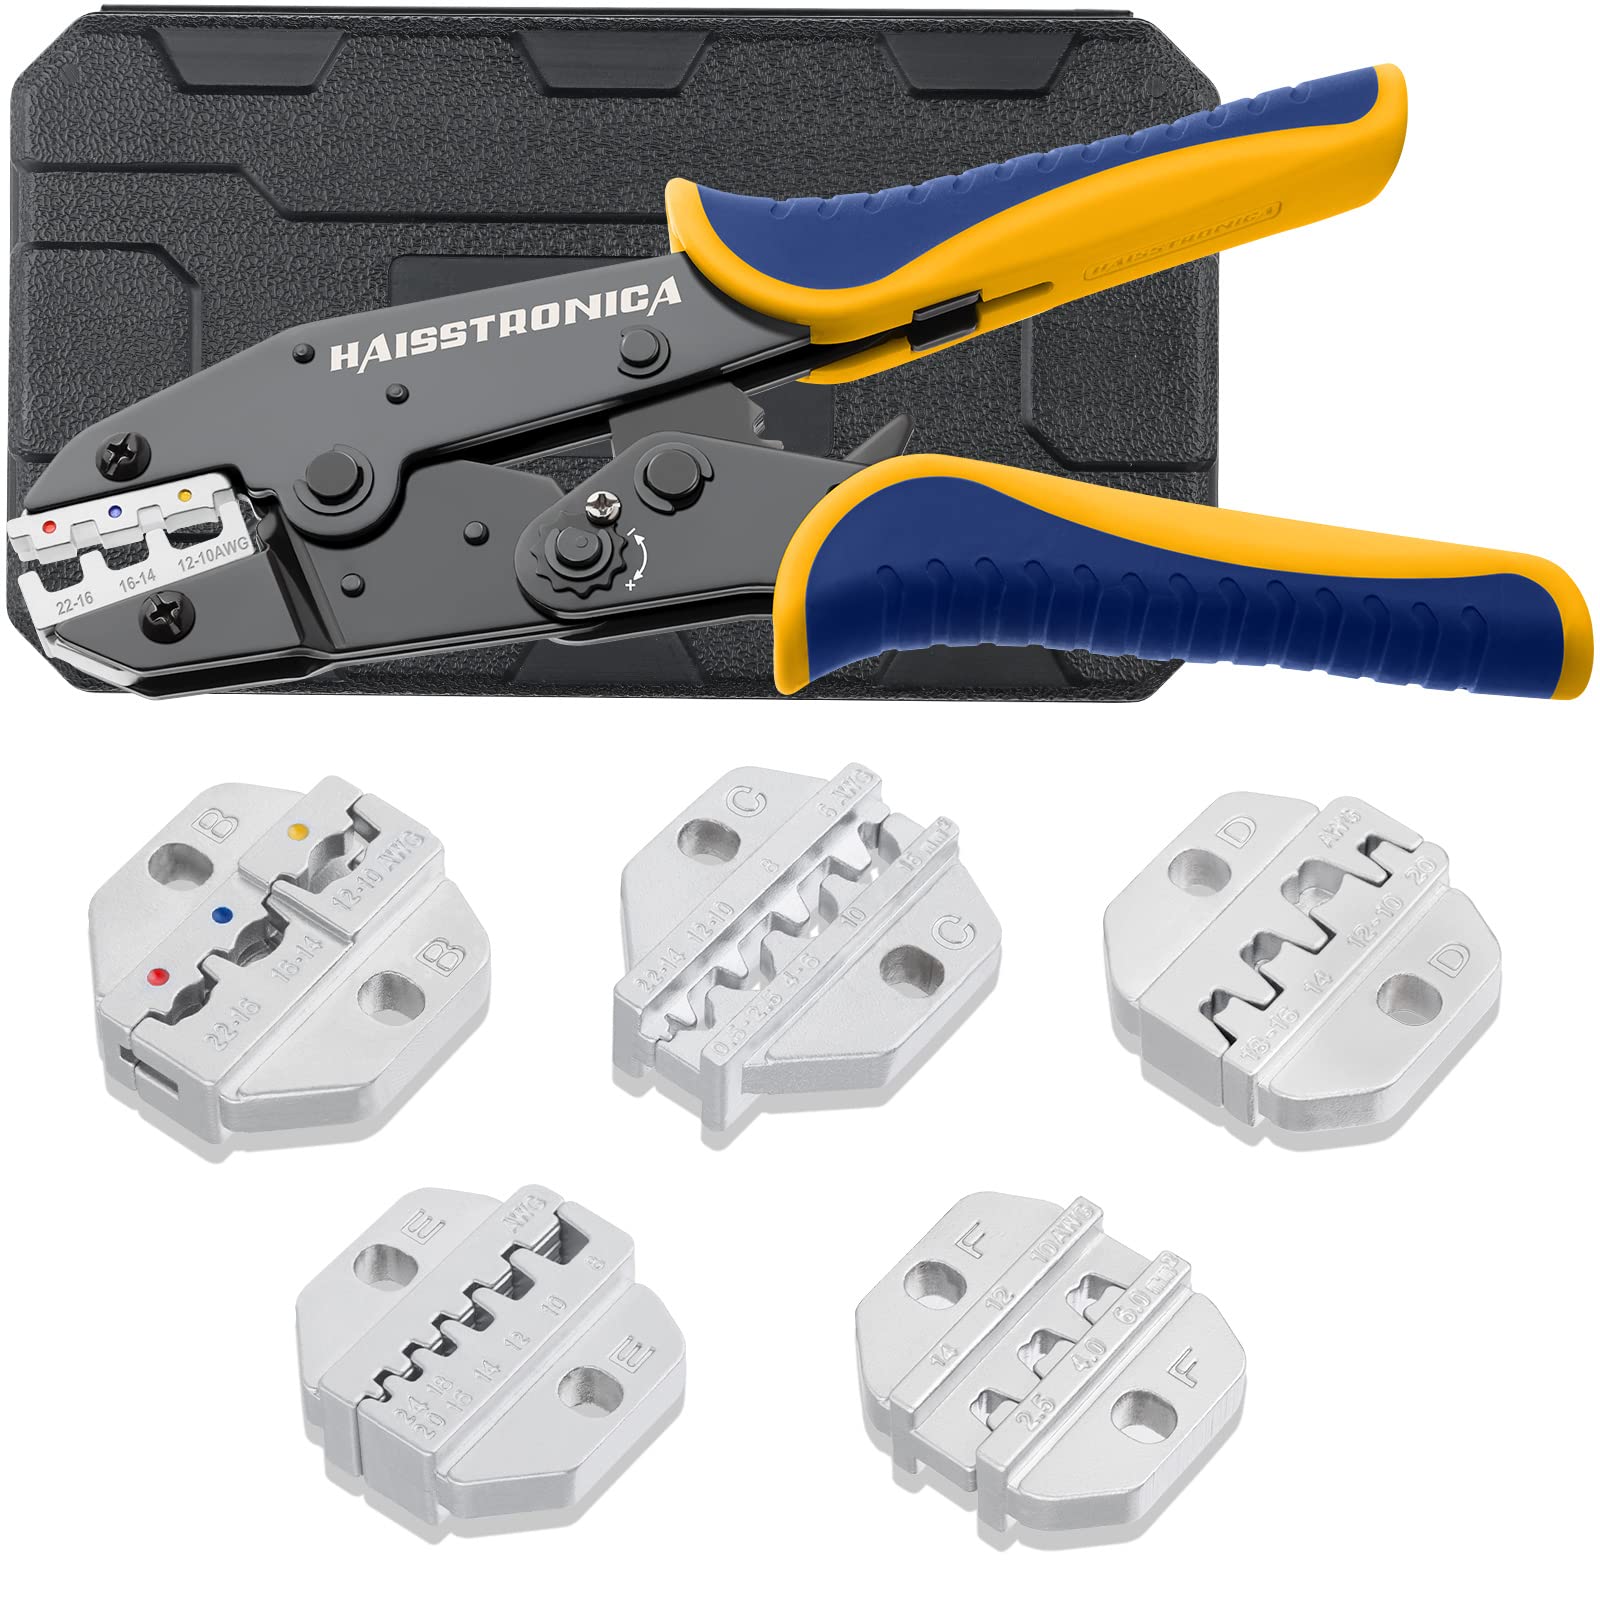
When selecting a crimping tool, consider the range of wire gauges and connector types you’ll work with. Many wire crimpers tools are designed for a specific category of terminals. For example, there are crimpers for insulated terminals (which typically have color-coded jaws for red/blue/yellow connectors), separate crimpers or dies for non-insulated terminals, ferrule crimpers, coaxial cable crimpers, and so on. A good approach is to choose a toolkit with interchangeable dies that cover multiple connector types and sizes. For instance, Haisstronica offers a ratchet crimping tool kit with quick-change dies covering insulated nylon terminals, non-insulated terminals, open-barrel terminals, ferrules, and even ignition terminals – so you have one versatile crimping solution for various needs. Always use the matched die size for the terminal and wire you are crimping: the die cavity should correspond exactly to the connector’s specifications (usually labeled by wire gauge or connector type). Using a mismatched die – say, one that’s too large – will result in a loose crimp that can pull off or allow oxidation. Too small a die, and you risk cutting into the connector or wire strands. The correct die will compress the terminal just enough to form that solid connection without deforming it excessively. Haisstronica’s crimp tool kits come with clearly marked dies (for example, A, B, C dies for different size ranges) so you can easily select the right one and avoid the pitfalls of the wrong crimp size. Having the right die in place ensures your wire crimp connectors come out firm and perfect each time, just like a pro’s work.
Illustration: Example of a crimping tool kit with multiple interchangeable dies for different connector types. Choosing the proper die for each terminal (insulated, non-insulated, ferrule, etc.) is crucial for a correct crimp. A quality crimp tool set like Haisstronica’s includes a range of dies so you’re always using the right cavity for the connector at hand (making it easy to crimp everything from tiny Dupont pins to heavy-duty lugs with one kit).
Beyond the basic hand crimpers, also know your project’s requirements. If you’re working with very large gauge wires (e.g. 4 AWG, 2 AWG, or bigger, such as battery cables or welding cables), a simple handheld crimper might not generate enough force. Professionals use heavy-duty crimpers for these, such as hydraulic crimping tools or compound leverage lug crimpers, to ensure a solid crimp on large copper lugs. These heavy-duty tools apply tremendous force to crimp thick cables and are often necessary for automotive battery terminals or industrial power cables. Conversely, if you are doing delicate electronics like crimping Dupont or JST connector pins (common in PCBs, RC hobbies, or automotive sensor connectors), you will need a fine open-barrel terminal crimper that is designed for those small pins – often with a precision ratchet and interchangeable dies specific to pin sizes. In summary, match your crimping tool to the size and style of connector: use ratcheting wire crimpers for most standard electrical connectors, upgrade to hydraulic or heavy-duty tools for large lugs, and use specialized pin crimpers for tiny terminals. If unsure, invest in a good all-in-one kit from a reputable brand. By equipping yourself with Haisstronica’s professional crimping tool kit (which even includes a wire stripper and multiple dies), you’ll cover 90% of wiring tasks with one set – ensuring you always have the right tool on hand for the job, and guaranteeing professional results without needing an entire arsenal of separate crimpers.
Lastly, consider tool calibration and adjustment. Quality ratcheting crimpers often include a way to adjust the crimping force (for example, a star wheel or dial) to fine-tune pressure. This is useful as tools wear or when you switch between connector brands that might have slight thickness differences. If a crimp feels too hard to complete or comes out too easy (wire can still move), you might need to adjust the tension. Also, periodically check your crimper for alignment and wear, especially if you use it frequently – a misaligned jaw can lead to uneven crimps. Professionals sometimes send their crimp tools for recalibration after extensive use, to ensure every crimp remains in spec. For everyday DIY use, just be mindful to keep the tool clean and stored safely so it doesn’t get bent. And remember, if your goal is a truly professional-grade connection, never skimp on the crimping tool. A good tool can last years and will save you from countless electrical gremlins caused by bad crimps. Haisstronica’s ratchet crimpers feature a full-cycle ratchet mechanism (ensuring the jaws fully close each time) and adjustable compression, so you can trust that each crimp is completed to spec and tweak the tool to your preferences – helping you crimp with confidence and get consistent, pro-level outcomes on every project.
(Check out the Haisstronica 8PCS Ratchet Crimping Tool Kit for an all-in-one solution – it includes multiple dies and even a wire stripper, covering insulated terminals, ferrules, open-barrel connectors and more, so you always have the right setup to crimp wires professionally.)

Use-Case Playbook: Crimping Electrical Connectors for Every Need
Different wiring tasks call for different connector types – and each has some best practices to crimp it properly. Below is a quick playbook covering common connector styles you’ll encounter, and how to handle each like a pro:
-
Insulated Terminals (Butt Splices, Ring & Spade Terminals, Quick-Disconnects): These popular connectors (often color-coded red, blue, yellow for various wire gauges) have insulation sleeves to prevent shorts. For butt splice connectors (which join two wire ends), strip both wires to the recommended length (usually about 1/4” or 6mm, or as specified), insert them fully from each end so they meet in the middle of the butt connector, and crimp each side in the correct die cavity (match the connector’s color or gauge to the die). A proper crimp will tightly compress the splice barrel onto the wires – give each wire a gentle tug afterward to ensure it’s secure. With ring terminals and spade (fork) terminals, insert the stripped wire into the metal barrel until the insulation butts up against the barrel. Position the terminal in your crimper’s corresponding die (for insulated terminals, usually the die is shaped to avoid cutting the insulation – often marked by color). Crimp firmly until the tool releases; the metal barrel should form a neat indentation and hold the wire tightly. The ring or spade’s insulation should not be cracked – if it is, you may have over-crimped or used the wrong cavity. Quick-disconnect (male/female blade) terminals crimp similarly to spades. Tip: Always orient the terminal correctly in the jaw (some crimping pliers have a dot or marker indicating which side the seam of the connector should face). A professional crimp on these insulated terminals will have the wire firmly attached with no wiggle, and the insulation grip (if the connector has one) slightly compressed on the wire’s insulation for strain relief. After crimping, if using heat shrink crimp connectors (e.g. heat shrink butt connectors or ring terminals with heat shrink insulation), use a heat gun to shrink the tubing evenly until it fully seals around the wire and connector, providing a waterproof, strain-relieved finish. Using quality insulated connectors (like Haisstronica’s nylon insulated terminals or heat shrink butt splices) along with a matching ratchet crimping tool will ensure these connections are secure and protected, giving your project a professional finish every time.
-
Non-Insulated Terminals (Bare Crimp Lugs, Splices, Open-Barrel Terminals): Non-insulated connectors – such as plain copper ring lugs, butt splices, or blade connectors without any plastic cover – are often used in high-heat environments or when an external insulation (like heat shrink tubing) will be applied later. When crimping non-insulated terminals, you’ll typically use a different die – one that often has a crimp profile like a dimple or indent (for example, a “B-crimp” or “OVL” crimp profile) to properly compress the bare metal. Make sure to center the connector’s barrel in the die and crimp to full closure. The result should be a tight crimp with a visible indent; no part of the wire should be exposed or loose. If it’s a flag terminal or an angled connector, be sure to position it correctly in the tool so that the crimping force goes in the right direction (these can be a bit tricky – some specialized crimpers have adapters for flag terminals). For open-barrel terminals (also known as F-crimp terminals, common for automotive connectors, Dupont computer connectors, etc.), the connector has little “wings” that wrap around the wire and insulation. The proper way to crimp these is to use an open-barrel crimper die of the right size: it will curl the wings inward and press them into the wire for the conductor crimp, and often simultaneously crimp the smaller wings around the insulation for strain relief. With open-barrel pins, never solder them after crimping – professionals avoid solder on crimp pins because it can make the wire brittle; a correctly done F-crimp is strong and gas-tight on its own. If you don’t have the exact die for a certain open-barrel pin, you might get by with pliers in a pinch for a non-critical fix, but it won’t be as reliable – this is where having the right tool really shows. For any non-insulated crimp, it’s good practice to slide a piece of heat shrink tubing over the connection afterward (if possible) and shrink it to cover the bare metal, restoring insulation and adding strain relief. Haisstronica offers high-quality copper crimp connectors and lugs as well as assorted heat shrink tubes – pairing these with our crimp tools ensures your non-insulated crimps are tight and protected, suitable for automotive or marine use where reliability is a must.
-
Ferrules (Wire End Sleeves): Ferrules are soft metal sleeves (often tin-plated copper) used to consolidate the strands of a flexible wire, typically before inserting into screw terminals or connector blocks. Crimping a ferrule on the end of a wire provides a neat, solid end that won’t fray and improves the contact under screws (common in industrial control panels, audio equipment, etc.). To crimp ferrules professionally, use a dedicated ferrule crimping tool or a die designed for ferrules. These tools usually make a symmetrical crimp (square or hexagonal shape) around the ferrule. Choose the ferrule size that matches your wire gauge, insert the stripped wire fully into the ferrule (the ferrule should cover all exposed strands), then place the ferrule into the crimper jaw and compress fully. The resulting crimped ferrule should have no loose strands and typically a uniform shape. It will greatly improve connection reliability in screw clamps by preventing stray strands and ensuring maximum contact. Ferrules can also be double (two wires in one ferrule) – ensure both wires together match the ferrule size and that both are fully inserted before crimping. Crimping ferrules with a proper wire ferrule crimper (like those in Haisstronica’s kits) is fast and gives a very professional look to any wiring project – your screw terminal connections will be rock solid and tidy, just like in high-end equipment.
-
Large Cable Lugs (Battery Terminals, Power Lugs): For heavy-gauge wires (8 AWG, 4 AWG, 1/0, etc.) used in automotive batteries, solar installations, or industrial power, you’ll be using lug connectors – thick tubular metal terminals. Achieving a professional crimp on large lugs requires a lot of force. Typically, a hydraulic crimping tool or heavy-duty ratchet crimper is used. Select the appropriate die for the lug’s gauge (dies are often numbered or colored for specific wire sizes). Strip the cable to the right length (usually the depth of the lug barrel) and insert the bare copper into the lug fully. Many pros recommend slightly rotating the cable as you insert to ensure all strands bundle in smoothly. Place the lug in the crimper die and activate the tool to compress. Crimp until the die bottoms out or the tool’s indicator shows a complete crimp – for manual hydraulic pumps, this means pumping until you can’t anymore or a relief valve kicks in. A properly crimped large lug will have one or more compressions along the barrel with clearly imprinted die codes or indentations, and no strands will pull out even under heavy force. Often, you’ll see a slight extrusion of copper at the lug’s inspection hole – which is good, it means the wire was fully inserted. For added protection, slide a piece of adhesive-lined heat shrink tubing over the joint and shrink it to seal the connection (this keeps out moisture and gives a strain-relief at the cable-to-lug interface). Professionals also avoid using something like a hammer and screwdriver to smash a lug (an old-school DIY trick) – it’s not consistent or reliable. Instead, invest in an appropriate cable crimper for those big jobs. If you’re frequently working with automotive or marine battery cables, Haisstronica offers heavy-duty crimpers as well. Using a proper lug crimper not only makes the job easier but ensures those high-current connections won’t fail – giving you peace of mind and truly professional-grade battery cables.
By following this use-case playbook and adjusting your method to the connector at hand, you’ll drastically improve the quality of your electrical work. Each type of connector has its nuances, but the common thread is using the right tool, the right die or setting, and good technique (proper strip length, full insertion, and full compression). With practice, your crimping will yield connections that look and perform as if done by a seasoned pro. And with Haisstronica’s range of specialized crimpers and connectors, every DIY enthusiast or electrician can have the exact tools they need for each job, making it straightforward to crimp anything from tiny signal wires to big power cables with professional results.
(No matter the application – be it automotive wiring, home electrical fixes, or electronics – Haisstronica has you covered with top-quality crimp connectors (from butt connectors to ferrules) and the best wire crimping tools to get the job done right. Using our tools and following the above tips will ensure your crimps are secure, safe, and long-lasting.)

Conclusion
In summary, getting professional results in wire crimping comes down to understanding what a quality crimp entails and using the proper tools and techniques to achieve it. A truly professional crimp is strong, gas-tight, and reliable – essentially forming a solid bond that keeps electricity flowing smoothly without future headaches. By picking a good ratcheting crimping tool and matching it with the correct die for your connector, you remove the guesswork and greatly improve consistency, avoiding common pitfalls like under-crimping (loose connections) or over-crimping (damaged wires). We’ve also seen how different connector types require slight variations in approach, but with the provided playbook you can handle each scenario – from crimping tiny signal connectors to hefty battery lugs – with confidence. Always remember to strip wires to the right length, fully insert into the connector, and crimp firmly until complete. A quick tug test and visual inspection will tell you if you’ve got it right: the wire shouldn’t pull out, and there should be no exposed strands or cracked insulation. When done correctly (and especially if you add finishing touches like heat shrink on exposed terminals), your wiring will not only work great but look clean and professional as well.
Crimping is favored by professionals for good reason – it produces connections that are consistent and durable, often superior to soldering for wires, especially in high-vibration or high-current situations. With the guidance from this article, you can now replicate those high standards in your own projects. All it takes is the right knowledge, a bit of practice, and quality tools. Crimping tools are a worthwhile investment for anyone serious about DIY electronics, automotive mods, or electrical installations – they truly are the key to transforming a tangle of wires and connectors into a reliable wiring harness. So next time you undertake a wiring task, approach it like a pro: choose the proper connector and matching die, grab your trusty ratchet crimper, and make that crimp with confidence. Your reward will be a rock-solid connection that you don’t have to worry about down the road.
And if you’re looking to upgrade your toolkit, consider giving Haisstronica’s crimping solutions a try. We design our tools and connectors with the end goal in mind – professional results for every user, whether you’re an electrician, an automotive enthusiast, or a weekend DIYer. With top-notch ratcheting mechanisms, precise dies, and reliable connectors, Haisstronica helps take the guesswork out of wire crimping. In the end, great crimps come from the perfect mix of technique and equipment. Now you have the know-how – combine it with quality crimpers and connectors, and you’ll be ready to crimp like a pro every time. Happy crimping, and stay wired for success! Every secure connection you make is a testament to doing it right – and Haisstronica is here to ensure you have the tools to make it happen.
References: