Crimping 2 AWG, 1/0, or even 4/0 battery cables is one of those jobs that looks simple but has zero margin for error: get it wrong and you can end up with voltage drop, nuisance shutdowns, or even melted insulation and fire risk. Heavy lugs must carry hundreds of amps, endure vibration, and still remain electrically efficient for years, which is why professionals follow standards like UL 486A‑486B and ABYC E‑11 when crimping them. At the heart of those standards is a simple idea: your crimp tool and lug must work together to create a dense, gas‑tight, 360° crimp that passes rigorous pull‑out tests. The “step you must not skip” is that full, verified compression plus proper sealing – not just squeezing the lug until it “looks OK.” When you combine correct technique with Haisstronica’s UL‑tested copper battery cable lugs and matched crimping tools, you turn every heavy cable into a robust, long‑life power connection that you can trust.

Why Heavy‑Lug Crimping Is Different – and Why Your Crimp Tool Choice Matters
With light gauge wiring you can sometimes get away with a basic ratcheting wire crimper and a small ring terminal, but heavy lugs on 8 AWG–4/0 AWG cable are different animals. The cross‑section of copper is much larger, so you must deform a lot more metal to achieve a low‑resistance, mechanically strong joint. UL 486A‑486B specifies minimum pull‑out forces for compression lugs, and for large sizes the required force is hundreds of pounds – up to 450 lb for 4/0 copper conductors. That level of performance is impossible if you just “mash it until it feels tight” with pliers; you need a purpose‑built crimp tool for heavy cable and lugs to meet those mechanical and electrical requirements. That’s exactly why Haisstronica designs its battery cable ends and battery lug crimping tools as a system – so the metal, geometry, and tool leverage all work together to hit those strength targets on every crimp.
Another major difference is the geometry of the crimp itself. For small insulated terminals, an oval or “W” profile from handheld crimping tools is often sufficient. For heavy cable lugs, however, pros aim for near‑360° compression – typically via a hexagonal crimp or equivalent multi‑indention pattern. Marine and industrial installers have shown that a full 360° crimp “cold‑forms” the lug barrel around the conductor, creating a dense, gas‑tight connection that exceeds MIL‑spec pull tests and dramatically outperforms simple hammer‑style crimps. In practice, that means using cable crimpers or hydraulic cable crimping tools with matching dies for each lug size, not improvising with a vise or generic clamp. When you use a hex‑die Haisstronica battery cable crimp tool on their matched copper lugs, you get that full 360° deformation and a professional‑grade crimp profile in one controlled squeeze.

Environment is another factor that makes heavy‑lug crimping special. Battery cables for boats, RVs, off‑road vehicles, and solar systems live in harsh conditions: vibration, moisture, salt, acid vapors, and temperature swings. ABYC and marine wiring guides explicitly call for tinned copper lugs, proper crimping, and then adhesive‑lined heat shrink over the lug barrel and cable insulation to seal out moisture and oxidation. A “good enough” crimp left bare will eventually corrode and heat up; the right crimp plus sealing turns that lug into a long‑term, low‑maintenance connection. That final sealing step is often the one people skip, yet it is crucial for long life. Haisstronica makes this easy by pairing its battery cable lugs with correctly sized 3:1 heat shrink tubing in the same kit, so your heavy‑duty crimp tool and your sealing materials are ready to go in one organized box.
Finally, the consequences of failure are bigger with heavy lugs. A marginal crimp on a small accessory circuit might just cause a flaky light; a bad crimp on a starter cable or inverter feed can deliver massive current through a tiny hot spot, risking melted insulation or worse. Professional tutorials on crimping battery cables emphasize that a properly crimped lug should exhibit minimal voltage drop under load and survive repeated pull tests and vibration cycles without movement. The only way to make that repeatable is to standardize your process: correct lug, correct cable, correct strip length, correct die, full crimp cycle, and sealed finish. With Haisstronica’s heavy‑duty battery cable crimping tools and UL‑tested lug assortments, you can lock in that standardized process and dramatically reduce the odds of ever fighting mysterious “hot cable” problems again.

Select the Right Lug & Cable Before You Grab the Crimp Tool
The best crimp tool in the world cannot fix a mismatch between lug and cable, so selection comes first. For heavy DC power work, the gold standard is annealed copper compression lugs sized by AWG, often tin‑plated for corrosion resistance. Quality suppliers explicitly list their lugs as UL 486A‑486B compliant and suitable for crimping, not just generic “battery terminals.” For example, 2 AWG cable should go into a 2 AWG lug barrel, not “something close,” and the stud hole (5/16", 3/8", etc.) must match your busbar or battery stud. Oversized barrels or improvised drilling destroy the engineered fit that standards assume. Haisstronica’s 220 PCS battery cable lug kit is laid out by proper AWG and stud size, so you can open the case, grab the exact copper lug you need, and know it’s designed to crimp correctly with your heavy‑duty cable crimper.
Cable selection is just as critical as lug selection. Marine and mobile power systems often use finely stranded tinned copper battery cable for flexibility and corrosion resistance, while some automotive cable is more coarsely stranded. ABYC battery cable sizing guidance stresses picking the correct gauge for run length and current, because undersized cable will run hot even with a perfect lug. Your lug barrel is designed to be almost completely filled by the strands of the intended cable size; if the cable is much smaller or larger, you won’t achieve the dense “metal‑to‑metal” interface the crimping standard assumes. Using 1 AWG cable in a 2 AWG lug or vice versa may look close, but it can lead to voids, asymmetric compression, and premature failure. To eliminate these guesswork problems, Haisstronica’s copper cable lugs and battery cable crimping tools are dimensioned around standard AWG sizes, so when you match AWG to AWG you automatically get a barrel fill optimized for a strong, low‑resistance crimp.

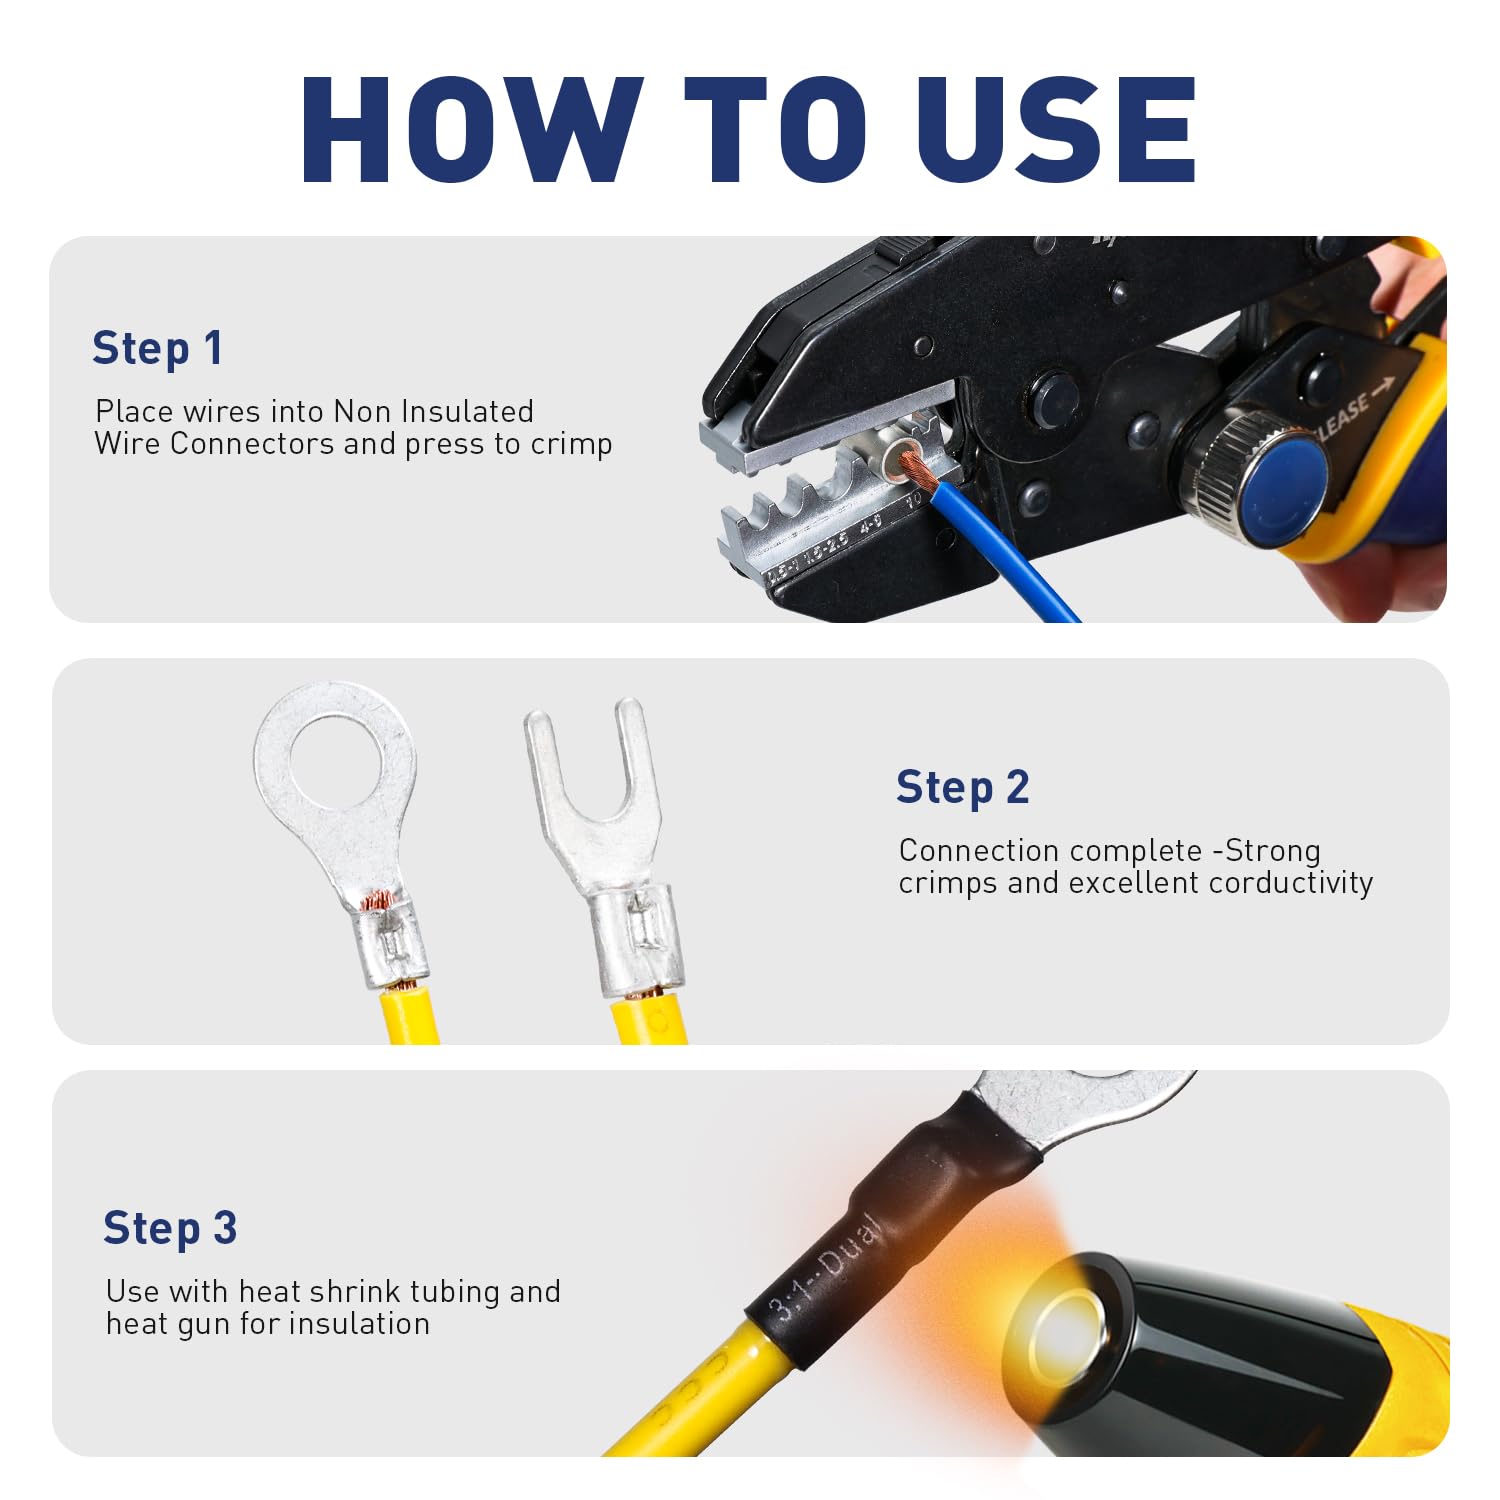
Once the lug and cable are matched, prep work becomes the next make‑or‑break detail. Strip just enough insulation so that the conductor fills the lug barrel but no bare copper protrudes past the inspection hole or tongue, usually around one lug barrel length. Professional guides recommend using a sharp cable cutter for a clean, round end, then a quality stripper or knife to remove insulation without nicking strands. Do not twist the strands excessively; you want them compact but not wound into a rope. Insert the cable until the copper is flush with the end of the lug barrel, then orient the lug so the seam or mark aligns with the die manufacturer’s recommendation. Skipping any of these small steps – such as failing to seat the cable fully – compromises the crimp, no matter how strong your crimping tool for wire cable may be. Haisstronica’s battery cable lug sets include step‑by‑step illustrations printed right in the listing images, making it much easier to prep the cable correctly before you ever reach for your lug crimp tool.
It’s also important to think about the whole termination stack before you start crimping. That means choosing the right length of adhesive‑lined heat shrink tubing, sliding it onto the cable before you crimp, and making sure there’s room for cable bend radius after the lug is installed. In tight battery compartments, a long straight lug may not be ideal; a 90‑degree lug or a shorter neck can reduce stress on the cable. Standards and best‑practice guides also recommend arranging lugs on a stud largest to smallest, with flat washers between, so contact pressure is consistent. None of this is difficult, but it must be planned; you can’t fix a cramped bend or forgotten heat shrink after the crimp is done without re‑doing the termination. By pairing Haisstronica’s compact copper lugs, pre‑cut 3:1 heat shrink, and organized kits, you can plan each termination in advance and build clean, serviceable battery connections that look as good as they perform.

Tooling—Hex, Dieless, Indent, Hydraulic Crimp Tool Options for Heavy Lugs
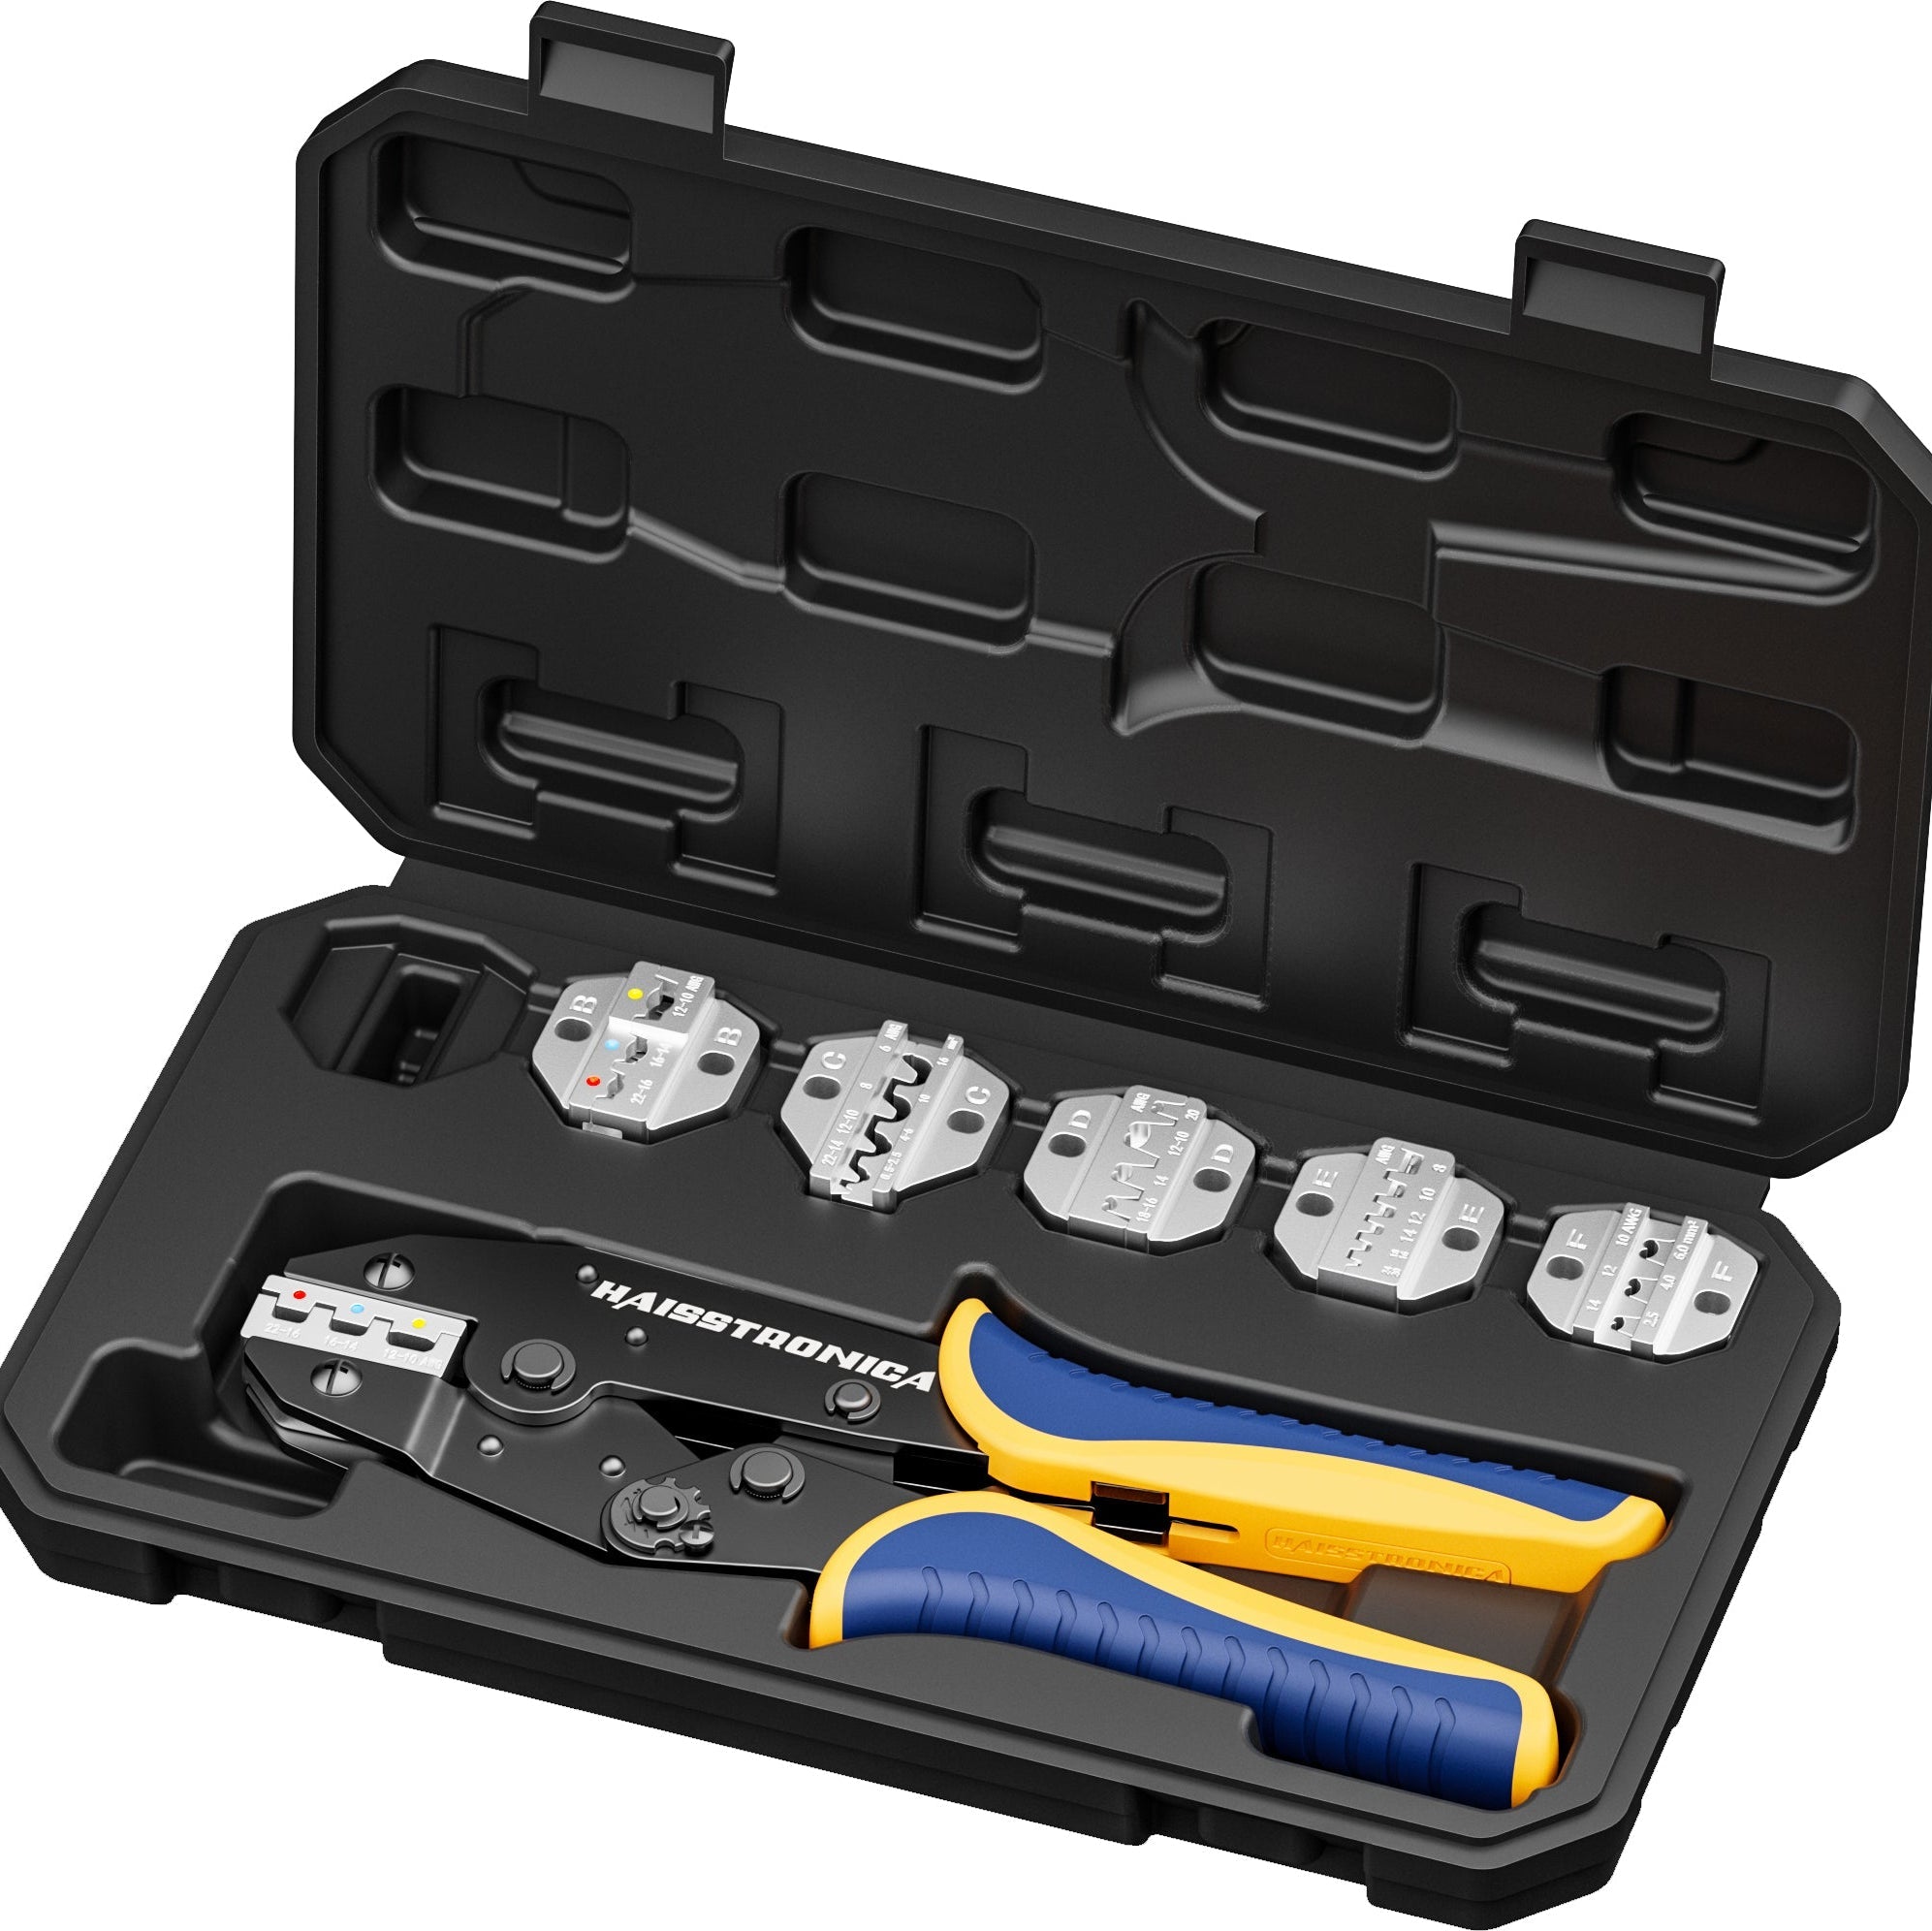
When you step into the world of heavy lugs, choosing the right crimp tool becomes just as important as choosing the right lug. For 8 AWG through 4/0 AWG, most professionals use one of four tool styles: hex crimpers, dieless indent crimpers, hydraulic crimping tools, or battery‑powered compression tools. Hex crimpers use matched dies that form a near‑perfect hexagon around the lug barrel, giving uniform 360° compression and working well on both copper and aluminum lugs. Dieless or “indent” crimpers instead push one or more punches into the barrel, forming deep indentations that collapse the copper onto the conductor. Hydraulic cable crimping tools (hand‑pump or electric) are very common for large battery lugs because they can deliver many tons of force with modest handle effort. In all these cases, the cable crimping tool must be used with dies approved for a specific lug family and conductor size if you want UL‑classified crimps – you cannot mix and match dies and lugs at random without sacrificing performance. That’s why Haisstronica’s heavy‑duty battery cable crimping tool kits ship with clearly labeled hex dies matched to their lug sizes, so you can dial in the correct cavity and create textbook‑perfect battery terminal crimps every time.
Matching tooling and lugs is more than just convenience; it’s a safety requirement in many specifications. Manufacturers like Panduit publish tables that pair each compression lug part number with specific die codes and crimp tools, and only those combinations are UL‑listed as a system. In the field, that means if you grab a random hydraulic cable crimper and a bag of third‑party lugs, you might end up under‑ or over‑crimping the connection. Under‑crimping leaves voids and low pull‑out strength, while over‑crimping can crack the barrel or damage strands. Both conditions can fail UL 486A‑486B pull‑out tests and ABYC tensile standards, which require heavy lugs to withstand significant pull forces without slippage. The easiest way to stay within that safe zone is to use a lug and lug crimp tool pair that were actually designed for each other, rather than guessing. Haisstronica helps you do exactly that by offering copper battery cable ends and a dedicated crimping tool for battery terminals that share sizing charts and AWG markings, so you know the crimp geometry and compression are within the intended spec.

There’s also the question of manual vs. hydraulic effort. Lightweight ratcheting crimpers for wire are perfect for 22–10 AWG heat‑shrink connectors, but they can’t generate the force required for big 1/0 lugs. For that, you either need long‑handle mechanical cable crimpers or a hydraulic cable crimping tool. Independent testing on marine battery cables has shown that high‑quality rotating‑die or hex hydraulic crimpers create much denser, stronger crimps than simple “hammer crimp” tools that rely on hitting a punch with a mallet. Hammer crimpers can be acceptable as an emergency solution, but for main battery cables you want repeatable, controlled compression that doesn’t depend on how hard someone swings a hammer. Modern battery‑powered compression crimp tools used by electricians take this even further, providing logged, UL‑classified crimps with minimal effort – but for most DIYers and small shops, a well‑made ratcheting battery lug crimper tool or hand hydraulic crimper is the sweet spot. Haisstronica’s heavy‑duty battery cable crimping tool kits are designed exactly for that sweet spot, combining extended handles, precision hex dies, and included cable cutters so you can achieve professional‑grade crimps without investing in expensive trade‑level compression gear.
Regardless of tool style, there’s one step that truly lives up to the “Don’t Skip This Step!” warning: verification. After you crimp, reputable guides recommend two checks: visual inspection and a pull or bend test. Visually, the hex or indentation should be centered in the crimp zone, there should be no cracks in the barrel, and the conductor should completely fill the compressed area. Then, you perform a firm manual pull test or use a torque/pull gauge for critical systems; ABYC and UL publish minimum pull‑out forces by gauge that properly crimped lugs should meet. Finally, slide your adhesive‑lined heat‑shrink into place and apply heat until you see sealant bead from the edges, locking out moisture and providing strain relief. Skipping this inspection and sealing step is where most failures originate, even when the right crimping tool was used. Haisstronica makes it easy to build this discipline into your workflow by bundling correctly sized heat shrink tubing with the copper lugs and by providing clear visual guides on what a good crimp should look like when using their crimp tool for battery cable.

Conclusion – Use the Right Crimp Tool and Don’t Skip the Final Step
Crimping heavy wire lugs the right way isn’t complicated, but it is unforgiving: every part of the process must work together. You’ve seen why heavy‑lug terminations are different from small terminals, how standards like UL 486A‑486B and ABYC demand strong, gas‑tight joints, and why choosing the correct crimp tool, lug, and cable is non‑negotiable. The most important lessons are simple: match AWG lug and cable size, use quality copper lugs and fine‑strand battery cable, pick an appropriate hex/dieless/hydraulic cable crimper with the correct dies, complete a full crimp cycle, and then verify and seal the connection with adhesive‑lined heat shrink. If you treat that last inspection and sealing step as mandatory rather than optional, your battery cables, inverter feeds, and winch lines will run cooler, last longer, and be far less likely to let you down when you need them most. Bring all of this together with Haisstronica’s 220 PCS battery cable lug kit and purpose‑built crimping tools for battery terminals, and every heavy cable you terminate can look – and perform – like it came from a professional harness shop.

Internal Haisstronica Product Links Mentioned
-
Haisstronica Ratchet Wire Terminal Crimping Tool for AWG 22‑10 Heat Shrink Connectors:
https://haisstronica.com/products/ratchet-wire-terminal-crimping-tool-for-awg-22-10-heat-shrink-connectors -
Haisstronica 220PCS Battery Cable Lugs AWG 8 6 4 2 1 with 3:1 Heat Shrink Tubing:
https://www.haisstronicashop.com/products/battery-cable-lugs-removable-storage-bins