


Quick Answer: Color Code = Gauge Quick Reference (Solder Sticks)
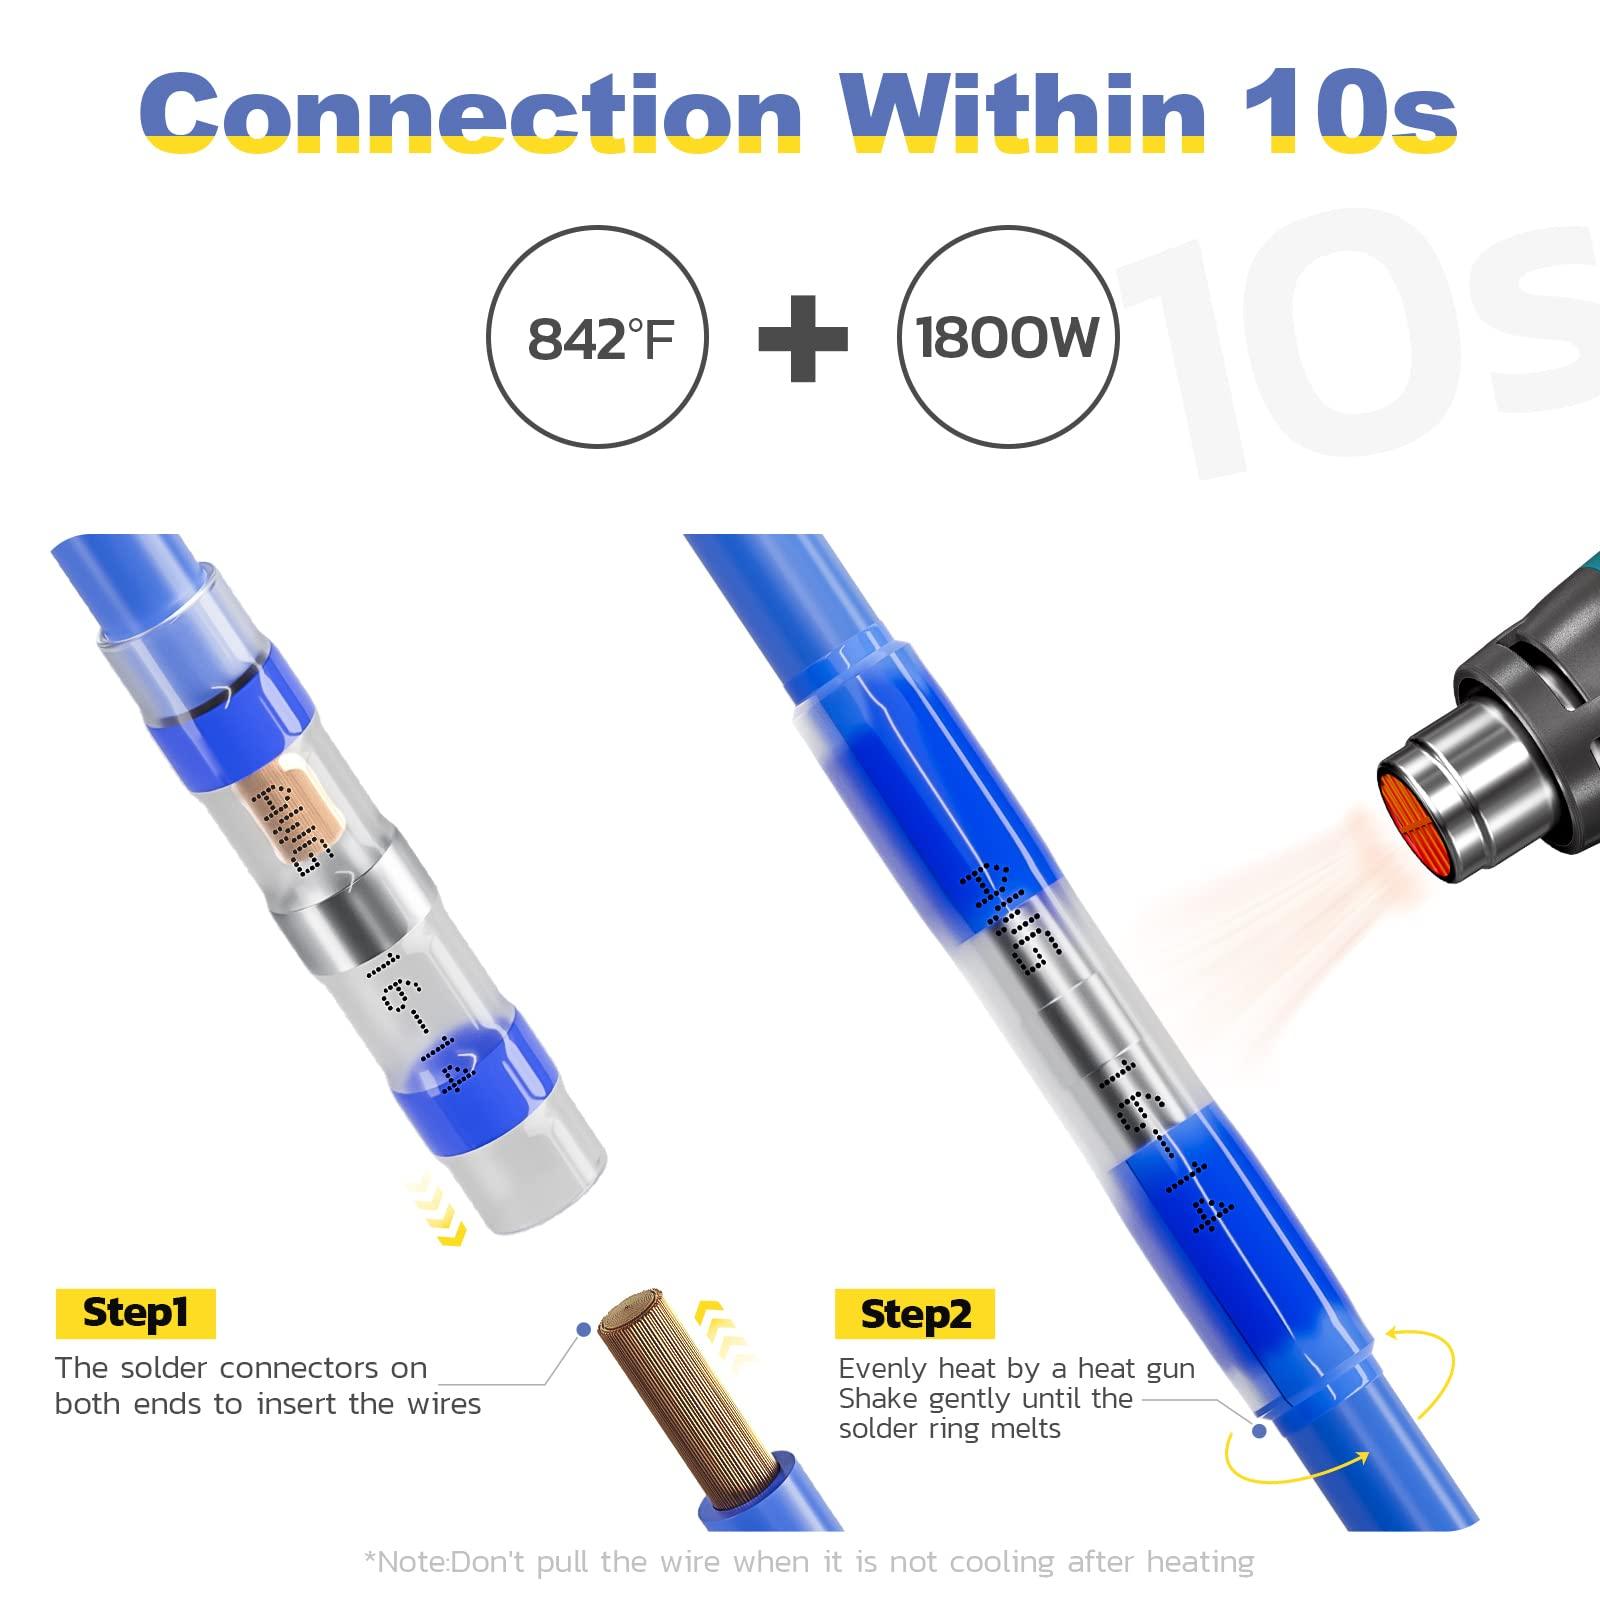
Solder stick connectors – a type of solderless electrical connector with built-in low-melt solder and heat shrink tubing – are color-coded by sleeve color to indicate what wire size (AWG range) they fit. The four common colors denote increasing wire gauge capacities from smallest (white) to largest (yellow). Here’s a quick guide:
-
White solder connectors: fit 26–24 AWG wires (smallest gauge, typically used for thin wires in microelectronics). For a reliable micro-wire splice, use a white connector from a solder & seal kit – Haisstronica’s kits include white sleeves for the tiniest wires (so even fine 26 AWG leads get a solid soldered connection!).
-
Red solder connectors: fit 22–16 AWG wires (small gauge range for small electronics, automotive sensors, etc.). These are the most common size for general wiring – using a red solder stick on a 20 AWG automotive wire, for example, gives a secure splice without needing a separate soldering iron.
-
Blue solder connectors: fit 16–14 AWG wires (medium gauge, often for automotive primary wires, marine wiring, and general circuits). Blue sleeves are a staple in any automotive wire connectors kit – Haisstronica’s blue heat shrink solder wire connectors create robust mid-size splices with a soldered core and sealed insulation.
-
Yellow solder connectors: fit 12–10 AWG wires (larger gauge for high-current or heavy-duty wiring). These yellow solder terminals accommodate thicker wires like those in trailers or industrial equipment – our solder & seal connectors in yellow ensure even heavy-gauge splices are tightly soldered and waterproof.
(Each color’s tubing usually has gauge markings, making it easy for DIYers and electricians to grab the right connector at a glance. For convenience, consider a waterproof marine electrical connectors set by Haisstronica – it includes white, red, blue, yellow solder stick connectors covering 26–10 AWG, so you’re prepared for any wiring project.)

Not Just Color – Two Critical Fits for Success (Wire & Insulation)
Choosing the correct color (gauge range) is essential, but don’t rely on color alone – two key “fits” determine your connection’s success. First is the fit of the wire conductor inside the connector’s metal solder ring or barrel. Second is the fit of the wire’s insulation inside the heat-shrink tubing. Both must be right for a secure, low-resistance splice. In other words, the connector size must match both the bare wire and the insulation for a proper mechanical and environmental seal.
If you use a connector that’s too large for the wire, the stripped conductor won’t be gripped firmly – the wire can slip out with a light tug, especially after heating or under vibration. You might notice the wire pulls out easily or see gaps around the copper. These loose “fits” cause poor electrical contact (high resistance, voltage drop) and invite corrosion into the joint. On the other hand, a connector that’s too small for the wire won’t even insert fully or could require excessive force – potentially crushing the wire strands or splitting the connector. Signs of an undersized connector include frayed strands that won’t all fit, difficulty pushing the wire in, or the insulation not entering the tube. Such a mismatched connector can damage the conductor (leading to overheating) or leave the splice half-crimped/soldered.
Industry tip: “Using a connector that’s too large or too small can lead to poor contact and failures. Always check the wire gauge against the connector size for a snug fit, and ensure the insulation fits well after crimping”. In practice, this means that even if the color code says the wire is in range, double-check that the stripped copper fills the connector barrel and the insulation butts up nicely inside the tubing. The metal solder ring or crimp barrel should be snug around the strands, and the heat shrink should be able to shrink onto the wire’s jacket. Correct two-way matching – conductor-to-barrel and insulation-to-tubing – is what makes these solderless connectors both electrically solid and physically sealed. For best results, use quality connectors that have the right internal diameters: for example, Haisstronica’s solder splice connectors are engineered to closely match the specified AWG ranges, ensuring both the wire and insulation are properly accommodated. Plus, each connector’s color-coded sleeve is labeled with its AWG range for easy verification.

Shrink Ratio & Adhesive: Sealing Performance (2:1 vs 3:1 vs 4:1)
Not all heat shrink tubing is equal – connectors come with different shrink ratios (like 2:1, 3:1, or even 4:1) and may include adhesive lining. These factors greatly affect how well the connector seals and grips the wire insulation. The shrink ratio is how much the tubing can contract: for example, a 2:1 ratio shrinks to half its original diameter, 3:1 shrinks to one-third, and 4:1 shrinks to one-quarter. Higher ratios can accommodate a broader range of insulation diameters and shrink down tighter. Many solder stick connectors use 2:1 or 3:1 polyolefin tubing; premium marine-grade ones often use 3:1 or 4:1 with extra adhesive.
So why does this matter? A connector with a higher shrink ratio can form a tighter seal, especially on wires with thin or uneven insulation. For instance, a 3:1 or 4:1 tube can start larger (to fit over a connector and thicker insulation) but still shrink enough to snug down on a thinner wire end – achieving a leakproof seal where a 2:1 tube might leave it slightly loose. Combine that with an adhesive lining (hot-melt glue inside the tubing), and you get a connection that’s effectively waterproof. When heated, the adhesive melts and fills any gaps, preventing moisture ingress and providing strain relief. As a result, adhesive-lined heat-shrink connectors offer superior weatherproofing, creating watertight seals that withstand moisture. This is crucial for automotive, marine, or outdoor wiring where connections must endure water, salt, and dirt.
2:1 vs 3:1 vs 4:1: A 2:1 ratio is common and works well if your wire insulation diameter closely matches the connector’s unshrunk tubing. However, it only shrinks to 50%, so if there’s a big size difference, it might not fully tighten. 3:1 ratio tubing gives more leeway – it will shrink to ~33%, allowing one connector size to cover a wider range of wire thicknesses and ensuring a firm seal on both the conductor and insulation. 4:1 ratio is even more forgiving and very high shrink, typically used in professional or marine connectors to seal irregular shapes or significantly mismatched sizes. The trade-off is that higher ratio tubing tends to have thicker walls when shrunk (adding stiffness) and is a bit more expensive, but it yields the best seal quality. In waterproof connector kits, 3:1 is a popular “sweet spot” for strong sealing without excessive bulk.
For example, Haisstronica’s solder seal connectors use a 3:1 shrink ratio tubing with adhesive lining – this allows each connector color to cover its full AWG range snugly, and when heated you’ll see the wire sealer (the glue) ooze slightly at the ends, indicating a complete seal. If you were to use a connector with only 2:1 tubing on a much thinner insulation, you might notice it doesn’t fully tighten; in such cases, stepping up to a 3:1 connector (or adding a second shrink sleeve) solves the issue by achieving full compression around the wire. Remember, the goal is a “solder & seal” connection: the solder joins the conductors electrically, and the shrunken adhesive tube seals out the environment. For critical projects – like automotive wire splices under the hood or waterproof connectors for boat wiring – opt for connectors with higher shrink ratios and adhesive. They ensure seal wire connections that last. Haisstronica’s heat shrink solder sleeves (3:1 dual-wall tubing) are an example that provides an automotive-grade wire seal against water and corrosion, keeping your splices protected.
(Always follow the connector’s instructions for heating: apply heat evenly until the tubing fully shrinks and you see adhesive flow. A properly shrunk connector will have transparent tubing turned slightly opaque with glue, and no gaps or air pockets – effectively a heat-shrink self-solder connector that is as sealed as a factory splice. If you use a quality connector with the right shrink ratio, you’ll end up with a solder wire splice that is both electrically and mechanically robust.)

Size Mismatch Symptoms & Remedies (Loose Splices and Fixes)
What if you realize you’ve used the wrong size connector for your wire? There are telltale symptoms of a size mismatch. A too-large connector may result in a splice that looks okay until you give it a slight pull – the wire pops out or wiggles because it never had a tight grip. You might also observe that after heating, the solder didn’t fully wick into the wire (it might blob without bonding) or the tubing didn’t shrink tightly on the insulation, leaving a gap. Conversely, a too-small connector often makes itself known upfront: the wire strands won’t all fit, or you had to excessively force or “crush” the wire in, potentially damaging strands. The solder in a very undersized connector might not flow well either, since the wire itself fills the space and there’s no room for solder to surround it. In either case, the connection’s reliability is compromised – expect higher resistance (voltage drops), intermittent contact, or corrosion infiltration over time. And in high-vibration environments (cars, boats), a loose crimp or cold solder joint can quickly fail.
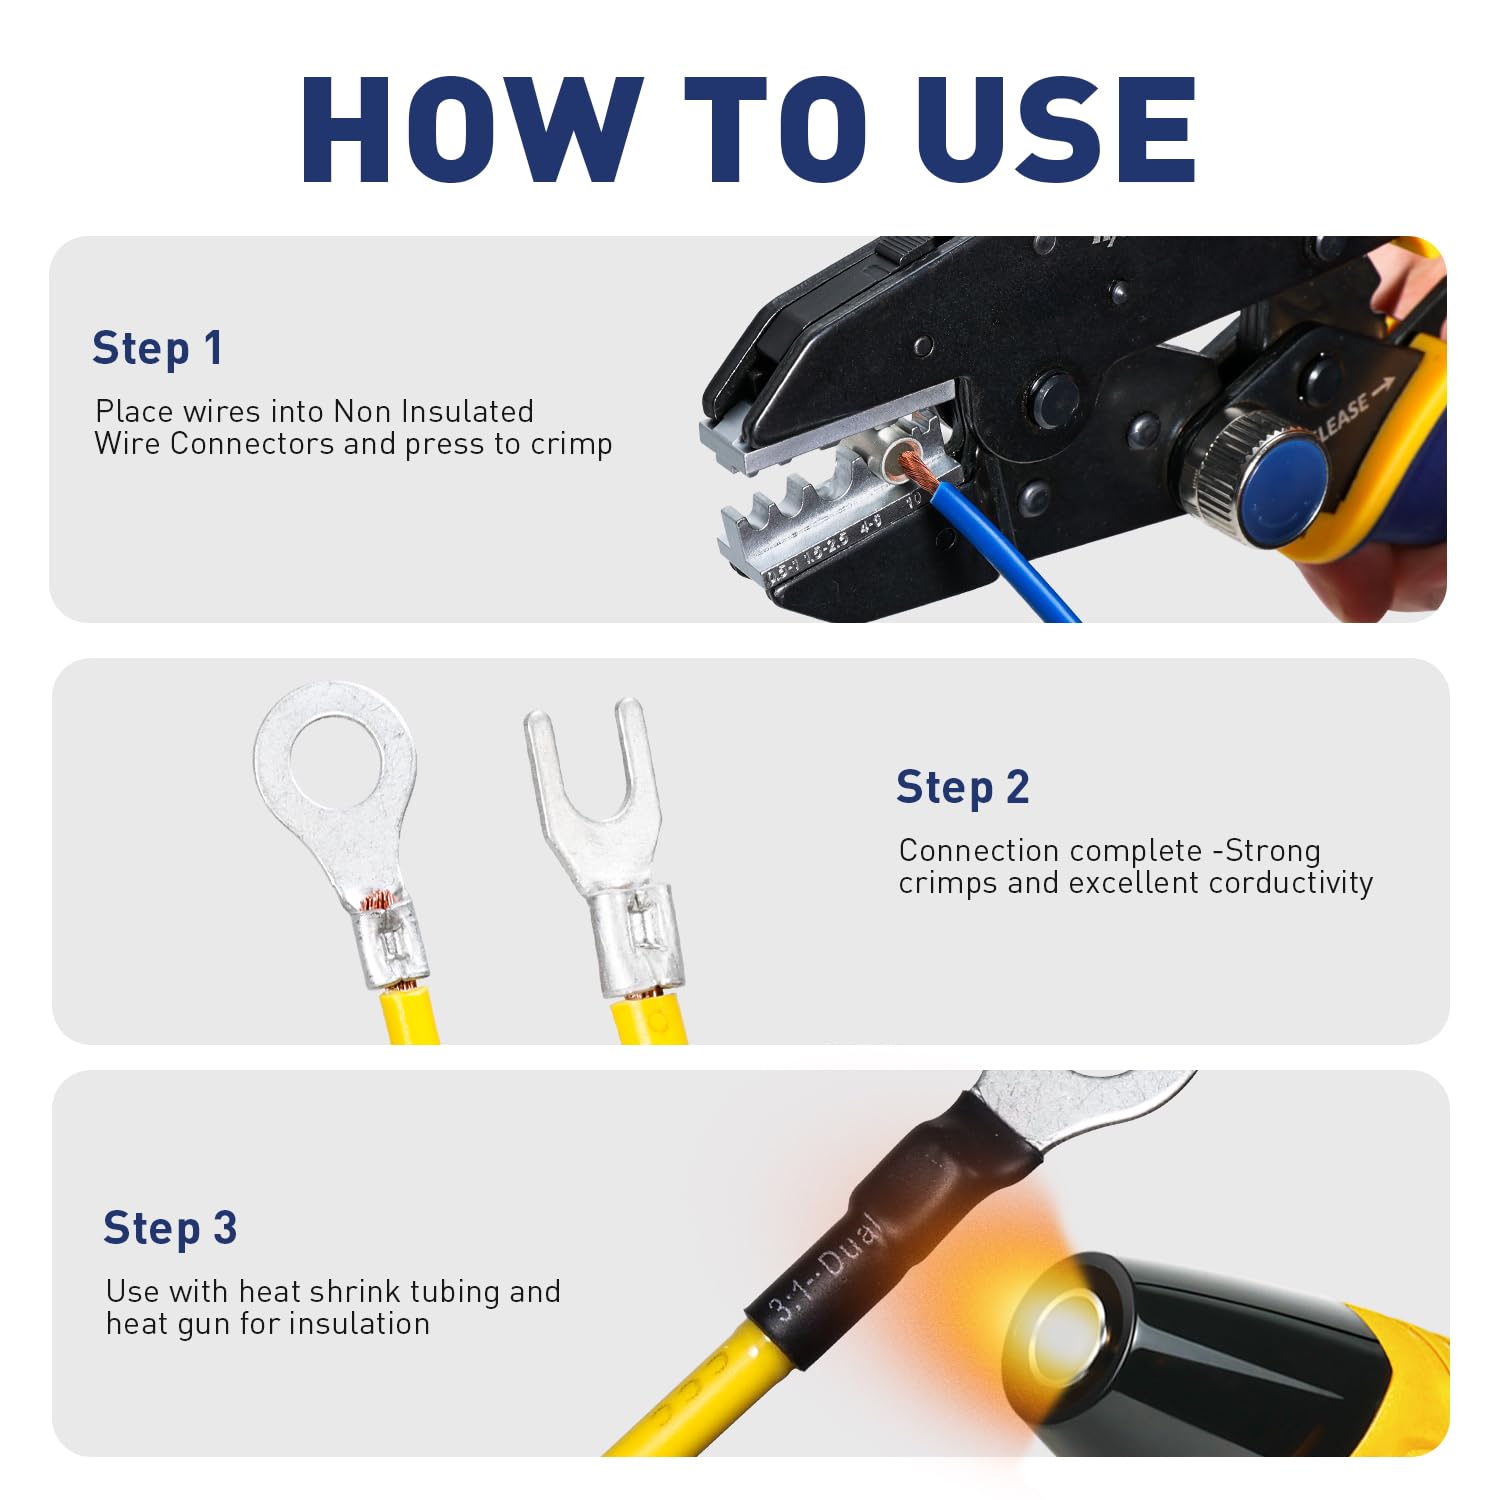
How to fix or mitigate mismatches: Ideally, if you spot a mismatch early (e.g., wire too loose or won’t insert), choose the proper connector size instead. But in situations where you’re dealing with a slightly undersized wire for a given connector, there are a couple of tricks. One accepted practice is to fold the stripped wire over to effectively double its thickness for crimping or soldering. In fact, aerospace and aviation standards endorse this for very small gauge wires: NASA’s wiring guidelines note that for very small wires, you should fold back the conductor after stripping and even add shrink tubing over it to bulk it up before crimping. In some cases (e.g. #32–36 AWG), two layers of shrink tube may be needed to ensure a proper crimp. This technique increases the wire’s cross-section so the connector barrel can grip it tightly. Always perform a pull-test – if the wire still slides out, it’s not secure enough. You can also crimp twice (once on the wire, once on the insulation) if using crimp-type connectors, to better secure a slightly small wire; with solder seal connectors, ensure the solder actually melted onto the wire (if not, reheat or consider a smaller connector and re-splice).
If the wire is too large for the connector (perhaps you grabbed a red connector for a 12 AWG wire), forcing it is not wise – you risk incomplete solder flow and exposed strands. The remedy is straightforward: get a larger connector that fits (use a yellow in this case). If you’re joining dissimilar wire sizes (like 12 AWG to 18 AWG), use a step-down butt splice or join the small wire with an appropriate connector (folding it if needed) then crimp to the large wire, or use a distribution block. In general, never trim off strands of a wire to make it fit – that undermines the wire’s capacity and can create a hotspot. It’s better to use the right connector or join methods.
Pro Tip: If you only have a larger connector for a small wire, you can strip extra length of the small wire, fold it once or twice until it fills the barrel, then proceed to crimp/solder. This is a common field solution: “Strip the small wires twice as long, twist them, double the wire over and stick it in the butt connector”. When done correctly (and sealed with heat shrink), this can hold well. Just ensure the folded portion doesn’t extend past the connector’s solder ring or crimp area. For extra assurance, you can add an additional piece of heat shrink tubing over the insulation to build it up, so the connector’s tubing has something to grip. This is essentially what NASA suggests with the shrink tube layers on fine wire – it helps the sealed connectors bond to the insulation.
Finally, after any fix or installation, inspect and test the connection. If it’s a crimp + solder sleeve, see that the solder has melted and wicked into the strands and that adhesive is visible at the ends. Give a gentle tug on each wire; if anything moves, redo it with the correct connector. A properly matched and installed connector will hold firm (often the wire will break elsewhere before the splice fails). It will also look neat: the tubing shrunk evenly with no remaining gaps, and you might see a bit of melted adhesive at the edges as a sign of a good seal. By paying attention to these details, you ensure every wire splice connector you make is safe and long-lasting. And of course, the easiest remedy is prevention – stock up on a variety of sizes. Using a comprehensive electrical connector kit (with all the common AWG sizes in color-coded form) means you’ll always have the right connector on hand, avoiding make-do mistakes.

Conclusion
Color codes are a convenient quick guide: white, red, blue, yellow solder stick connectors correspond to increasing wire sizes and help you pick the right connector for the job. But as we’ve explored, a truly reliable connection comes from considering all the factors – not just the color, but also making sure the connector’s size matches your wire’s conductor and insulation, and choosing connectors with the right shrink ratio and adhesive for your environment. By understanding the nuances of shrink & seal connectors (like how a 3:1 adhesive-lined tube creates a waterproof bond, or how doubling back a small wire can improve a crimp), you can significantly boost your wiring success rate.
Whether you’re a DIY hobbyist wiring up lights or a professional electrician repairing automotive harnesses, following these guidelines will result in stronger, safer electrical connections. Use the color codes to get in the right ballpark, then double-check fit. When in doubt, err on the side of a snugger connector and utilize tricks like wire folding or additional shrink tubing for a custom fit. Always properly heat the connector to melt the solder and adhesive – when done correctly, these solderless wire connectors actually form a soldered joint internally, giving you the best of both worlds (the conductivity of solder and the sealing of heat shrink).
By selecting quality connectors and the appropriate size for each wire, you’ll prevent the common pitfalls of loose connections, corrosion, or overheating joints. In short, color codes simplify connector selection, but remember the motto: “Measure twice, connector once.” Match that wire gauge, ensure a good mechanical fit, and your electrical connections will be clean, strong, and long-lasting.
Sources: