Introduction
Crimping tools (also called crimp tools, crimper tools, or wire crimpers) are essential hand tools for anyone working with electrical wiring. They allow you to crimp wires securely by attaching a connector (terminal) to the wire end using compressive force, essentially deforming metal parts to bind them together. Unlike simply twisting wires or taping them, using a proper wire crimping tool creates a strong, permanent connection that withstands vibration and stress. Crimp connections are widely used by electricians, mechanics, and DIYers for reliable, solder-free electrical joins in cars, homes, and electronics because a well-executed wire crimp is mechanically robust and often gas-tight (preventing corrosion). In short, if you need to join wires or attach connectors safely and effectively, a crimping tool is the go-to solution.
Need a Crimping Tool for a Real Wiring Job?
Choose the tool by connector type first. A ratchet wire crimper is a strong choice for heat shrink terminals, insulated terminals, butt connectors, ring terminals, and spade terminals where repeatable pressure matters. For open barrel terminals, use a die that folds the terminal wings cleanly around the conductor and insulation.
Recommended next step: browse wire crimping tools if you need a crimper for terminals and connectors, or compare wire tools if you also need cutters, strippers, and prep tools. If the repair also needs sealed terminals, match the tool with heat shrink connectors.
Definition: What is a Crimping Tool?
A crimping tool is a device used to join two pieces of metal (typically a wire and a connector) by compressing them together until they form a solid bond. In electrical work, the most common use of a crimp tool is to attach a lug or terminal to the end of a stripped wire. The tool’s jaws (often called dies) deform the connector around the wire crimp area, essentially cold-welding them together into one secure unit. This creates a solderless electrical connection: the crimped joint can conduct electricity and resist being pulled apart without needing any solder. Crimping tools come in various sizes and styles – from simple handheld wire crimping pliers for small wires to heavy-duty hydraulic crimpers for large cables – but all serve the same function of creating a reliable crimped connection.

Operation Steps: How to Crimp a Wire (Step-by-Step)
Using a wire crimping tool is straightforward, but following proper steps will ensure your crimped wires are safe and secure. Here’s a general guide on how to crimp a wire using a common insulated terminal crimper or wire connector crimping tool:
-
Prepare the Wire: Use a wire stripper to remove about 1/4 inch of insulation from the end of the wire. Make sure not to damage the metal strands. (Tip: Match the wire gauge to the connector size; for example, use red insulated connectors for 22-16 AWG wires, blue for 16-14 AWG, yellow for 12-10 AWG, etc.)
-
Choose the Connector: Select the appropriate crimp connector (ring terminal, spade, bullet, butt splice, etc.) that fits your wire. Slide the stripped wire end into the connector until the wire’s insulation meets the connector barrel.
-
Position in the Crimp Tool: Open the crimping tool jaws and place the connector into the correct die slot. Most ratchet crimping tools have color-coded or labeled notches for different connector sizes (matching the connector’s color/gauge). Ensure the connector’s barrel is aligned in the crimper die and the wire is still fully inserted.
-
Crimp the Connection: Squeeze the crimper handles firmly until the tool completes the crimp. If you’re using a ratcheting wire crimper tool, it will latch and only release once sufficient pressure is applied – this helps guarantee a consistent crimp every time. The connector’s metal barrel should deform tightly around the wire (“cold-welded” onto it).
-
Inspect and Test: Open the tool and remove the now-crimped connector. Inspect the crimp – it should look compressed evenly, and you shouldn’t be able to pull the wire out. A bad wire crimp will feel loose, have exposed wire, or come apart easily. Give the connector a gentle tug to ensure it’s secure. If it slips or the wire pulls out, the crimp was not successful (cut it off and try again with a new connector).
-
Insulate (if needed): If you used an insulated connector, you’re done – the plastic sleeve provides insulation. If you crimped a non-insulated connector (like a bare metal ferrule or butt connector), slide a piece of heat-shrink tubing over the joint and shrink it with a heat gun to protect and insulate the connection.
Application Scenarios: Where Would You Use Crimping Tools?
Crimping tools are used in a wide range of projects and industries wherever secure, electrical or mechanical connections are needed. Here are some common application scenarios for crimping tools:
-
Home DIY and Electronics: Crimp tools are handy for home wiring repairs, stereo and home theater installations, appliance fixes, and hobby electronics. Instead of twisting wires or risking a bad connection, you can crimp wires together with butt connectors or attach spade/ring terminals for speakers and devices. This is safer and more durable for DIYers.
-
Automotive and Marine: In vehicle wiring, wire crimpers are indispensable for installing car stereos, lighting, and repairing wiring harnesses. Automotive wire crimping often involves specialty connectors like spark plug wire terminals and battery cable lugs. For example, when you need to crimp spark plug wires, you would use a spark plug wire crimping tool to attach the ignition terminals onto the thick spark plug cables. Similarly, heavy-duty battery cable crimpers are used to crimp lugs on battery terminals or ground wires for cars and boats, creating robust connections that handle high current and vibration.
-
Electrical Contracting: Professional electricians use crimping tools daily to terminate wires with lugs or ferrules in electrical panels, junction boxes, and industrial equipment. Ferrule crimpers are special crimp tools for securing bootlace ferrule tips on multi-stranded control wires – this keeps strands together for a reliable connection under screw terminals. Whether it’s crimping ferrules onto control wiring, crimping ring terminals on appliance cords, or splicing wires with insulated butt connectors, a quality electrical crimping tool makes the job faster and ensures a long-lasting connection.
-
Networking and Telecom: Crimping isn’t limited to power wires. Networking technicians use cable crimping tools for attaching RJ45 plugs to Ethernet cables and coaxial crimpers for coax cables (e.g. for cable TV or CCTV). These connector crimping tools create data cable ends that fit into jacks and ports. Even telephone wire uses small modular crimp connectors – all require precise crimpers designed for those connectors.
-
Specialty and Others: There are crimp tools for many purposes beyond electrical wiring. Plumbers use PEX crimping tools to join water pipes with crimp rings. Fishermen and riggers use wire rope crimping tools (swagers) to crimp metal sleeves on steel cables (for example, making loops in wire rope or repairing fence wire). Even certain DIY crafts or jewelry making may use mini crimpers for beads or metal fittings. The concept is the same – deform a sleeve or connector to hold materials together. No matter the context, when a strong, permanent join is needed, there’s likely a crimping tool for the task.
Purchase Guide: How to Choose the Best Crimping Tool
When shopping for a crimping tool, it’s important to get the right tool for your needs – the best wire crimping tool for you depends on the type of work you’ll do. Keep these considerations in mind:
-
Connector Type & Size: Crimping tools are often designed around specific connector types and wire gauge ranges. Determine what you’ll crimp most often (insulated terminals, non-insulated lugs, ferrules, coax connectors, spark plug wires, etc.). For general electrical work (like 10-22 AWG insulated terminals), a standard ratcheting wire crimper tool with interchangeable dies is a versatile choice. For very large cables (battery lugs, 0-4 AWG), you might need a larger hydraulic or hammer crimp tool. If you work with networking or phone lines, you’ll need dedicated RJ45/RJ11 crimpers, which differ from electrical terminal crimpers.
-
Ratcheting vs. Non-Ratcheting: Ratcheting crimping tools are highly recommended for most users because they ensure the crimp is fully compressed before releasing. The built-in ratchet mechanism applies uniform pressure and prevents under-crimping. Non-ratchet (plier-style) crimpers can work for occasional use, but they rely on your hand strength and feel – it’s easier to make an inconsistent crimp with those. For beginners and pros alike, a ratcheting crimp tool provides more consistent, reliable results.
-
Interchangeable Dies: Some crimpers come as kits with multiple die sets to handle different connectors (for example, a wire crimping tool kit might include dies for insulated terminals, non-insulated open-barrel terminals, and wire ferrules). If you need flexibility, look for a crimping tool kit or a crimper with compatible dies. On the other hand, if you only work with one type of connector, a fixed-die tool dedicated to that job might be simpler and more durable.
-
Build Quality & Ergonomics: A good crimping tool should feel solid and comfortable in your hand. Look for tools made of hardened steel that can withstand repeated use (cheaply made crimpers may misalign or break over time). Ergonomic cushioned handles and a smooth ratchet action will make it easier to perform many crimps without hand fatigue. If you’re doing professional or large projects, these features are important. Also, tools that meet industry standards (for example, some crimpers are UL listed or meet MIL-spec for certain connectors) give confidence in making safe connections.
-
Kits and Accessories: If you’re starting from scratch, consider a wire crimper kit that includes an assortment of common connectors. Many manufacturers offer electrical crimping tool kits which bundle the crimper plus a range of terminals (ring, spade, butt connectors, etc.) and sometimes a wire stripper. This can be cost-effective and convenient for DIY beginners. Ensure the kit’s connectors are the type you need (insulated vs. non-insulated and appropriate gauges). For instance, heat shrink crimp connectors (insulated with heat-shrink tubing) are popular for marine/automotive use, and some kits focus on those.
Finally, always buy from a reputable brand or source. A quality crimp tool will create connections that last for years, whereas a flimsy tool might result in poor crimps that fail under load. If you’re unsure where to start, a highly rated option is the Haisstronica Ratchet Wire Terminal Crimping Tool for AWG 22-10 Heat Shrink Connectors – an affordable, well-reviewed crimper that covers the most common wiring tasks for DIYers and electricians. (You can check it out here: Haisstronica Ratchet Wire Terminal Crimping Tool – AWG 22-10.) This connector crimping tool features a precise ratchet, ergonomic grip, and it consistently delivers secure crimps (no more worries about the frustrations of a bad crimp!). Investing in a good crimping tool or crimping tool set will pay off with safer, cleaner wiring in all your projects.

FAQ: Frequently Asked Questions
Q: Can I crimp a wire without a crimping tool (for example, using pliers)?
A: It’s possible to deform a connector with pliers in a pinch, but it is not recommended. Proper wire crimpers apply uniform pressure that ordinary pliers cannot. Crimping without the right tool often results in a bad or loose connection that can pull apart or cause electrical resistance (heat). For a safe, reliable connection, always use the appropriate crimping tool rather than makeshift methods. In short, you shouldn’t try to crimp wires with general pliers – invest in a decent crimp tool for any critical wiring.
Q: Is a crimped connection better than soldering wires?
A: Crimped connections are widely used as an alternative to soldering, especially in automotive and industrial applications. A well-executed crimp is mechanically strong and electrically reliable. Unlike solder, which can make a wire joint rigid and prone to cracking under vibration, a crimped wire retains some flexibility. Crimps also avoid heat damage since no heating is required. In many cases (if done with a quality crimp tool and correct technique), a crimped connection will last as long as or longer than a soldered one. That said, both methods can be effective when done properly – it’s just that crimping is faster and ensures a gas-tight bond without special skills.
Q: What are ferrules and why do I need a ferrule crimper?
A: Ferrules are small metal sleeves used to terminate stranded wire, typically in screw clamp terminals (common in industrial control panels, circuit breakers, or audio equipment). The ferrule is placed over the stripped multi-strand wire, and a ferrule crimping tool is used to crimp (compress) the ferrule, turning the end of the stranded wire into a solid pin. This prevents the individual strands from fraying or fanning out under the screw terminal, resulting in a more secure and durable connection. If you work with a lot of panel wiring or audio installs, a dedicated ferrule crimper is very useful. Ferrule crimpers are designed to create a square or hexagonal crimp on the ferrule for maximum contact. They come in plier styles (often self-adjusting for different wire sizes) and are an important part of a professional electrician’s toolkit.
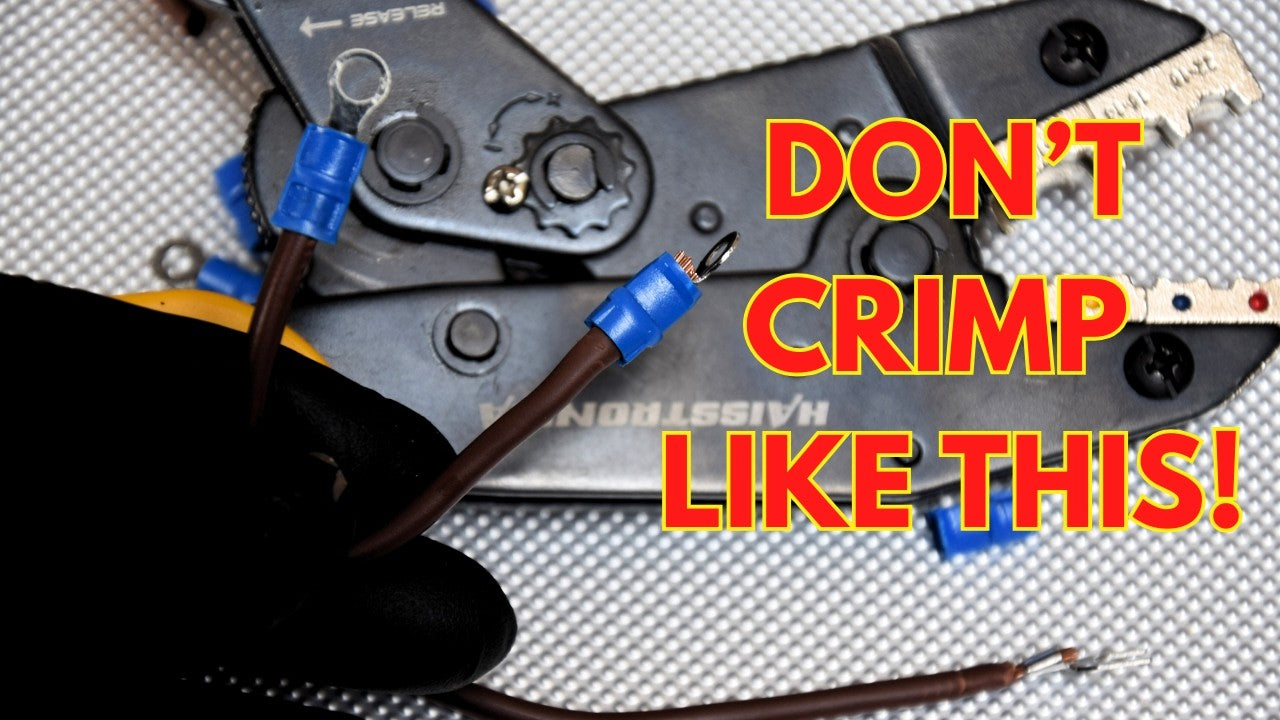
Q: How do I know if my crimp is done correctly (signs of a good vs. bad crimp)?
A: A good crimp will tightly hold the wire and connector together without any play. Signs of a proper crimp include: the wire’s insulation is right up to the connector but not crimped inside it, the connector’s barrel is evenly compressed without cracks, and the wire does not pull out when you tug firmly. Often, the crimped area will have an indent or imprint from the die – this is normal. In contrast, signs of a bad wire crimp include loose strands or the wire falling out, visible gaps between the wire and connector, or an over-crimp that cracks or cuts into the connector. If the connector has insulation, it shouldn’t be mangled or stripped away by the crimp; if it’s a heat-shrink style connector, the tubing should still cover the crimp area after you shrink it. Always give the terminated wire a decent pull test. If anything moves or feels marginal, cut it off and redo the crimp with a fresh connector. It’s better to spend an extra connector than to have a critical connection fail later due to a poor crimp.
Q: Do I need different crimping tools for different connectors?
A: It depends on the range of work you do. Some universal crimping tool sets come with multiple dies to crimp various connector types (insulated terminals, non-insulated terminals, coax connectors, etc.). If you commonly do a variety of wiring (say, automotive wiring one day, network cables the next, and coax antenna cables another), you will likely need different crimpers or an all-in-one kit. For example, an automotive wire crimping tool may not crimp an RJ45 Ethernet plug, and an RJ45 crimper can’t crimp a heavy battery lug. In practice, many electricians and DIYers have a couple of crimpers: one insulated terminal crimper tool for general wiring connectors, and perhaps a specialized one like a spark plug wire crimper or battery cable crimping tool for larger automotive jobs. Assess what connectors you will actually use and choose your tools accordingly. For beginners doing home and auto projects, a versatile ratcheting crimper that covers common wire sizes (around 10-22 AWG) is a great start, and you can add more specific crimpers (like a ferrule crimper or heavy-duty lug crimper) if you find you need them.