Introduction: Why Crimping Matters
Crimping is a method of joining wires to connectors by deforming a metal connector barrel around the wire. A proper crimping tool (often called a crimper, crimp tool, or crimping pliers) essentially cold-welds the wire to the connector, creating a strong, gas-tight bond. This is crucial for electrical reliability – a well-executed crimp won’t loosen, corrode, or fail under vibration, unlike a loose twist or weak solder joint. In DIY electrical projects (automotive wiring, electronics, home repairs), using wire crimpers to make crimps on connectors ensures a safe and long-lasting connection. But what if you don’t have a crimper tool on hand? Many DIYers wonder what to use instead of a crimper when they’re in a pinch. In this article, we’ll explore some alternative methods to crimp a wire without a specialized wire crimping tool, discuss the pros and cons of these makeshift solutions, and explain why investing in a proper electrical crimping tool is ultimately the best practice for any wiring job.
👉Prefer one-and-done crimps? Meet the Haisstronica ratcheting terminal crimper (AWG 22–10) for heat-shrink connectors.

When a Crimper Alternative Is Not Enough
If the repair will see vibration, moisture, heat, or meaningful current load, treat pliers, solder, and twist connections as temporary fixes. Move to a ratcheting crimper matched to the connector style and AWG range.
- Use heat shrink terminal crimpers for sealed automotive, marine, trailer, and outdoor wiring.
- Use ferrule crimpers for control panels, terminal blocks, and stranded wire ends.
- Use interchangeable die crimpers when you work across insulated terminals, open barrel terminals, ferrules, and lugs.
Shop Haisstronica wire crimping tools to choose the right tool before the final repair.
Can You Crimp Wires Without a Crimping Tool?
It’s understandable that a DIY hobbyist or home user might not have a dedicated cable crimper readily available. You might be tempted to improvise with other tools. There are a few methods to create a crimp-like connection using common tools, and we’ll cover them below. However, it’s important to note up front that any alternative will likely not be as secure or reliable as using the correct crimping tool. Electrical connections are critical for safety – a poor connection can lead to voltage drop, overheating, or even fire. That said, here are some crimping alternatives and what to expect from them:
-
Needle-Nose Pliers as a Crimping Tool: In a pinch, you can use pliers (preferably needle-nose or linesman pliers) to squeeze a connector onto a wire. This manually crimps the connection by brute force. For example, one could press down on an insulated butt connector or a non-insulated ferrule with pliers. Some people even use a pair of vise-grips (locking pliers) adjusted to apply high pressure. While pliers can deform the connector onto the wire, they lack the precision of a real wire crimper tool. The result may work for wire crimps on a very small scale, but it’s hard to ensure uniform pressure all around the connector. You risk an incomplete crimp that could pull off, or you might crush the connector too much and damage the wire. Crimping pliers are shaped to make the perfect indent – ordinary pliers are not. Use this method only for light-duty fixes and test the connection thoroughly.
-
Hammer and Punch/Vise: Another DIY method is to place the connector on a hard surface (or in a vise) and use a hammer and a punch (or even a sturdy screwdriver) to deform the connector onto the wire. For instance, some DIYers crimp large battery cable lugs by hammering them. If you lack a proper heavy-duty battery cable crimping tool, you can set the lug on an anvil or metal block, position a punch on the lug, and strike it with a hammer to swage it. This method can achieve a crimp on bigger cables (in fact, there are inexpensive “hammer crimp” tools sold for this purpose). However, caution is needed: you must hit squarely and avoid nicking the wire or connector. Using a vise to slowly squeeze the connector is another option – effectively a manual press. Ratcheting crimper tools apply controlled pressure from all sides, whereas a hammer blow might only crimp one side at a time. So, you may need to rotate and hammer a few times to get a uniform crimp. This method is workable for one-off jobs (many have done emergency battery cable crimping this way), but it’s not as consistent or safe as using the right cable crimping tools.
-
Soldering the Connection: If you truly cannot crimp, you might consider soldering the wire to the connector as an alternative. In this approach, you’d fill the connector (like a lug or pin) with solder after inserting the wire, effectively bonding them. Soldering creates an electrical connection and can be very conductive. However, solder is not generally recommended for high-vibration environments or heavy current connections in place of crimping. Soldered joints can become brittle, and the soldering heat can weaken or anneal the copper wire strands. In automotive or appliance wiring, a soldered wire may crack over time due to movement. Crimped (cold-formed) connections, by contrast, remain flexible and vibration-resistant. Thus, while soldering a terminal is better than a loose connection or mere twisting, it should be seen as a last resort or supplement rather than a replacement for proper crimps. Some experts actually prefer crimping over solder for reliability – a correctly crimped joint can be stronger mechanically and doesn’t introduce solder’s brittleness. In summary: you can solder, but be aware of the limitations.
-
Twisting Wires Together and Taping: Simply twisting wires onto a connector or together, and wrapping with electrical tape, is not a true crimp at all – and not a safe long-term solution. This method might get you out of a very temporary bind (for example, twisting a wire onto a battery post or terminal and taping it to hold for a short time). However, twisted and taped connections can easily come loose and are prone to oxidation (since they’re not gas-tight). They also have higher resistance. In fact, experienced electricians warn that a twist-and-tape splice is unreliable and potentially dangerous, especially in automotive or household electrical systems. Bottom line: Avoid this method except in true emergencies, and re-do the connection properly with a crimp or approved connector as soon as possible.
-
Use Screw Terminals or Wire Nuts (If Applicable): Depending on your project, you might be able to use a different style of connector that doesn’t require crimping. For example, in home wiring, wire connectors like twist-on wire nuts or lever clamps (Wago connectors) can join wires without crimping. In automotive or DC wiring, you might use screw-down terminal blocks or binding posts to secure a wire. These are not “crimp” connections at all, but they can serve a similar purpose of mechanically joining conductors. If your application allows for such a connector, it’s a viable alternative. Just ensure it’s rated for the environment (for instance, don’t use a household wire nut in a high-vibration automotive setting). When possible, using a proper connector with its intended method (screw, clamp, etc.) is better than jerry-rigging a crimp.
As you can see, there are multiple ways to create a pseudo-crimp connection without a specialized crimper tool. Using pliers or a hammer can physically deform the connector onto the wire; soldering can bond the wire; twisting can hold things together briefly. However, all of these alternatives have downsides. They either compromise the strength of the connection, risk damage to the wire, or just aren’t reliable over time. In contrast, a true wire crimping tool is designed to make perfect, consistent crimps that maximize conductivity and mechanical strength. Next, we’ll explain why using the proper crimping tools is worth it, especially for DIY and home users – and how to choose the right tool for the job.
Why a Proper Crimping Tool Is Best (Crimp vs. Solder vs. Twisting)
If you’re serious about doing electrical projects (whether automotive, electronic, or household), investing in a good wire crimper or electrical crimping tool is highly recommended. Professionals prefer crimped connections for many reasons:
If you're looking for a reliable crimping tool, browse our wire crimping tool collection featuring ratcheting crimpers for professional-grade connections.
-
Reliability and Safety: Connections made with a quality crimping tool are highly reliable. As mentioned, a correct crimp essentially becomes a solid, gas-tight joint – often called a “cold weld”. This prevents oxygen and moisture from creeping in and corroding the connection. It also means the wire and connector move together as one piece, so there’s less risk of arcing or heating. By contrast, an improvised crimp with pliers may not be fully tight, allowing oxidation, or a soldered joint may crack and let air in. Crimped terminals are commonly used in automotive, aerospace, and industrial applications because they stand up to harsh conditions (vibrations, temperature changes) without failing. Simply put, a crimping tool helps ensure your crimp connectors perform as intended.
-
Consistent, Strong Crimps: Proper crimpers have dies or jaws shaped for specific connector types and wire gauges. This ensures the compression is even and to the correct degree every time. For example, a ratcheting terminal crimper will not release until the crimp is fully compressed with the right force. This consistency is hard to achieve with ad-hoc methods. A study by wiring experts noted that using pliers or other makeshift tools often results in connectors that either aren’t crimped enough (loose) or are crimped too much (damaging the connector or wire). In critical wiring (e.g., in your car’s engine bay or your home’s circuit box), a bad crimp can lead to intermittent issues or safety hazards. Using the correct crimping pliers eliminates this guesswork. Every crimp will be tight and secure, and you can visually inspect that it’s properly formed (for instance, insulation isn’t crushed and the wire is firmly gripped).
-
No Wire Damage or Weakening: As discussed, soldering can overheat and weaken wire, and twisting can nick or stress wires. A well-designed wire crimping tool will compress the connector without cutting into the strands. Many ratcheting crimping tools also have an adjustable tension and a design that prevents over-crimping. For insulated terminals, a good insulated crimping tool will crimp the metal part without cracking the plastic sleeve. With open-barrel terminals, a proper open barrel crimper rolls the “ears” of the terminal into the wire for a snug fit, rather than simply smashing them. All these nuances mean less chance of broken strands or other issues that could reduce the current-carrying capacity of the connection. Manufacturers of wiring harnesses emphasize that using the right crimp tool for the connector is essential – for example, Painless Performance (an automotive wiring company) explicitly advises against “grabbing a set of pliers and trying your best” because it will “only create issues”. They, like most pros, insist on using the proper crimper for each terminal type to avoid compromised wires.
-
Strain Relief and Insulation Support: Many crimp connectors (especially in automotive or electronic use) have two crimp sections – one for the bare wire and one for the insulation (this is common with open barrel crimps on pins, or with certain connectors like Deutsch or AMP/Tyco pins). A specialized crimping tool will often crimp both in one go (or have two separate crimps in one tool squeeze) to secure the wire and the insulation. This provides strain relief so the wire doesn’t flex right at the termination point. Improvising with pliers usually cannot achieve this double crimp. By using the recommended wire crimper tools, you ensure the connector’s design (including any insulation crimp) is properly executed, resulting in a more durable assembly.
-
Compliance with Standards: If you’re working on anything that needs to meet electrical codes or industry standards (even as a DIYer, think of marine wiring, automotive racing standards, or home electrical code for splices), crimped connections often need to be made with an approved crimping tool to be considered proper. For example, in house wiring, certain crimp sleeves or butt connectors are only code-compliant if crimped with a specified tool. Similarly, manufacturers of connectors like Molex or AMP will specify the exact crimp tool or die to use for their pins to achieve a gas-tight crimp. While a DIY home user might not always face inspections, following these best practices ensures your work is up to professional quality.
In summary, while you can use alternatives in a pinch, nothing truly replaces a real crimping tool for critical connections. A phrase often heard is “use the right tool for the job,” and it’s very true here. The best connection is a proper crimp – ideally on a quality connector with either insulation or a heat-shrink cover to protect it. Soldering has its place in electronics, but for wires that carry current in anything that moves or vibrates, crimping is superior for longevity. Even for home projects, a crimp (using UL-listed crimp caps or connectors) can be more secure than a solder splice. Ultimately, having a set of wire crimpers in your toolbox is a small investment for the peace of mind it brings.
Choosing the Right Crimping Tool for Your Needs
If you’re convinced that getting a proper crimping tool (or set of crimping tools) is the way to go, the next question is: Which one do you need? Not all crimpers are the same. The right choice depends on the types of connectors and wires you’ll be working with. Here we’ll outline common types of wire crimping tools for DIY/home use and what they’re for. This will also incorporate many of the keywords you might see (like ratcheting crimper, ferrule crimper, etc.), so you can identify what tool suits each application.
-
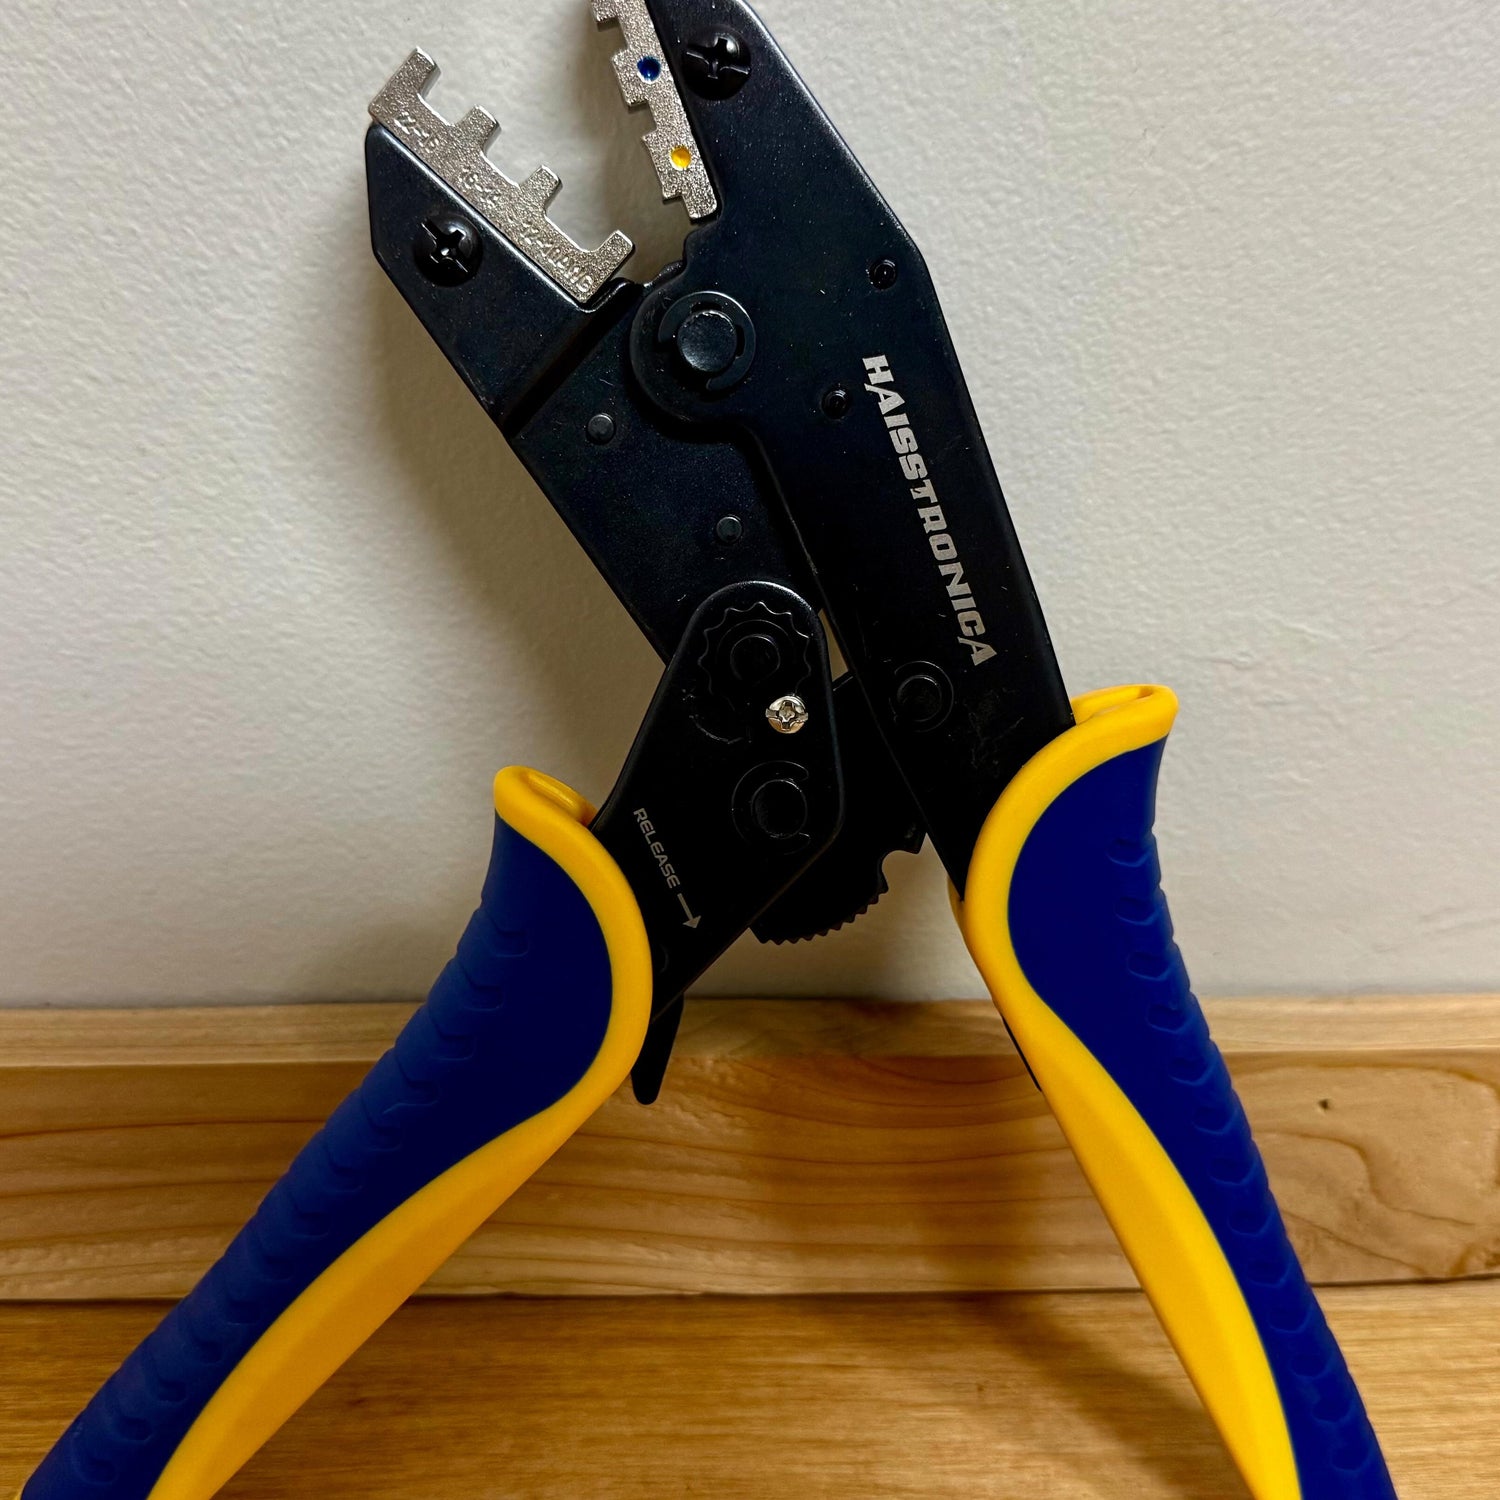
Ratcheting Crimping Tool for Insulated Terminals: These are very popular and versatile for general electrical work. A ratcheting crimper has a mechanism that locks the handles as you squeeze, ensuring full compression before release. It typically has interchangeable or multiple die sizes to crimp insulated terminals (the colored plastic-ring terminals: red (22-16 AWG), blue (16-14 AWG), yellow (12-10 AWG), etc.). If you’re wiring vehicles, boats, or doing appliance repair, you’ll likely use insulated ring terminals, spade connectors, and butt connectors. A good ratcheting wire crimper tool for insulated connectors will handle the range of wire sizes (often AWG 22-10) and produce a solid B-crimp without damaging the plastic insulation. Tool example: Haisstronica Crimping Tool for Insulated Electrical Wire Connectors (AWG 22-10) – a recommended crimper that quickly and easily crimps red, blue, yellow insulated terminals with a proper indent, firmly grasping the wire without cracking the insulation. Its ratchet auto-adjusts for different connector sizes, making it easy for even beginners to get a perfect crimp every time.
-
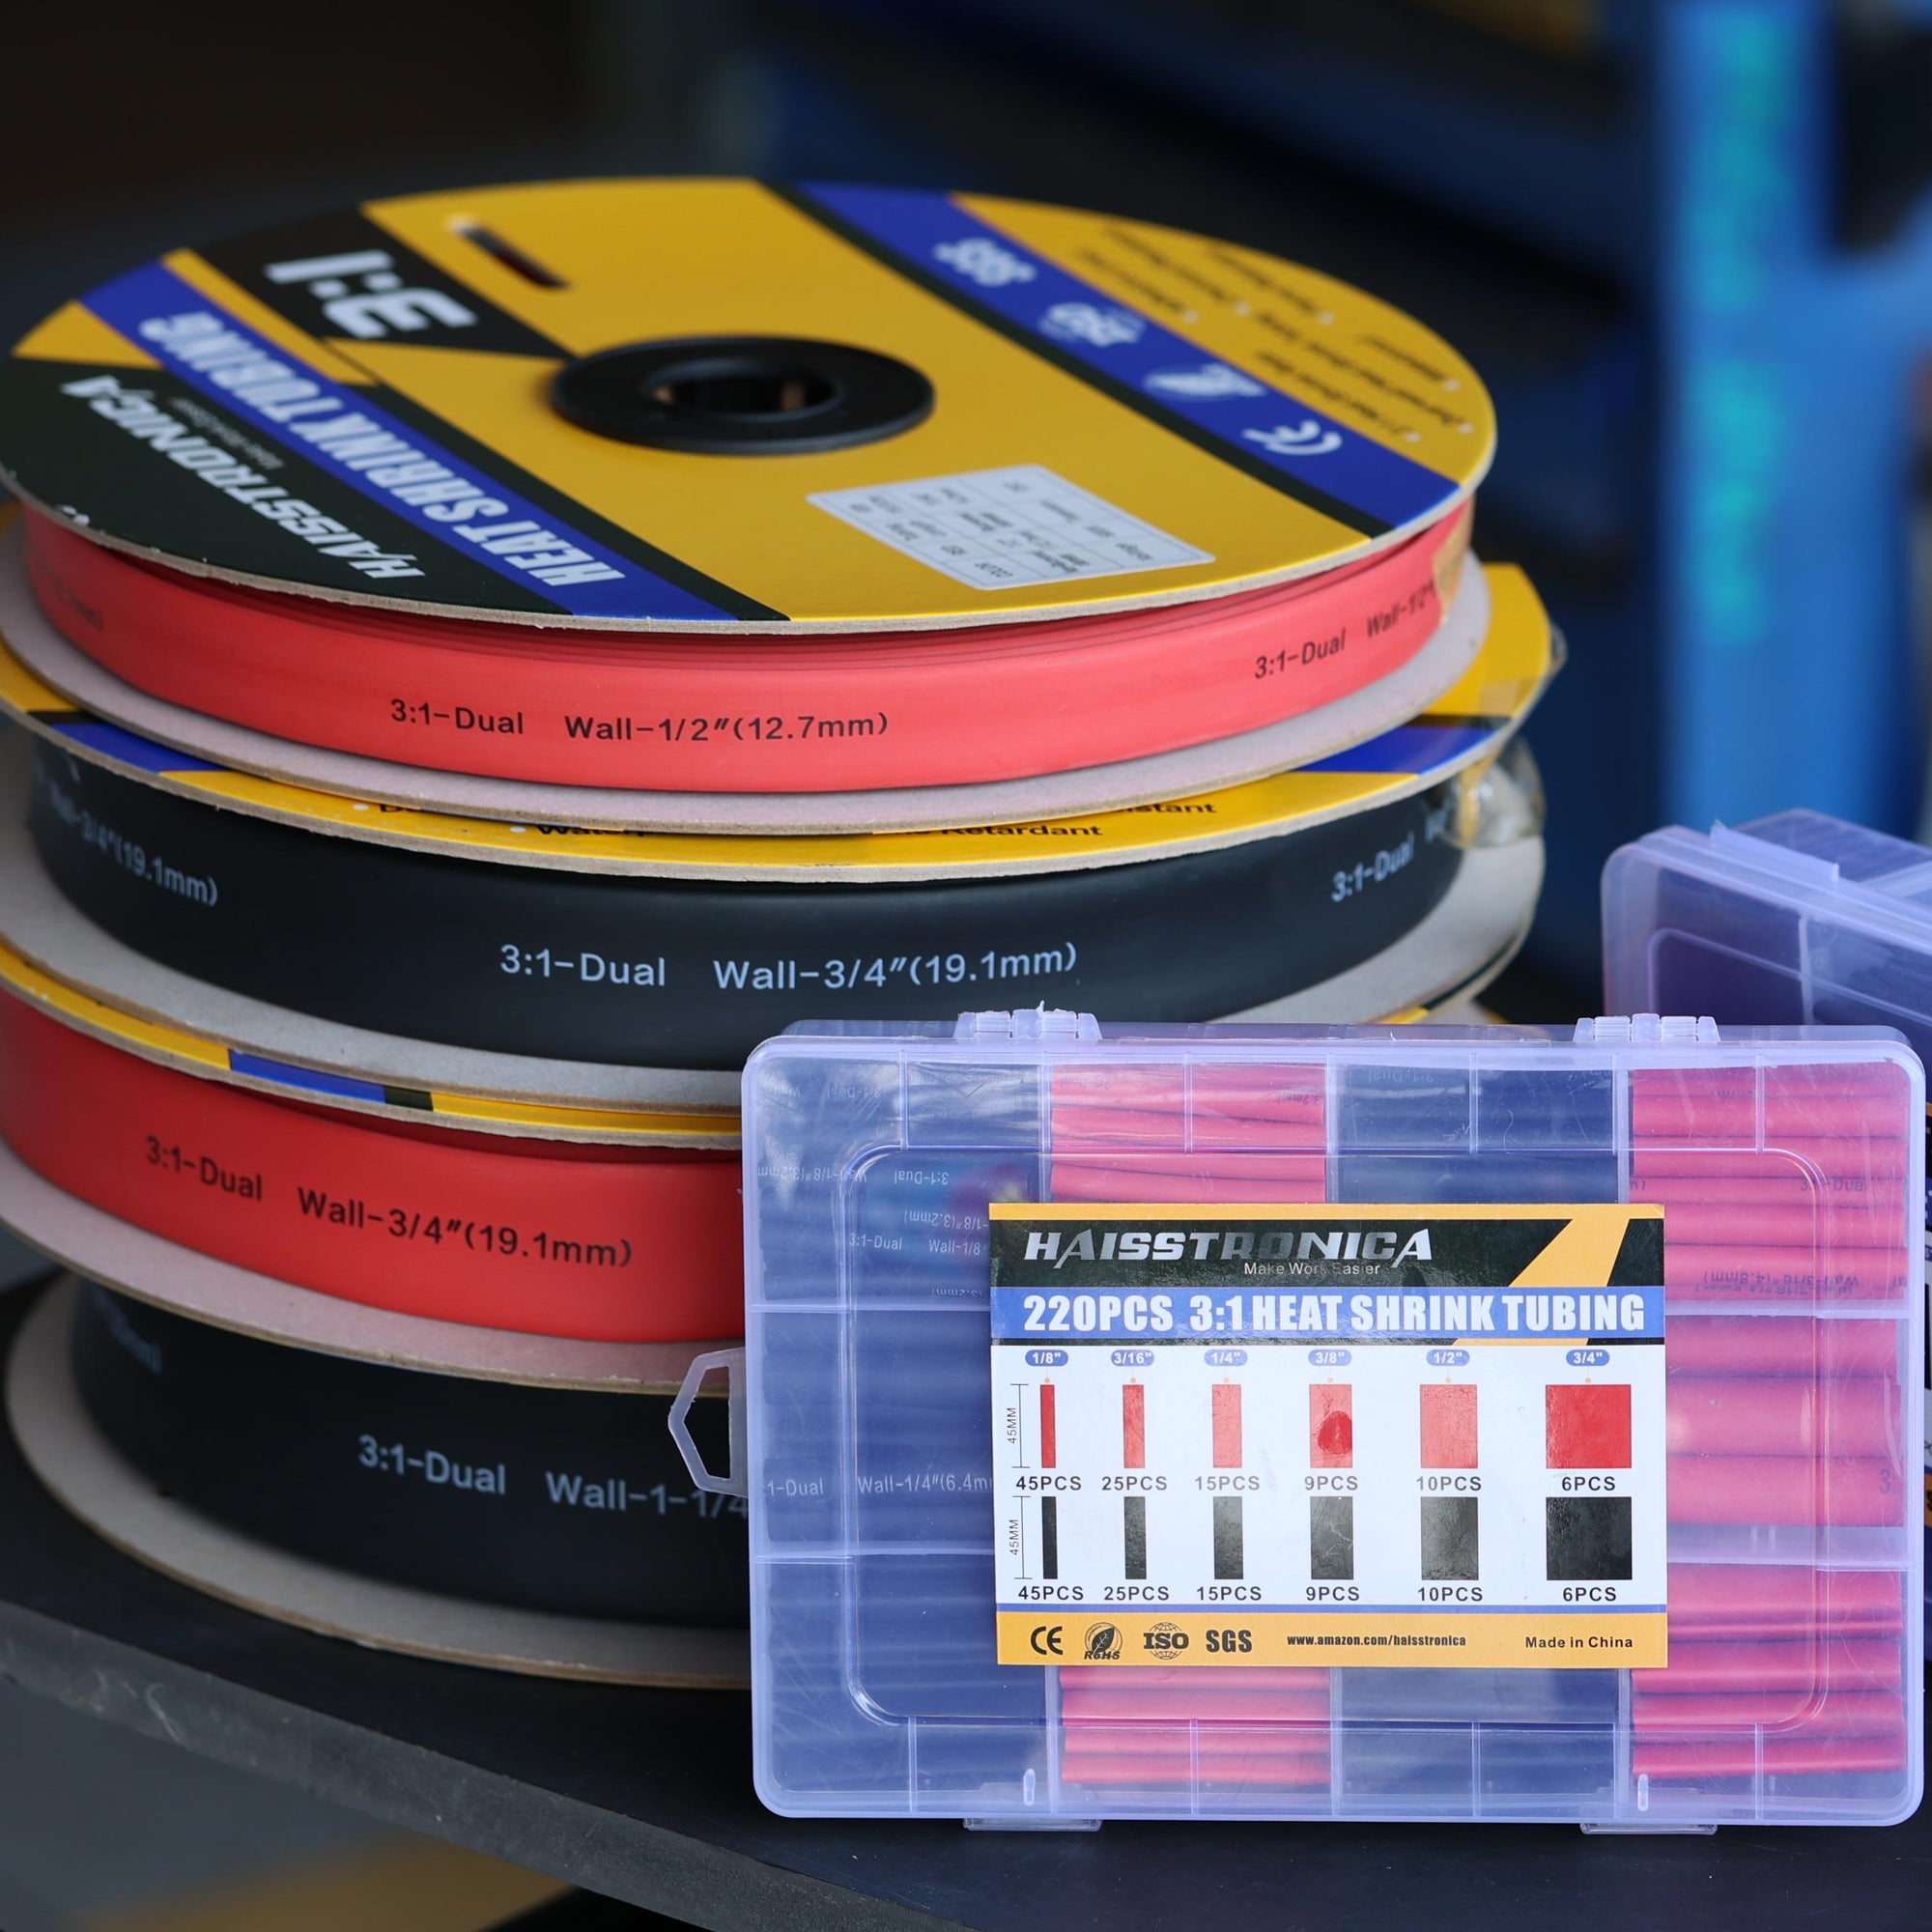
Crimping Tool for Heat Shrink Connectors: Heat shrink connectors (a type of insulated connector) have become very popular for automotive and marine use. These are crimp connectors (often butt splice, ring, or fork terminals) with a heat-shrinkable sleeve that you shrink with a heat gun after crimping, sealing the connection from moisture. While you can crimp these with a regular insulated crimper, some tools are optimized for them – often by providing a bit more even crimp to avoid cutting the heat shrink material. Many ratcheting crimpers can handle both standard vinyl-insulated and heat shrink terminals. Tool example: Haisstronica Ratchet Wire Terminal Crimping Tool for AWG 22-10 Heat Shrink Connectors – this is a versatile cable crimper designed especially for heat shrink terminals. It creates consistent, reliable crimps on heat shrink butt connectors and ring terminals, which you can then shrink down for a waterproof seal. DIY users love these heat shrink connectors for things like trailer wiring or outdoor applications, and a matching crimper tool makes the job easy. This crimper tool provides a strong crimp without puncturing or deforming the heat shrink tubing, and its ratcheting design ensures you’ve applied enough force each time.
-
Crimping Tool for Non-Insulated Open-Barrel Terminals: Not all connectors have plastic insulation. Open barrel terminals (also called Japanese style, Molex, or Delphi terminals, depending on shape) are the kind where the connector has “ears” or tabs that wrap around the wire. Think of the pins inside plastic automotive multi-pin connectors, or the terminals in a PC’s Molex KK connectors – these are usually open-barrel. They require a different style crimp: typically a W-crimp or B-crimp that folds the ears over the wire conductor, and sometimes another set of ears over the insulation. For these, you need an open barrel crimping tool (sometimes generically just called a non-insulated terminal crimper). Tool example: Haisstronica Crimping Tool for Non-Insulated Open Barrel Terminals & Receptacles – this ratcheting wire crimper is designed for the open-barrel type terminals common in automotive connectors (like those found in OEM harness plugs, relay sockets, or ignition coil connectors). It works for typical sizes (~22-10 AWG range) and ensures those open “wings” of the terminal are properly rolled and crimped into the wire for a factory-quality connection. If you’re restoring a car’s wiring or building custom wire harnesses with open barrel terminals, this tool is a must-have. It saves you from the frustration of trying to mash those tiny wings with pliers. With the correct open barrel crimper tool, you get a solid mechanical and electrical connection that won’t come apart. (Note: Open barrel crimpers are also great as non-insulated wire crimpers for any bare terminals or splices that don’t have insulation.)
-
Wire Ferrule Crimpers: If you work with multi-stranded wires in screw terminals (common in audio, industrial controls, or solar installations), you might use ferrules. Ferrules are small metal tubular crimps that go over a stripped wire end, forming a neat pin when crimped. A ferrule crimper tool is usually a square or hexagonal crimping plier that compresses the ferrule around the strands. This makes inserting the wire into terminal blocks or breaker panels easier and prevents stray strands. Ferrule crimpers often have a ratcheting action and will crimp a range of ferrule sizes (for example 0.5mm² to 6mm², or AWG 20 to AWG 10, etc.). If you see terms like ferrule crimping tool, ferrule crimper tool kit, or wire ferrule crimper, these refer to that specific use. For DIY electronics or machinery wiring, a ferrule kit and crimper can really upgrade the professionalism of your connections. Haisstronica also offers ferrule crimpers and tool kits for those who need them – the concept is similar: insert the ferrule on the wire, and use the crimping tool for ferrules to make a tight crimp.
-
Heavy-Duty Cable Crimpers (Battery Lug Crimping): For very thick wires (like battery cables, welding cables, or mains supply cables), you’ll need a heavy-duty cable crimping tool. These come in two main types: manual hammer or hydraulic crimpers, and large ratcheting or compound-leverage crimpers. They handle large gauge lugs (AWG 8, 4, 1, 1/0, etc.) often using a hex crimp or indent crimp style. DIY mechanics sometimes use a hammer crimp tool for battery terminals. A better approach is a hydraulic crimper which can be hand-pumped to apply several tons of force. If you’re crimping battery terminals often (say for marine batteries or custom car audio power wires), consider a hydraulic battery cable crimping tool. However, for occasional use, there are also inexpensive hammer-indentation tools that work with a hammer strike. In any case, crimping battery terminals is far superior to trying to solder such large cables. The crimp forms a solid connection that can handle hundreds of amps. Some electricians crimping tool sets include interchangeable dies for sizes up to 00 gauge. Choose according to the largest cable you plan to crimp.
-
Spark Plug Wire Crimpers: If you’re making custom spark plug wires (ignition leads), you’ll need a special spark plug wire crimping tool. Spark plug wires are usually 7mm or 8mm cables with a carbon or spiral core, and the terminals are usually 90° or straight metal connectors that crimp onto the wire and its insulation. These are a type of open-barrel crimp, but often larger and sometimes done with a die that also forms the terminal to shape. There are dedicated spark plug wire crimpers (some are manual plier types, others ratchet). Many ignition wire sets even include a cheap crimping tool that you use in a vise. While you might improvise with regular pliers for these (some have had success carefully using a standard open-barrel crimper), having the right spark plug crimp tool makes it easier. If you see a crimping tool for spark plug wires advertised, it’s specifically for that job. Haisstronica offers an 8.5mm ignition wire crimper as well, which ensures you get a good crimp on the plug terminals so they won’t vibrate loose from the wire. For classic car enthusiasts or anyone frequently changing plug wire lengths, this tool is worth it.
-
Specialty Crimp Tools (Coax, MC4, etc.): Beyond the common connectors, there are specialized crimping tools for things like coaxial cables (TV/Satellite coax uses F-connectors, RG6, RG58 etc. with their own hex crimp tools), MC4 solar connectors (used for solar panel wires, which require an MC4 crimper to properly crimp the pins that then snap into the weatherproof housing), fiber optic connectors, and more. If your project involves these, you’ll need the specific crimper type. For instance, an MC4 connector crimp tool will have dies for the 2.5mm²/4mm² solar connector pins. Always match your crimp tool to the connector type – e.g., don’t try to crimp an RJ45 network cable connector with a ferrule crimper or vice versa; use a dedicated RJ45 crimp tool for Ethernet connectors, an MC4 crimper for MC4, and so on. Using the wrong tool can damage the connector or result in a poor crimp that fails.
As a DIY user, you don’t necessarily need all these tools. You should select based on what projects you do. A general ratcheting wire crimper for insulated terminals is a great all-purpose tool for electrical work. If you frequently do automotive or gadget wiring, adding an open barrel crimper and a ferrule crimper to your kit will cover most needs (plus a basic coax crimper if you do AV cables). The good news is that high-quality crimpers are more affordable than ever. Brands like Haisstronica offer durable, ergonomic crimp tools at reasonable prices, often under $30, which is a small price to pay for professional-grade connections.
👉The tool we recommend: Haisstronica ratcheting terminal crimper—precise, repeatable crimps for heat-shrink connectors.

How to Crimp Properly (Quick Tips)
Now that we’ve covered the alternatives and emphasized using the right tool, here’s a quick refresher on how to make a good crimp with a proper crimping tool. These tips apply whether you’re using a simple plier-style crimper or a ratcheting tool crimper:
-
Strip the Wire to the Correct Length: Remove the insulation from the wire end according to the connector’s specification (usually the metal barrel length). For most wire crimps connectors, you want the stripped wire to fill the barrel with no bare wire sticking out past the connector. Use a wire stripper for a clean strip without cutting strands.
-
Select the Right Connector Size: Use a connector that matches your wire gauge. Crimp connectors often are color-coded (red, blue, yellow for common ranges). Using the wrong size connector will result in a bad crimp (too loose or won’t fit). For open-barrel terminals, ensure the terminal’s wire gauge spec matches your wire. For ferrules, use the correct ferrule diameter for the wire.
-
Place the Connector in the Crimp Tool: Most crimping tools have color-coded or labeled jaw sections for the different sizes. Place the connector’s barrel in the appropriate notch of the crimp tool. For insulated terminals, usually the tool compresses the barrel underneath the insulation. For open barrel, position the terminal so the crimp forms correctly (this may take a little practice to orient). Many ratchet crimpers will hold the connector in place lightly so you can insert the wire.
-
Insert the Stripped Wire into the Connector: Push the bare wire in fully so that all strands are inside and reach the end of the metal barrel. This is critical – you want maximum contact. For terminals with insulation grip, also make sure the insulation is positioned under the larger crimp wings if present (so the second crimp will grab the insulation).
-
Crimp Firmly: Squeeze the crimping pliers handles fully (for ratcheting types, squeeze until the ratchet releases). This will compress the barrel around the wire. In a proper crimp, the tool’s die may create an indentation or reshape the barrel (for example, into a hex or trapezoid shape). The connection is now mechanically secured. Do not crimp twice on the same spot, as that can fracture the connector – if the first crimp was not positioned correctly, you should cut it off and do it again with a fresh connector. On a ratcheting tool, never release mid-crimp; always complete the cycle.
-
Inspect the Crimp: Check that the wire is snug and doesn’t pull out (give it a firm tug test). Also verify that the crimp indents look proper. For insulated terminals, ensure you didn’t cut through the insulation and that the crimp is centered on the metal barrel. For open-barrel, the “wings” should be neatly wrapped and compressed over the wire strands, and the insulation wings (if any) over the insulation. No strands should be sticking out. A well-made crimp will have the wire visible maybe just at the end, and you might see a slight extrusion of wire in the inspection hole (if the connector has one). If anything looks off, it’s best to redo it – one benefit of using affordable crimp connectors is that you can simply try again if needed.
-
Add Insulation/Seal (if applicable): If you used non-insulated terminals, now is the time to cover the connection. Slide on a piece of heat shrink tubing over the crimp and shrink it, or use electrical tape, to insulate the connection and provide strain relief. Many non-insulated crimping tool users will crimp, solder optionally (some choose to add a bit of solder as backup, though generally not needed if crimp is correct), and then heat shrink. For heat shrink crimp connectors, use a heat gun to shrink the built-in tubing until it snugly seals the wire and connector. This provides a waterproof, corrosion-resistant seal over the crimp.
By following these steps with the proper crimping tools, you’ll achieve crimps that are electrically sound and mechanically robust. It might take a few tries to get the hang of using a new wire crimper, but once you do, you’ll never want to go back to makeshift methods. Crimping properly not only gives you peace of mind that your wire connections won’t fail, but it also makes your DIY work look clean and professional.
👉See details and availability: Haisstronica Ratchet Wire Terminal Crimping Tool (AWG 22–10).

Conclusion
When you find yourself without a crimper, you do have some alternatives – from pliers to soldering – to temporarily get the job done. However, as we’ve shown, these substitutes for a proper crimping tool come with significant compromises in strength, safety, and longevity. Nothing truly beats using the right crimping tool for the connector. For DIY and home users, investing in a quality wire crimping tool (or a set of crimpers for different needs like insulated and non-insulated terminals) is one of the best decisions you can make if you do any amount of wiring. With the proper tool, your crimped connections will be safe, durable, and professional-grade.
Rather than asking “what to use instead of a crimper,” the better question might be “which crimper tool should I use for this task?” We hope this guide answered both – giving you insight into emergency methods and convincing you of the value of proper crimping. For those ready to upgrade their toolkit, the recommended Haisstronica crimping tools mentioned (for insulated connectors, heat shrink terminals, and open-barrel terminals) are excellent choices that cover the vast majority of DIY applications. They are designed with the home user in mind – easy to use, yet delivering consistent results comparable to high-end professional tools. By using such dedicated electrical crimping tools, you’ll ensure every wire crimp you make is one you can trust.
Our Top User-friendly Picks
Crimp heat-shrink connectors fast and clean with the Haisstronica crimping tool. Whether you’re wiring or rewiring boats, cars, or home appliances, this professional crimper delivers secure, uniform terminations in a single squeeze. Precision-forged jaws apply consistent pressure to prevent splits and insulation damage, producing factory-grade results every time. Unlike generic crimpers that crush or distort connectors, the Haisstronica wire crimper creates tight, reliable seals that withstand vibration and moisture. Choose a durable, ergonomic crimping tool engineered for speed, accuracy, and repeatable performance on every connection.
👉Get cleaner joints with the Haisstronica Ratchet Wire Terminal Crimper, AWG 22–10, optimized for heat-shrink terminals.

👏 You may be interested in the following:
- Cable crimping tool. Everything You Need to Know
- How to Crimp Wires Like a Pro: Tools, Tips, and Safety Guide
- Why Mid-Century Homes Need Special Wire Crimping Techniques
Need a Reliable Crimping Tool?
Browse our selection of ratcheting crimping tools designed for DIYers and professionals.
Shop Crimping Tools →