Crimping is an essential skill for any DIYer working on wiring projects – when done right, a crimped connection is secure, low-resistance, and long-lasting. However, a few common crimping mistakes can turn a good connection into a weak link. The good news is that each mistake has a quick fix (often taking just a few seconds). In this Haisstronica guide, we’ll walk through the five most deadly crimping mistakes and how to fix them fast. Whether you’re using basic crimp pliers or high-quality ratcheting crimpers, avoiding these errors will ensure your crimp connectors are safe and reliable. Let’s dive in!
Mistake #1 – Using the Wrong Cavity or Connector Size (AWG Mismatch)

One of the biggest pitfalls is using a crimp connector or crimp tool cavity that doesn’t match your wire’s gauge. Each crimp terminal is designed for a specific wire size (measured in AWG), and using the wrong size can spell trouble. If the connector is too large for the wire, the crimp will be loose and the wire can pull out easily. If it’s too small, you might not even fit the wire in, or you’ll end up crushing the connector and the wire strands, causing high resistance and heat buildup. In short, an AWG mismatch leads to poor electrical contact and an unreliable connection.
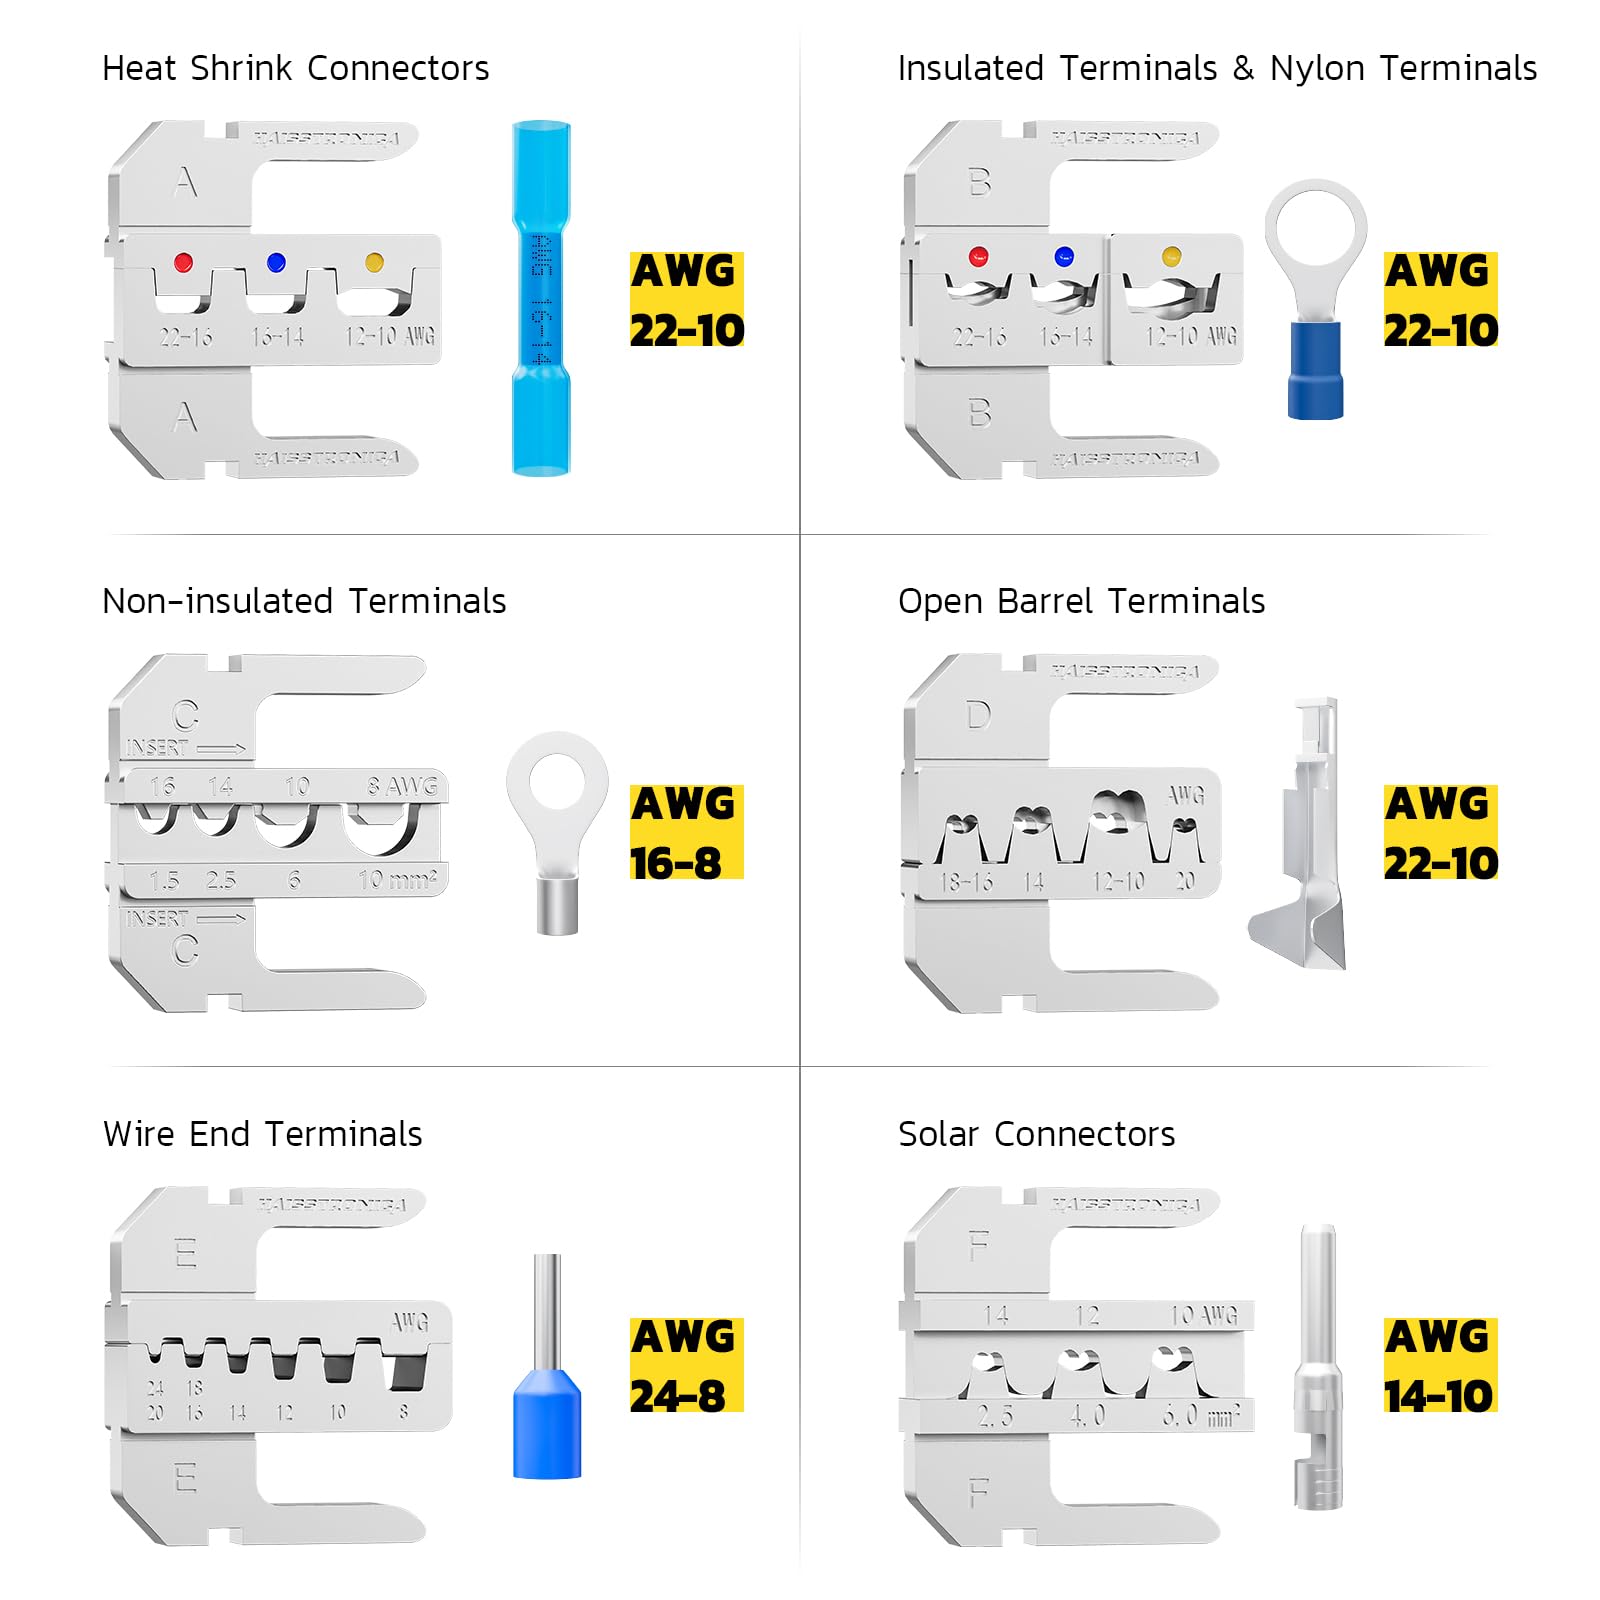
How to Fix it: Always match the connector to your wire gauge and use the proper notch on your crimping tool for that gauge. Most wire crimp tools have multiple cavities (labeled by wire size or color-code) – select the one that corresponds to your wire and terminal. For insulated terminals, remember the universal color codes: for example, red sleeves typically fit 22–16 AWG, blue for 16–14 AWG, and yellow for 12–10 AWG. Double-checking that you have, say, a 16 gauge wire in a blue connector, crimped in the 16–14 AWG slot, takes only a few seconds but guarantees a snug fit. Using quality crimping pliers or ratchet crimping tools with clear markings will help prevent this mistake. If you realize you’ve chosen the wrong connector size, the 10-second fix is simply to cut it off and crimp on a correctly sized connector – a small redo now can prevent big problems later.
Mistake #2 – Incorrect Strip Length & Not Inserting the Wire Fully

Another common crimping mistake happens before you even make the crimp: stripping the insulation to the wrong length. If you strip off too little insulation, there won’t be enough bare wire to securely grab inside the connector. The crimp might only bite on the insulation or a few strands, leading to a weak electrical contact. Conversely, strip off too much insulation and you’ll have exposed conductor hanging out of the connector barrel – this can cause shorts to nearby wires and leaves the copper unprotected and prone to corrosion. In both cases, the wire likely isn’t fully seated in the connector, which means the crimped joint will be subpar. Many DIYers also make the mistake of not pushing the wire all the way into the terminal. If the stripped wire isn’t inserted until it bottoms out, part of the crimp barrel will be empty – resulting in a loose crimp that could let the wire slip out.
How to Fix it: Measure twice, strip once. Check the connector’s barrel length and strip about that much insulation from the wire (typically, only 1/4" to 3/8" for common terminals, or around 6–10 mm, depending on connector size). The goal is that once inserted, no bare wire is protruding, but also no insulation is jammed inside the metal barrel. When you insert the wire, give it a firm push so that the insulation butts up to the barrel end; you might even feel it hit the back of a closed-end connector. Ideally, about 1–2 mm of copper should be visible through the inspection hole or at the end of the barrel – just enough to verify the wire reached the end. If you see a lot of bare wire exposed, you’ve stripped too much (trim the wire and try again). If the wire doesn’t reach the crimp area, strip a bit more. Taking these few extra seconds to get the strip length right will ensure a connector crimping job that is electrically solid and mechanically strong. Always use a good wire stripper tool to avoid nicking the conductors.
Mistake #3 – Releasing Halfway (Incomplete Crimp) or Using Non-Ratcheting Tools Improperly

It’s extremely important to fully crimp the connector to the intended compression – yet a lot of DIYers err by not squeezing the crimper handles completely. This half-press crimp (stopping before the crimp is fully compressed) results in an under-crimped connection. Essentially, the wire is only partially deformed with the terminal, leading to a loose fit. A connection like this might feel barely secure initially, but it can slip out with a slight tug or vibrate loose over time. Under-crimping raises the electrical resistance and can cause the joint to heat up under load. Why does this happen? Often the culprit is using non-ratcheting crimping pliers that rely on hand feel – a beginner might think “that’s tight enough” and release too early. In some cases, using the wrong tool or die can similarly result in insufficient pressure applied. On the flip side, other folks over-crimp by squeezing too hard or using an improper tool, crushing the connector and cutting into the wire. Both under- and over-crimping are problematic, but the under-crimp (not completing the crimp) is especially sneaky because it’s not always obvious until the wire falls out or fails a tug test.
How to Fix it: Whenever you crimp, go the full cycle. If you’re using a hand crimper (non-ratchet), make sure to close the tool completely on the connector – you might feel a bit of a “give” when the metal finally deforms fully. Don’t stop at the first hint of resistance; finish the crimp with firm pressure. The best solution, though, is to use a ratcheting crimping tool. Ratcheting crimpers have an internal mechanism that won’t release until the crimp is fully compressed, ensuring you complete the crimp every time. This not only prevents under-crimping but also applies uniform pressure so you don’t over-crimp. Essentially, the ratchet guarantees a perfect wire crimping action – when the tool clicks open, you know the crimp is done correctly. Upgrading from old-school plier-style crimpers to a ratcheting model can instantly elevate the quality of your crimps (and it’s one of the “10-second fixes” that permanently solves a common mistake). After crimping, always perform a quick tug test on the wire – a properly done crimp should hold even with moderate force. If it pops out, it was under-crimped (or the wrong size, per Mistake #1) and should be redone.
Mistake #4 – Soldering (Tinning) Wires Before Crimping, or Only Crimping the Conductor without Insulation Support
10-SECOND FIX · TECHNIQUE, NOT ANOTHER PRODUCT
Cut off the tinned end and start with fresh bare strands
Strip again, crimp the conductor and insulation support in their separate zones, then tug-test. Solder before crimping cannot be “pressed out.”
This mistake is actually a pair of related missteps revolving around how the wire and connector interface:
-
“Tinning” the wire before crimping: Some DIY enthusiasts mistakenly pre-solder (tin) the stranded wire thinking it will improve conductivity or help the wire hold its shape. In reality, this is a big no-no in crimping. When you crimp onto a tinned wire, the solder metal is soft and will cold-flow under the pressure of the crimp over time. The result is a loose connection as the solder yields and the strands are no longer tightly pressed by the connector. Moreover, soldered wire becomes rigid, defeating the purpose of a crimped joint’s flexibility – it can crack under vibration. Industry standards explicitly forbid crimping onto soldered wire: “Crimping of solder tinned stranded wire is prohibited.” Doing so can lead to overheating and failure of the connection. In short, never tin your wires if you plan to crimp; crimping is designed for plain stranded copper.
-
Not crimping the insulation (no strain relief): Many electrical connectors, especially open-barrel terminals and insulated rings/spades, are designed to crimp in two places – once on the bare conductor and once on the insulation. The insulation crimp (also called the strain relief) is crucial for mechanical support. If you only crimp the conductor and neglect the insulation, the wire isn’t secured against flexing. The point where the wire meets the back of the connector will become a stress concentration. Under vibration or pulls, the wire can break or the conductor can start to slide out of the crimp since nothing is holding the insulation. Skipping the insulation support crimp is essentially leaving the wire to wiggle inside the connector’s sleeve. Sometimes this mistake happens due to using the wrong tool – e.g., using a conductor-only crimper on an insulated terminal, or not adjusting the tool so that it also compresses the insulation.
How to Fix it: The fixes here are straightforward and quick:
-
Do NOT tin wires for crimping. Simply insert the stripped stranded wire directly into the connector as intended. Trust the crimp to make the connection. Modern crimp terminals create a gas-tight cold weld with the wire strands, so additional solder is not needed (nor wanted). If you accidentally tinned a wire, your best bet is to cut it off, strip a fresh end, and crimp again properly – it literally takes seconds but can save your circuit. Remember, electrical crimp connectors are tested and rated for bare stranded conductors; deviating from that is asking for failure.
-
Use connectors and tools that provide insulation strain relief. If you’re using open-barrel terminals (common for automotive or PCB connectors), make sure your crimp tool has a die for the insulation wings, or crimp them manually in a second step. For standard insulated butt connectors, choose a crimp tool that’s designed to handle the insulation — often indicated by a larger crimp nest for the insulation ferrule. A proper insulation crimp will firmly grip the wire’s jacket without cutting it, providing strain relief and vibration resistance. Essentially, the insulation should be crimped in its own portion of the terminal separate from the bare wire crimp. When done right, you can actually see the insulation firmly pinched by the connector’s back end. This extra support means any pulling stress on the cable is transferred to the insulation (which is more robust) and not to the electrical contact. It prevents the conductor from bearing all the stress.
If you realize your connector has an insulation support that you didn’t crimp, you can often go back with the appropriate tool and crimp the insulation portion after the fact (for open-barrel, carefully bend the tabs over the insulation and crimp). However, it’s best to do it all in one go with the right tool. Using ratcheting wire crimpers that are designed for your terminal type will ensure both crimps (conductor and insulation) are completed in one cycle. It only takes an extra moment to set up but dramatically improves the durability of the connection.
Mistake #5 – No Sealing or Strain Relief (Ignoring Environmental Factors & Vibration)
The final mistake is often an afterthought – you might make a decent crimp, but then fail to protect it from the environment and mechanical stress. If your connection is going to be in any harsh or mobile environment (car engine bays, boats, outdoors, or even an appliance that vibrates), neglecting to seal and support the crimp can lead to premature failure. Two aspects to consider here are moisture ingress and strain relief beyond the connector:
-
Ignoring moisture/corrosion protection: A bare crimped connection, especially one with exposed metal (like an uninsulated splice or a wire end going into a lug), can corrode quickly if water, salt, or humidity reach it. Corrosion will increase electrical resistance and eventually could break the connection. Many DIYers skip the simple step of adding insulation or sealant over a crimp. For instance, using a standard butt splice in an automotive or marine application without any sealing is asking for trouble – the next time it rains or the engine bay gets wet, that connection can start corroding internally. Even indoors, in high-humidity areas or where condensation is possible, unsealed crimps are vulnerable. Essentially, failing to weather-proof an electrical crimp is a mistake that might not show immediately, but months down the line you might find the wire turned green with oxidation and the connection failing.
-
Ignoring strain relief for cables: While earlier we discussed the built-in strain relief of the connector (Mistake #4), here we mean the external support of the wire. If a crimped connection is just left dangling in mid-air or bearing weight/tension, mechanical stress can cause the wire to fatigue right at the crimp. Imagine a heavy gauge wire crimped to a ring terminal on a vibrating machine – if the wire isn’t secured, its constant movement can eventually fracture the strands at the end of the crimp barrel. Many people make the mistake of not securing wires near the terminals. Likewise, not providing a cable strain relief (like a clamp or grommet) when a wire goes into a connector housing can let it flex too much. Over time, vibration can literally wiggle a crimped wire to failure if no strain relief is present.
How to Fix it: The fixes here involve a bit of foresight, but they are quick to implement:
-
Seal your connections. For any crimp that might see moisture or dirt, use heat shrink tubing or, even better, heat shrink crimp connectors that have adhesive lining. These create a waterproof seal over the joint. For example, heat-shrink butt connectors will melt adhesive as you heat them, sealing the wire entry points and also adding extra strain relief when the tubing cools and hardens. This step takes only a few seconds with a heat gun or lighter, but drastically improves the longevity of the connection. If you don’t have heat-shrink connectors, you can manually apply a piece of heat-shrink tube over a regular crimp: slide it on before crimping, then after the crimp is done, center the tubing over the connection and shrink it. Another option for multi-pin connectors is to use dielectric grease on the contacts and weatherproof boots or housing seals that come with the connector system. The key point is to keep water and contaminants out of the crimped interface – a properly crimped joint is gas-tight, but the surrounding metal can still corrode if exposed. A little sealing goes a long way. (For outdoor junctions, also ensure you position the connection in a way water won’t directly wick into it – drip loops can help.)
-
Provide strain relief for wiring harnesses: Secure the wires on either side of the crimp. You can use cable ties, clamps, or routing through harness anchors so that the crimped connection isn’t bearing the full brunt of any movement. In panels or junction boxes, use cord grips or strain relief fittings for cables so that any tug on the cable doesn’t pull on the terminals. In automotive applications, clip the wires to the frame or use P-clamps/routing channels. Essentially, support the wire near the connector so the connector isn’t the flex point. This prevents the wire from bending right at the crimp repeatedly. Also, leave a little slack (service loop) rather than a taut line – slack acts as a buffer for movement and thermal expansion. These practices prevent the crimp from experiencing constant mechanical stress.
By taking these steps, you address both the environmental and mechanical factors that can degrade a crimped connection. The effort is minimal: sliding on a heat shrink tube or using pre-insulated heat shrink terminals, plus spending a few seconds to anchor the wires, can literally be done in 10–20 seconds during your install. The result will be a crimp electrical connector that remains solid for years even in tough conditions.
By avoiding these five deadly mistakes, you’ll vastly improve the safety and durability of your DIY wiring projects. Crimping is meant to be a fast and effective way to join wires – and indeed each of the fixes above is quick to implement with the right approach. The key takeaways are: use the correct size connectors, prepare your wires properly, utilize the right crimping tool (preferably a ratcheting crimper) for a full crimp, keep solder away from crimps, and protect your finished connection from the environment. With these best practices, your wire crimping work will look professional and, more importantly, perform reliably.