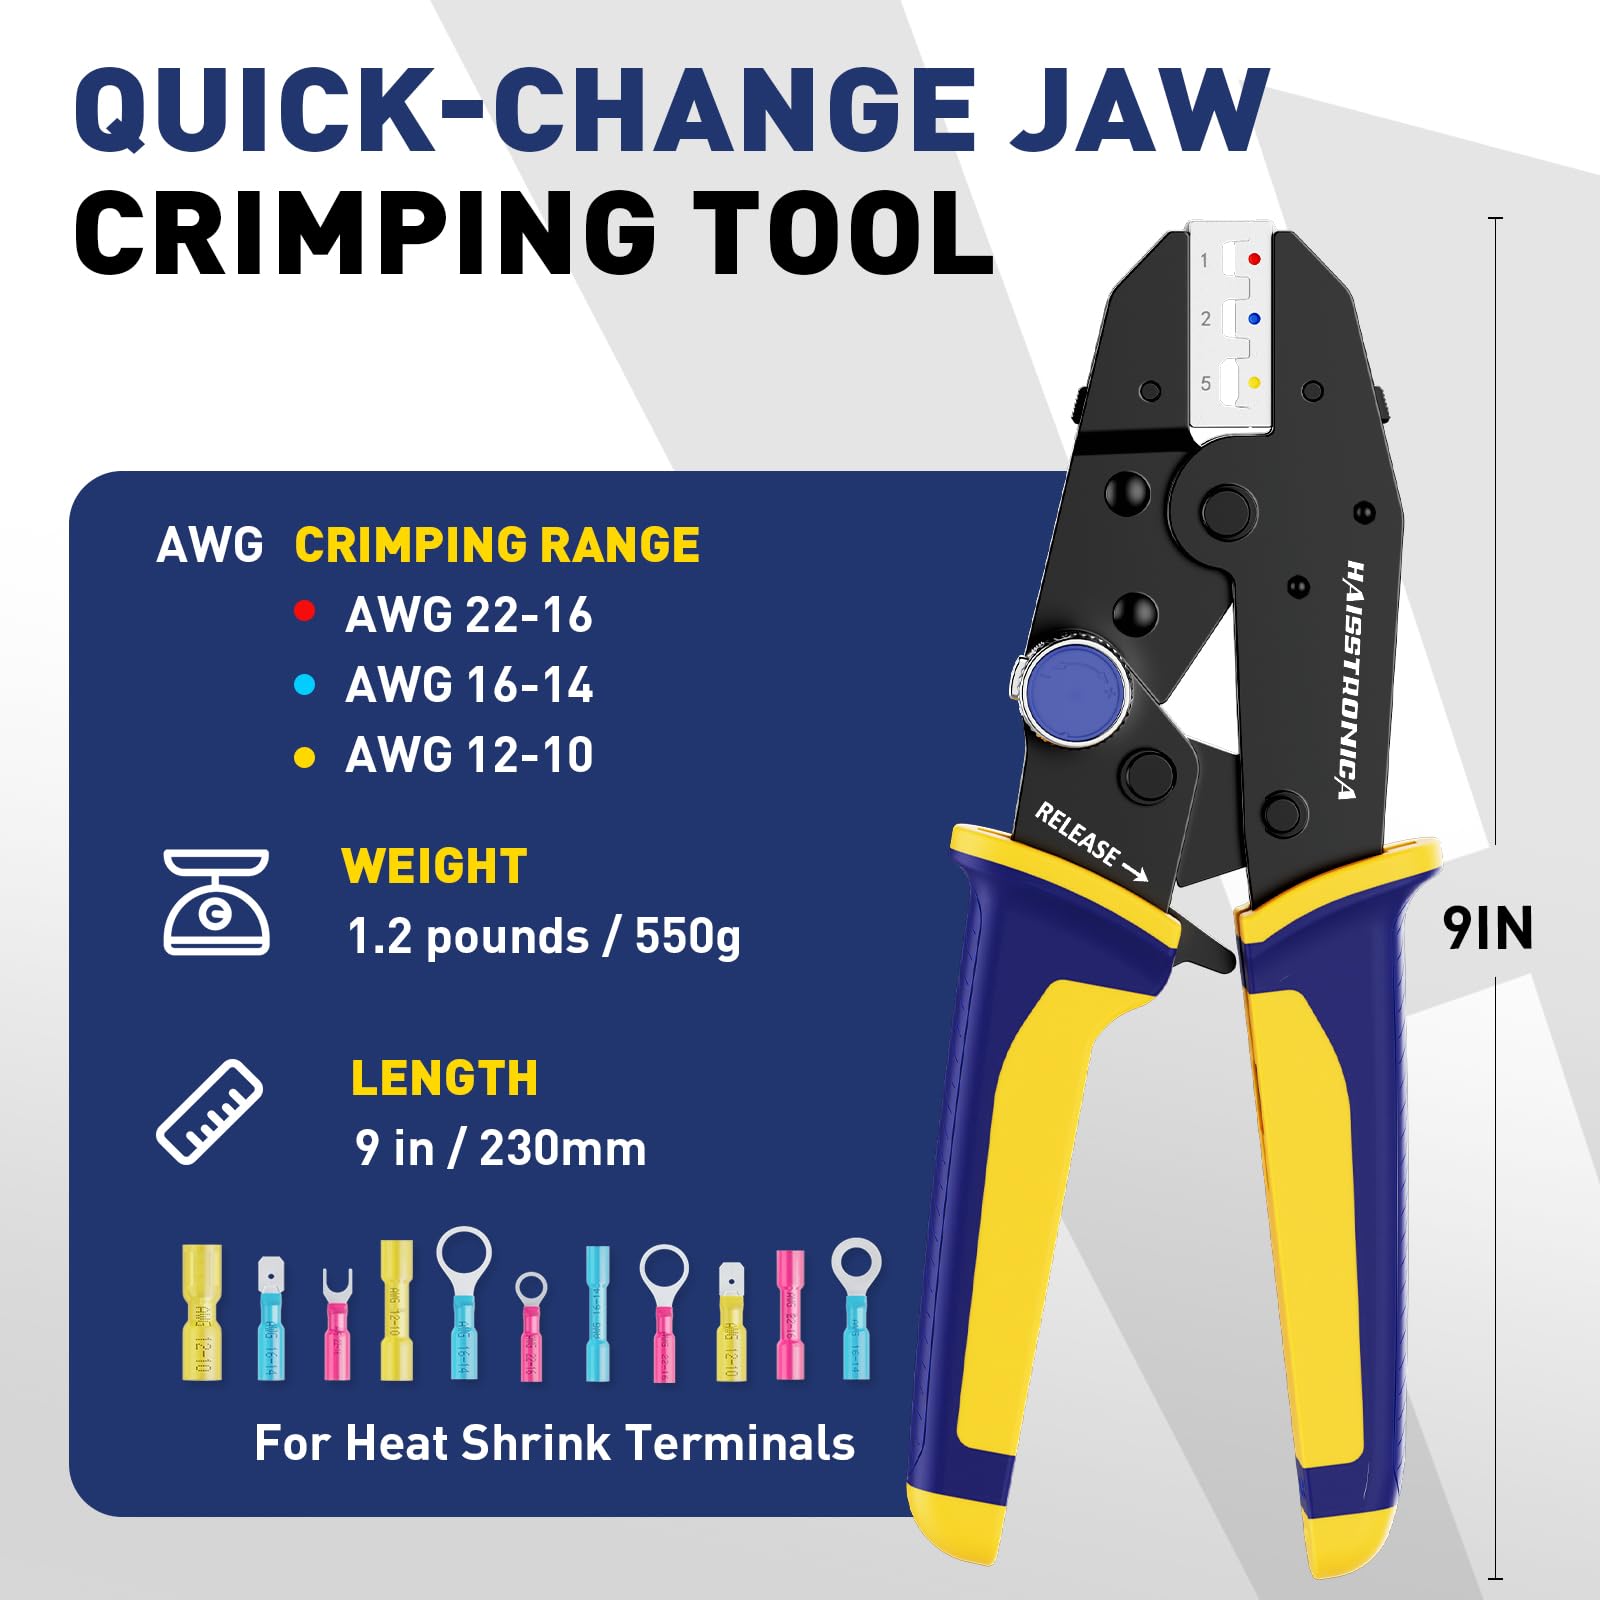


Bad wire crimps are a hidden menace in electrical projects. A crimp that looks “okay” at first glance can later cause intermittent power, overheating, or outright connection failure. In this guide, we’ll explain how to recognize the telltale signs of a poor crimp and how to fix it. From a visual checklist of what to look for, to simple tests that confirm a crimp’s integrity, to the crimping technique that actually works – we’ve got you covered. By the end, you’ll know how to use your crimping tool like a pro to achieve secure, long-lasting connections. (Using a reliable ratcheting wire crimping tool, such as Haisstronica’s Ratchet Wire Terminal Crimping Tool for AWG 22–10 heat shrink connectors, is key to avoiding bad crimps from the start.)
👉Shop terminal crimpers tools—Haisstronica performance you can trust.

Visual Checklist for Identifying Bad Crimp Connections
The first step in troubleshooting is a visual inspection of your crimped connectors. A good crimp will be neat and secure, whereas a bad crimp often has visible red flags:
-
Wire not fully inserted: In a proper crimp, you should see a bit of the bare conductor protruding just beyond the crimp barrel – usually about 1–2 mm (roughly a wire’s diameter). Both the conductor and a small “brush” of strands should be visible at the end of the crimp, indicating the wire was stripped to the correct length. If you cannot see any copper at the end (the conductor is buried or flush), or if too much wire is sticking out, the crimp is suspect. Tip: Using the correct strip length ensures the conductor extends slightly past the barrel without leaving excess wire exposed – a sign of a professional crimp. And remember, always use a proper wire crimping tool to make a clean crimp without crushing or cutting the strands.
-
Insulation positioning: The wire’s insulation should butt up to the edge of the barrel, but not inside the conductor crimp. You want the metal barrel crimping only the stripped wire strands, not the insulation. At the same time, the insulation often is secured by a secondary crimp (on insulated terminals) or it should at least be very close to the barrel for support. In a good crimp, you can typically see both the stripped conductor and a bit of the insulation at the entry – ensuring the connector grips the wire well without pinching the insulation. If you notice insulation crimped under the barrel or the insulation is cut/damaged, that’s a bad crimp. For example, a common mistake is stripping too little, causing the insulation to get jammed into the connector; this prevents a solid metal-to-metal contact and weakens the connection. On the other hand, stripping too much insulation leaves excess bare wire (which can lead to shorts or corrosion). In short, the wire insulation should be just outside the metal crimp – providing strain relief but not interfering with the conductor crimp. Using a quality wire stripper and the right connector size helps get this right every time.
-
Barrel seam and shape: Examine the crimp barrel itself. Is the seam completely closed and evenly crimped? A proper crimp often has a uniform indent from the die with no cracks or uneven bends. The connector barrel should wrap tightly around the wire, essentially cold-welding it into one solid piece. If you see a gap in the barrel seam (for open-barrel terminals) or the crimp looks lopsided, that connection is likely poor. Likewise, check for distortions or cracks in the connector metal. Over-crimping (too much force) can create hairline cracks or a “flash” of extruded metal, while under-crimping leaves the barrel rounded and loose. No sharp edges, no open seams, no deformities – the crimp should appear clean and tightly formed around the wire. Using a calibrated ratcheting crimp tool ensures the proper compression every time, preventing these issues. Cheap or incorrect crimpers may not apply even pressure, resulting in a misshapen crimp.
-
Stray wire strands: Look closely for any loose strands poking out. All of the wire’s strands should be captured inside the crimp barrel. If even a couple strands didn’t get crimped and are sticking out or can wiggle, the connection’s current-carrying capacity and strength are greatly reduced. This often happens if the wire was not inserted fully or was at an angle during crimping. A good crimp will have the conductor strands compressed into a tidy bundle (often forming a solid “coin” or hex shape in cross-section). Any frayed or escaping strands are a sign of a bad crimp that could overheat or break. Before crimping, always insert the wire straight and all the way in. If strands splay, remove and re-twist them, or use a ferrule. A professional crimping tool with the correct die size will enclose all strands firmly, avoiding this problem. Haisstronica’s ratcheting crimper, for instance, is designed to evenly gather and crimp every strand for a rock-solid connection.
-
Connector and wire as one piece: A quick qualitative check – the lug and wire should feel like a single solid piece when you tug or bend it slightly. There should be no movement of the wire within the connector, and the crimped barrel shouldn’t spin or wiggle on the wire. If the terminal feels in the least bit loose on the wire, that crimp is no good. A proper crimp essentially creates a gas-tight bond between the metal terminal and conductor. Manufacturers note that when done right, the wire and connector achieve one homogeneous metal piece. So, if your visual inspection finds any of the above issues – wire not visible or too much showing, insulation in the wrong place, open seams, damaged barrel, or stray strands – consider that crimp failed. Cut it off and redo it with the right technique. Catching these visual cues early prevents bigger problems later. And when you crimp wires correctly using a high-quality tool, you’ll rarely see these defects. Every well-done crimp is one more safe and reliable connection in your project – a goal Haisstronica tools are made to help you achieve!
(After inspecting all your crimped wire connectors with this checklist, you’ll have a clear idea which ones are sound and which need rework. This saves time and ensures your electrical system is built on secure connections. Always remember: quality starts with using the right crimping tool and proper technique – a small upfront effort that pays off with trouble-free performance.)
👉Reach for an electric wire crimper—Haisstronica control, compact size.

Tests That Prove It: Verifying Crimp Connection Quality
Even if a crimp looks okay, we need to confirm it’s mechanically and electrically sound. Here are a few simple tests to prove whether a connection is good or if it’s a dud in disguise. Performing these checks will help catch marginal crimps that visual inspection alone might miss – especially critical in automotive, marine, or aircraft wiring where vibrations and high currents are present. (Spending a minute on testing each connection is worth it. It’s far easier to fix a bad crimp now than to troubleshoot an electrical fault later! Using a dependable electrical crimping tool from the start minimizes the chance of bad crimps, but testing provides extra peace of mind.)
-
Tug Test (Pull Test): This is the quickest way to verify the mechanical strength of a crimp. Grab the wire just behind the connector and give it a firm tug (don’t yank violently, but apply a steady, significant pull as if you were trying to pull the wire out). A proper crimp should hold the wire firmly – no movement at all. If the wire slides out or feels even slightly loose, the crimp is compromised. In that case, do not trust it – cut it off and crimp on a new connector with better technique. Industry standards (like UL 486A/B and others) specify minimum pull-out forces for crimped joints based on wire gauge (for example, a crimp on 18 AWG wire should hold with around 20–30 lbs of force). You don’t need to measure force in the field, but the connection should be strong enough that a solid tug doesn’t budge it. Essentially, if you can pull it apart by hand, it’s a bad crimp. Many professionals make it a habit to do a quick tug test on every crimped terminal during installation. If you’re using a good ratcheting crimping tool, you will rarely have one fail the pull test – but test anyway! It’s better to find a weak crimp now than have it vibrate loose later.
-
Continuity and Resistance Check: The electrical test for a crimp is to ensure low resistance. Using a multimeter, check that there is continuity through the crimp from the wire to the terminal on the other end. A good crimp will show essentially zero resistance (very close to 0 Ω) because it’s a tight metal-to-metal bond. If your meter shows a higher resistance or intermittent continuity when you wiggle the connector, that indicates a problem – perhaps only a few strands are conducting or there’s oxidation due to a poor crimp. In practice, most bad crimps will still pass a basic continuity test initially (since even a flimsy connection might complete a circuit with no load). The real issue is voltage drop under load – a bad crimp has higher electrical resistance, which will cause it to heat up when current flows, and potentially lead to erratic performance. One commercial electrician’s saying is, “It might pass continuity, but fail under load.” If you suspect a crimp is marginal, you can do a voltage drop test: run a significant current through the connection (for example, turn on the device it powers) and measure the voltage across the crimp – it should be near 0 V. Any noticeable voltage drop (or heat felt at the crimp) is a red flag that the crimp’s resistance is too high. Note: In critical applications, thermographic cameras are even used to spot hot spots from high-resistance crimps. For our purposes, just know that a solid crimp conducts electricity as well as an intact wire. If it doesn’t, redo it. Using the correct size connector and a quality wire crimp tool greatly reduces the chance of a high-resistance crimp. When the crimp barrel fully envelops the strands, the connection will handle current smoothly. Always double-check dubious connections – a quick meter test can save you from a hidden voltage drop that turns into a melted connector later!
-
Environmental and Vibration Test: This might not be a single “test” you perform on the bench, but it’s worth considering how the crimp will hold up in real conditions. A crimp that passes the above tests initially could still fail over time due to vibration, thermal cycling, or corrosion if it wasn’t truly gas-tight. For instance, in automotive or aircraft settings, wires are subject to constant movement and temperature changes. A marginal crimp can become an intermittent connection under these stresses. One way to vet your crimps is to flex the wire back and forth a few times and see if the connection remains tight. Also inspect after a period of use – any sign of discoloration or melting of insulation near the crimp could indicate it’s been running hot (a result of high resistance in a bad crimp). Professional harness manufacturers sometimes conduct pull tests and microsection inspections on sample crimps from each batch to ensure quality. While you may not go to that extent for DIY or small-scale work, it underlines the importance of reliable crimp methods. If you know a connection will face harsh conditions (water, heat, vibration), consider using heat-shrink crimp connectors or adding heat-shrink tubing over the crimp for strain relief and sealing. And definitely use a professional wire crimping tool to form the tightest crimp possible. Haisstronica’s heat-shrink connectors combined with their ratcheting crimper are a great solution here – they provide both a strong crimp and a sealed, insulated result, improving longevity.
In summary, test your crimps. A quick pull test and electrical check can catch nearly all bad connections. If a crimp fails any test – even if it looked fine – fix it now. It’s not worth gambling on a poor connection that could cause a device to fail or even an electrical fire. By using proper tools and verifying each crimp, you’ll ensure every wire connector in your project is safe and sound. (Regular testing paired with high-quality tools is a one-two punch against bad crimps. Haisstronica encourages this practice: their crimping tool kit makes it easy to crimp correctly, and a simple tug on each newly crimped wire will confirm you’ve got the job done right. Don’t skip this step – your wiring will be as reliable as the crimps you make!)
👉Prefer an electrical wire crimper? Haisstronica delivers repeatable compression.

Crimping Technique That Works Every Time (How to Fix and Prevent Bad Crimps)
The ultimate “fix” for bad crimps is actually preventing them with the right crimping technique. If you’ve identified a poor connection, the best course is to cut it off and re-crimp a new connector using proper methods – trying to re-crimp or “salvage” a bad crimp often doesn’t work well. In this section, we’ll outline a step-by-step crimping procedure that virtually guarantees a good connection. Whether you are crimping a tiny spade connector or a heavy-duty ring terminal, the fundamentals are the same. Master this technique and you’ll drastically reduce the chance of ever dealing with a bad crimp again. (Crimping is both a science and an art – but it’s easy to get right with a bit of know-how. Following these steps with a quality crimp tool for wires will give you factory-quality results. Say goodbye to loose wires and failed connections!)
-
Choose the Right Connector for the Wire: Start by matching your connector to your wire gauge and application. A common cause of bad crimps is using a connector that’s too large or too small for the wire. Always check the wire gauge rating on the terminal (often color-coded: e.g., red insulation for 22–16 AWG, blue for 16–14 AWG, yellow for 12–10 AWG, etc.). Using the wrong size will either result in an overly loose crimp or one that you have to over-compress (damaging the wire). Also select the right type of connector for the job – for instance, use butt splice crimp connectors to join wires end-to-end, spade or ring crimp connectors for attaching to screw terminals, and heat shrink insulated connectors for moisture-prone environments. Having the proper connector ensures a good fit in the crimp tool and a secure grip on the wire. Tip: Quality connectors matter – cheap thin terminals deform easily. Opt for reputable brands or the connectors provided by Haisstronica, which are designed to crimp solidly with their tools. By starting with the right connector, you set yourself up for success.
-
Prepare the Wire Correctly: Cut the wire to the needed length and strip the end. Strip off the insulation according to the connector’s requirement – usually about ¼ inch (6 mm) or as specified. The stripped length should allow the bare wire to fill the crimp barrel completely without excess wire sticking out. As mentioned earlier, roughly 1–2 mm of wire might protrude beyond the metal crimp when inserted – that’s ideal. If you strip too little, the insulation will interfere with the crimp; too much, and a “bird’s nest” of strands will be exposed. Use a good wire stripper tool to avoid nicking the strands. After stripping, twist the wire strands gently so they stay together (unless you’re using a ferrule or the connector is a solderless pin that requires untwisted strands). Proper wire prep also means the wire is clean – no corrosion or oils. If the copper is tarnished, give it a quick brush or trim to fresh copper. This step is crucial: many bad crimps start with poor wire prep. It takes just seconds to strip correctly and align the strands, but it makes a huge difference. A well-prepared wire in a proper connector practically begs to be crimped perfectly by your crimping tool.
-
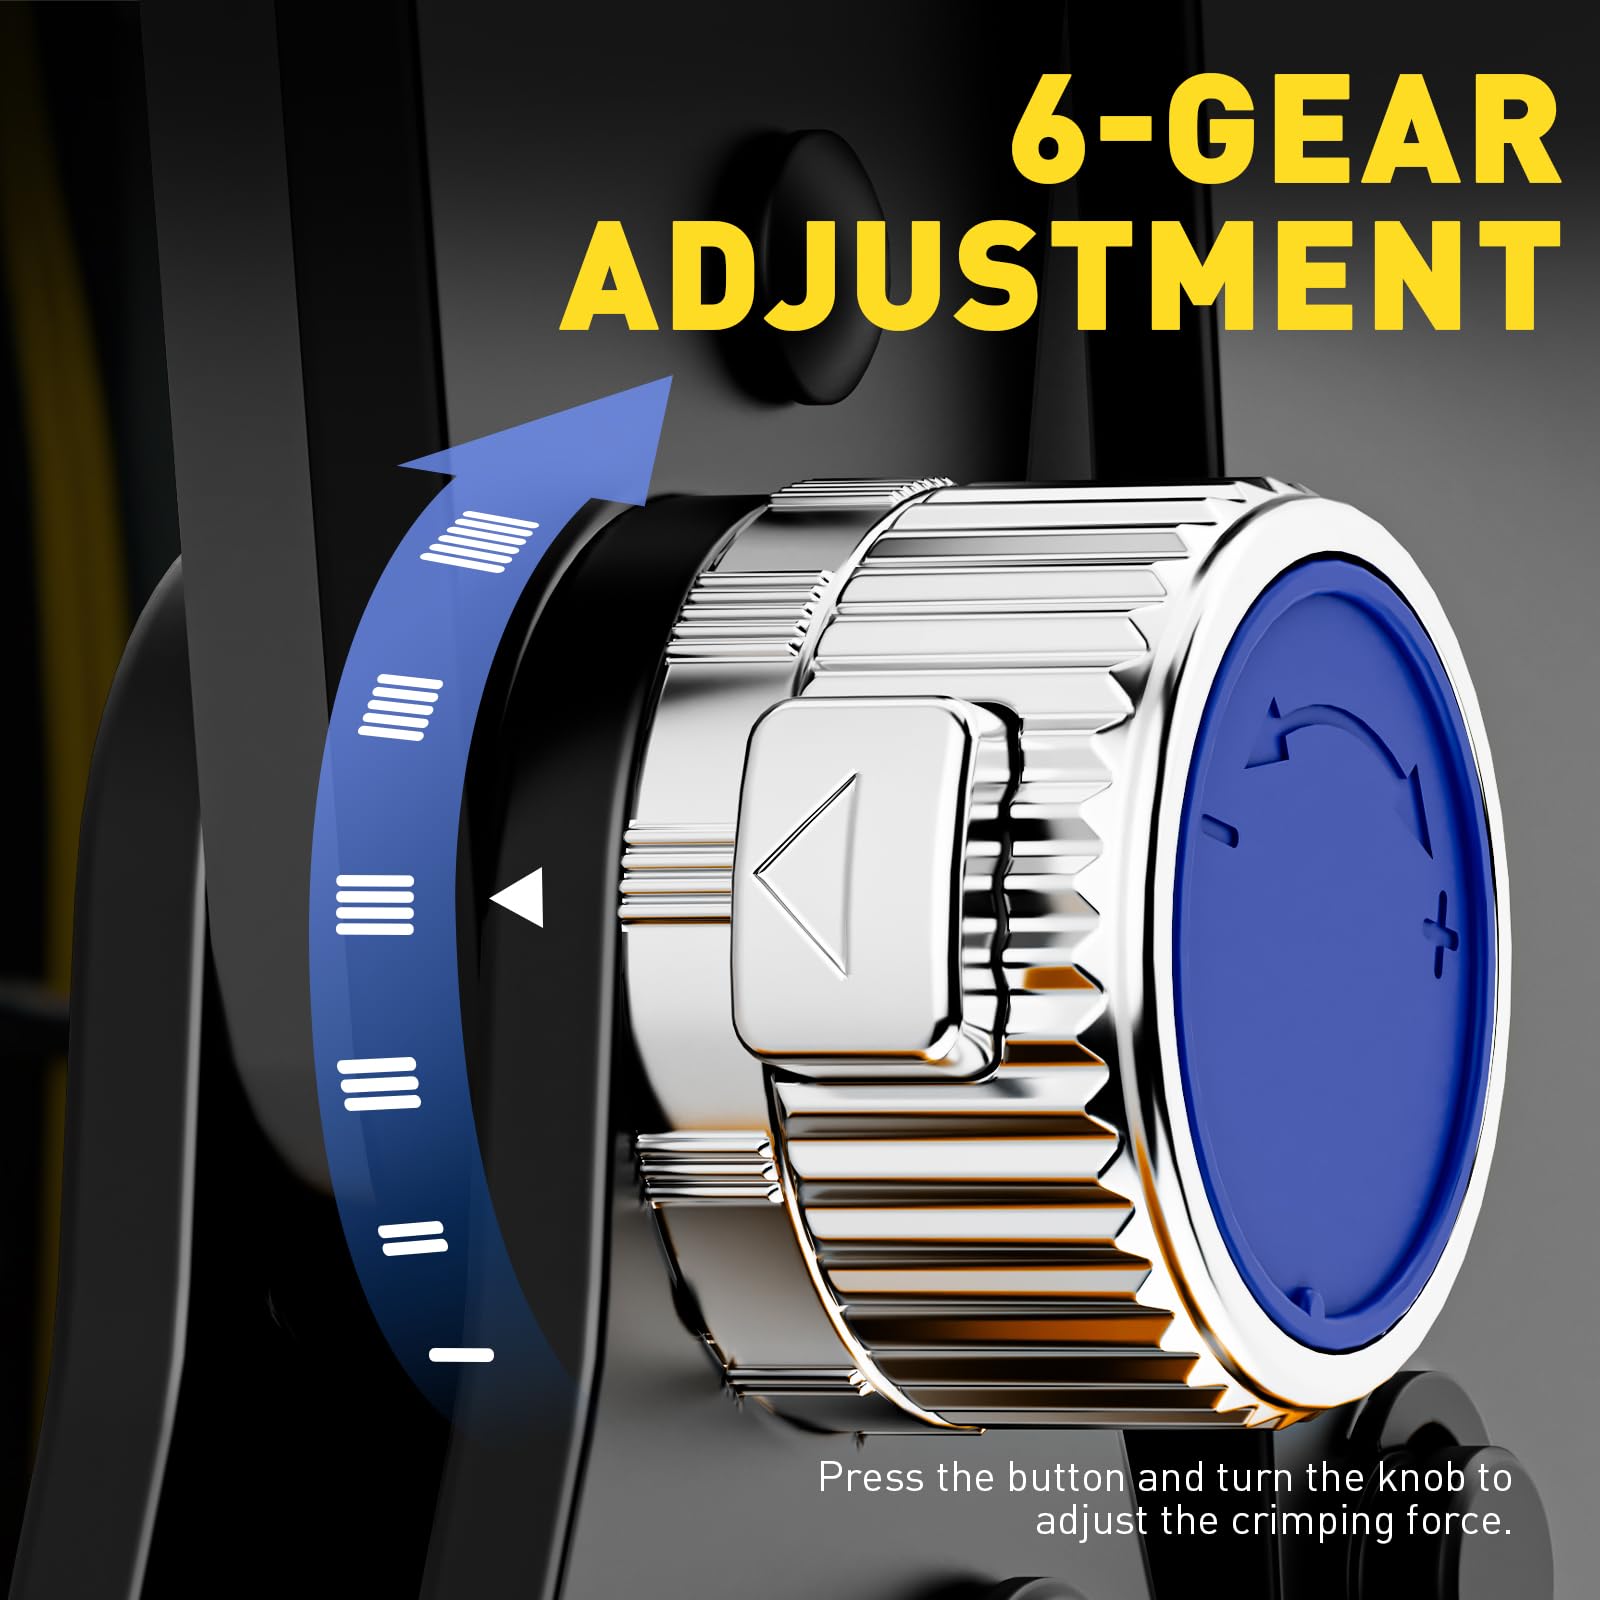
Use a Quality Crimping Tool (Preferably Ratcheting): Tool selection is often the dividing line between a solid crimp and a subpar one. Avoid generic pliers or makeshift crimpers – they won’t apply even pressure. Instead, use a dedicated wire crimping tool that matches your connector type. For insulated terminals, a ratcheting crimper is highly recommended. Ratcheting crimpers, like the Haisstronica ratchet crimp tool, are designed to apply consistent pressure and will not release until the crimp is fully compressed. This prevents under-crimping (a major cause of loose wires). These tools also often have multiple die sizes for different gauges, ensuring the right amount of compression. If you’re crimping non-insulated terminals or open-barrel contacts, use the specific crimper for those (often called a ferrule crimper or open-barrel crimper) which makes the proper “B-crimp” or indent. The bottom line: the best wire crimping tool is one that is designed for your connector and wire size, and if possible, has a ratchet mechanism for consistency. Haisstronica’s ratcheting crimper for AWG 22–10, for example, covers the common ranges and makes the job much easier. Using the right tool eliminates a huge portion of crimping errors – it’s a smart investment that pays off with every connection.
-
Position the Connector and Wire Correctly: Now place your connector in the crimp tool’s die (the correct notch for the wire size) before inserting the wire. For barrel-style crimps (the common ones), you’ll generally position the barrel in the crimper so that the crimp tool’s “tooth” will indent the side opposite the seam. In other words, orient the connector seam facing the flat side of the crimping die, and the crimping nub will press into the solid side of the connector. This orientation ensures the seam doesn’t open up and the crimper applies force where it’s needed. (Many insulated terminals don’t obviously show the seam due to the plastic sleeve – but typically the side with the writing or a slight ridge is the seam; align that accordingly or follow the tool’s instructions). Insert the stripped wire into the connector until it bottoms out. Double-check that all strands went into the barrel (none folded outside). Once everything is aligned – the wire is fully inserted and the connector is correctly placed – you’re ready to crimp. This step is where many beginners slip: an upside-down connector in the crimp tool or a half-inserted wire will guarantee a bad crimp. Take two seconds to orient things right. Proper connector placement in the tool is key for success. Many ratcheting crimpers have markings or even a mechanism to help you position connectors – use them. If done right, this alignment yields a perfect crimp impression and a tight grasp on the wire.
-
Crimp with Controlled, Full Compression: Squeeze the crimp tool handles evenly and firmly until the crimp is complete. If using a ratcheting tool, it will typically release automatically once the proper compression is achieved. For manual (non-ratchet) crimpers, close them fully on the connector to ensure a tight crimp – you may need to squeeze hard, but do not try to over-squeeze by forcing beyond the tool’s design. The goal is to deform the connector barrel around the wire completely, but not fracture it. When done, the connector’s barrel should have a clear impression from the die and should not rotate or wiggle on the wire. The wire should also be firmly locked in place. Inspect the crimp: the insulation (if an insulated connector) is gripped but not crushed, and the conductor barrel is crimped snug with a slight bell-mouth at the ends. If something looks off (for example, if the crimp didn’t fully form or the tool stopped too early), do not hesitate to re-crimp with a fresh connector. It’s better to discard a connector than leave a doubtful crimp in your wiring. A properly calibrated crimping tool will apply exactly the right amount of force. Ratcheting crimpers shine here because they eliminate guesswork – you get a consistent crimp every time. Haisstronica’s ratchet tool, for instance, is designed so that under- or over-crimping is nearly impossible when used correctly. By crimping until the cycle is complete, you ensure the connection is mechanically strong and electrically sound. This step is effectively “locking in” all the good prep work you did in prior steps.
-
Inspect the Finished Crimp and Test: Finally, inspect your work (use the visual checklist from earlier) and perform the tests described in the previous section. The finished crimp should pass the eye test – correct wire reveal, no insulation in the wrong place, good die imprint, etc. Give the wire a tug to confirm it’s secure. If it’s an important connection, check continuity or resistance to be sure. When done correctly, the crimped connection will be nearly as strong as the wire itself and free of gaps or weaknesses. As TE Connectivity notes, a well-formed crimp essentially becomes a unified piece of metal, highly resistant to electrical and physical stress. If the crimp doesn’t meet this standard, don’t gamble – recrimp it with a new connector. The beauty of having a solid technique is that re-crimps should be rarely needed. You’ll find that following the above steps with a quality tool produces a perfect crimp 99% of the time. Developing this reliable crimping method means future troubleshooting is minimal – your connections will just work. And if you’re ever unsure, you have the knowledge to spot and fix a bad crimp immediately. Using professional tools like Haisstronica’s not only speeds up the process but also instills confidence that each crimp is done right. In the end, the technique that works is equal parts proper preparation, correct tool usage, and careful inspection. It’s a simple recipe that solves bad crimp problems before they start!
(By implementing the above crimping technique, you essentially “fix” bad crimps proactively. Each step addresses the common pitfalls that lead to failure. Remember, every failed crimp is an opportunity to improve your process. With the right approach and a dependable crimping tool kit, you’ll soon crimp with ease and precision. Haisstronica’s tools and connectors are designed to work in harmony with these best practices – making it straightforward to achieve strong, professional-grade crimps every time.)
👉Make flawless wire crimping terminals—Haisstronica, built for pros.

Conclusion & Summary
Bad crimps may be a common issue, but they are entirely avoidable. The key takeaways for troubleshooting and fixing poor connections are: first, know the visual signs of a bad crimp (e.g. improperly seated wire, deformed connector, loose strands) so you can spot problems immediately. Second, always test suspect connections – a quick pull test or resistance check will expose a crimp that isn’t up to par, since a good crimp won’t budge and offers virtually zero resistance. Third, and most importantly, use the proper crimping technique and tools to prevent bad crimps from happening in the first place. That means using the right size connectors, preparing your wires correctly, and crimping with a quality ratcheting tool for consistent results. If you do all that, you’ll find that bad crimps become a rarity in your projects.
In practice, “fixing” a bad crimp usually means redoing it – and that’s okay. It’s far better to cut off a questionable connection and crimp it fresh than to leave a weak link in your electrical system. By following the guidance in this article, you’ll greatly reduce the need for such rework. Your crimps will be solid, your connections secure, and electrical gremlins due to bad crimps will be a thing of the past.
In summary, troubleshooting bad crimps comes down to keen observation and diligent technique. Inspect each crimp, test its strength, and don’t settle for anything less than a rock-solid connection. With the visual checklist to flag issues, the pull/continuity tests to verify integrity, and a proven crimping method to do it right, you have a complete toolkit for dealing with bad crimps. And remember, having a high-quality crimp tool like the Haisstronica ratcheting crimper makes all the difference – it takes the guesswork out of the process and ensures every crimp is uniformly tight.
Every successful electrical project is built on good connections. By applying the tips in this guide, you’ll ensure that your wire crimps are reliable from the start, and any bad crimp that sneaks through won’t stay hidden for long. Here’s to perfect crimps and a job well done – troubleshoot once, crimp right, and enjoy a safe, dependable connection! (For top-notch crimping supplies, don’t forget to check out Haisstronica’s range of professional wire crimping tools and connectors – engineered to make bad crimps a thing of the past.)
Our Top User-friendly Picks
Speed through projects with Haisstronica’s automatic wire crimping tool feel—precision ratchet, quick‑release lever, and hardened dies that deliver uniform heat shrink crimps without nicking conductors. The ergonomic grip reduces fatigue, while the color‑coded nests simplify sizing. Ideal as your everyday crimper tool for cable on boats, cars, and appliances.
👉The go‑to wire terminal crimper—Haisstronica accuracy, minimal effort.