Quick Answer – Crimp Heat Shrink Connectors Correctly
To crimp heat shrink connectors without melting the sleeve, use quality connectors matched to your wire size, a proper crimper connector tool, and controlled heat application. Start by choosing the correct connector size (match the connector’s AWG to your wire gauge to ensure a snug fit). Next, use a ratcheting crimping tool designed for insulated terminals so it compresses the metal barrel firmly without cutting or puncturing the heat-shrink tubing. Crimp the connector onto the stripped wire with steady pressure – a ratchet mechanism helps apply the right force consistently. Finally, shrink the insulating sleeve using a heat gun on a low or moderate setting (never a direct flame) to activate the adhesive and seal the connection without charring the tubing. In short, the keys are: proper connector, proper tool, and proper technique. Follow these steps, and your heat shrink sleeve will only shrink neatly around the joint – not melt or burn. (Promo: Haisstronica offers premium heat shrink connectors and precise ratcheting crimpers, making it easy to achieve perfect crimps without any melted insulation.)
Choose the Right Connector – Quality Crimp Connectors Matter
The foundation of a good crimp is using the right connector. Always match your connector type and size to the wire and job. Heat shrink connectors come in various styles (butt splices, ring terminals, spades, etc.) and are typically color-coded by wire gauge. Using the correct size ensures you won’t have to over-crimp (which can damage the sleeve) or under-crimp (which can cause a loose connection). For example, a 22-18 AWG red connector should be used on a 22-18 gauge wire – not on thicker wire, and vice versa. According to industry guidelines, the connector’s AWG must match the wire’s AWG for a secure fit after shrinking.
Equally important is the connector quality. Opt for high-quality electrical crimp connectors made from tinned copper with dual-wall (polyolefin) heat shrink tubing. Cheap connectors may use inferior materials (even aluminum) and thin insulation that can literally fall off or melt improperly under heat. Quality heat shrink connectors have adhesive-lined tubing that, when heated, creates a waterproof seal around the wire. In contrast, bargain connectors often skimp on adhesive – their insulation might not fully seal, or could crack when crimped. An expert from Marine How-To notes that good brands like 3M, Molex, or FTZ make reliable heat shrink crimp terminals, whereas cheap no-name versions can be weak and prone to failure. In short, don’t be penny-wise, pound-foolish with critical wiring: a few extra cents for a better crimp connector can prevent issues like sleeve shrinkage irregularities or melting due to low melting-point plastics.
Also, choose connectors appropriate for the environment. If the wiring is in a marine or automotive setting, use marine-grade heat shrink connectors with adhesive that withstands moisture and vibration. These will have thicker insulation and stronger glue, ensuring the sleeve won’t degrade or loosen over time. Using the right connector sets the stage for a smooth crimp and shrink process. (Promo: Haisstronica’s electrical crimp connectors are made of tinned copper and high-grade heat shrink tubing, offering consistent performance. By choosing Haisstronica, you’re investing in connectors that shrink evenly without any chance of the sleeve melting or splitting – a smart choice for pros and DIYers alike.)

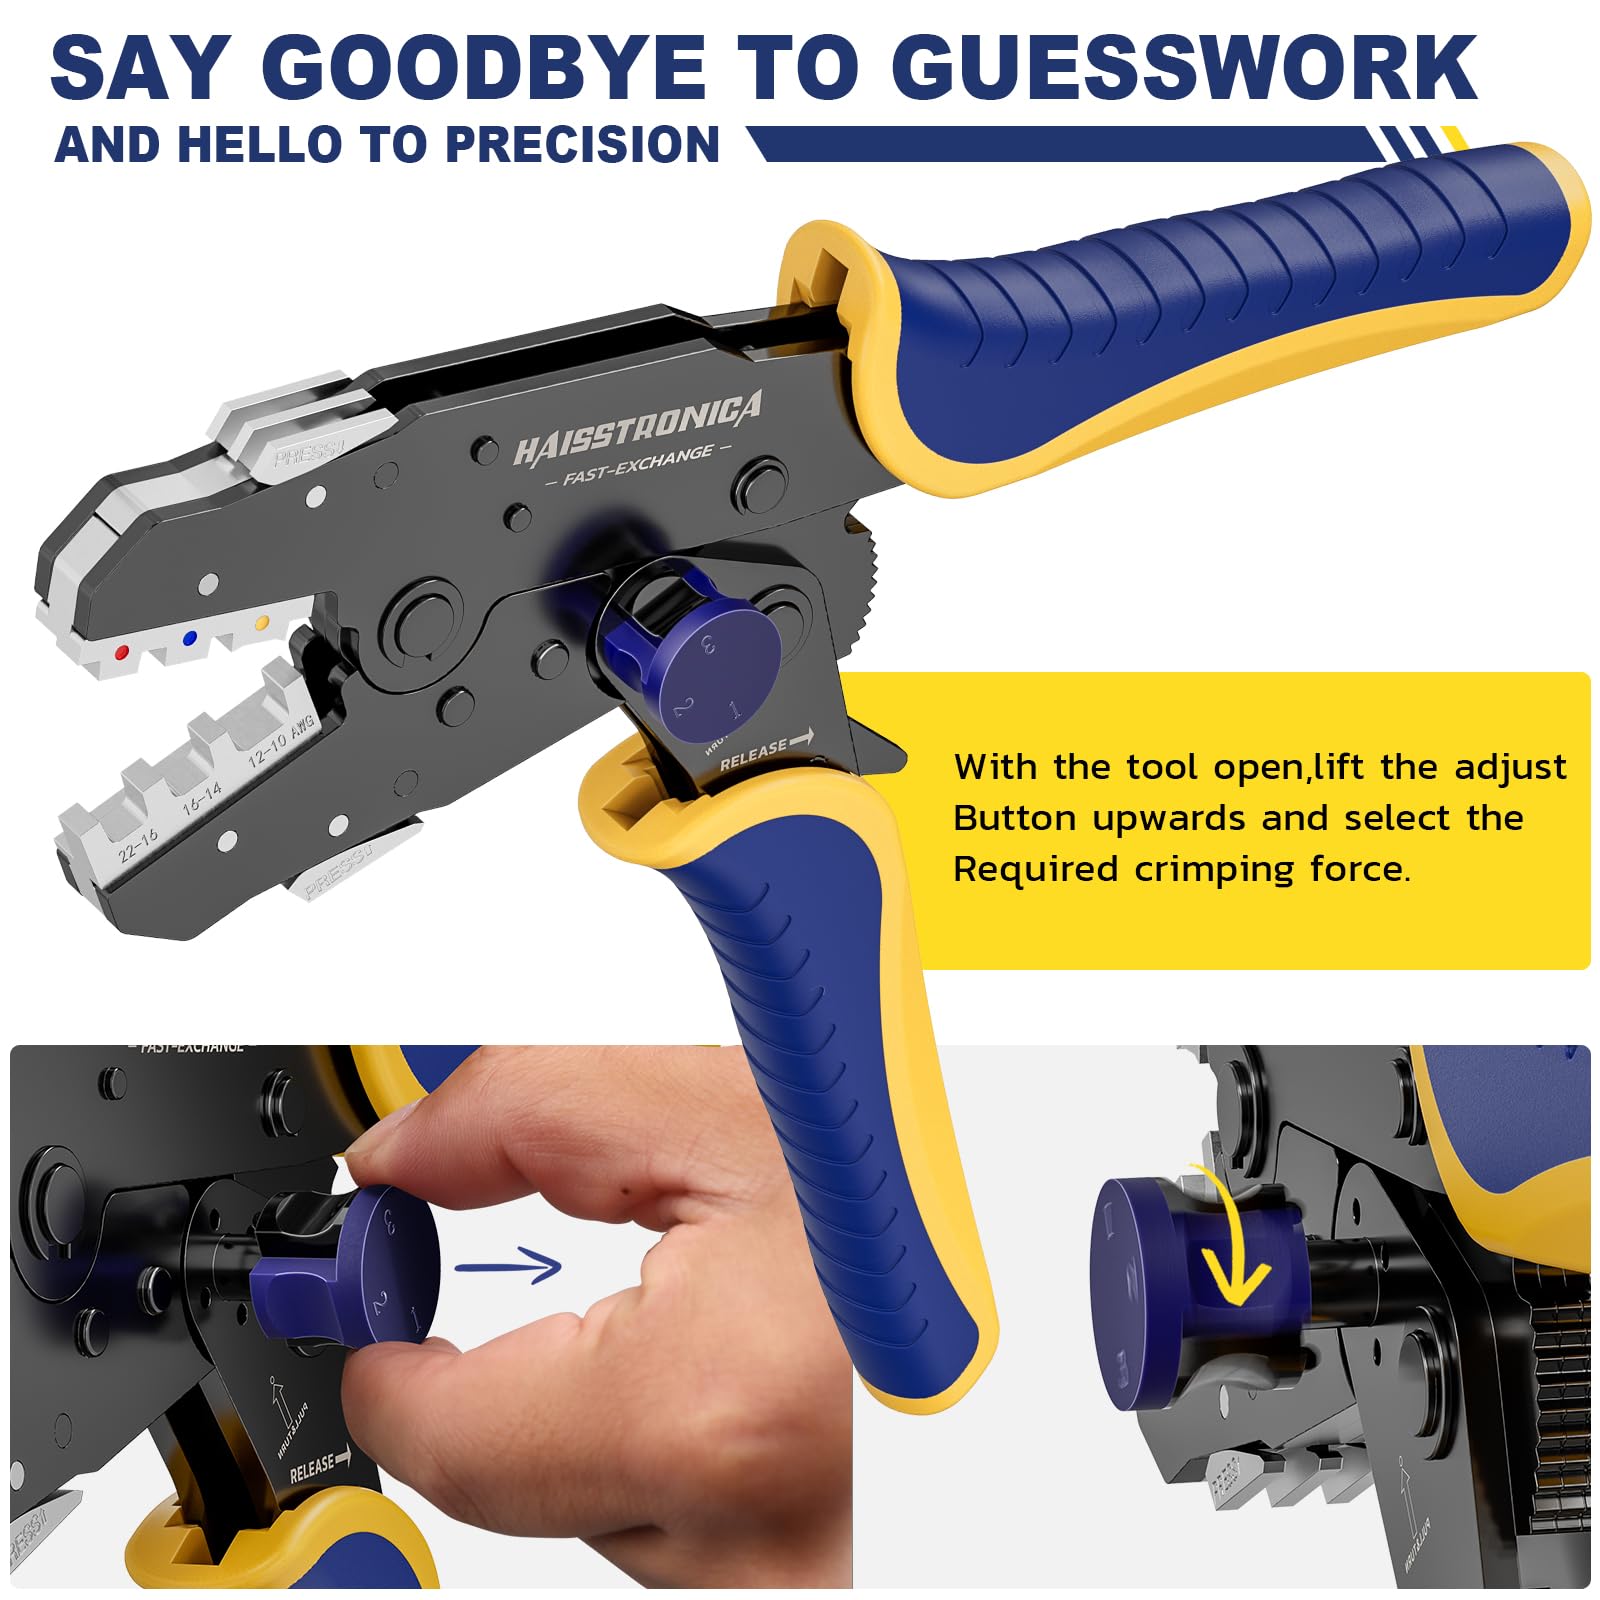
Tools That Prevent Melting – Use the Proper Wire Crimping Tools
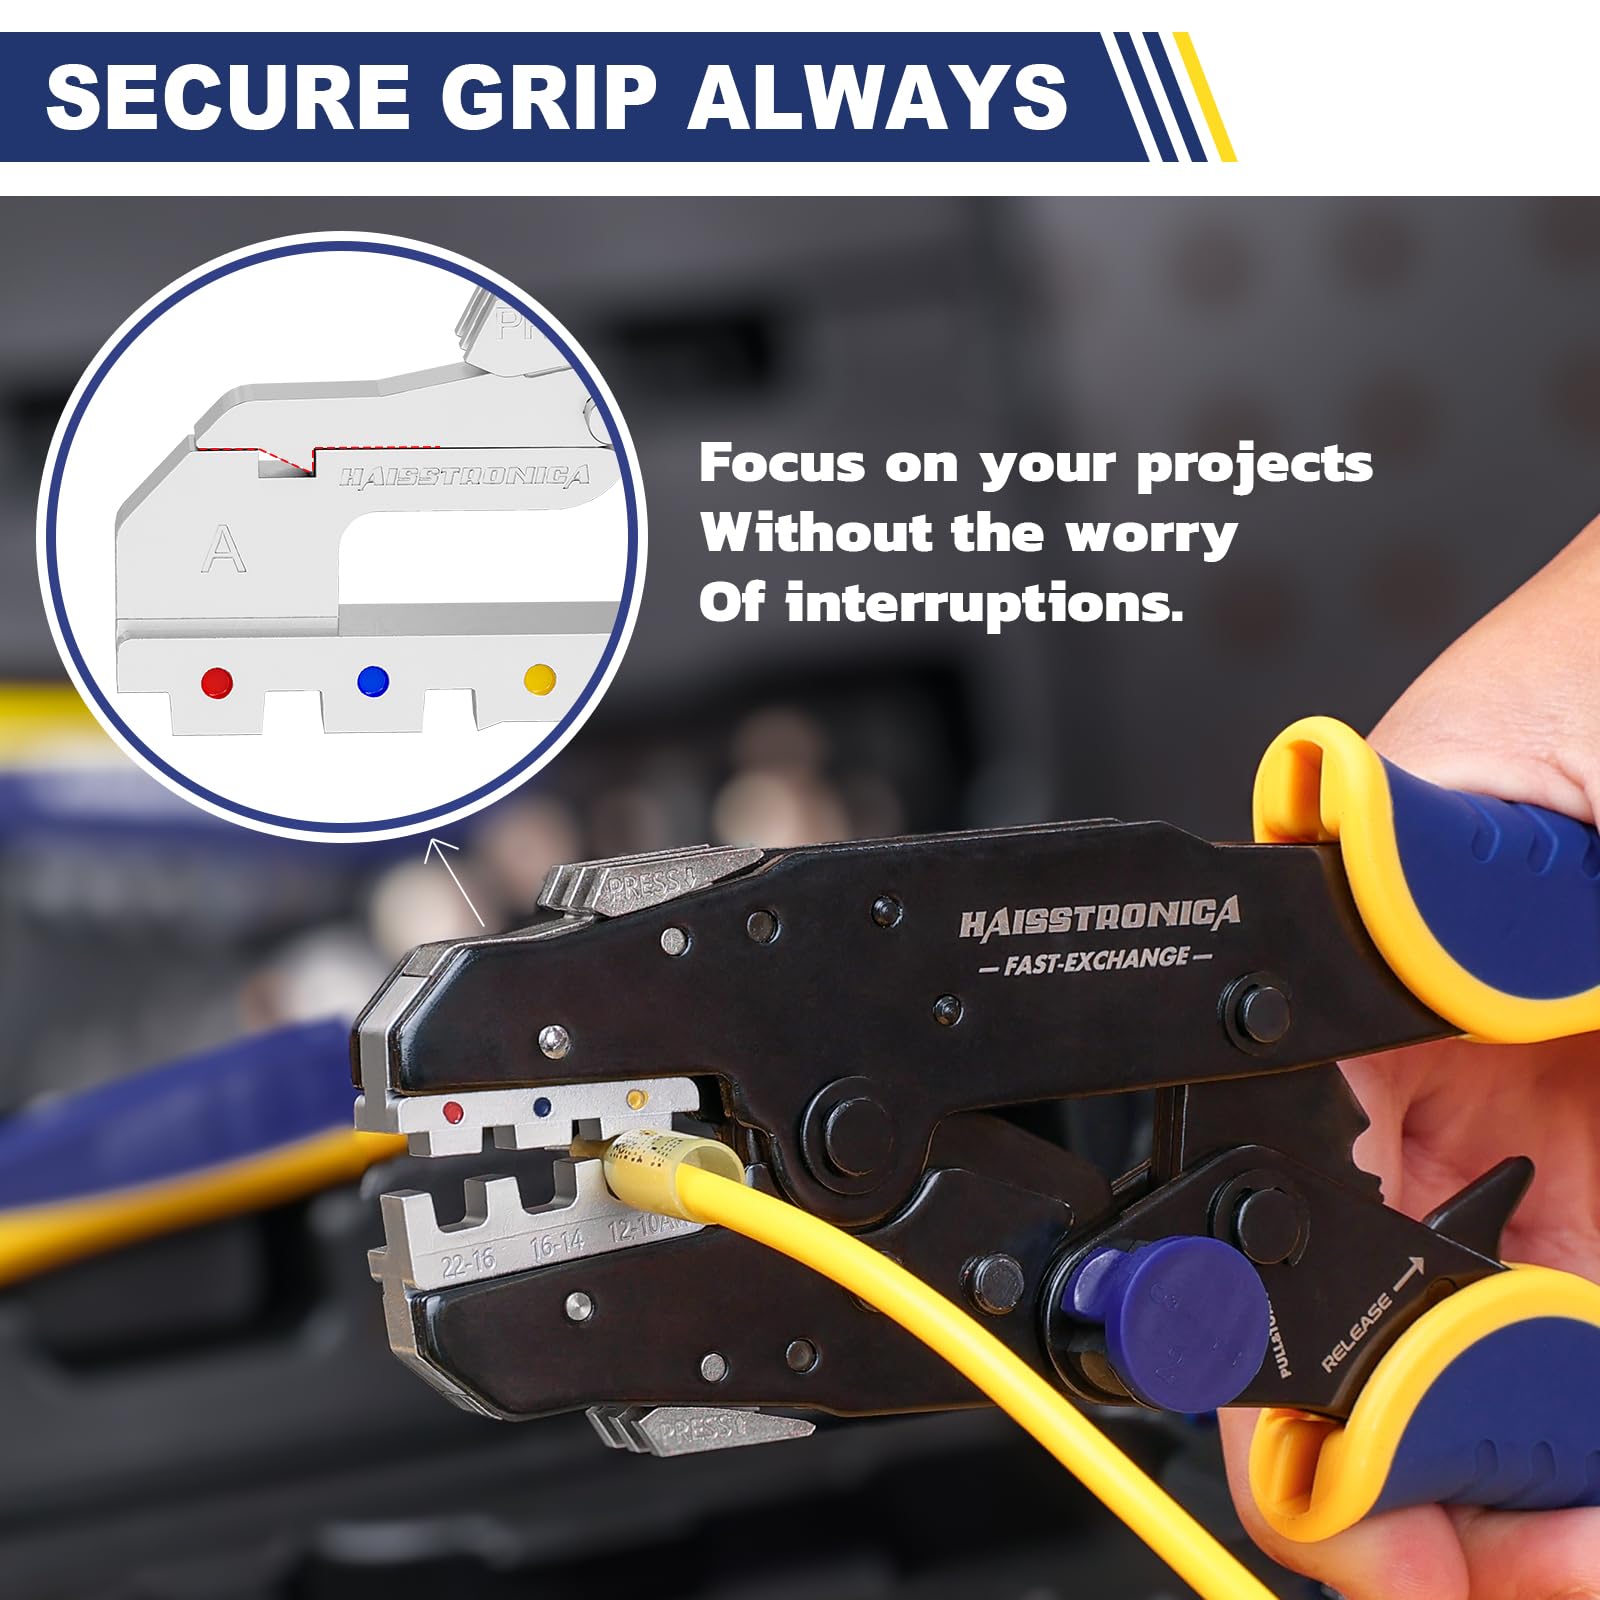
Using the proper tools is critical to crimp heat shrink connectors without damaging the sleeve. The primary tool for crimping should be a ratcheting crimp tool (sometimes called a ratchet wire crimper or crimping plier) that is specifically designed for insulated and heat-shrink connectors. Unlike plain pliers or flimsy stamped crimpers, a good ratcheting terminal crimper applies controlled, consistent pressure and has die shapes that accommodate the connector’s insulation. This means it will crimp the metal barrel tight onto the wire while not piercing or tearing the heat shrink jacket. In fact, high-quality crimpers (like those by Ancor or similar professional brands) have jaws that squeeze the barrel without hurting the heat-shrink tubing, whereas cheap or wrong-sized tools can cut into the sleeve. The difference can be seen clearly: using the wrong tool often results in splits or punctures in the insulation – effectively “melting” or destroying it during crimping, as shown below.
Using an improper crimp tool can damage the connector’s sleeve. In the image, the heat shrink insulation on these ring terminals was split by a staking (dimple) style crimper – the wrong tool for heat shrink connectors. Such crimping pliers are meant for non-insulated terminals; their pointed dies easily puncture or crack the soft tubing. To avoid this, always use a proper ratchet crimping tool with the correct die for insulated terminals. A ratcheting wire crimp tool holds the connector snug and compresses it uniformly, drastically reducing the risk of sleeve damage. In fact, a professional-grade crimp tool will make “rock-solid crimps without damaging heat shrink insulation,” as noted by Wirefy’s experts. So skip the old-school pliers – even electricians’ multi-tool crimpers can be hit-or-miss – and invest in a dedicated electrical crimping tool for connectors with heat shrink. It’s a one-time purchase that ensures every crimp is clean and every sleeve remains intact.
Aside from the crimper, the other essential tool is your heating method. Never use an open flame (like a lighter or torch) to shrink the tubing, as direct flame is hard to control and can scorch or melt the sleeve almost instantly. Instead, use a heat gun. A quality heat gun blows hot air at a controllable temperature – some models let you dial in a specific range (for example, 200°F up to 1000°F). This allows you to apply just enough heat to shrink the tubing and activate the adhesive, without overheating the plastic. As OneMonroe Titan’s blog advises, a heat gun gives you “complete control over the temperature” so you can shrink the connector’s glue lining without jeopardizing the connector’s body. The goal is to evenly heat the sleeve until it snugly conforms to the wire and you see a bit of adhesive ooze out, not to blast it on the highest setting. Professionals recommend using a moderate heat setting and moving the gun around the connector for an even shrink. Avoid lingering too long in one spot, and keep the heat gun a few inches away from the sleeve. If adhesive-lined heat shrink is heated too fast (too hot), the outer tubing can burn before the inner glue properly melts. A slower, controlled heating yields the best bond. In fact, marine electricians note that with adhesive-lined connectors, “a slower melt will produce better adhesion… Use open flame only as a last resort. A heat gun with consistent predictable heat is the proper tooling”. In summary, the right combination of crimpers tool and heat gun will prevent any melting mishaps. (Promo: Haisstronica sells a professional ratcheting crimper tool calibrated for heat shrink connectors, as well as a 350W heat gun with adjustable settings. These tools take the guesswork out of crimping and shrinking – ensuring your connector sleeves never get singed in the process.)

Prep Like a Pro – Proper Wire Preparation for Crimping
Even with top-notch connectors and tools, your technique in preparing the wire and connector for crimping is pivotal. Think of it as “measure twice, cut once” for wiring. Start by cutting and stripping your wire to the right length. For most heat shrink crimp connectors, you should strip about 1/2 inch to 3/4 inch of insulation off the end of the wire. This exposes enough bare wire to fully fill the connector’s metal barrel without any excess sticking out. Do not strip too much – you don’t want bare wire protruding beyond the connector (that could lead to exposed copper and possible shorts). Conversely, don’t strip too little, or the wire won’t reach all the way through the barrel. Use a good-quality wire stripping tool to remove the insulation. Avoid using a knife or improper tool that might nick or cut the copper strands; even a small nick weakens the wire and can cause it to break later. A precise stripper (often built into a wire crimping tool or available separately) will cleanly remove insulation while leaving all the strands intact – a key to a reliable crimp.
Next, twist the exposed wire strands gently so they stay together as you insert them into the connector. This prevents stray strands from bending back or getting caught. (Stray strands can also pierce the heat shrink from inside or reduce the quality of the crimp.) If the wire is multi-stranded, ensure it’s not frayed. Some professionals very lightly tin the strands with solder for certain specialty applications, but generally do not tin the wire when using crimp connectors in automotive or marine projects – crimping is designed for bare copper, and solder can interfere with a proper cold crimp joint in high-vibration scenarios.
Before crimping, it’s wise to do a dry fit: insert the stripped wire into the connector’s barrel to check that the copper is visible through the translucent sleeve and nearly reaching the connector’s end. Many wire connector crimpers (ratcheting types) make this easier by having a ratchet that can hold the connector in place. For instance, you can pre-load the connector into the crimper jaws and squeeze just to the first click of the ratchet. This lightly grips the connector, acting like a “third hand.” Then insert your stripped wire into the connector until you feel it hit the metal stop. Once everything is positioned correctly – wire fully inserted, connector aligned in the die – finish crimping by squeezing the tool until it completes the cycle and releases. This technique ensures the wire doesn’t slide out during crimping and that the crimp is located on the correct spot on the barrel. Remember, crimp once; you shouldn’t have to crimp the same spot twice. A proper ratchet crimper will not release until the crimp is fully compressed, preventing under-crimping. If you’re using manual crimping pliers (not recommended for heat shrink types), make sure to center the connector and, if it’s a stake-type crimper, orient the dimple away from the seam to avoid splitting the barrel or insulation. Taking this care during prep will result in a tight mechanical bond and leave the heat shrink sleeve intact and ready to be heated.
Finally, ensure the heat shrink tubing is in the correct position (for connectors where the tubing is separate, slide it over the splice before crimping). In the case of integrated heat shrink connectors, the sleeve is already part of the connector – just be careful not to put any heat on it until you’ve finished crimping. It might sound obvious, but it’s worth stating: always crimp before applying heat. Many heat shrink connectors are designed for this two-step process: crimp, then heat. If you accidentally heat the connector first, you’ll shrink it prematurely and won’t be able to get the wire in or achieve a solid crimp. So, double-check everything: wire stripped and clean, correct connector size, connector pre-positioned if possible, wire inserted fully, and proper crimping tool at the ready. This professional prep work sets you up for a perfect crimp. (Promo: Haisstronica’s all-in-one wire crimper tool kit includes a wire stripper, ratcheting crimper, and an assortment of heat shrink connectors – everything you need to prep like a pro. With our tools, you’ll make clean cuts and strips every time, ensuring the wire connector crimp process goes smoothly from start to finish.)

Conclusion – Perfect Crimps Without a Scorched Sleeve
Crimping heat shrink connectors without melting the sleeve is achievable by combining the right products with the right practices. By choosing quality connectors that fit your wire, using a ratcheting crimper connector tool that preserves the insulation, and carefully prepping and finishing the connection, you’ll consistently get secure, professional results. When done correctly, the heat-shrunk sleeve will be clear, tight, and unscathed by burns – you’ll often see the adhesive evenly melted and oozed slightly at the ends, indicating a solid seal. There should be uniform color and transparency around the connection, with no charred spots or tubing split apart. If you observe any uneven shrinking or brown/black singe marks, that’s a sign to refine your technique (or check your tools and materials). But with the pro tips outlined here, those issues will be a thing of the past. Remember, it’s all about attention to detail: correct connector, proper tool usage, careful wire prep, and controlled heating.
In summary, take your time and do it right. Whether you’re a DIY hobbyist wiring a project car or an electrician making dozens of connections a day, these methods will ensure each crimp is strong and each heat shrink sleeve remains perfectly intact. No more melted insulation – just clean, durable electrical connections that you can trust. Happy crimping! (Promo: Ready to put these tips into practice? Check out Haisstronica’s range of crimping tools electrical and heat shrink connectors. With our professional crimping tools and connectors at your side, you’ll have everything needed to crimp with confidence – and never worry about a melted sleeve again.)
Sources: