The “Best” Crimper Depends on Your Project (Crimping Tools & Uses)
When it comes to crimping wires and connectors, “best” is a relative term – the ideal tool depends entirely on your specific project needs. A home electronics hobbyist, an automotive DIYer, and a professional electrician might each need a different wire crimper. For example, if you mainly crimp small gauge wires and standard electrical connectors, a versatile ratcheting wire crimper tool will likely be the best fit. On the other hand, working on heavy-gauge battery cables or specialized connectors might require a more powerful cable crimper like a hydraulic lug crimper. There’s no one-size-fits-all solution in crimping; it’s about matching the tool to the job. That’s why Haisstronica offers a range of crimping tools and kits – so every DIYer can find the perfect terminal crimper for their unique wiring projects, ensuring each crimp is secure and reliable.
Crimp connectors come in many types (rings, spades, butt splices, ferrules, etc.), and each type may crimp best with a certain style of tool. A simple plier-style crimper might handle basic insulated terminals, but it could struggle with consistent quality on every crimp. In contrast, a ratcheting crimping tool applies controlled pressure and won’t release until the crimp is fully compressed, giving more uniform results for electrical connectors. If you’re working on automotive or marine wiring, you’ll likely need a heavy-duty ratcheting wire crimper that can cinch down on terminals tightly to withstand vibration. However, if you’re only crimping the occasional small butt connector or crimp-on wire connector in a household fix, a simple manual crimper might suffice. The key is to assess your project’s requirements: wire gauge (AWG size), connector type, and volume of crimps. With Haisstronica’s selection – from all-in-one wire crimping tool kits to pro-grade lug crimpers – you can choose exactly the right tool for the job, making every wiring project easier and more dependable.
(Haisstronica’s Ratchet Wire Crimping Tool Sets are designed with multiple interchangeable dies to cover a wide range of connector types and wire sizes, so DIYers can tackle diverse projects with one high-quality kit.)

What Makes a Great DIY Crimper (Key Features for Wire Crimping Tools)
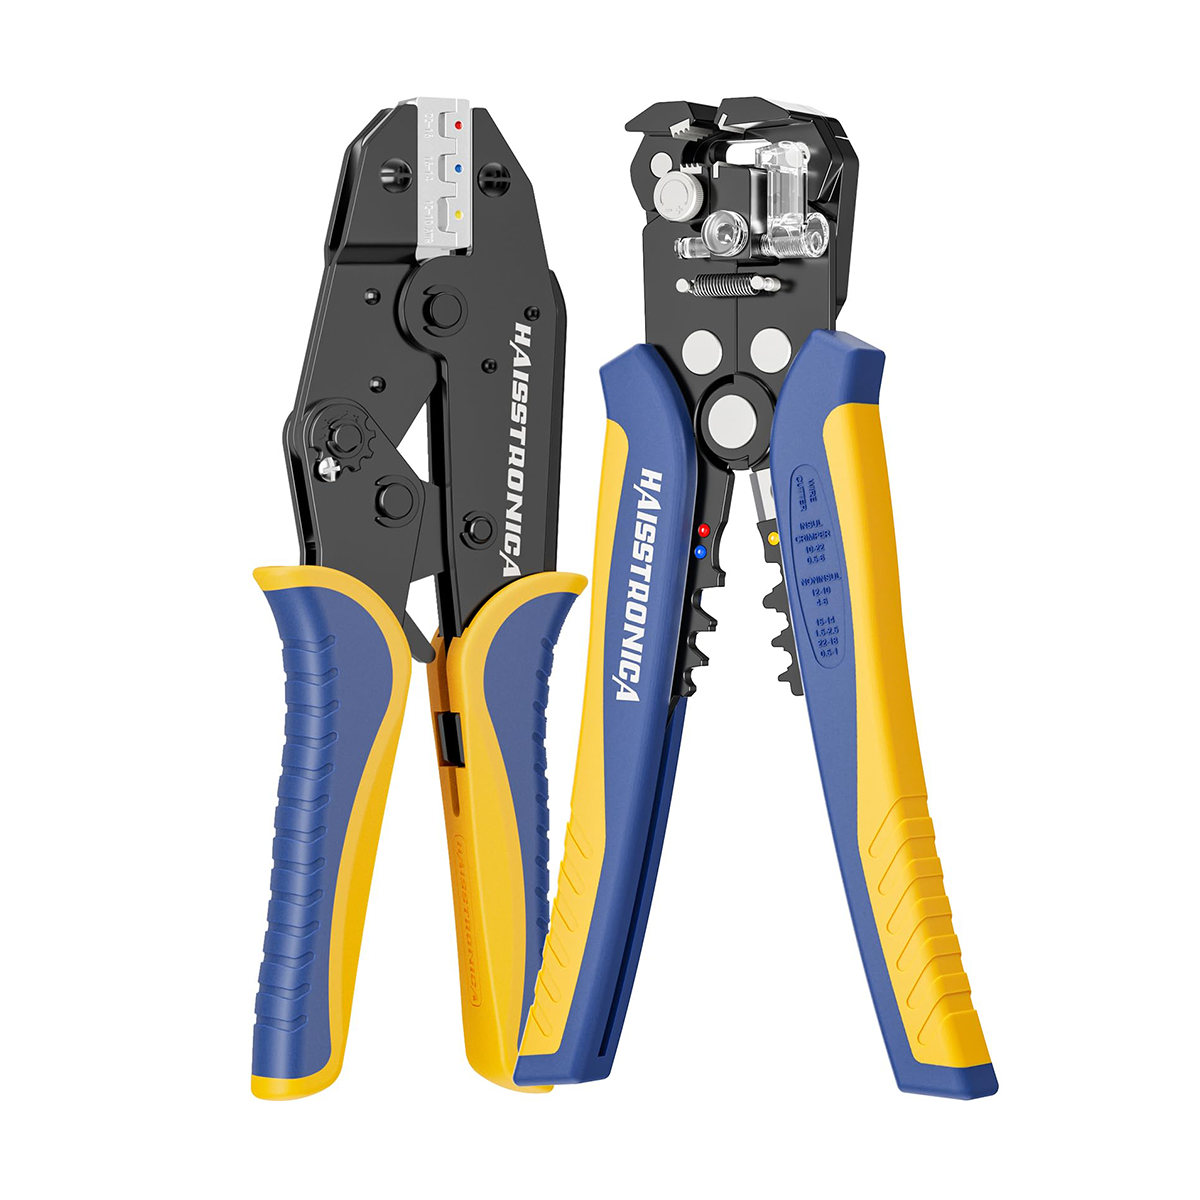
Not all wire crimpers are created equal, and as a DIY enthusiast you’ll want a crimping tool that is user-friendly yet capable of professional-quality results. One hallmark of a great DIY crimper is a ratchet mechanism for consistency and ease of use. Unlike basic crimping pliers that rely on your hand strength and judgment, a ratcheting crimper ensures you apply the right amount of pressure every time. The ratchet will not release until the crimp is complete, preventing under-crimping (loose connections) and over-crimping (damaged wires). This feature is especially helpful if you’re new to crimping – it takes the guesswork out of the process and produces uniform, tight crimps on all your electrical connectors crimp after crimp. Haisstronica’s DIY crimping tools all incorporate a smooth ratcheting action, so even beginners can achieve factory-grade crimps with minimal effort, making your wiring projects safer and more reliable.
Another factor that makes a crimp tool stand out is its versatility and build quality. A great DIY wire crimping tool will accommodate the range of wire sizes (AWG) and connector types you commonly use. Many top-rated crimpers for wire come with interchangeable dies or jaw sets, allowing one tool to crimp various terminals – from insulated vinyl connectors to ferrules and even coax or Dupont pins. Look for a tool with clearly marked die cavities (often color-coded for red, blue, yellow terminals) and an adjustable crimping force or release, which can fine-tune the pressure. Build quality matters too: hardened high-carbon steel jaws ensure durability, and comfortable ergonomic handles reduce hand fatigue. A non-slip grip and a smooth leverage mechanism make repetitive crimping much easier on the hands, which is important for DIY projects that might involve dozens of connections. Haisstronica’s terminal crimpers are built with precisely machined jaws and cushioned handles for comfort – a quality wire crimp tool that feels solid in your hand and won’t wear out after a few uses, giving you confidence in every crimp.
For the DIYer, additional convenience features can also set a crimper apart. Some wire crimpers tools include built-in wire strippers or cutters, effectively combining multiple wiring tools into one. Others come as part of a kit with a collection of assorted connectors or a carrying case to keep everything organized. While not mandatory, these extras can be a nice bonus for a hobbyist or homeowner trying to build up their electrical toolkit. Ultimately, good wire crimpers share the traits of reliability, consistency, and matching your specific needs. When you choose a Haisstronica crimping tool, you’re getting a thoughtfully designed product – often packaged as a complete wiring crimping tool kit – that ensures you have all the features and accessories needed for a successful DIY wiring job, backed by the brand’s commitment to quality.

Crimper Types You Should Know (From Ratcheting to Hydraulic)
Crimping tools come in a variety of types and sizes. Understanding the main categories will help you pick the right crimping tool for your project, since, as experts note, there really is no “jack-of-all-trades” crimper that covers every situation. Here are the crimp tool types you should be familiar with:
-
Handheld Ratcheting Crimpers: These are the most common electrical crimping tools for DIY and professional use. They look like heavy-duty pliers and typically cover moderate wire gauges (often ~22 AWG to 10 AWG for insulated terminals). The ratchet crimping tool mechanism ensures consistent pressure, making it easier for beginners to get a solid crimp every time. Handheld crimpers often have multiple built-in die positions or come with interchangeable die sets for different connector styles. For example, one tool might crimp red/blue/yellow insulated terminals, ferrule sleeves, and non-insulated connectors just by swapping dies. These are terminal crimpers ideal for general wiring projects, automotive repairs, appliance fixes, and electronics. Haisstronica’s popular Ratchet Wire Crimping Tool Set falls in this category – an all-in-one wire crimper tool kit that gives you several jaw options to tackle various connectors (heat shrink terminals, nylon connectors, open-barrel pins, etc.) with one ergonomic ratcheting tool.
-
Manual (Non-Ratchet) Crimping Pliers: These are simpler crimpers that rely purely on the user’s hand force. They are often inexpensive and can work for occasional jobs, but they lack the controlled ratcheting action. Without a ratchet, achieving a perfectly consistent crimp requires practice and strength, as you must judge the pressure and complete the crimp in one squeeze. Regular crimping pliers may be fine for crimping larger connectors like coax cable ends or crimping a quick butt splice in a pinch, but for small gauge electrical wires (16–22 AWG, etc.), users often prefer ratcheting crimpers for reliability. If you do use manual crimpers, ensure you test each crimp with a tug to verify it’s tight. For most DIYers, upgrading to a ratchet crimper (like those from Haisstronica) is worth it for the improved consistency and ease – no more guessing if your crimp electrical connection is secure.
-
Hydraulic Crimping Tools: When dealing with very large wires and cables (think 8 AWG down to 4 AWG, 2 AWG, or even 0/2, 0/4 gauge for battery lugs and heavy copper terminals), the force needed to make a proper crimp is much greater. Hydraulic crimpers use a pump (sometimes hand-pumped, sometimes powered) to apply tons of pressure for crimping large lugs and splices. These tools often have interchangeable dies that produce a hexagonal crimp profile on the lug, which is common in industrial and automotive battery cables. While hydraulic crimpers are more expensive and typically used by professionals or serious enthusiasts, they are the best crimping tools for heavy-duty jobs – for instance, attaching a 2 AWG or 4/0 AWG cable to a copper grounding lug. Some hydraulic crimpers are handheld devices with a lever, while larger ones can be bench-mounted or electric. As a DIYer, you’d only invest in a hydraulic crimper if you frequently work with big cables (such as off-grid solar hookups or car audio power wires). In Haisstronica’s lineup, you can find heavy-duty crimping tools capable of handling larger connectors – ensuring that even big cables get a rock-solid crimp connection that won’t pull loose.
-
Hammer and Indent Crimpers: A hammer crimping tool is a very rugged, low-tech solution for crimping large lugs. It consists of a an anvil and a ram – you place the lug and wire in the tool and strike it with a hammer to deform the connector around the wire. These are often used in the field or by hobbyists who only occasionally need to crimp big wires and don’t want to invest in a hydraulic tool. The results can be effective, though not as uniform as a proper die-based crimper. Another variant is an indent crimper (sometimes a large wrench-like tool or a press) that makes an indentation in the connector to crimp it. These tools are cheap and simple, but require caution to ensure the crimp is adequately tight. If you only rarely need to crimp a large cable, a hammer-style crimp tool can work in a pinch – but for frequent use or critical connections, Haisstronica and other top brands offer more controlled solutions like ratcheting or hydraulic crimpers to guarantee consistent results.
-
Specialty Crimpers: Beyond the standard electrical terminal crimpers, there are specialized tools for specific connectors and applications. For example, an RJ45 crimping tool is made for crimping Ethernet cable plugs (8P8C connectors) – it’s a must if you plan to make your own network cables. Similarly, a coaxial cable crimper is used for TV or CCTV coax connectors (often creating a hex crimp on an F-type or BNC connector). If you dabble in electronics, you might need a precision pin crimping tool for Dupont connectors, JST connectors, or other tiny crimp pins; these tools can reliably crimp very small gauge wires (often 24–30 AWG) and usually have a ratcheting mechanism for precision. There are wire rope crimping tools (swagers) for crimping copper or aluminum sleeves on steel cable – useful for rigging, fencing, or heavy-duty automotive brake lines. Even plumbers use crimpers (for PEX tubing rings), though those are outside electrical work. The bottom line is that if your project involves a specialized connector, there’s probably a dedicated crimp tool for it. Electrical crimping tools really run the gamut from tiny handheld pliers to large bench presses. Haisstronica focuses on electrical connector crimpers for wires and cables – including some specialty kits for ferrules and open-barrel pins – ensuring that DIYers can find a high-quality tool for almost any wiring task, from crimping flag terminals or spade connectors for speakers, to heavy-duty automotive wire crimpers for car projects.
No matter what type of crimper you choose, always use the correct tool for the connector and wire at hand. Using the wrong type can result in poor connections and potential failures down the line. By understanding these tool types, you can make an informed decision and avoid frustration. With a trusted brand like Haisstronica, you have access to a full spectrum of crimping solutions – so whether you need a simple crimper plier for a quick fix or a professional crimping tool set for a complex wiring harness, you know you’re getting a reliable tool that’s up to the task.

How to Match AWG, Strip Length, and Insulation Support for Crimping
Even the best crimping tool won’t guarantee a good connection if you don’t prepare and match your materials correctly. Properly matching the wire (AWG), strip length, and insulation support to your connector and crimp tool is crucial for a secure, long-lasting crimp. Here’s how to get it right:
Match the Wire Gauge to the Terminal and Crimper: Always use a connector that’s rated for the wire size (AWG) you are working with, and ensure your crimp tool’s die is appropriate for that same range. Electrical terminals are often color-coded by size to make this easier – for instance, red insulated terminals typically fit 22–16 AWG wires, blue for 16–14 AWG, and yellow for 12–10 AWG. These colors correspond to die markings on many wire connector crimpers as well. If you crimp a wire in a too-large connector (oversized barrel), the metal won’t compress fully around the copper and you’ll get a weak crimp. Too small, and you may not even fit the wire or you’ll damage the strands. The wire should slide into the terminal’s barrel snugly, with all strands inside and no excessive slack. Choose your crimper’s die setting accordingly (most ratchet crimpers label the die cavities by color or AWG number). Using the proper size ensures a crimped wire connection that is gas-tight and mechanically strong. Haisstronica’s crimping tools and connectors are clearly labeled for their AWG ranges, removing the guesswork – for example, the ratcheting tool kits come with dies labeled for red/blue/yellow terminals, so you can easily match the wire gauge to the correct crimp slot for a perfect compression every time.
Strip the Correct Length of Insulation: Strip length is key to a successful crimp. Strip too little and the wire won’t reach deep enough into the connector; strip too much and bare conductor may stick out past the barrel (which can cause corrosion or shorts). As a rule of thumb, strip the wire to the length of the connector’s barrel (the metal sleeve) not including any insulation grip. In practice, for common insulated terminals, this usually means about 4–6 mm (around 3/16 inch) of exposed wire. You want the bare copper to reach the end of the barrel without protruding out the other side. Many connectors have a sight window or a bell-mouth at the end – you should see the copper strands there, but they shouldn’t extend beyond. A comprehensive crimping guide emphasizes that the strip length must match the terminal to enable correct wire placement before crimping. Use a good quality wire stripper to get a clean cut without nicking strands (nicked strands can reduce the connection’s strength and conductivity). Once stripped, insert the wire fully into the connector barrel. If you’ve got the length right, the wire’s insulation will butt up against the connector’s insulation or barrel end, and all copper will be inside. Following these strip length guidelines, along with using Haisstronica’s precise wire strippers (included in some crimping kits), will ensure your wire is perfectly prepped – this means the wire crimp will compress exactly where it needs to, maximizing electrical contact and strength.
Use Insulation Support (When Applicable): Many electrical connectors, especially higher quality ones, have an insulation support crimp in addition to the conductor crimp. For example, an insulated ring terminal often has two crimped sections – one on the bare wire and one lightly crimping the insulation for strain relief. If your connector has this feature, make sure your crimp tool accommodates it (some ratcheting crimpers have a die section labeled for insulation, often a wider crimp). The purpose of the insulation support crimp is to grab the wire’s insulation and take stress off the conductor, so any pulling or vibration isn’t directly transmitted to the bare wire joint. To use it properly, strip the wire only to the length of the inner barrel as noted, and position the connector in the crimper so that the second crimp lands on the insulation. Not all connectors have insulation support barrels (for instance, uninsulated ferrules only crimp the conductor), but for those that do, it’s worth using the right tool setting. Using the correct die (e.g., a die labeled for insulated terminals) ensures you form both the conductor crimp and insulation crimp correctly. Also, verify that the connector’s insulation diameter matches your wire’s insulation – if you put a thin insulated wire in a connector made for a much thicker insulation, the support crimp won’t grab anything. In short, match “like with like”: wire gauge to terminal, and terminal type to crimp tool profile. Industry guidelines note that using the proper insulation crimp range on your tool is essential for a good support crimp. Haisstronica’s insulated crimp connectors electrical are engineered with the right insulation diameters and work hand-in-hand with the brand’s crimpers, which have the appropriate die for insulation support – this means when you crimp with a Haisstronica tool and connector, you automatically get that extra strain relief for a connection that stands up to tugging, vibration, and harsh conditions.
By carefully matching your wire, connector, and crimp tool settings, you’ll create crimps that are electrically sound and mechanically robust. Every detail – from using the right size wire crimp tools to stripping just enough insulation – contributes to a crimp connection that won’t fail when it counts. When in doubt, refer to trusted resources or the connector manufacturer’s specifications for strip length and tool selection. Haisstronica provides clear instructions and even tutorial content for DIYers, because we want you to crimp with confidence. With the right prep and a quality crimping tool for wires in hand, you’ll achieve safe, professional-grade results on all your wiring projects!
Conclusion: Choosing Your Perfect Terminal Crimping Tool
In summary, the best crimping tool for your wiring project is the one that fits your specific needs – there is no universal crimper that excels at everything, but fortunately there’s a crimping solution for every application. We’ve discussed how a top-notch DIY crimper offers consistent results (thanks to features like ratcheting mechanisms), how there are various crimper types each suited to different tasks (from versatile ratchet crimpers for everyday electrical repairs to hydraulic crimpers for heavy cables), and the importance of properly matching your wire size, strip length, and connector to achieve a perfect crimp. Armed with this knowledge, you can confidently evaluate crimping tools and pick the one that will give you safe, durable electrical connections.
For most DIY enthusiasts dealing with typical automotive or household wiring, a quality ratcheting wire crimper tool set is the ideal choice – it brings pro-level reliability to your work without breaking the bank. And if you’re working with specialized connectors (whether it’s crimping Ethernet plugs, heavy-duty battery lugs, or delicate electronics pins), remember that using the correct dedicated tool will save you a lot of frustration and yield far better results. Investing in a good crimping tool is investing in the safety and longevity of your electrical projects, as a proper crimp avoids the pitfalls of loose wires, overheating, or intermittent connections.
As you shop for the perfect terminal crimper, keep the key factors in mind: does it cover your wire gauges, does it work with your connector types, is it easy to use, and is it built to last? Brands like Haisstronica have become go-to choices for many DIYers and even professionals by meeting all those criteria – offering robust, well-designed tools along with high-quality connectors to match. When you use a Haisstronica crimping tool, you can trust that each crimp will be consistent and secure, giving you peace of mind about your wiring job. In the end, the right crimping tool in your hand is like a trusty partner that makes every wiring project smoother and more successful. So choose wisely, crimp carefully, and enjoy the satisfaction of creating safe, solid electrical connections that stand the test of time. Happy crimping! And if you’re ready to upgrade your toolkit, don’t forget to check out Haisstronica’s line of professional crimping tools and connector kits – the perfect companions for any DIY wiring enthusiast looking for reliability and performance.
Sources: