
はじめに:電線の圧着は、電線の端にコネクタを取り付けることで、はんだ付けをせずに素早く確実な接続を確立する方法です。これらの電線圧着工具には様々な種類があり、適切な工具を選ぶことで作業が楽になり、圧着の信頼性も向上します。主な分類は、手動圧着工具、ラチェット圧着工具、電動(パワー)圧着工具です。この記事では、これらの圧着工具の違い、適切な電線圧着方法、一般的な使用例、最適な工具の選び方、必要なアクセサリについて説明します。 (圧着工具と圧着技術に関するより詳しい入門書については、「 ケーブル圧着工具:知っておくべきことすべて」ガイドをご覧ください。)
👉 耐久性があり、正確なラチェット圧着工具—Haisstronica がそれを実現します。

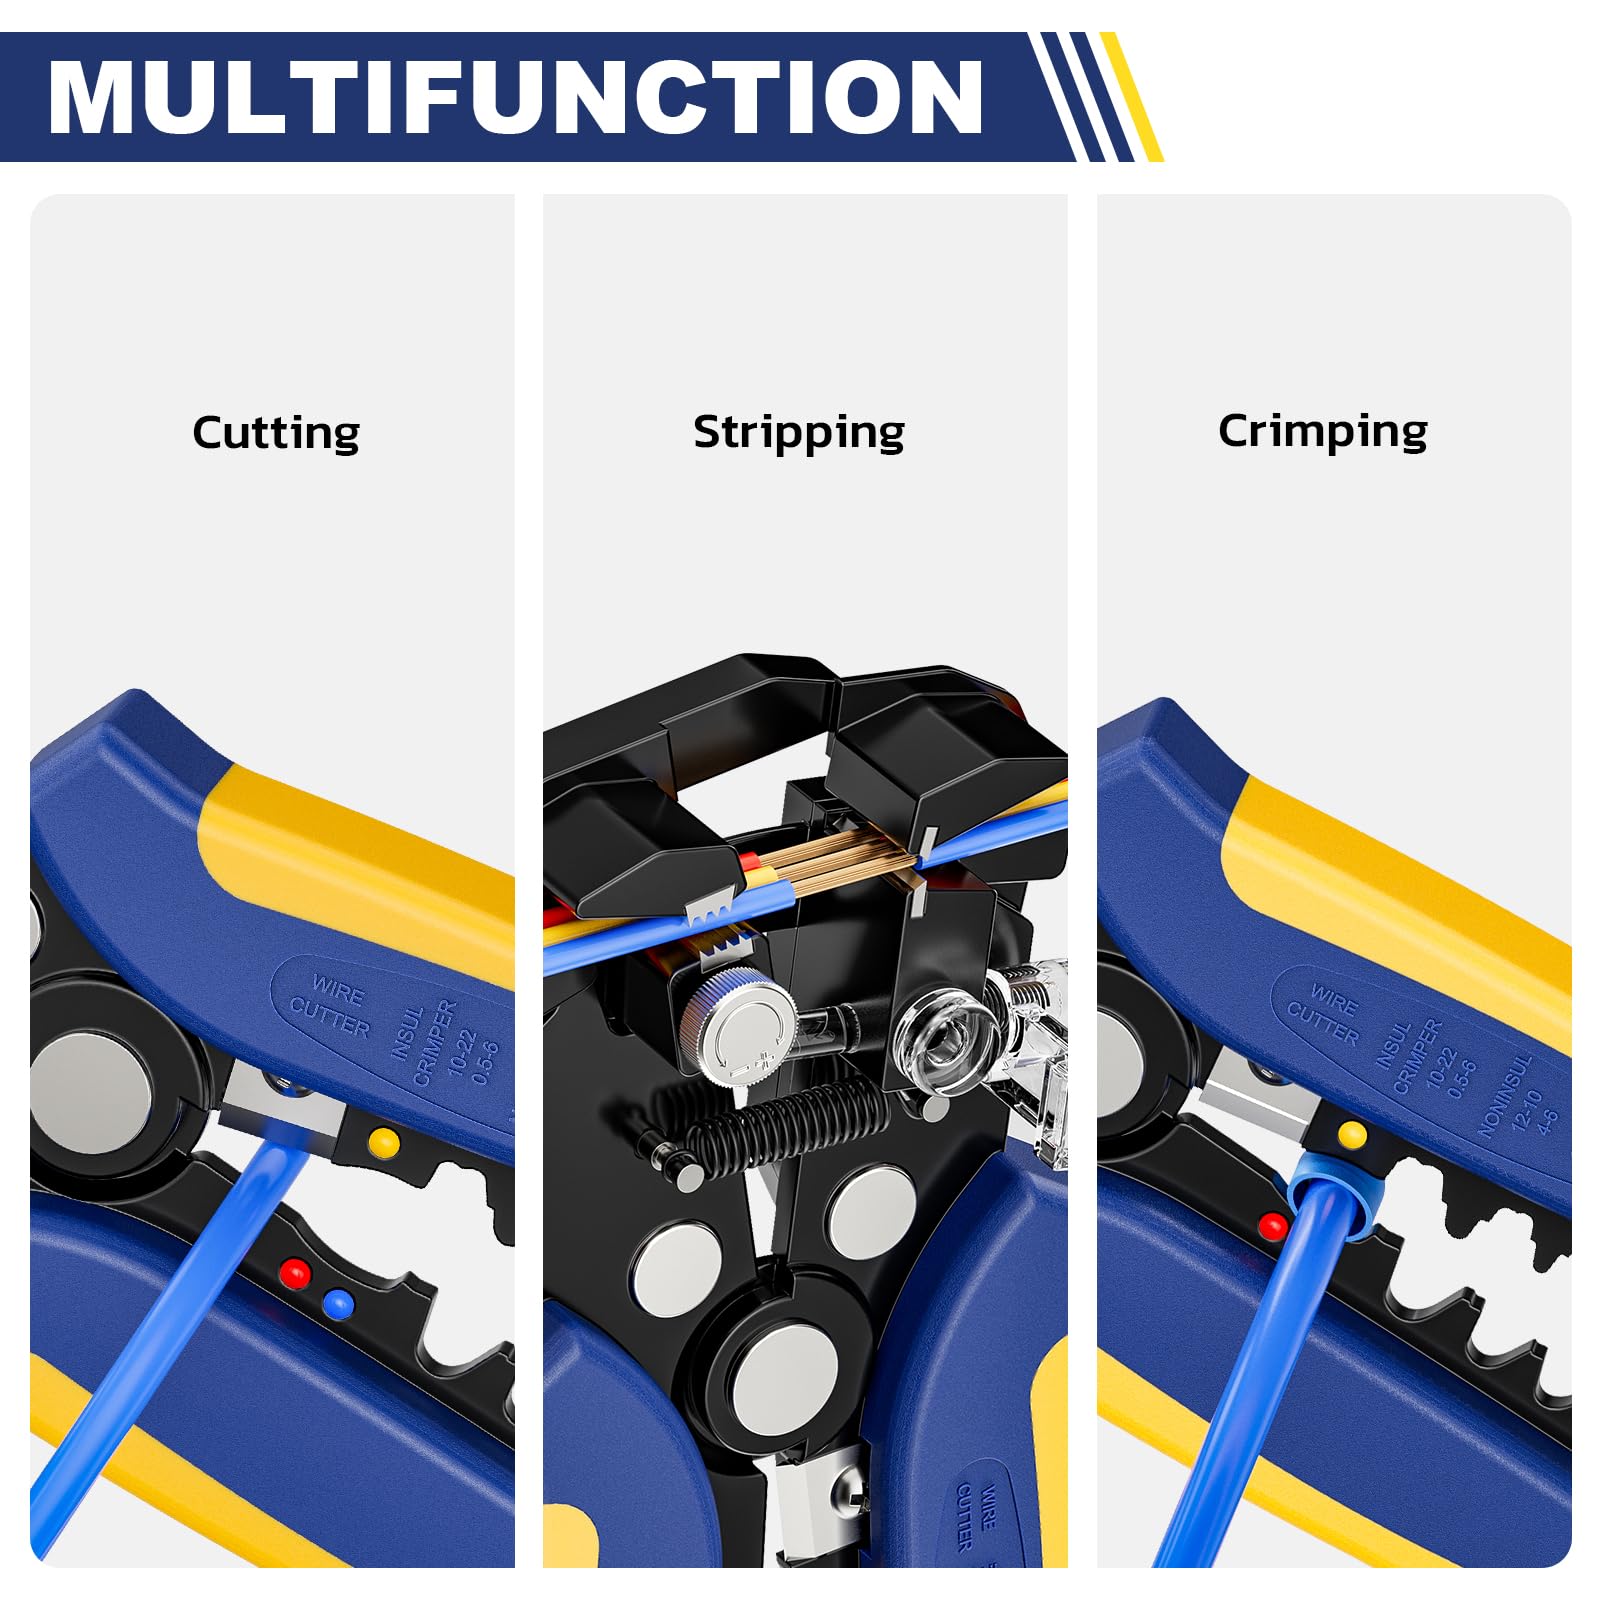
さまざまなワイヤー圧着工具の理解
圧着工具は一般的に、手動式、ラチェット式、電動式に分類されます。それぞれの圧着工具には独自の機構と最適な使用方法があります。
手動圧着工具(ラチェット式ではない)
手動圧着ペンチは、手の力と感覚のみを頼りにする基本的な手動圧着ペンチです。多くの場合、シンプルなペンチ型、または多機能工具(ワイヤーストリッパーやカッターと組み合わせる場合もあります)です。電線とコネクタをジョーに差し込み、握って圧着します。内部に補助機構はなく、圧着の品質は、どれだけ強く、均等に押し込むかによって決まります。手動圧着ペンチは安価で持ち運びに便利なため、時々使用したり、緊急の修理に最適です。しかし、初心者にとっては扱いが難しい場合があります。力が弱すぎたり強すぎたりしやすく、圧着が弱くなったり、コネクタが損傷したりするからです。ユーザーの判断に基づいて一度に握って圧着するため、均一性にはばらつきがあります。
ラチェットクリンパー(複合機構)
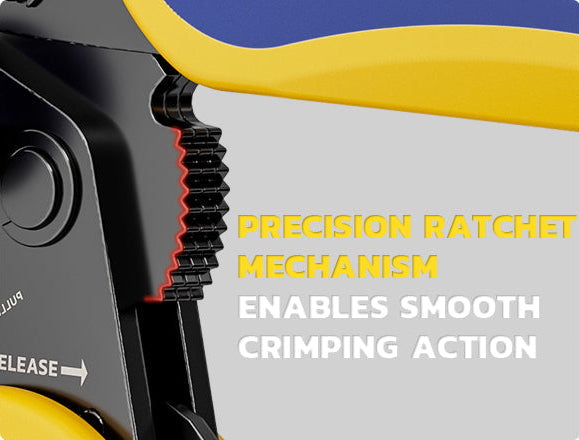
ラチェット圧着工具(ラチェット式圧着工具)は、内蔵のラチェット機構を使用して一定の圧力をかけ、完全な圧着圧縮を保証します。ハンドルを握るとラチェットが噛み合い、十分な力で圧着が完了するまで解放されません。この設計により、圧着不足(早期に停止すること)が防止され、より均一で高品質の圧着が実現します。また、ラチェット式ワイヤー圧着工具は機械的な利点も提供するため、手動圧着工具ほど手の力は必要ありません。そのため、ラチェット圧着工具は初心者にも使いやすく、初めて使用する人でも信頼性の高い圧着を実現できます。多くのラチェットワイヤー圧着工具には、異なるコネクタタイプ(例えば、絶縁端子、非絶縁端子、フェルールなどのための個別のダイセット)用の交換可能な圧着ダイが付属しており、汎用性が向上しています。その代償として、基本的な手動圧着工具よりも若干高価になりますが、ほとんどのDIY愛好家や電気技師にとって、使いやすさと一貫性は十分に価値があります。 (実際、初心者は最良の結果を得るために、良質のラチェット式ワイヤー クリンパから始めることが推奨されます。)
👉 Haisstronica のプロ用ツールでワイヤコネクタを素早くきれいに圧着します。

電動クリンパー(電池式または油圧式)
「電動」クリンパとは、電動圧着工具のことで、通常は電池駆動の油圧クリンパまたはベンチトップ自動機械です。これらの工具は、ボタンを押すかトリガーを引くだけで、モーターまたは油圧の力を利用して圧着します。電動圧着工具は一般に、大量の作業や、手動工具では非常に困難な太いケーブルの圧着に使用されます。たとえば、コードレス油圧クリンパは、重いバッテリーラグや産業用ケーブルコネクタを楽々と圧着できます。圧力が非常に一定で、ユーザーの身体的労力がほとんどかからないため、大規模な作業での手の疲労が大幅に軽減されます。最新のバッテリークリンパは、人間工学と安全性を考慮して設計されており、多くの場合、電気安全のために絶縁ボディを備えています。欠点はコストです。電動または油圧クリンパは非常に高価なので、時々趣味で使用するには過剰です。また、かさばるため、シンプルな手動クリンパよりも携帯性が低くなります。プロの電気技師、電線工事作業員、あるいは極太の電線を頻繁に圧着する方にとって、電動圧着工具は素晴らしい投資となるでしょう。しかし、一般的な自動車や家庭用の配線には、高性能なラチェット式圧着工具で十分です。
圧着工具の使い方(ステップバイステップ)
圧着工具を使ってワイヤーコネクタを圧着するのは簡単です。以下に、一般的な手順をご案内します(手動式でもラチェット式でも手順はほぼ同じです。電動式は自動的に力を加えますが、設定はほぼ同じです)。
-
適切なコネクタを選択してください:電線の太さと用途に適した圧着コネクタ(端子)をお選びください。一般的な圧着端子には、リング端子、スペード(フォーク)端子、バレットコネクタ、バットスプライスコネクタなどがあります。コネクタの推奨電線サイズ(例:絶縁端子の場合は赤、青、黄色の色分け)が電線に適合していることを確認してください。サイズやタイプが不適切なコネクタを使用すると、良好な結果が得られません(例:コネクタが大きすぎるとしっかりと圧着できず、小さすぎると電線にフィットしません)。
-
電線の被覆を剥がす:ワイヤーストリッパーを使用して、電線の端から約6mm(1/4インチ)の被覆を剥がします(ほとんどの標準コネクタの場合)。銅線を切らないように注意してください。太いケーブルや特殊なコネクタの場合は、メーカーのガイドラインに従ってください(例えば、同軸ケーブルや点火コードには、被覆を剥がすための特別な要件があります)。
-
電線をコネクタに挿入します。むき出しの電線の端をコネクタのバレルに完全に差し込みます。被覆を剥がした芯線は金属スリーブの奥まで入り、絶縁体はバレルにちょうど接触するようにしてください。むき出しの芯線が突き出ていないことを確認してください。突き合わせ接続を使用する場合は、両端から電線を挿入します。閉端圧着キャップの場合は、複数の電線を片側から挿入します。正しく挿入することで、圧着時に確実な電気接触が確保されます。
-
コネクタを圧着工具に装着します。圧着工具を開き、コネクタ(電線を装着した状態)を正しい圧着ダイのキャビティに挿入します。ほとんどの圧着工具には、複数のダイサイズ、または一般的なコネクタサイズに対応した色分けされたマーキングが付いています。絶縁端子の場合は、通常、コネクタに対応するマーク(赤、青、または黄色)付きのスロットを使用します。コネクタの向きを正しく合わせます。コネクタに継ぎ目がある場合は、通常、継ぎ目がダイの窪みのある側を向くようにします(継ぎ目が開かないようにするため)。正しい向きにすることで、圧着工具がコネクタを均等に圧縮するのに役立ちます。
-
しっかりと圧着します。圧着工具のハンドルを最後まで握り、コネクタを電線の周りに圧縮します。ラチェット式圧着工具の場合は、ラチェットサイクルが完了して自動的に解放されるまで押し込みます(締め付けられる感覚があり、カチッと音がして解放されます)。手動圧着工具の場合は、コネクタが完全に圧着されるまで一定の圧力をかけ続けます。太い電線の場合は、かなりの力が必要になる場合があります。コネクタの金属バレルが変形し、電線をしっかりと固定します。重要:部分的に圧着しただけで止めないでください。一度の動作で完全に圧着してください(ラチェット工具では途中で止めることができません)。
-
圧着部の点検:圧着されたコネクタを取り外し、電線を軽く引っ張ってしっかりと固定されていることを確認します。正しく圧着されていれば、電線はしっかりと固定され(抜け落ちることはありません)、緩んだ芯線は見えません。絶縁端子の絶縁体にひび割れがないか、圧着部がバレルの中央にきているかを確認してください。熱収縮コネクタの場合は、ヒートガンを使用してチューブを収縮させ、しっかりと密着させます。圧着部が変形しているように見える場合や電線が緩んでいる場合は、切断し、新しいコネクタで再度圧着してください。問題のある圧着部はそのままにしないでください。
適切な圧着工具を用いてこれらの手順に従うことで、強力で信頼性の高い接続が保証されます。より詳細な手順(同軸コネクタなどの特殊なケースを含む)については、「 ケーブル圧着工具:知っておくべきことすべて」の記事をご覧ください。
👉 Haisstronicaワイヤコネクタ圧着工具と完璧なプレスでレベルアップしましょう。

圧着工具の適用シナリオ
圧着工具は、電線を確実かつ恒久的に接続する必要があるあらゆる場所で使用されます。以下に、一般的な用途と、最適な圧着工具の種類をいくつかご紹介します。
-
自動車・船舶配線:車両や船舶は常に振動にさらされるため、信頼性の観点から圧着ワイヤコネクタが好まれます。ラチェット式端子圧着工具は、スピーカー用スペードコネクタ、バッテリーケーブル用リング端子、ワイヤ接続用バットコネクタなど、ほとんどの自動車配線修理に使用されます。船舶用途では、腐食防止のため絶縁防水圧着コネクタ(熱収縮端子)が使用されます。高品質のラチェット式圧着工具を使用することで、これらの圧着は確実に防水されます。太い端子(自動車のバッテリーケーブルなど)の場合は、ワイヤサイズが大きいため、油圧式またはハンマー式の圧着工具が必要になる場合があります。
-
電気DIYと家庭修理:家電製品の修理、照明器具の設置、トレーラーの配線など、家庭の電気工事では、標準コネクタ(リングスプライス、フォークスプライス、バットスプライス)を取り付けるために圧着工具を使用します。10~22AWGの電線に対応した基本的なラチェット式圧着工具は、一般的なランプコードやスピーカーコードなどに対応できるため、これらの作業に最適です。電気圧着工具を使用すると、プロ仕様の規格に準拠した接続(例えば、アース線にリング端子を圧着してネジの下に取り付けるなど)が可能になります。
-
電子機器とネットワーク:通信ケーブルやデータケーブルには、小型で特殊な圧着工具が使用されます。例えば、RJ45モジュラープラグ圧着工具は、イーサネットネットワークケーブル専用に設計された圧着工具の一種です。同様に、テレビやCCTV用の同軸ケーブルには、同軸圧着工具で接続する六角形の圧着コネクタが使用されています。これらのコネクタは、精度を上げるためにラチェット式になっていることが多いです。ArduinoやPCハードウェアを扱う場合は、細いケーブル用のデュポンコネクタ圧着工具やフェルール圧着工具に遭遇するかもしれません。これらの圧着工具には、高精度のミニ圧着工具が必要です。
-
ソーラーパネルと再生可能エネルギーの配線:太陽光発電設備では、多くの場合MC4ソーラーコネクタが使用され、PVパネルのリード線に圧着する必要があります。信頼性の高い耐候性接続を確保するため、専用のMC4コネクタ圧着工具(通常はMC4ピンサイズ用に設計されたラチェット工具)を使用します。オフグリッドシステムやバッテリーバンクシステムで非常に太いケーブルを使用する場合は、銅製ラグをケーブルに接続するために油圧式またはバッテリー駆動式の圧着工具が必要になる場合があります。
-
その他の用途:圧着工具は、電気配線以外にも、配管(PEXパイプ継手の圧着)、航空宇宙(高性能圧着ピンと校正済みクリンパー)、さらには工芸品や宝飾品(ワイヤーの極小圧着ビーズ)などにも使用されています。これらの分野では、特殊なクリンパー(例えば、ワイヤーロープ用の圧着工具やスチールケーブル用のケーブルスウェージング工具など)が使用されることもあります。原理は同じで、スリーブまたはコネクタを材料の周りに変形させることです。どの分野でも、作業に適したタイプのクリンパーを使用することが成功の鍵となります。
👉 コンパクトなパワー- Haisstronicaクリンパープライヤーの性能を実感できます。

適切な圧着工具の選び方
必要な圧着工具を決定するときは、プロジェクトの範囲と作成する接続の種類を考慮してください。
-
電線サイズ(AWG範囲):使用する電線サイズに合った工具を選びましょう。一般的な自動車用電線や家庭用電線(AWG22~10程度)を主に圧着する場合は、その範囲に対応する標準的なラチェット式圧着工具が最適です。非常に太い電線(AWG8、AWG4など)の場合は、高性能な手動ラグ圧着工具や電動/油圧式圧着工具が必要になる場合があります。一方、非常に細い電子機器用電線(AWG24~30)の場合は、それらのサイズに対応する精密圧着工具を探してください。想定されている電線サイズ範囲外の工具を使用すると、圧着不良が発生します。
-
コネクタの種類:圧着する端子またはコネクタについて考えてください。絶縁ビニル/ナイロン端子、非絶縁(裸)端子、熱収縮コネクタ、フェルール、または特殊端子でしょうか?コネクタの種類によって、必要なダイプロファイルが異なる場合があります。柔軟性が必要な場合は、交換可能なダイが付いた圧着工具キット、または多目的端子圧着工具を選択してください。例えば、Haisstronicaの熱収縮コネクタ用ラチェットワイヤ端子圧着工具(AWG 22~10)は、絶縁された熱収縮型端子を確実に圧着するように設計されています(絶縁体を貫通することなく適切な圧力を加えます)。さまざまな絶縁圧着と非絶縁圧着を行う予定の場合は、工具(または付属のダイ)が両方に対応していることを確認してください。
-
作業頻度と作業量:これは、手動、ラチェット、電動の中から選ぶ上で重要な要素です。少量のコネクタをたまに圧着するだけ(ちょっとしたDIY作業など)であれば、基本的な手動圧着工具またはラチェット式圧着工具で費用対効果が高く、十分な作業量を確保できます。頻繁に使用する場合や、大量の圧着作業(数百本の電線を圧着する自動車整備工場や組立ラインなど)の場合は、ラチェット式工具を使用すると作業時間を短縮し、疲労を軽減できます。また、効率性を高めるために電動式圧着工具にアップグレードする価値があるかもしれません。一般的に、少量の作業には手動式手動圧着工具が最適ですが、大量または極太の電線を圧着する必要がある場合は、自動式または油圧式の圧着工具が効果的です。
-
使いやすさとスキルレベル:初心者の方、または確実な仕上がりをお求めの方は、ラチェット式圧着工具が最適な選択肢です。ラチェット式はミスが少なく、正しい技術で作業できます(前述の通り、良質なラチェット工具であれば、圧着不良を起こすことはほとんどありません)。ラチェット式ではない手動圧着工具は、熟練したプロであれば問題ないかもしれませんが、安定した品質が求められる場合はお勧めしません。また、ハンドルの人間工学的な設計も考慮しましょう。握り心地の良いグリップを探し、手の力が気になる場合は複合てこ構造の圧着工具を選ぶとよいでしょう。
-
予算:シンプルな手動圧着工具が最も安価で、ラチェット式圧着工具は中価格帯、電動/油圧式圧着工具はかなり高価です。高品質な圧着工具を手に入れるために大金を費やす必要はありません。中価格帯のラチェット式ワイヤー圧着工具キットは非常に手頃な価格で、ほとんどのニーズに対応できます。生産性の向上や機能(0ゲージケーブルの圧着など)が価格に見合う場合にのみ、電動圧着工具に投資しましょう。評判の良いブランドの高品質な手動圧着工具であっても、一生使い続けられ、プロフェッショナルな仕上がりを実現できることを覚えておきましょう。
まとめると、作業要件に合わせて圧着工具を選ぶことが重要です。一般的な配線作業を行う趣味人や電気技師にとって、信頼性と使いやすさの点で、汎用性の高いラチェット式圧着工具が最適です。油圧式やバッテリー式の圧着工具は、本当に力やスピードが必要な場合にのみ使用しましょう。
圧着用アクセサリおよび関連製品
圧着工具を使用するには、適切なコネクタを使用し、便利なアクセサリをいくつか用意することが不可欠です。考慮すべき点をいくつかご紹介します。
-
各種圧着コネクタ:各種電線コネクタ(端子)キットを常備しておきましょう。一般的な電気圧着コネクタには、リング端子、スペード/フォーク端子、バットスプライスコネクタ、クイックディスコネクト(ブレード)端子、バレットコネクタ、フェルールなどがあります。種類を揃えておくことで、様々な配線作業に対応できます。例えば、自動車の配線作業を頻繁に行う場合は、様々なサイズの絶縁バットスプライスコネクタとリング端子を複数用意しておく必要があります。確実な圧着を実現するために、コネクタは良質のもの(通常は錫メッキ銅)を使用してください。
-
コネクタの絶縁体の種類:コネクタには、絶縁タイプ(プラスチックスリーブまたは熱収縮チューブ)と非絶縁タイプがあります。それぞれに適したダイ設定または工具を使用してください。絶縁端子用圧着工具は、プラスチックを切断せずに圧着できる形状のダイを備えていますが、非絶縁端子用圧着工具は、より強固な圧着を実現するために金属に直接食い込む場合があります。不適切なダイを使用すると、コネクタが損傷したり、圧着が弱くなる可能性があります。圧着工具の中には、複数のジョー溝や交換可能なダイを備え、絶縁端子と非絶縁端子の両方に対応しているものもあります。用途に合わせて使い分けてください。非絶縁コネクタを圧着した後は、絶縁と張力緩和のために、接続部に熱収縮チューブを通すことができます。
-
交換可能な圧着ダイス:作業対象が複数のコネクタタイプにまたがる場合は、交換可能なダイスを備えた圧着工具キットをご検討ください。これらのキットには、ラチェット式圧着工具ハンドル1個と複数のダイスセット(例えば、絶縁端子用、小型フェルール圧着用、同軸コネクタ用など)が付属しています。ダイスの交換は通常、数本のネジやスナップイン機構で簡単に行えます。これにより、1つの工具で多くの作業に対応でき、複数の専用圧着工具を所有するよりもコストとスペースを節約できます。例えば、Haisstronicaは、絶縁配線端子から点火端子、デュポンピンまで、あらゆるコネクタを圧着できる6~8種類のダイスを備えたラチェット式圧着工具キットを提供しています。
-
ワイヤーストリッパー&カッター:高品質のワイヤーストリッパーは、圧着ペンチと併用する必需品です。適切な長さの被覆をきれいに剥がすことは、圧着品質に大きく影響します。多くの電気技師は利便性からワイヤーストリッパーと圧着工具が一体になったものを使用していますが、専用のワイヤーストリッパーの方が作業が速く、精度も高くなります。一部の圧着ペンチにはカッターやストリッパーが内蔵されていますが、配線が多い場合は、別途自動ワイヤーストリッパーを用意すると準備作業がスピードアップします。
-
熱収縮チューブとヒートガン:非絶縁コネクタを使用している場合、または保護性能を強化したい場合は、熱収縮チューブが役立ちます。接続部に熱収縮チューブをかぶせ、圧着後に収縮させることで、接合部を湿気から保護し、絶縁性を高めます。熱収縮圧着コネクタにはこの機能が内蔵されていますが、そうでない場合は、様々な直径の熱収縮チューブを複数用意しておくとよいでしょう。チューブの収縮には、一般的なヒートガン、あるいはライター(ただし注意が必要です)でも使用できます。
-
圧着工具のメンテナンス:最後に、工具のお手入れをしましょう。ラチェット式圧着工具(多くの機種は張力調整ホイール付き)は、定期的に目盛りを確認してください。ジョーやダイスを清潔に保ち、グリースや銅粉などが付着しないように注意しましょう。ピボットポイントに少量のオイルを塗布すると、スムーズな動作を維持できます。適切なメンテナンスを行えば、ワイヤー圧着工具は長年にわたり安定した性能を発揮します。
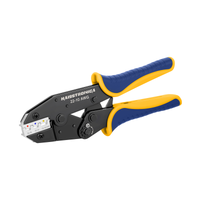
日常のほとんどのニーズに対応する、特におすすめの製品が、 AWG 22~10 熱収縮コネクタ用 Haisstronica ラチェット式ワイヤ端子圧着工具です。このラチェット式圧着工具は、自動車や船舶の配線に使用される一般的な絶縁端子(熱収縮端子を含む)用に設計されています。快適なグリップと精密なラチェット機構を備え、初心者でもプロ仕様の仕上がりでワイヤコネクタを圧着できます。幅広いAWG範囲と堅牢な構造により、キットに必須の優れた多目的電気圧着工具です。Haisstronica コネクタ アソートメント(熱収縮絶縁付きのさまざまなリング、スペード、バットコネクタを含む)と組み合わせれば、ほぼすべての配線プロジェクトに自信を持って取り組むことができます。
(おまけのヒント:同じ種類の圧着作業を頻繁に行う場合は、パネル配線用のフェルール圧着工具、大量生産用の自動ワイヤ圧着工具、さらには作業をスピードアップするための自動調整式絶縁ストリッパーなどの専用工具も検討すると良いでしょう。ただし、ほとんどのユーザーにとって必要なのは、高性能のラチェット圧着工具と高品質のコネクタだけです。)
👉 Haisstronicaワイヤコネクタクリンパを使用してすべての端子を釘付けにします。

よくある質問
Q:ワイヤー圧着工具は何に使用しますか?
A:電線圧着工具 (または電線クリンパ) は、電線束の周囲に金属スリーブを圧縮 (圧着) することで、電線の端にコネクタを取り付けるために使用されます。これにより、はんだ付けを必要とせずに安全で低抵抗の電気接続が作成されます。圧着工具はあらゆる種類の電気作業に使用されます。たとえば、電気技師の圧着工具は、リング端子またはスペード端子で電線を終端処理したり、2 本の電線をバットスプライスで接続したり、RJ45 プラグをネットワーク ケーブルに固定したりできます。目的は、強力な機械的および電気的結合を形成することです。適切なサイズのコネクタを正しい方法で正しく圧着すれば、外れる心配がなく、確実に電気を伝導します。圧着接続は、迅速で一貫性があり、振動にも強いため、自動車、航空機、家電製品、電子機器で広く使用されています。つまり、圧着工具は、安全で恒久的な接続を確立するために電線に電気コネクタを圧着する必要があるあらゆる場所で使用されます。
Q:圧着工具を使わずに電線を圧着できますか?
A:適切な圧着工具を使用せずにワイヤを圧着することはお勧めしません。ペンチを使用してコネクタをワイヤに押し付けたり、バイスで押しつぶしたりすることは技術的には可能ですが、確実で安全な圧着は得られません。圧着は、ワイヤを切断することなくコネクタを変形させるために正確で均一な圧力に依存しており、これは専用の圧着工具のジョーが設計されている機能です。適当なペンチを使用すると、圧着が緩んでワイヤが抜けたり、接続に高抵抗が生じたり、圧着しすぎたり (ワイヤが損傷する) する可能性があります。圧着工具がなく、すぐに直す必要がある場合は、ワイヤに適した圧着工具が手に入るまで、別のコネクタ方法 (たとえば、ワイヤコネクタ キャップ(ワイヤ ナット) を使用してワイヤをねじったり、はんだ付けしたりする) を使用する方がよいでしょう。「ペンチで圧着できますか?」と尋ねる人もいますが、結局のところ、真の圧着品質は得られません。信頼性と安全性を確保するには、手頃な価格のワイヤー圧着工具に投資してください。基本的なラチェット式圧着工具でも比較的安価であり、いつでも適切に作業を行うことができます。
Q:ラチェット式クリンパは手動式クリンパよりも優れていますか?
A:ほとんどの場合、はい。ラチェット式クリンパは、均一で高品質な圧着を実現するのに適しています。ラチェット機構により、圧着部が完全に圧縮された後にのみ工具が解放されるため、毎回均一な圧着結果が得られます。 この一貫性は、ユーザーの力と感覚だけに頼るラチェットのない手動圧着工具では実現が困難です。初心者やたまにしか使用しない人にとって、ラチェット式圧着工具は推測による作業を排除します。手の力はそれほど必要ではなく、圧着不足 (接続が緩む原因となる) や圧着過剰 (コネクタやワイヤが損傷する原因となる) になる可能性が低くなります。手動圧着工具は、経験豊富なユーザーの手にかかれば確かに良好な圧着を実現できますし、一度握るだけで完了するため、単一の圧着の場合は少し速いかもしれません。ただし、習得曲線は急峻で、プロですらラチェット式圧着工具がばらつきをなくすのに役立つと認めています。ある業界記事が述べたように、 「手動圧着工具は、新しいツールの使いやすさと一貫性により、陳腐化に向かっています」 。ラチェット式圧着工具の唯一の欠点は、最もシンプルなプライヤー式圧着工具よりも若干価格が高いことですが、圧着品質の向上(そして圧着不良の減少)を考えると、その価値は十分にあります。まとめると、ラチェット式圧着工具は、作業を容易にし、より信頼性の高い結果をもたらすため、ほとんどの電気コネクタ圧着作業において最適な選択肢です。
ユーザーフレンドリーなおすすめ
スムーズなラチェットとクイックリリースにより、自動圧着工具のような感覚で繰り返し作業をスピードアップ。粘着剤付きコネクタと組み合わせることで耐久性の高い接合部を実現し、自動圧着工具ならではの正確な圧着を実現します。コンパクトな電線圧着工具は、狭いパネルや現場キットにもフィットします。
👉 推測は不要です。Haisstronica のラチェットを使用すると、ペンチによる圧着が簡単になります。