Introduction
Installer un câble basse tension pour votre éclairage extérieur peut transformer un jardin sombre en un paysage magnifiquement éclairé. Ce projet est facile à réaliser soi-même, même si vous débutez en câblage paysager , à condition de bien planifier et d'utiliser les bons matériaux. Avec les grandes pelouses, la difficulté est de garantir un éclairage continu, ce qui implique souvent d'utiliser un câble de section plus importante, comme du 10/2, pour supporter de longues distances et des charges plus élevées. Dans ce guide, nous commencerons par les bases du câble paysager, puis vous expliquerons étape par étape le câblage électrique de vos éclairages extérieurs pour une grande pelouse. Nous expliquerons comment câbler vos éclairages paysagers en toute sécurité, discuterons des différents calibres de fil (du câble extérieur 14/2 classique au 10/2 robuste) et partagerons des conseils pour entretenir un système d'éclairage sûr et efficace. À la fin, vous saurez comment choisir le bon fil électrique pour vos éclairages extérieurs , l'installer correctement et assurer un éclairage paysager lumineux et sûr.
Qu'est-ce qu'un fil de jardin 10/2 ? (Définition)
Un câble d'éclairage paysager basse tension, comme le 10/2, est généralement composé de conducteurs en cuivre toronné, enveloppés dans une gaine isolante durable. Le cuivre pur est utilisé pour son excellente conductivité et son efficacité : il réduit les pertes de puissance et permet à vos éclairages de briller à pleine puissance. L'isolation est généralement résistante aux UV et homologuée pour l'enfouissement direct , ce qui permet d'enfouir le câble dans le sol sans conduit supplémentaire. (La plupart des câbles d'éclairage paysager vendus pour l'éclairage extérieur sont homologués pour l'enfouissement direct, mais il est toujours judicieux de vérifier les spécifications du produit.) .) La gaine du câble est souvent noire et se fond dans le sol ou le paillis, et peut être marquée d'un texte tel que « fil paysager basse tension 10/2 ».
Comment le 10/2 se compare-t-il aux autres câbles d'éclairage paysager ? Les tailles courantes de câbles d'éclairage paysager sont : 16/2, 14/2, 12/2 et 10/2 (le premier chiffre correspond au calibre AWG, le second au nombre de conducteurs). Un câble d'éclairage paysager 16/2 ou 14/2 est plus fin et utilisé pour les courts trajets ou quelques luminaires LED, tandis que le 12/2 est de calibre moyen pour les distances moyennes. Le 10/2 est le plus épais de ces câbles standard, utilisé pour les longs trajets ou les installations à forte puissance. Par exemple, si vous n'avez qu'un petit jardin avec quelques luminaires près de la maison, un câble 14/2 plus léger pour l'éclairage extérieur peut suffire. En revanche, si vous prévoyez de câbler une grande pelouse ou d'installer plus de 15 lumières sur un même circuit, le câble d'éclairage paysager 10/2 (10 AWG, 2 conducteurs), plus épais, transportera le courant 12 volts avec une chute de tension minimale, garantissant ainsi une luminosité aussi élevée pour les luminaires éloignés que pour ceux situés près du transformateur. En résumé, les fils d'éclairage paysager existent en différents calibres ; choisir le bon est crucial pour garantir le bon fonctionnement de vos éclairages, sans surchauffe ni atténuation. Dans la section suivante, nous détaillerons les étapes d'installation en prenant comme exemple un fil 10/2 pour une grande pelouse.
Étapes de l'opération : Comment installer un fil de jardin (calibre 10/2)
Installer un câblage paysager dans un grand jardin peut sembler complexe, mais en le décomposant en plusieurs étapes, vous pouvez l'aborder comme n'importe quel autre projet domestique. Vous trouverez ci-dessous un guide étape par étape pour installer un câble basse tension 10/2 pour votre système d'éclairage extérieur. Ces étapes s'appliquent à la plupart des installations d'éclairage paysager basse tension (12 V) :
-
Planifiez votre aménagement : Commencez par planifier l'emplacement de chaque luminaire et le cheminement des câbles. Dessinez un plan simple de votre pelouse et marquez l'emplacement des luminaires. Déterminez la distance entre le transformateur (source d'alimentation) et le luminaire le plus éloigné. Cela vous aidera à déterminer le cheminement du câble et à vous assurer de couper une longueur suffisante. Pour une propriété plus grande, pensez à diviser l'éclairage en zones ou en sections distinctes afin qu'aucune section ne soit excessivement longue. Anticiper permet de minimiser le gaspillage de câbles et de s'assurer d'avoir le bon matériel à disposition.
-
Choisissez le bon transformateur et le bon calibre : Les éclairages paysagers basse tension nécessitent un transformateur pour convertir le courant domestique de 120 V en 12 V. Choisissez un transformateur suffisamment puissant pour tous vos luminaires (additionnez la puissance de chaque luminaire). En règle générale, n'utilisez que 80 % de la capacité du transformateur pour éviter toute surcharge. Pour une grande pelouse, vous pourriez avoir besoin d'un transformateur de 200 W ou 300 W, voire de plusieurs. Concernant le calibre du fil, vous avez probablement choisi un fil paysager de calibre 10/2 en raison des longues distances ou de la charge plus importante. À titre indicatif, si votre installation dépasse environ 45 mètres ou si elle consomme plus de 150 à 200 watts, un calibre 10 est recommandé. Un fil plus épais (calibre inférieur) réduit la chute de tension, permettant à chaque luminaire de bénéficier d'une tension suffisante pour fonctionner correctement. Conseil : si votre configuration est très étendue, il peut être plus efficace de faire passer plusieurs câbles plus courts de calibre 12 ou 10 vers différentes sections (méthode du home-run ou du hub), plutôt qu'un seul câble extrêmement long.
-
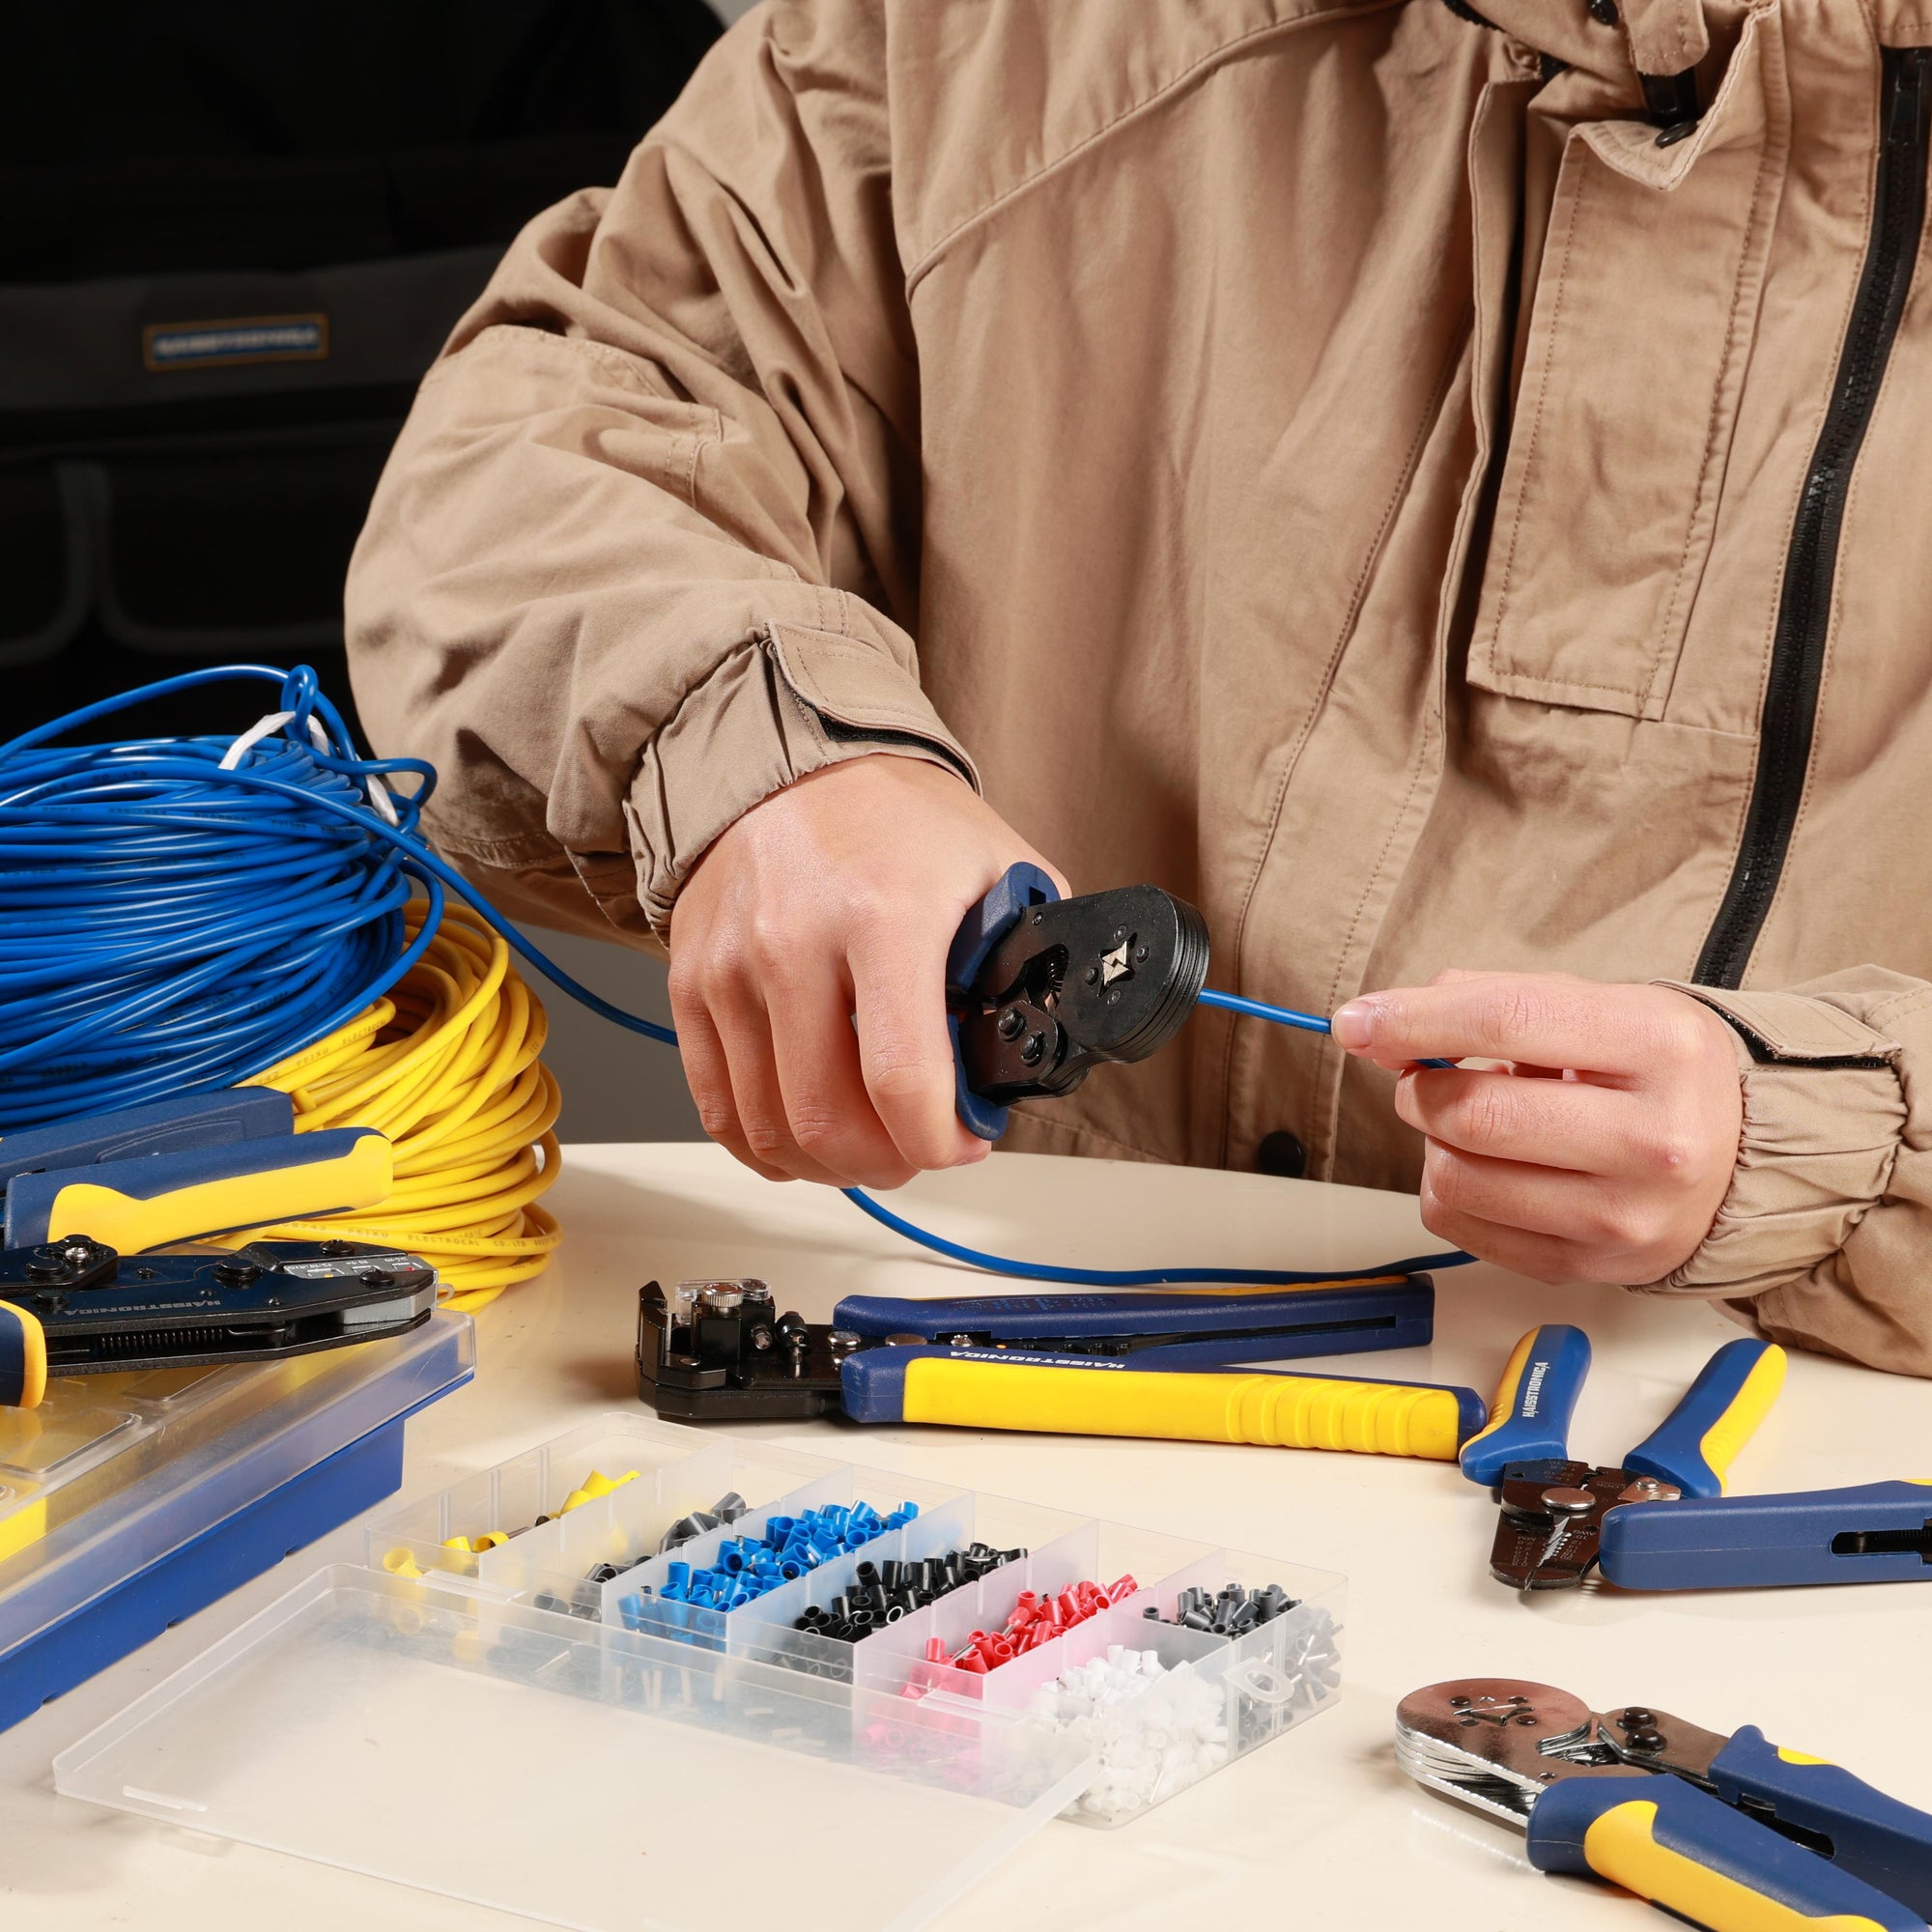
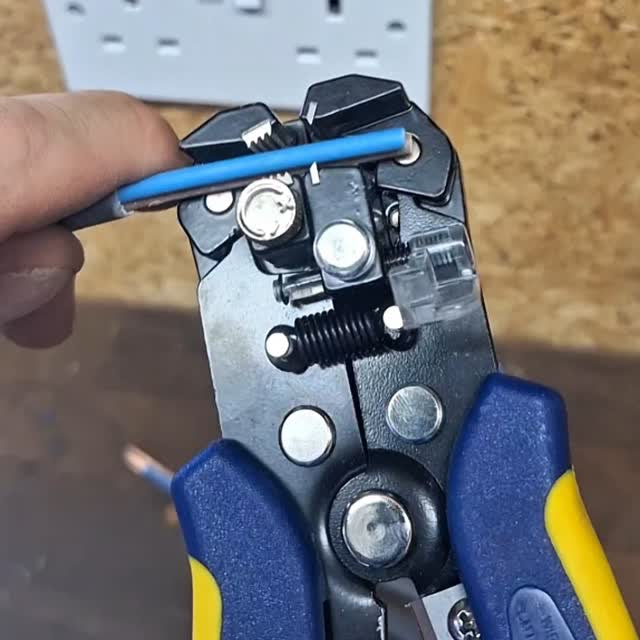
Rassemblez les outils et le matériel : Avant de commencer l'installation, rassemblez tout le nécessaire. Cela comprend le fil basse tension pour l'éclairage paysager (assurez-vous d'avoir une longueur suffisante pour tous les passages), vos luminaires, le transformateur et les connecteurs. Vous aurez besoin d'une pince à dénuder (le fil de calibre 10 étant épais, utilisez une pince robuste compatible avec le calibre 10), d'une pelle ou d'un coupe-bordures pour enterrer le fil, d'un tournevis pour les bornes du transformateur et de connecteurs étanches pour l'éclairage paysager afin de raccorder les fils aux luminaires. Les connecteurs étanches sont importants : ils protègent les épissures de l'humidité et de la corrosion, garantissant ainsi une connexion fiable à long terme. Il en existe différents types : certains luminaires sont équipés de connecteurs rapides qui percent l'isolant du câble, tandis que d'autres utilisent des serre-fils vissés remplis de silicone ou des connecteurs à sertir et thermorétractables pour une étanchéité permanente. Assurez-vous que le connecteur utilisé est conçu pour une utilisation en extérieur/enfouissement direct afin de garantir une connexion sûre et sèche.
-
Disposition des lumières et du câblage (essai à blanc) : Placez vos luminaires à leur emplacement prévu sans les installer définitivement. Déroulez votre câble 10/2 et faites-le passer au sol en suivant le tracé prévu, en partant du transformateur et en allant d'un luminaire à l'autre. Maintenez le câble à quelques centimètres du pied des plantes ou des bordures pour éviter de l'endommager lors de l'enfouissement. Laissez environ 45 à 60 cm de câble libre à chaque luminaire. Ce jeu supplémentaire (environ 45 cm) vous permettra de déplacer ou d'ajuster le luminaire ultérieurement, et facilitera les branchements. Prévoyez également du jeu près des angles ou des virages au cas où vous auriez besoin de repositionner quoi que ce soit. Une fois que tout est installé et que vous êtes satisfait de la disposition, n'enfouissez pas encore le câble ; nous commencerons par connecter les lumières et testerons le système.
-
Connecter les fils aux luminaires : Une fois le câble en place à côté de chaque luminaire, il est temps de les connecter. Pour les luminaires avec câbles pré-connectés : la plupart des éclairages paysagers comportent deux fils courts (câbles) à connecter au câble principal. Si vos luminaires sont équipés de connecteurs à pince (courants dans de nombreux kits DIY), vous pouvez simplement les clipser sur le câble principal 10/2 en alignant et en appuyant sur le connecteur. Il percera l'isolant et entrera en contact avec le cuivre (assurez-vous qu'il s'enclenche fermement et que les broches métalliques entrent en contact avec les conducteurs). Cependant, pour une grande pelouse et un câble 10/2 plus épais, vous préférerez peut-être des connexions plus robustes. Une meilleure méthode consiste à réaliser une épissure en T à l'aide de serre-fils étanches ou de connecteurs à sertir :
-
Utilisation de serre-fils étanches : Dénudez environ 1,9 cm des deux conducteurs du câble principal à la pointe de chaque luminaire (vous devrez couper le câble, puis dénuder les extrémités de chaque section). Dénudez également les extrémités des fils du luminaire. Torsadez un fil du luminaire avec un côté du câble principal coupé, et l'autre avec l'autre côté du câble principal coupé. Vissez ensuite un serre-fils rempli de silicone sur chaque paire. Le silicone ou la graisse à l'intérieur assurera l'étanchéité une fois serré.
-
Utilisation de connecteurs à sertir et de gaines thermorétractables : Une alternative consiste à utiliser des connecteurs à sertir en laiton (connecteurs à épissure bout à bout). Insérez les fils à chaque extrémité du connecteur et serrez les vis (ou sertissez-les s'il s'agit d'une gaine à sertir) pour les maintenir ensemble. Après la connexion, glissez une gaine thermorétractable sur l'épissure et utilisez un pistolet thermique ou un chalumeau pour la rétracter afin de créer une étanchéité parfaite. Cette méthode permet une connexion très fiable, étanche et permanente. C'est un peu plus complexe, mais idéal pour une durabilité à long terme – un facteur important pour le câblage d'un grand espace vert où l'on ne souhaite pas déterrer les connexions ultérieurement.
Vérifiez la solidité de toutes les connexions de chaque luminaire. Important : Pendant cette opération, le transformateur ne doit pas être sous tension ; ne le branchez pas tant que tout le câblage n'est pas terminé et inspecté. Essayez également d'échelonner les épissures (évitez de placer les deux épissures d'un même luminaire au même endroit sur le câble principal ; décalez-les de quelques centimètres) afin de préserver la résistance du câble et de faciliter l'enroulement ou l'enfouissement.
-
-
Câblage du transformateur : Une fois tous les luminaires connectés au câble principal, accédez au transformateur (généralement fixé sur un mur extérieur ou un poteau près d’une prise). Assurez-vous que le transformateur est bien fixé et débranché . Ouvrez le panneau du transformateur pour accéder aux bornes basse tension. Dénudez environ 1,9 cm d’isolant aux extrémités des deux conducteurs du câble principal. Sur un fil 10/2, les conducteurs sont généralement noirs ; le fil branché à la borne de sortie 12 V n’a aucune importance (la basse tension CA n’a pas de polarité). Desserrez les vis des bornes et insérez chaque conducteur sous une pince de serrage distincte, puis serrez-les fermement. Tirez doucement sur les fils pour vous assurer qu'ils sont bien fixés. Vérifiez qu'aucun brin de cuivre ne dépasse et ne risque de court-circuiter. Si votre transformateur possède plusieurs prises de tension (12 V, 13 V, 14 V, etc.), consultez vos calculs de chute de tension ou les instructions du fabricant pour choisir la prise appropriée. Par exemple, pour les très longues distances, vous pouvez utiliser une prise de 13 V ou 15 V pour compenser la chute de tension. En revanche, une seule prise de 12 V convient à la plupart des systèmes LED, à condition que le calibre du câble soit suffisant.
-
Testez le système : Maintenant que toutes les connexions sont établies, il est temps de procéder à un test complet avant d’ enfouir le câble. Branchez ou allumez le transformateur pour mettre le système sous tension. Tous vos éclairages extérieurs devraient s’allumer. Vérifiez le bon fonctionnement de chaque luminaire. Portez une attention particulière à la luminosité des éclairages les plus éloignés du transformateur : si leur intensité est nettement plus faible, vous pourriez subir une chute de tension. Dans un système bien conçu utilisant un fil de calibre 10, les LED auront généralement une luminosité uniforme (les éclairages extérieurs LED modernes supportent une tension d’entrée de 9 V à 15 V). ). Si des lumières sont éteintes ou faibles, résolvez le problème immédiatement : vérifiez les connecteurs (une broche n'a peut-être pas percé le câble, ou un capuchon de connexion est peut-être desserré) et assurez-vous que la puissance totale ne surcharge pas le transformateur ou le câble. Vérifiez également les réglages de la minuterie ou du capteur de lumière du transformateur, le cas échéant (vous pourrez toutefois les régler ultérieurement). Il est bien plus facile de résoudre les problèmes de connexion maintenant qu'une fois tout enterré.
-
Enterrer le câble : Une fois que tout fonctionne, débranchez l’alimentation du transformateur. Il est temps d’enterrer le câble pour une installation propre et sûre. À l’aide d’une pelle plate ou d’une trancheuse , creusez une tranchée étroite d’environ 15 cm de profondeur le long du parcours du câble. 15 cm est généralement assez profond pour protéger le câble des perturbations superficielles (comme les aérateurs ou les râteaux), mais suffisamment peu profond pour faciliter le creusement (les câbles basse tension ne nécessitent généralement pas d’enfouissement profond, contrairement aux lignes haute tension). Placez le câble dans la tranchée au fur et à mesure. Dans les zones herbeuses, une astuce consiste à fendre le gazon avec un coupe-bordure et à y enfoncer le câble. Dans les massifs, un enfouissement de quelques centimètres est acceptable, surtout sous du paillis. Important : Laissez les boucles de fil lâches (fil supplémentaire au niveau des luminaires) enroulées et enterrées près du luminaire au cas où vous auriez besoin de retirer une certaine longueur ultérieurement. Après avoir posé le câble dans la tranchée, remblayer avec de la terre et tasser pour restaurer la surface. Si vous creusez une tranchée dans votre pelouse, remettez les mottes de gazon en place ; d'ici une semaine ou deux, la ligne de tranchée disparaîtra. Félicitations, vous avez installé vos éclairages paysagers ! Il ne vous reste plus qu'à programmer la minuterie du transformateur ou la cellule photoélectrique intelligente pour que les lumières s'allument au crépuscule et s'éteignent à l'aube (ou selon votre horaire préféré).
-
Creuser une tranchée d'environ 15 cm le long de la pelouse pour enterrer le câble basse tension. Enterrer le câble est une étape finale cruciale pour protéger le câble d'aménagement paysager . Une bêche plate ou un coupe-bordure est idéal pour creuser une tranchée étroite dans la pelouse (comme illustré ci-dessus) où le câble d'aménagement paysager peut être inséré . Comme il s'agit d' un câble d'aménagement paysager à enfouissement direct , vous pouvez le poser directement dans le sol, sans conduit . Veillez à recouvrir entièrement le câble afin qu'il soit hors de vue et à l'abri des tondeuses à gazon et des animaux domestiques. Une fois enterré, l'installation est très discrète : seuls les luminaires doivent être visibles, pas le câblage. Enfin, remettez en état tout aménagement paysager perturbé pendant le creusement. Le câblage électrique de vos éclairages extérieurs est maintenant prêt et votre jardin devrait être magnifiquement illuminé à la tombée de la nuit.

Scénarios d'application pour l'utilisation du fil 10/2 sur les grandes pelouses
Vous vous demandez peut-être : ai-je vraiment besoin d'un fil de calibre 10 à deux conducteurs pour mon projet ? Cela dépend du scénario. Voici quelques cas d'application typiques où un fil basse tension de calibre 10/2 est le meilleur choix :
-
Grands terrains et longues distances : Si vous possédez une grande propriété (par exemple, si l'éclairage s'étend sur une grande cour avant, une cour arrière et une longue allée), la distance entre le transformateur et le luminaire le plus éloigné peut dépasser largement 30 mètres. L'utilisation d'un calibre plus important, comme du 10 AWG, minimise la chute de tension, même à plus de 60 mètres, pour un éclairage continu. Des bobines de fil d'aménagement paysager de 10 2 pouces (500 pieds) sont disponibles pour couvrir de très longues distances en un seul passage si nécessaire (ou vous pouvez installer plusieurs câbles plus courts). En comparaison, l'utilisation d'un fil plus petit de 16 ou 14 AWG sur de telles distances peut entraîner une atténuation notable de l'intensité lumineuse à l'extrémité de la ligne en raison de la résistance du fil.
-
Charges d'éclairage à forte puissance : Vous installez peut-être de nombreux luminaires, par exemple 20 LED ou plus, ou quelques éclairages paysagers puissants pour les arbres ou les points d'eau. Même si les LED ont une faible puissance individuelle, des dizaines d'entre elles peuvent représenter une puissance totale importante. Un câble d'éclairage paysager de calibre 10/2 peut transporter plus de courant (ampérage) en toute sécurité qu'un câble fin. Par exemple, un câble d'éclairage paysager classique de calibre 12 peut supporter environ 200 watts sur une distance moyenne, tandis qu'un câble de calibre 10 peut supporter plus de 300 watts avec une perte de tension moindre. L'utilisation d'un câble de calibre 10/2 en cas de forte charge permet de maintenir la chute de tension dans une plage acceptable (en général, visez une chute de tension inférieure à 1,5 V). Ceci est particulièrement important si vous possédez des éclairages paysagers halogènes plus anciens, plus gourmands en énergie ; ils nécessitent souvent un câblage plus épais pour fonctionner dans leur plage étroite de 10 à 12 V. (bien que la plupart des systèmes modernes utilisent des LED qui sont plus indulgents).
-
Installations commerciales ou publiques : Dans les espaces verts commerciaux, les parcs ou les lotissements, les installations d'éclairage couvrent souvent de vastes zones avec plusieurs zones d'éclairage. Dans ce cas, des câbles de calibre 10/2 ou même 8/2 peuvent être utilisés depuis les transformateurs centraux vers les différentes zones. Par exemple, un concentrateur dans le jardin peut se diviser en plusieurs massifs ; un câble paysager reliant le centre d'alimentation principal à ce concentrateur pourrait être de calibre 10/2 et alimenter des fils de calibre 12/2 pour chaque zone plus petite. Le câble basse tension choisi pour les alimentations principales doit être robuste afin de garantir la fiabilité et la luminosité de l'ensemble du système.
-
Agrandissement futur en vue : Si votre projet actuel est de taille moyenne, mais que vous prévoyez d'ajouter des éclairages ultérieurement, il peut être judicieux d'installer dès maintenant une ligne principale plus épaisse. Par exemple, un câble d'éclairage paysager de calibre 12/2 pourrait suffire pour les 8 premiers éclairages. Mais si vous prévoyez d'installer 8 autres éclairages sur le même tronçon, passer d'emblée à un câble basse tension de calibre 10/2 vous évitera d'avoir à poser un nouveau câble ultérieurement. La différence de coût est modeste comparée aux travaux de retranchement ultérieurs. Ce scénario est courant pour les propriétaires qui commencent par un éclairage d'allée basique, puis étendent leur installation à des éclairages d'accentuation pour le jardin, etc. Poser un câble d'éclairage paysager légèrement plus épais dès le départ permet de dégager une marge de manœuvre pour une puissance supplémentaire.
En résumé, le fil d'aménagement paysager 10/2 est utilisé lorsque la distance ou la charge dépassent la capacité des fils plus petits. Pour un petit jardin, vous pouvez utiliser un fil 14/2 ou 12/2 sans problème. Mais pour les grandes pelouses , les longs câbles ou les grands éclairages, le fil 10/2 garantit un fonctionnement optimal de tous vos éclairages extérieurs avec une chute de tension minimale. Il s'agit essentiellement de fournir une tension constante à chaque luminaire de votre jardin. En cas de doute, vous pouvez effectuer des calculs de chute de tension (comme décrit dans de nombreux guides d'éclairage) ou consulter les recommandations du fabricant. De nombreux experts recommandent de commencer avec un calibre 12 AWG minimum pour la plupart des systèmes LED, et de passer au 10 AWG si la longueur du fil (en pieds) multipliée par la puissance totale est supérieure à environ 10 000 watts. En utilisant cette règle empirique : par exemple, 150 watts × 80 pieds = 12 000 watts, il est donc conseillé de passer au 10 AWG ou de diviser le fil en deux pour éviter une faible luminosité à la fin.
Guide d'achat : Choisir le bon fil et les bons accessoires pour votre jardin
Choisir les bons matériaux facilitera votre installation et assurera la longévité de votre système. Voici un guide d'achat rapide pour les composants de câblage paysager, axé sur les câbles basse tension pour usage extérieur , et plus particulièrement sur le câble paysager 10/2 et ses alternatives :
-
Calibre de fil : Déterminez le calibre dont vous avez besoin. Comme indiqué précédemment, le fil d'éclairage paysager 16/2 est fin (idéal pour les courts trajets ou les charges inférieures à 50 W), le fil d'éclairage paysager 14/2 est un peu plus épais (idéal pour les trajets moyens ou les charges d'environ 100 W), le fil basse tension 12/2 est le plus courant pour les systèmes d'éclairage résidentiels moyens (prend en charge les trajets plus longs, les charges d'environ 200 W) et le fil 10/2 est destiné aux grandes installations sur de longues distances ou à forte puissance. En cas de doute entre deux calibres, il est plus prudent d'opter pour le plus épais pour une chute de tension moindre. Gardez à l'esprit que les fils plus épais sont un peu plus chers et légèrement moins flexibles, mais le gain de performance est généralement justifié pour les projets de grande envergure. De plus, utilisez toujours du fil d'éclairage paysager en cuivre toronné (presque tous les câbles d'éclairage paysager réputés sont en cuivre pur, et non en aluminium cuivré, car le cuivre offre la meilleure combinaison de conductivité et de durabilité pour une utilisation en extérieur). L'utilisation d'un câble d'éclairage extérieur basse tension en cuivre pur comme celui de Haisstronica garantit une luminosité et une efficacité maximales.
-
Longueur du câble : Déterminez approximativement la longueur de câble dont vous avez besoin. Il est conseillé d'en acheter un peu plus que prévu pour tenir compte du jeu et des imprévus. Le fil d'aménagement paysager est généralement vendu en bobines de 30, 76 ou 152 mètres . Par exemple, vous trouverez du fil d'aménagement paysager 12/2 de 152 mètres pour les grands projets, ou des bobines plus petites de 30 mètres de fil d'aménagement paysager 16/2 pour les travaux plus simples. Si vous installez du fil d'aménagement paysager 10/2 , vous pouvez opter pour un rouleau de 30 mètres pour une courte longueur, mais pour une grande pelouse, vous aurez peut-être besoin de plusieurs bobines, voire d'une seule (certaines marques proposent du fil d'aménagement paysager 10/2 de 76 ou même de 152 mètres). Assurez-vous que l'emballage indique la longueur (par exemple, « fil d'aménagement paysager 10/2 de 30 mètres » ou toute autre longueur) afin d'en avoir suffisamment. C'est frustrant de tomber à court de fil en plein chantier ! À titre de référence, Haisstronica propose du fil paysager basse tension 10/2 en bobines de 30, 60 et 76 m (100, 200 et 250 pieds), et les versions 12/2 et 14/2 sont disponibles en bobines allant jusqu'à 150 m (500 pieds). Prévoyez toujours un peu de fil supplémentaire ; vous pourrez utiliser les surplus pour des extensions ou des réparations ultérieures.
-
Qualité et homologations : Tous les câbles d'aménagement paysager ne se valent pas. Privilégiez les câbles homologués UL ou certifiés, garantissant leur conformité aux normes de sécurité (températures nominales, résistance au feu comme VW-1, etc.). L'isolation doit être étiquetée pour une utilisation en extérieur ou en enfouissement direct. Par exemple, un bon produit affichera des caractéristiques telles que la résistance aux UV, l'étanchéité et une plage de températures de fonctionnement. Ces caractéristiques garantissent que l'isolation du câble ne se fissurera pas sous l'effet du soleil ou du froid extrême. Vérifiez également que le fil résiste au soleil et à l'humidité , ce qui est le cas de la plupart des câbles d'aménagement paysager isolés en PVC. Si vous voyez des termes comme « SJTW », il s'agit plutôt de rallonges ; un câble d'aménagement paysager peut simplement indiquer « câble d'éclairage basse tension 150 V » ou similaire. Tous les fils de la collection de câbles d'aménagement paysager Haisstronica , par exemple, sont spécialement conçus pour l'éclairage extérieur, avec une isolation en PVC robuste et un nombre élevé de brins de cuivre pour plus de flexibilité.
-
Connecteurs : Dans votre kit de câblage, prévoyez de nombreux connecteurs étanches pour éclairage paysager . Ils peuvent être vendus sous forme de packs de serre-fils remplis de gel, de connecteurs à clipser ou de connecteurs thermorétractables. Si vous avez une méthode de connexion préférée, achetez-en plusieurs. Pour un fil principal de calibre 10/2, assurez-vous que le connecteur est compatible avec un calibre 10 AWG (certains petits connecteurs torsadés ne vont que jusqu'à 12 AWG ; vérifiez donc l'étiquette). Les connecteurs étanches pour éclairage paysager sont essentiels à la longévité ; un serre-fils standard pour emplacement sec peut être défectueux à l'extérieur. Voici quelques options courantes :
– Capuchons de connexion remplis de silicone : faciles à utiliser, il suffit de les visser. Privilégiez le grand format pour les fils de fixation de 10/2 et plus.
– Connecteurs à percer (connecteurs à encliquetage) : souvent inclus avec les luminaires ; assurez-vous qu’ils peuvent accueillir des fils plus épais si vous prévoyez de les utiliser sur un câble 10/2.
– Bouchons à sertir thermorétractables : ils assurent une étanchéité parfaite. Vous aurez besoin d'une pince à sertir et d'un pistolet thermique, mais ils sont parfaits pour les grands systèmes. -
Outils et accessoires : Si vous n’en avez pas déjà, pensez à vous procurer un bon outil à dénuder capable de dénuder proprement les fils de calibre 10 AWG (certaines pinces à dénuder sont des outils combinés couvrant les calibres 10 à 22 AWG). Un outil bon marché pourrait avoir des difficultés avec les fils épais. Une bêche à tranchée ou un coupe-bordure demi-lune peuvent également accélérer considérablement l’enfouissement de longs câbles. Vous pourriez également avoir besoin de piquets ou de crampons en U pour fixer le fil à certains endroits avant l’enfouissement (pratique si vous posez le fil un jour et l’enfouissez plus tard ; les piquets le maintiennent en place pour éviter les trébuchements). Enfin, du ruban adhésif ou des marqueurs de fils peuvent être utiles pour identifier plusieurs câbles au niveau du transformateur si vous avez plusieurs zones, afin de savoir lesquelles correspondent.
En choisissant soigneusement les bons produits de câblage paysager , vous garantirez une installation plus fluide et un système fiable. L'achat d'un câble d'éclairage paysager de qualité peut coûter un peu plus cher au départ, mais vous évitera des soucis par la suite. Si vous achetez en ligne, privilégiez les marques connues ou les produits bien notés. Le lien ci-dessous est un exemple de fournisseur de câbles paysagers de haute qualité.
FAQ (Foire aux questions)
Q1 : Puis-je utiliser un fil 14/2 ou 12/2 au lieu de 10/2 pour mes éclairages paysagers ?
R : Oui, vous pouvez utiliser d'autres calibres selon les besoins de votre projet. Les câbles extérieurs 14 AWG (14 AWG) et 12 AWG sont courants pour les petits systèmes. La règle est la suivante : utilisez le fil le plus épais (calibre le plus bas) adapté à votre configuration et à votre charge. Si vos longueurs sont courtes (disons moins de 15 mètres) et que vous ne possédez que quelques luminaires LED, un câble d'éclairage paysager 14/2 peut convenir et vous faire économiser un peu d'argent. Le câble d'éclairage paysager 12/2 est très populaire pour son rapport qualité-prix et ses performances, et convient à la plupart des jardins de taille moyenne. Optez pour un câble d'éclairage paysager 10/2 uniquement si vous avez besoin d'une capacité supplémentaire, généralement pour des longueurs supérieures à environ 30 mètres ou pour de nombreux éclairages. Il est également possible de combiner plusieurs calibres dans un même système (par exemple, utiliser du 10/2 pour la ligne principale et des dérivations de 14/2 pour des sections plus courtes), mais cela complexifie les épissures. Par souci de simplicité, de nombreux bricoleurs s'en tiennent à un seul calibre tout au long de leur projet, couvrant la distance ou la charge la plus défavorable. N'oubliez pas qu'un fil plus épais = moins de chute de tension, il n'y a donc aucun inconvénient (à part le coût et la rigidité) à utiliser du 10/2 partout si vous souhaitez des performances maximales.
Q2 : À quelle profondeur dois-je enterrer les câbles d'aménagement paysager basse tension ?
R : La profondeur recommandée pour l'enfouissement des câbles basse tension en extérieur est d'environ 15 cm . Contrairement aux lignes électriques haute tension qui nécessitent souvent 45 cm ou plus, le Code national de l'électricité (NEC) autorise généralement l'enfouissement direct des câbles paysagers avec une couverture moins profonde, car ils ne sont que de 12 à 15 V et présentent un risque d'électrocution minimal. À 15 cm de profondeur, vos câbles seront protégés de la plupart des travaux de jardinage. Il est toutefois conseillé d'éviter les zones où vous pourriez creuser profondément pour d'autres projets, ou de faire passer le câble dans un conduit en PVC dans les zones à fort trafic si cela vous inquiète (bien que ce ne soit pas obligatoire). Contactez toujours votre service local de localisation des services publics avant de creuser si vous creusez plus profondément, afin d'éviter d'autres lignes enterrées. Dans les massifs de fleurs, certains glissent simplement le câble sous du paillis ou de la terre à quelques centimètres de profondeur ; si cela peut fonctionner, c'est plus sûr à la profondeur d'une bêche. De plus, partout où le fil apparaît (au niveau du transformateur ou à l'endroit où il se connecte à un appareil), essayez de le dissimuler et de le protéger (par exemple, utilisez des manchons de conduit ou cachez-le derrière des structures) pour éviter tout dommage accidentel.
Q3 : Que signifient réellement « 10/2 », « 12/2 », etc. ?
R : Ce sont les désignations de calibre de fil. Le premier chiffre correspond au calibre (selon la norme américaine « Wire Gauge »), et le deuxième chiffre après la barre oblique indique le nombre de conducteurs. Ainsi, un fil d'éclairage paysager 10/2 signifie un câble à deux conducteurs de calibre 10 AWG. Un fil 12/2 signifie un câble à deux conducteurs de calibre 12 AWG, et ainsi de suite. On trouve parfois un câble d'éclairage paysager écrit 10-2 , voire sans la barre oblique, comme « fil d'éclairage paysager 12 2 », ce qui signifie la même chose. En principe, tous les câbles d'éclairage paysager basse tension sont à deux conducteurs (une simple paire de fils), car ils transportent le phase et le neutre 12 V (ou le positif/négatif dans les systèmes CC) jusqu'aux éclairages et inversement. Contrairement aux câbles CA domestiques, la plupart des systèmes d'éclairage paysager 12 V ne comportent pas de fil de terre séparé. Le calibre est inversement proportionnel à la taille : un fil d'éclairage paysager de calibre 14 est plus fin qu'un fil de calibre 10. Les fils plus fins ont une résistance au mètre carré plus élevée et donc une chute de tension plus importante. Les fils plus épais ont une résistance plus faible, ce qui leur permet de transmettre l'énergie sur de plus longues distances avec moins de pertes. Par exemple, le calibre 16 AWG a une résistance environ deux fois supérieure à celle du calibre 10 AWG ; c'est pourquoi le calibre 16/2 n'est recommandé que pour les très courtes distances ou les faibles charges.
Q4 : Mes lumières de paysage sont faibles ou certaines sont plus lumineuses que d’autres. Quel est le problème ?
R : Une luminosité inégale indique généralement une chute de tension ou un circuit surchargé. Si les lumières à l'extrémité du câble sont sensiblement plus faibles, cela signifie que le câble est trop long ou que le calibre du fil est trop fin pour la puissance de ce dernier. Lorsque le courant arrive à l'extrémité, une certaine tension a déjà chuté le long du câble. Pour résoudre ce problème, vous pouvez opter pour un calibre de fil plus épais (par exemple, de 14/2 à 12/2, ou de 12/2 à 10/2), ou raccourcir/redistribuer les câbles (par exemple, ajouter un deuxième câble à partir du milieu du transformateur, ou utiliser un concentrateur). Si toutes les lumières sont faibles, vérifiez que votre transformateur n'est pas sous-dimensionné ou surchargé ; si vous dépassez sa puissance, il pourrait produire une tension plus faible. Assurez-vous également que toutes les connexions sont bien serrées et non corrodées ; une mauvaise connexion peut introduire une résistance. L'utilisation de luminaires 100 % LED réduit considérablement les risques de variation d'intensité lumineuse, car leur faible puissance et leur meilleure tolérance aux chutes de tension que les anciennes ampoules halogènes. Dans un système LED bien conçu et équipé d'un fil de section appropriée, la luminosité devrait être uniforme. Un voltmètre peut aider à diagnostiquer les chutes de tension. Par exemple, vous pouvez mesurer la tension au premier et au dernier voyant d'un cycle ; une différence de plus de 1,5 à 2 volts indique une chute importante qui doit être corrigée.
Q5 : Ai-je besoin d'un conduit ou d'une protection spéciale pour le fil paysager ?
R : En général, non. Si vous utilisez un câble spécialement conçu pour l'éclairage paysager (souvent appelé câble d'éclairage paysager ou câble paysager 12/2 , 10/2, etc.), il est conçu pour être enterré directement dans le sol sans conduit. L'isolation est suffisamment épaisse pour résister à l'humidité et aux abrasions mineures, et le câble est doublement isolé (chaque conducteur est isolé et une gaine extérieure est présente). Cependant, dans certaines situations, une protection supplémentaire peut être utile : si le câble doit passer au-dessus du sol sur une certaine distance (le long d'un mur ou d'une clôture) ou à travers un aménagement paysager, il est conseillé de le placer dans un conduit ou une gaine de protection pour le protéger des UV et des dommages physiques. De plus, à l'endroit où le câble arrive au transformateur ou à un luminaire, un court morceau de conduit (ou une protection de fil en plastique) peut protéger le coupe-bordures des dommages. Si vous deviez faire passer un fil électrique standard de bâtiment à l'extérieur, vous auriez besoin d'un conduit, mais avec un câble basse tension pour extérieur , vous pouvez l'enterrer directement, ce qui vous épargne beaucoup d'efforts. Suivez toujours les instructions figurant sur l'emballage du câble ; s'il est écrit « enterrement direct », vous pouvez le mettre en terre tel quel.
Q6 : Où puis-je acheter du fil de fer paysager 10/2 et que dois-je rechercher ?
R : Vous pouvez acheter du fil d'éclairage paysager dans les magasins de bricolage, les magasins de matériel électrique ou en ligne. Lors de l'achat, assurez-vous d'acheter du fil d'éclairage paysager basse tension 10/2 (par exemple) et non un fil d'arrosage ou de haut-parleur (ils peuvent se ressembler, mais leur isolation ou leur qualité de cuivre sont différentes). L'emballage doit clairement indiquer le calibre et préciser qu'il est destiné à l'éclairage extérieur/paysager. Privilégiez les conducteurs 100 % cuivre ; évitez les fils en aluminium cuivré (CCA), car ils offrent une résistance plus élevée et sont moins durables en cas d'enfouissement direct. La plupart des marques réputées utilisent de toute façon du cuivre. Pour plus de commodité, voici un lien vers la collection de fils d'éclairage paysager Haisstronica , qui comprend des fils 10/2, 12/2, 14/2 et 16/2 de différentes longueurs : Collection de fils d'éclairage paysager Haisstronica – Câble basse tension 16/2, 14/2, 12/2 et 10/2 . Haisstronica propose des câbles en cuivre pur certifiés UL, avec des options telles que des rouleaux de fil basse tension 10/2 de 61 m ou de fil paysager 10/2 de 30 m , pour vous permettre de choisir la longueur dont vous avez besoin. Comparez toujours les prix au mètre : une bobine de 76 m est parfois plus économique que deux rouleaux de 30 m. Et n'oubliez pas de vous procurer des connecteurs et, si vous n'en avez pas, une pince à dénuder.
Conclusion et achat
Installer soi-même son éclairage paysager est très gratifiant : vous profitez d'un jardin plus sûr et plus beau la nuit. Utiliser un câble adapté, surtout sur une grande pelouse, est la clé d'une installation réussie. Nous avons constaté que le fil basse tension 10/2 est un outil performant pour les grands projets, fournissant de l'électricité sur de longues distances avec un minimum de pertes. En suivant les étapes de ce guide et en utilisant des matériaux de qualité, même un débutant peut obtenir un résultat professionnel. Commencez toujours par un plan précis, prenez votre temps pour réaliser des connexions étanches et solides et privilégiez la sécurité (n'oubliez pas de débrancher le transformateur pendant les travaux !).
Si vous êtes prêt à démarrer votre projet, assurez-vous d'avoir le matériel adéquat. Pour une installation de grande envergure, munissez-vous d'une bobine de fil d'éclairage paysager 10/2 et de tout autre calibre nécessaire pour les petites longueurs. Haisstronica propose une gamme complète de produits et d'accessoires de câblage paysager pour vous aider dans votre projet d'éclairage DIY. Consultez la collection de fils d'éclairage paysager Haisstronica pour trouver des fils basse tension de haute qualité (12/2, 10/2, etc.) , des connecteurs et des outils pour votre éclairage extérieur. Avec le bon fil et ce guide en main, vous serez sur la bonne voie pour éclairer votre propriété en toute sécurité et avec élégance. Profitez de votre jardin illuminé !