Introduction : Choisir les bons outils de sertissage et les bonnes cosses est crucial pour une connexion électrique sûre et durable. Bricoleurs comme professionnels se demandent souvent quand utiliser des cosses isolées ou non isolées , et en quoi la technique de sertissage diffère selon le type. Dans cet article, nous détaillerons les principales différences, les étapes de préparation (section du fil, longueur de dénudage, ajustement) et présenterons même quelques solutions du catalogue Haisstronica. À la fin de cet article, vous saurez exactement quel outil de sertissage choisir, que vous souhaitiez sertir un fil sur un connecteur en vinyle isolé ou fixer une cosse nue non isolée, et comment sertir correctement les fils avec chaque type pour des résultats fiables.
La réponse courte : quand choisir chaque outil et en quoi le sertissage diffère
Quand utiliser des cosses non isolées ou isolées ? En résumé, les cosses à sertir non isolées sont idéales lorsque l'isolation électrique n'est pas un problème (par exemple, à l'intérieur d'un panneau électrique ou pour une connexion à la terre) et que vous recherchez une solution compacte et économique. Ce sont simplement des connecteurs en métal nu, donc plus petits et moins chers, ce qui est idéal si vous prévoyez d'ajouter votre propre isolation (comme une gaine thermorétractable) ou si la connexion se fait dans une zone à faible risque. En revanche, les cosses à sertir isolées (en vinyle, en nylon ou thermorétractables) sont à privilégier en cas de risque de court-circuit ou d'exposition aux intempéries. Leur isolation intégrée protège contre les contacts accidentels et l'humidité, ce qui est essentiel si le fil est susceptible de toucher d'autres conducteurs ou d'être exposé aux vibrations, aux produits chimiques ou aux intempéries. Par exemple, si un fil sous tension passe à proximité d'autres fils, l'utilisation d'un connecteur isolé empêche les courts-circuits dangereux en recouvrant le fût de sertissage. En résumé, n'utilisez des cosses non isolées que lorsqu'une isolation supplémentaire n'est pas nécessaire, et privilégiez les cosses isolées pour plus de sécurité.
👉 Améliorez votre pince à sertir avec la précision à cliquet Haisstronica.

En quoi le sertissage est-il différent ? L'opération de sertissage, qui consiste à utiliser une pince à sertir pour comprimer la cosse sur le fil, diffère principalement par la conception et la technique de sertissage de la matrice. Les pinces à sertir non isolées présentent souvent une empreinte pointue, ou « bouton », qui mord dans le corps pour un sertissage serré. Cela crée un verrouillage mécanique solide sur le métal nu, mais une mauvaise utilisation risquerait de percer ou d'endommager le manchon en plastique d'une cosse isolée. C'est pourquoi les pinces à sertir dédiées aux cosses isolées utilisent un profil de mâchoire différent : généralement un sertissage arrondi ou ovale qui comprime la ferrule métallique interne sans fissurer l'isolant. En pratique, cela signifie qu'il ne faut jamais sertir un connecteur isolé avec une pince à sertir non isolée , car cela pourrait percer l'isolant et exposer le métal nu (risque de sécurité). L'inverse (sertir un connecteur non isolé avec une pince à sertir de type isolé) n'est pas aussi destructeur, mais il ne formera souvent pas une liaison aussi serrée Les outils de sertissage de fils appropriés sont étiquetés pour chaque type. Par exemple, certaines pinces à sertir manuelles possèdent des marquages ou des fentes distincts pour « INS » (isolé) et « NON » (non isolé). La forme et la taille du sertissage sont volontairement différentes pour les cosses isolées et non isolées afin de garantir un sertissage sûr et sans dommage.
Une autre différence réside dans la possibilité d' un double sertissage sur certaines cosses isolées. De nombreux connecteurs isolés en nylon permettent un double sertissage : une fois sur le fil nu et une seconde fois sur la partie isolée du fil, afin de réduire la traction. Ce sertissage en deux étapes améliore la résistance à la traction et aux vibrations. Les cosses non isolées, en revanche, ne sont généralement serties que sur le fût (bien que, dans certains modèles à fût ouvert, une paire d'ailettes saisisse le conducteur et une autre l'isolant pour réduire la traction en un seul mouvement). En résumé, le sertissage de fils avec des cosses isolées nécessite une compression plus douce et contrôlée autour de l'insert métallique (souvent à l'aide de matrices à code couleur), tandis que le sertissage de cosses non isolées utilise souvent une empreinte plus agressive pour former le métal à froid. Utiliser l' outil de sertissage adapté à chaque cas garantit une connexion solide sans compromettre le connecteur.
En savoir plus : Pince à sertir les câbles. Tout ce que vous devez savoir
👉 La pince à sertir fiable — Haisstronica pour AWG 22–10.

Travaux préparatoires — Taille du fil, longueur du dénudage et ajustement
Quel que soit le type de cosse à sertir, une préparation adéquate est essentielle. Avant même de prendre vos outils de sertissage , prenez le temps de préparer le fil et la cosse :
-
Adaptez le calibre du fil à la borne : Utilisez toujours une borne de taille adaptée au calibre de votre fil. Les bornes isolées facilitent cette opération grâce à leurs codes couleur standardisés : rouge pour les fils de calibre 22 à 16 AWG, bleu pour les fils de calibre 16 à 14 AWG et jaune pour les fils de calibre 12 à 10 AWG. Par exemple, une cosse à fourche isolée bleue est conçue pour les fils de calibre 16 ou 14. L’utilisation de la bonne taille garantit que le fil remplit correctement le fût de sertissage. Une mauvaise taille peut entraîner un sertissage lâche (fil trop petit dans un fût plus grand) ou un sertissage excessif qui coupe les brins (fil trop gros pour le connecteur). Pour les cosses à sertir non isolées , vérifiez les spécifications ou l’étiquetage du produit pour connaître la plage AWG prise en charge, car il n’y a pas de plastique de couleur pour signaler la taille. L’objectif est d’obtenir un ajustement parfait entre le fil et le fût.
-
Dénudez la bonne longueur d'isolant : À l'aide d'une pince à dénuder, retirez juste assez d'isolant pour que le fil nu s'insère parfaitement dans le fût de la cosse. En général, environ 6 mm (1/4 po) de fil nu sont nécessaires pour les petites cosses (jusqu'à environ 1/2 po pour les plus gros calibres). Ne dénudez pas trop : vous ne voulez pas que l'excès de cuivre nu dépasse du connecteur, ce qui pourrait provoquer des courts-circuits. À l'inverse, un dénudage insuffisant risque de coincer l'isolant sous le sertissage et de compromettre la bonne fixation du fil. En règle générale, le fil dénudé doit être suffisamment long pour qu'aucun conducteur nu ne soit visible lors de l'insertion et que son isolation soit bien en contact avec l'arrière du fût de la cosse. Conseil de pro : pour les cosses à fût ouvert (non isolées) dotées de languettes séparées pour le fil et l'isolant, dénudez uniquement la longueur de la zone de sertissage du conducteur intérieur ; l'isolant restant se trouvera sous les deuxièmes ailettes de sertissage.
-
Assurez-vous d'un ajustement parfait avant le sertissage : Après le dénudage, insérez le fil dans la cosse avant de sertir pour vérifier l'ajustement. Tous les brins dénudés doivent s'insérer parfaitement dans le fût, aucun ne doit s'écarter. Le fil doit être bien ajusté, avec un espace minimal. S'il s'agit d'une cosse non isolée, vous pouvez vérifier visuellement que le fil remplit le fût et atteint son extrémité. S'il s'agit d'une cosse isolée, assurez-vous que le fil s'insère complètement (de nombreux connecteurs isolés sont dotés d'une butée métallique à l'intérieur). C'est également le moment idéal pour orienter correctement la soudure de la cosse (pour les sertisseuses à matrices d'indentation : placez généralement la soudure du fût face à la matrice d'indentation, afin que le côté plein reçoive la force). Enfin, positionnez la cosse dans la fente appropriée de l'outil de sertissage avant de serrer. Pour les cosses isolées, utilisez la matrice de couleur correspondante (par exemple, rouge, bleu ou jaune) et alignez l'outil de manière à ce que sa mâchoire appuie sur le fût métallique sous l'isolant. Pour les câbles non isolés, choisissez l'ouverture de matrice la mieux adaptée à la taille du fût. Prenez le temps de vérifier la taille, le dénudage et l'ajustement pour que le sertissage se déroule sans problème et garantisse un sertissage solide dès le premier essai.
👉 Contrôlez les travaux difficiles — Outil de sertissage Haisstronica pour une polyvalence des câbles métalliques .
Cartographie des produits
Après avoir choisi les bonnes cosses, il vous faut également les outils de sertissage adaptés. Haisstronica propose des sertisseuses de qualité adaptées à chaque type de cosse, vous garantissant ainsi un sertissage digne d'une usine, à domicile :
-
Pour les cosses isolées : Découvrez la pince à sertir Haisstronica pour connecteurs de fils électriques isolés (AWG 22-10) – une pince à sertir à cliquet conçue pour les cosses isolées rouges, bleues et jaunes (vinyle, nylon, gaine thermorétractable). Cette pince à sertir isolée est dotée de mâchoires à code couleur (comme illustré ci-dessous) correspondant aux sections de fil, éliminant ainsi toute incertitude lors du choix du sertissage. Le mécanisme à cliquet assure une pression constante pour un sertissage correct sans écraser l’isolant. L’empreinte de la pince est conçue pour ne pas percer ni endommager la coque en plastique pendant le sertissage, ce qui permet d’obtenir un sertissage serré sur le conducteur tout en préservant l’isolant. Si vous sertissez fréquemment des connecteurs isolés , cette pince accélère le processus et produit des sertissages fiables et uniformes à chaque fois. (Lien produit : Pince à sertir pour connecteurs de fils électriques isolés.)
-
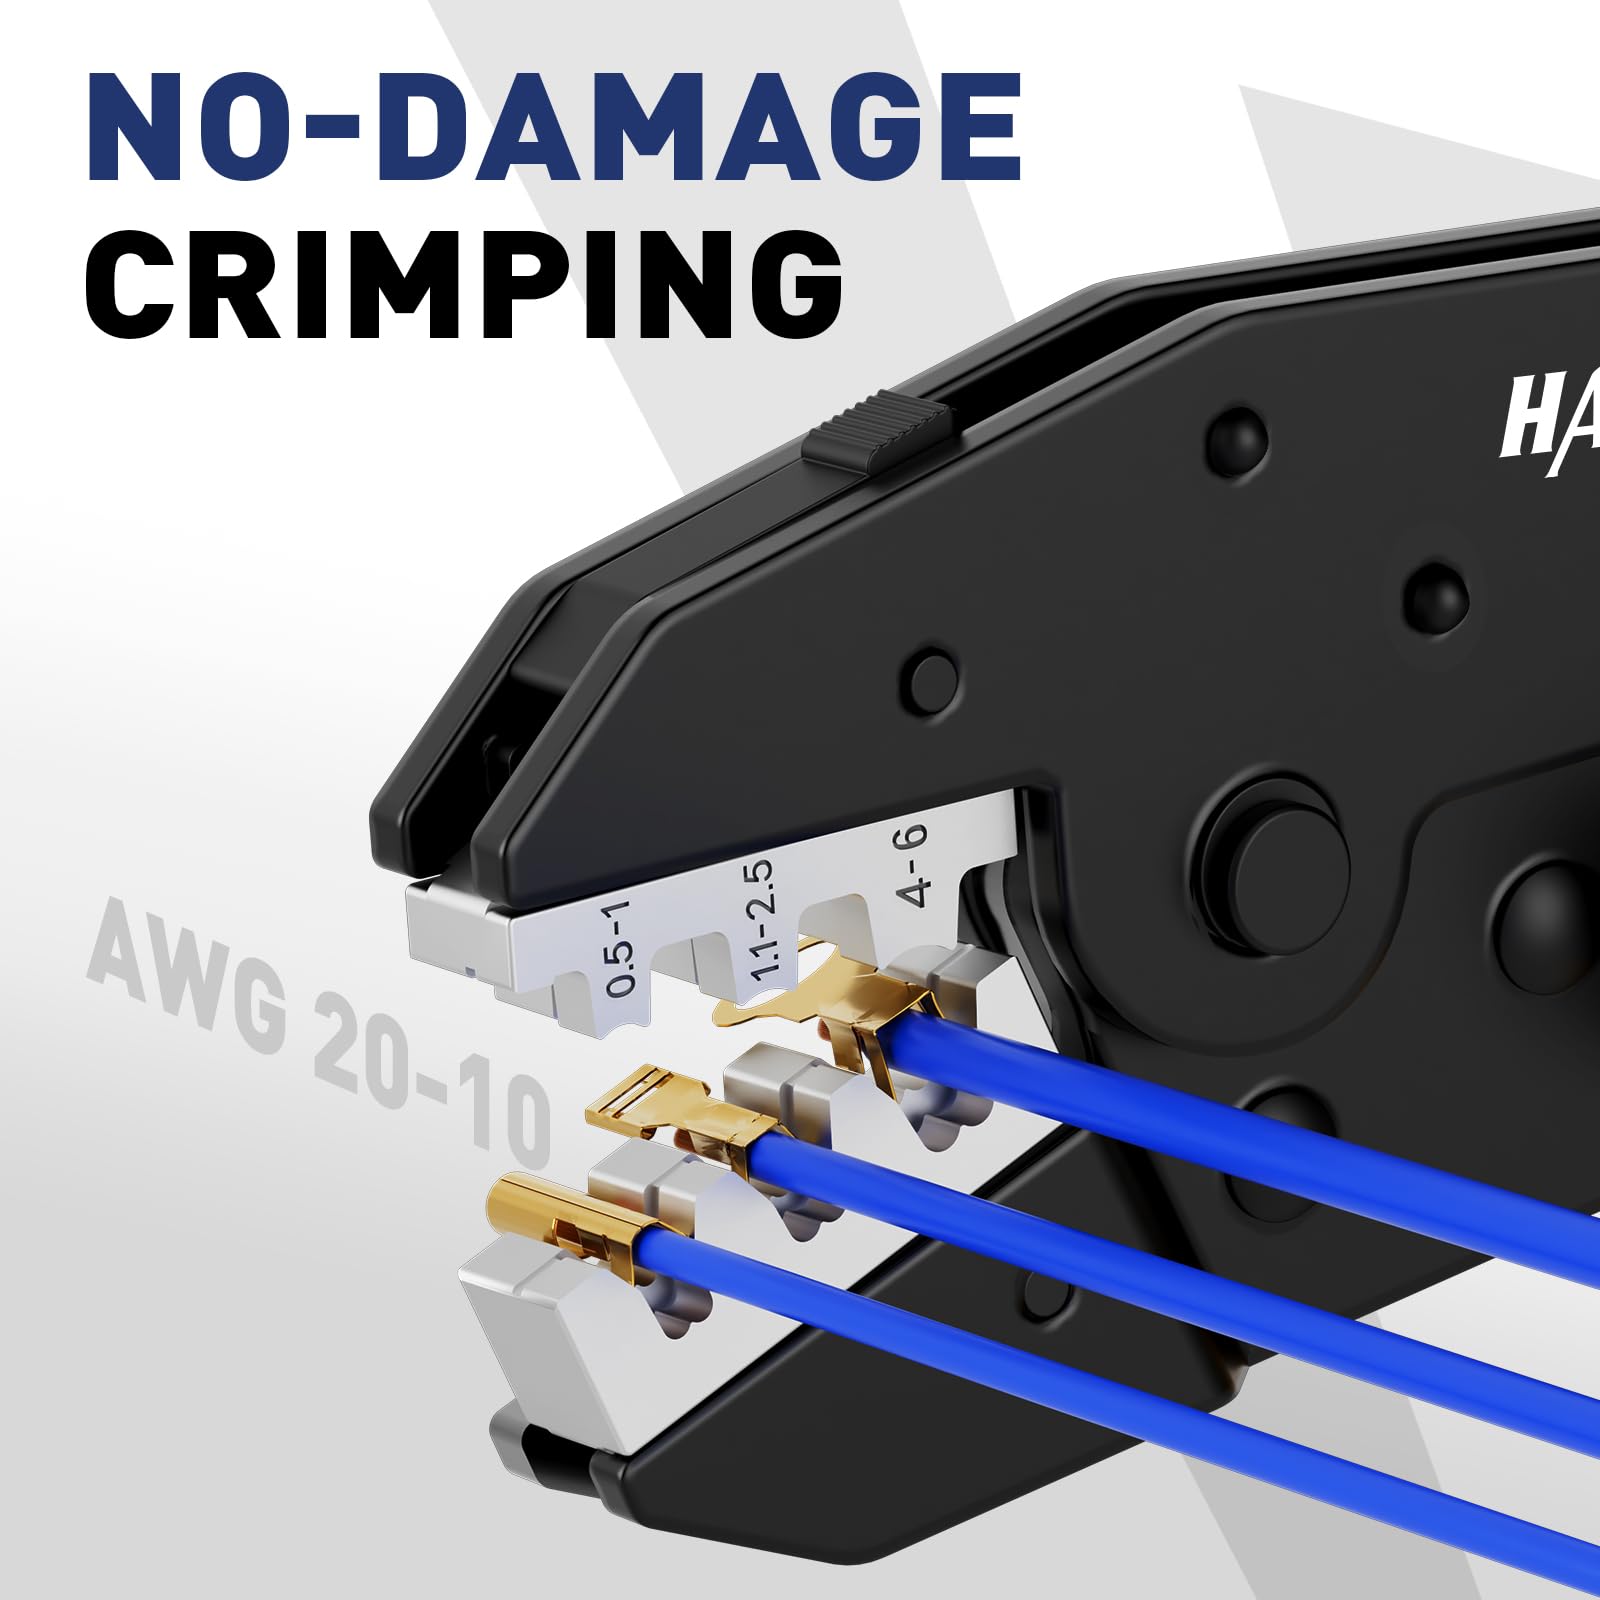
Pour les cosses non isolées (à fût ouvert) : Haisstronica propose également une pince à sertir dédiée aux cosses et embases à fût ouvert non isolées . Cet outil est idéal pour les connecteurs non isolés souvent utilisés dans l'automobile et l'électronique (tels que les cosses à fourche à fût ouvert, les cosses de bobine d'allumage ou les broches de relais/boîtiers à fusibles). Ses mâchoires de qualité professionnelle sont conçues pour sertir un fil sur ces cosses d'un seul geste fluide, en enroulant fermement les languettes autour du fil et de l'isolant. Le profil de sertissage, plus large et denté, saisit fermement le fil sans le couper. Comme notre pince isolée, sa conception à cliquet avec molette de compression réglable garantit un sertissage constant et évite les sertissages excessifs ou insuffisants. Chaque cavité de sertissage est clairement indiquée pour les calibres de fil pris en charge (de 20 à 10 AWG environ), facilitant ainsi le choix de la taille adaptée. Si vous devez sertir des cosses non isolées , notamment celles à fût ouvert, cette pince à sertir vous offrira un sertissage sûr et de qualité OEM. (Lien produit : Pince à sertir pour cosses à fût ouvert non isolées .)
En savoir plus : Pince à sertir les câbles. Tout ce que vous devez savoir
👉Équipez votre établi avec des outils de sertissage électriques Haisstronica.

Conclusion
En résumé, le choix entre cosses isolées et non isolées dépend des exigences de sécurité et de durabilité de l'application. Chaque type de cosse doit être serti avec la technique appropriée. Utilisez des cosses à sertir isolées (avec les outils de sertissage adaptés) dans tous les cas où une protection supplémentaire contre les courts-circuits, l'humidité ou les vibrations est nécessaire. N'utilisez des connecteurs à sertir non isolés que dans des environnements contrôlés ou si vous prévoyez de les isoler ultérieurement, et veillez à les sertir avec un outil qui n'endommagera pas la cosse nue. En adaptant le type de cosse à votre application et en suivant une préparation de sertissage appropriée (section de fil, longueur de dénudage et matrice adaptées), vous obtiendrez des connexions électriques d'une solidité à toute épreuve. Investir dans des pinces à sertir de qualité – une pour les cosses isolées et une pour les non isolées – est judicieux pour toute personne travaillant fréquemment avec des câbles, car cela garantit une étanchéité, une solidité et une sécurité optimales pour chaque sertissage. Grâce aux instructions ci-dessus, vous pouvez sertir des fils en toute confiance, comme un pro, que vous connectiez un faisceau automobile avec des cosses non isolées ou que vous répariez un projet maison avec des connecteurs isolés. Bon sertissage !
Nos meilleurs choix conviviaux
Choisissez la meilleure pince à sertir pour cosses thermorétractables : acier trempé, poignées antidérapantes et cliquet calibré. Conçue pour un usage intensif , elle maintient l'alignement sous charge pour des cosses uniformes. Ajoutez une matrice de sertissage pour manchons de fils pour une finition parfaite du serre-câble.
👉 Bornes de sertissage impeccables — Haisstronica offre une compression uniforme.

👏 Vous pourriez être intéressé par les éléments suivants :
-
Comment sertir des fils comme un pro : outils, conseils et guide de sécurité
-
Outils de sertissage économiques et haut de gamme : comparaison des performances en conditions réelles
- Pourquoi les maisons du milieu du siècle ont besoin de techniques de sertissage de fils spéciales
Sources: