When Solder Seal Works on RV/Trailers — solder connectors
If you’ve ever repaired a 7-way trailer plug in the rain, you know why solder connectors exist. A sleeve combines three steps—join, solder, and seal—into one heat cycle you can do roadside with a compact heat gun. Done right, the clear tube lets you see conductor overlap, solder flow, and adhesive wet-out before you button up the loom.
Why it works on RVs and trailers
-
Visual QC in the field. Clear bodies reveal conductor overlap and the solder ring’s full melt. You don’t guess; you verify.
-
Fast, repeatable process. For lighting branches (marker, brake, reverse), a solder wire connector shortens repair time versus “strip → crimp → heat.”
-
Water resistance for road spray. The hot-melt rings act as a wire sealant, forming adhesive beads at each end once you heat them properly (look for adhesive squeeze-out).
-
Compact splices in tight spaces. Behind tail lights, in under-frame junctions, or within an A-frame tongue box, sleeves save precious room.
Typical RV/trailer runs that suit sleeves
-
Trailer light harness repairs (butt splice solder convenience for 18–14 AWG).
-
Interior 12 V accessory circuits (fans, USB/12 V outlets, LED strips) where solder and heat shrink offers neat, low-profile splices.
-
Solar/house electrical (low-current branch leads). Where wire size matches the sleeve and the run is supported in loom.
-
Camera, sensor, and alarm leads routed through cabin walls or trunks—places a crimper won’t fit but a heat nozzle will.
Boundaries to respect
-
Heat + vibration. Solder produces a rigid center. On moving hinge loops (garage door-style cable chases, tailgate flex points) or frame areas that buzz, a soldered core can fatigue sooner than a cold-formed crimp. Several workmanship standards favor crimps for vibration endurance (see sources).
-
High-current or large gauged feeds. Battery, inverter, jack motors, brake controllers, and breakaway switch wiring belong on listed lugs or crimp and seal connectors, not a sleeve.
-
Sustained high temperatures. Near engines or exhaust on motorized RVs, pick adhesive-lined crimps or higher-temp terminations; verify temperature ratings on any soldered connector you buy.
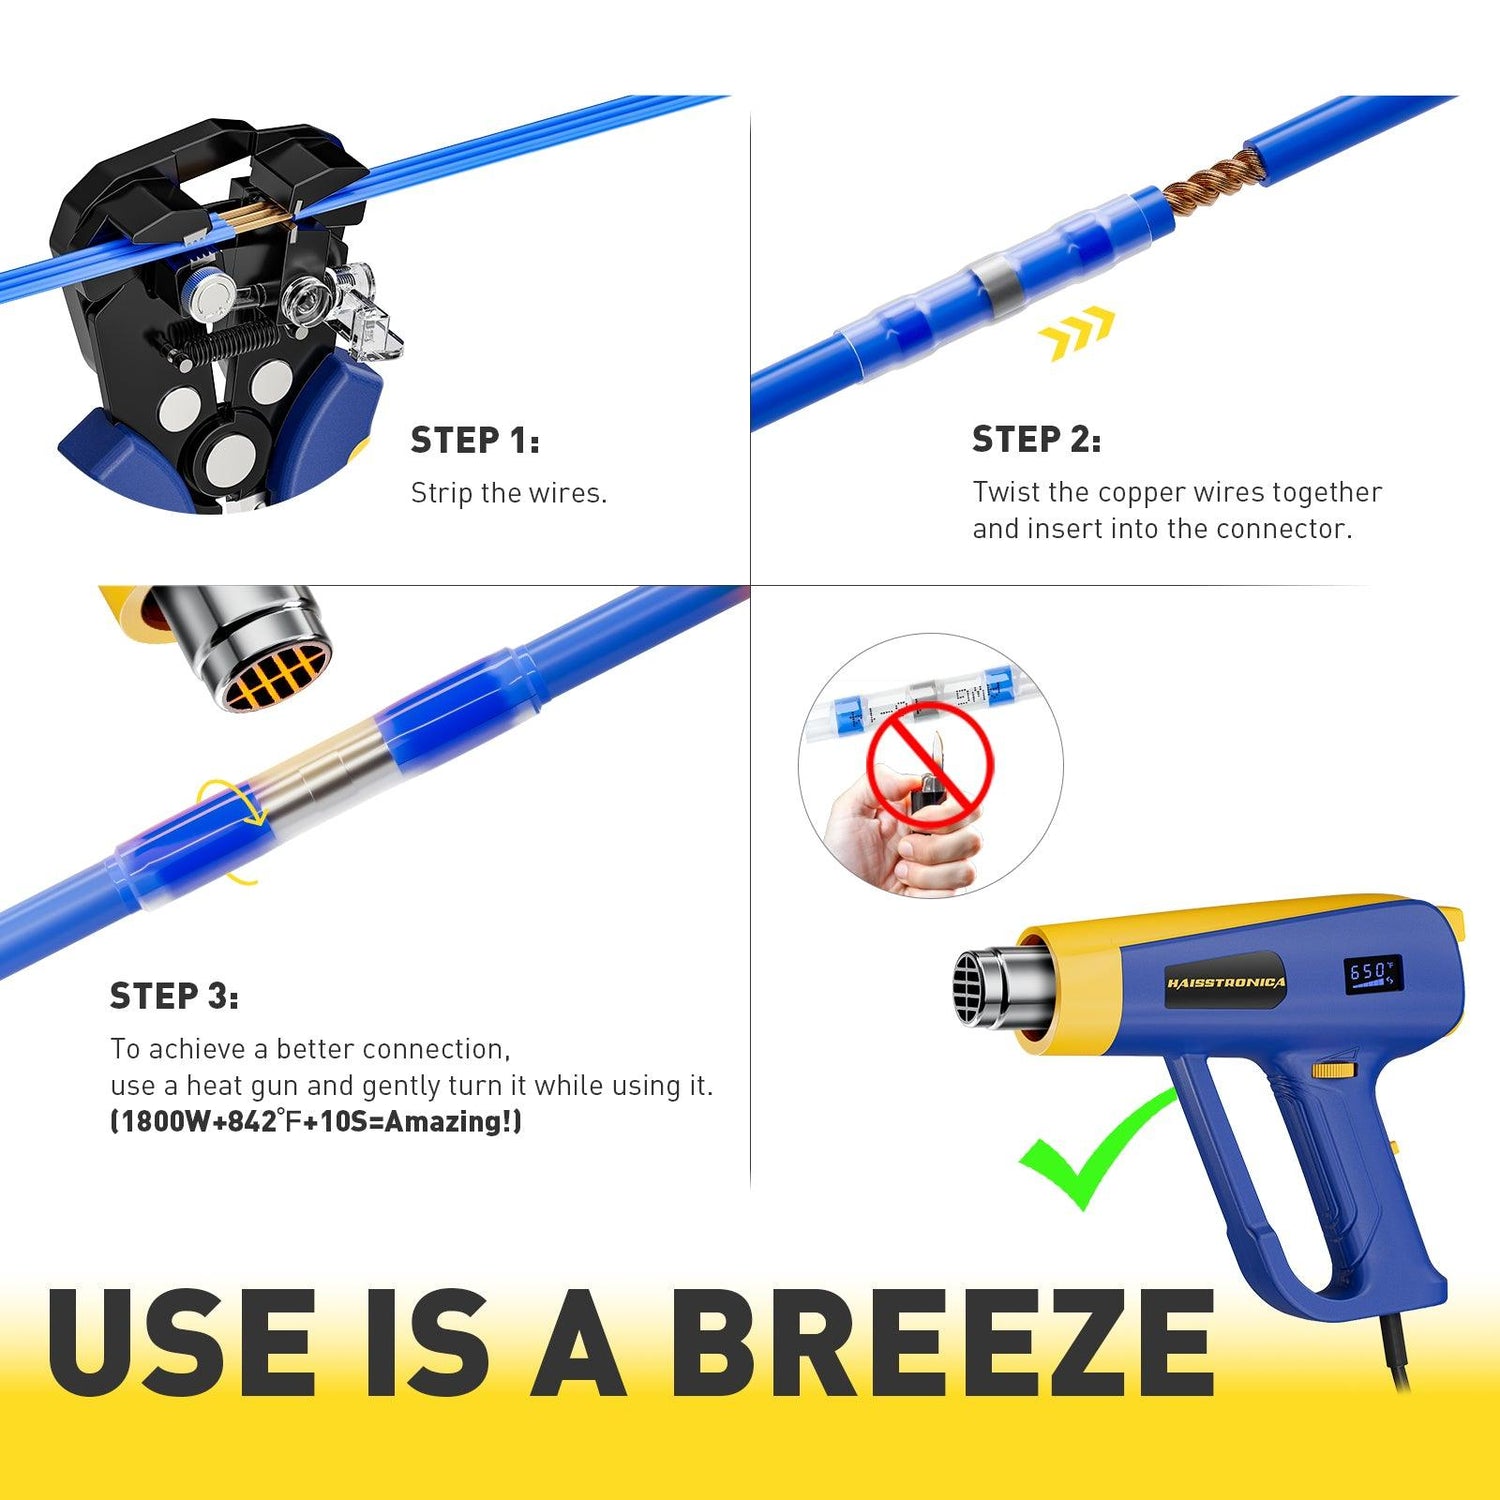
Quick process refresher
-
Strip just enough so bare ends overlap ~6–8 mm under the solder ring.
-
Insert both ends so the ring sits centered over the overlap.
-
Heat the ring first until it collapses and turns shiny; then chase heat to each adhesive band until you see uniform bead formation.
-
Cool, tug-test lightly, loom, and strain-relieve both sides.
Try this in the field: keep a tiny reducer-nozzle heat gun in the trailer tongue box with a solder sleeve connector assortment. For dark roadside work, a headlamp keeps your heat on target instead of scorching tubing.
👉 Get clean terminations with Haisstronica soldering connector options—order today.

Buying Criteria—What “Right Connector” Means — solder connectors
Not all solder connectors are created equal. Here’s what actually predicts success on an RV or trailer.
1) Correct AWG coverage & color coding
Look for kits covering the common RV/trailer sizes (AWG 26–10). Standard color bands—white, red, blue, yellow—should map clearly to AWG; the tube should be printed or the kit chart explicit. Mismatched sizing is the #1 cause of pull-outs and “no seal” failures with solder sleeves.
2) Shrink ratio that matches your jackets
A 3:1 heat shrink solder connectors ratio fits most primary wire and pigtails; 4:1 offers more grab on thin-wall or uneven jacket ODs. Trailers mix PVC, cross-linked poly, and TPE jackets—higher ratios reduce “sleeve didn’t bite” moments.
3) Low-melt, fluxed solder ring
The ring in a solder seal connector should flow with a common heat gun. If you need a soldering iron, you bought the wrong product. The melt should be shiny and continuous with no granular spots (cold joints). Poor alloy or low flux equals unreliable splices.
4) Dual adhesive bands & crystal-clear tubing
Two adhesive rings—one each side—matter. On a good heat, you’ll see small adhesive beads at the tube ends (your moisture barrier). Clear bodies aren’t cosmetic; they’re your inspection window to confirm overlap, solder wetting, and full adhesive wet-out.
5) Temperature, UV & chemical resistance
Verify operating temps and environment claims. Under-chassis harnesses see splash (oils, salts, de-icers) and sunlight. Quality sealed solder connectors specify tubing and adhesive suited to road chemicals and UV, not only “indoor electronics.”
6) Documentation & repeatability
Simple, pictorial steps and an AWG chart save time for DIY users and mobile techs. If the supplier can’t state ratings or process clearly, move on.
7) Storage that works on the road
In a truck or tongue box, tiny parts migrate. A durable organizer keeps sizes sorted and speeds grabs. That’s exactly why the Haisstronica bottle pack is convenient—shake-proof, size-labeled, and refillable.
8) Honest claims about sealing
Good vendors say “water-resistant seal when properly heated,” not magical IP ratings without test data. For immersion or constant wet, even a strong solder seal butt connector benefits from extra loom and anchor points to prevent flex at the splice.
Pro tip: When comparing kits, lay out a red (22–18 AWG) sleeve from each. Check: Is the ring centered and consistent? Are adhesive bands equal? Is the tubing clear and springy, not cloudy/brittle? Does the color map to the printed AWG range?
👉 Get clean terminations with Haisstronica soldering connector options—order today.

Where to Use vs. When to Avoid — solder connectors
A placement map beats a thousand forum opinions. Use this guide to decide where solder connectors shine and where other solutions win.
Smart places to use sleeves (Yes)
1) Trailer lighting branches (18–14 AWG)
-
Marker/turn/brake/reverse lines that see splash, not constant flex.
-
Stagger splices in a harness to avoid a single hard “bulge.”
-
Finish with split loom and anchors.
Keywords in context: solder splices, solder and seal connectors, solder shrink connectors.
2) Interior RV 12 V circuits (fans, LEDs, USB)
-
Clean, compact splices behind cabinetry and under dinettes.
-
Low vibration; temperatures remain moderate.
-
Clear tubing helps you confirm overlap on fine-strand wire.
Keywords: heat shrink solder, solder sleeves, solder wiring connectors.
3) Tongue box & junction box service
-
Tie-in for a 7-way harness or electric tongue jack sensor leads.
-
Quick inspection before sealing the cover.
Keywords: solder connectors heat shrink, heat shrink connectors with solder.
4) Cameras & safety add-ons
-
Backup or side-view camera leads routed through the cabin.
-
Also good for alarm, TPMS repeater, or GPS antennas (power leads).
Keywords: wire soldering connectors, soldered wire connectors.
5) Solar branch circuits (panel pigtails to combiner)
-
When current is low and the run is supported in conduit/loom.
-
Keep the splice out of flex points and shield from UV.
Keywords: solder connector, wire connector solder.
6) Trailer pigtail repairs on the road
-
A compact heat gun and a bottle of sleeves can get you home.
-
Later, evaluate whether to rework critical splices with crimp-and-seal if the run flexes.
Keywords: self soldering wire connectors, solder seal.
Use with caution / Prefer alternatives (No or Conditional)
A) Hinge loops & moving flex zones (doors, ramps, slide-outs)
-
Repeated flex focuses strain at a rigid solder center.
-
Prefer adhesive-lined crimp and seal connectors or longer barrel crimps; route a generous flex loop with anchors.
Keywords: crimp solder connectors, solder vs crimp, crimp vs solder.
B) High-current or large-gauge runs (battery, inverter, leveling jacks, brake controller feeds)
-
Use listed lugs or butt splices rated for the gauge with adhesive heat-shrink—not a sleeve.
-
For 10 AWG and larger, most solder on connectors are not appropriate.
Keywords: sealed connectors, sealed electrical connectors.
C) Sustained heat zones (engine/ exhaust on motorized RVs, near furnaces or water heaters)
-
Verify sleeve temperature; many users default to adhesive-lined crimp terminations here.
Keywords: soldering heat shrink, solder heat shrink connectors.
D) Submersion or constant wet (bilges, under-boat trailers, flooded conduits)
-
Sleeves are water-resistant when properly heated; for long-term immersion, marine-rated crimp splices with adhesive heat-shrink are preferred by many standards.
Keywords: waterproof solder wire connector, sealed wire connector.
E) Signal integrity-critical splices (long sensor runs, CAN lines)
-
Keep splices minimal and identical across pairs; when necessary, some techs prefer matched crimp splices to keep conductor geometry consistent.
F) Unknown wire alloys or corroded conductors
-
Clean to bright copper; tinned marine wire solders wet readily. If oxidation persists, sleeves won’t save a contaminated joint—cut back further.
Practical placement recipe
-
Outside + little flex + modest heat: OK for solder seal connectors.
-
Inside + little flex + modest heat: Ideal for solder & seal sleeves.
-
Flex + vibration + heat: Choose adhesive-lined crimp.
-
Large gauge + high amps: Lug + adhesive heat-shrink.
👉 Go tool-light with Haisstronica solderless connectors—quick, sealed connections.

Field-Proven Installation Pattern (for first-pass success)
-
Size first. Match AWG to sleeve color; don’t overshrink a too-big tube to “make it work.”
-
Strip precisely. 6–8 mm overlap under the ring. Avoid nicked strands.
-
Heat sequence. Ring → ends. The ring turns shiny, then adhesive beads appear.
-
Inspect. Clear tube shows: full solder wet-out, no voids, uniform adhesive fillets, no scorch.
-
Support. Re-loom; add clamps/zip-ties within 100–150 mm on both sides so the splice doesn’t “hinge” on bumps.
-
Document. Photo the finished joint for your maintenance log.
Common mistakes to avoid
-
Hovering too long over one spot (scorching). Keep the nozzle moving.
-
Inadequate overlap (weak joint).
-
Heating ends first (traps flux, poor solder wetting).
-
No strain relief (the splice becomes the bend point).
Why Haisstronica’s Bottle Pack Works on the Road
-
Balanced assortment for AWG 26–10 with clear AWG/color mapping.
-
Low-melt solder ring and dual adhesive bands that flow cleanly with a compact heat gun.
-
Crystal-clear tubing for QC—see overlap, solder flow, and seal.
-
Tough, portable bottle that keeps sizes sorted in a truck bin or tongue box.
-
Transparent, simple instructions—ideal for DIYers and fleet techs alike.
Our Top User-friendly Picks
Create pro-grade splices fast with Haisstronica. The integrated adhesive wets the joint and cures quickly, locking in a watertight seal while the heat-shrink guards against nicks and low-impact bumps. Printed gauge indicators make sizing simple. If you prefer a clean wire connector solder finish rather than crimp-only solutions, our solder on connectors pair durability with ease. Ideal solder wiring connectors for automotive repairs, marine harnesses, and field installations.
👉 Combine protection & strength with Haisstronica solder and heat shrink—buy now.

Conclusion
Used in the right places, solder connectors are a time-saving, confidence-building option for RV and trailer wiring. They give you compact splices, fast water-resistant sealing, and a visual quality check you simply don’t get with opaque barrels. Reach for them on lighting branches, cabin accessories, solar branches, cameras, and protected exterior runs. Reach for adhesive-lined crimp lugs on high-vibration loops, constant-wet or high-heat zones, and large-gauge/high-amp circuits. Carry both in your kit and choose deliberately—that’s how you wire once and camp more.
Stock a field-ready bottle and stop fighting messy, unsealed splices.
→ Haisstronica Solder-Seal Wire Connectors (Bottle Pack)
Sources & Further Reading (authoritative workmanship guidance)
-
IPC/WHMA-A-620: Requirements & Acceptance for Cable and Wire Harness Assemblies — https://www.ipc.org/standards/ipcwhma-a-620
-
SAE J1128 (Low Voltage Primary Cable—automotive/RV harness wire) — https://www.sae.org/standards/content/j1128_200011
-
TE Connectivity SolderSleeve Devices—Application Guidelines — https://www.te.com
-
NFPA 70® (NEC) — wiring methods and splices (low-voltage RV systems) — https://www.nfpa.org/codes-and-standards