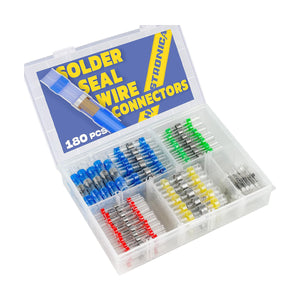

Comment choisir la bonne taille — connecteur de fil à souder
Choisir un connecteur de fil à souder n'est pas difficile, mais précis. La taille est déterminante : la bague de soudure mouille-t-elle les deux conducteurs ? La gaine maintient-elle fermement l'isolant après rétraction ? Et l'adhésif thermofusible assure-t-il une étanchéité parfaite ? Consultez cette liste de 5 points avant tout achat ou achat.
1) Commencez par la taille du conducteur (AWG ou mm²)
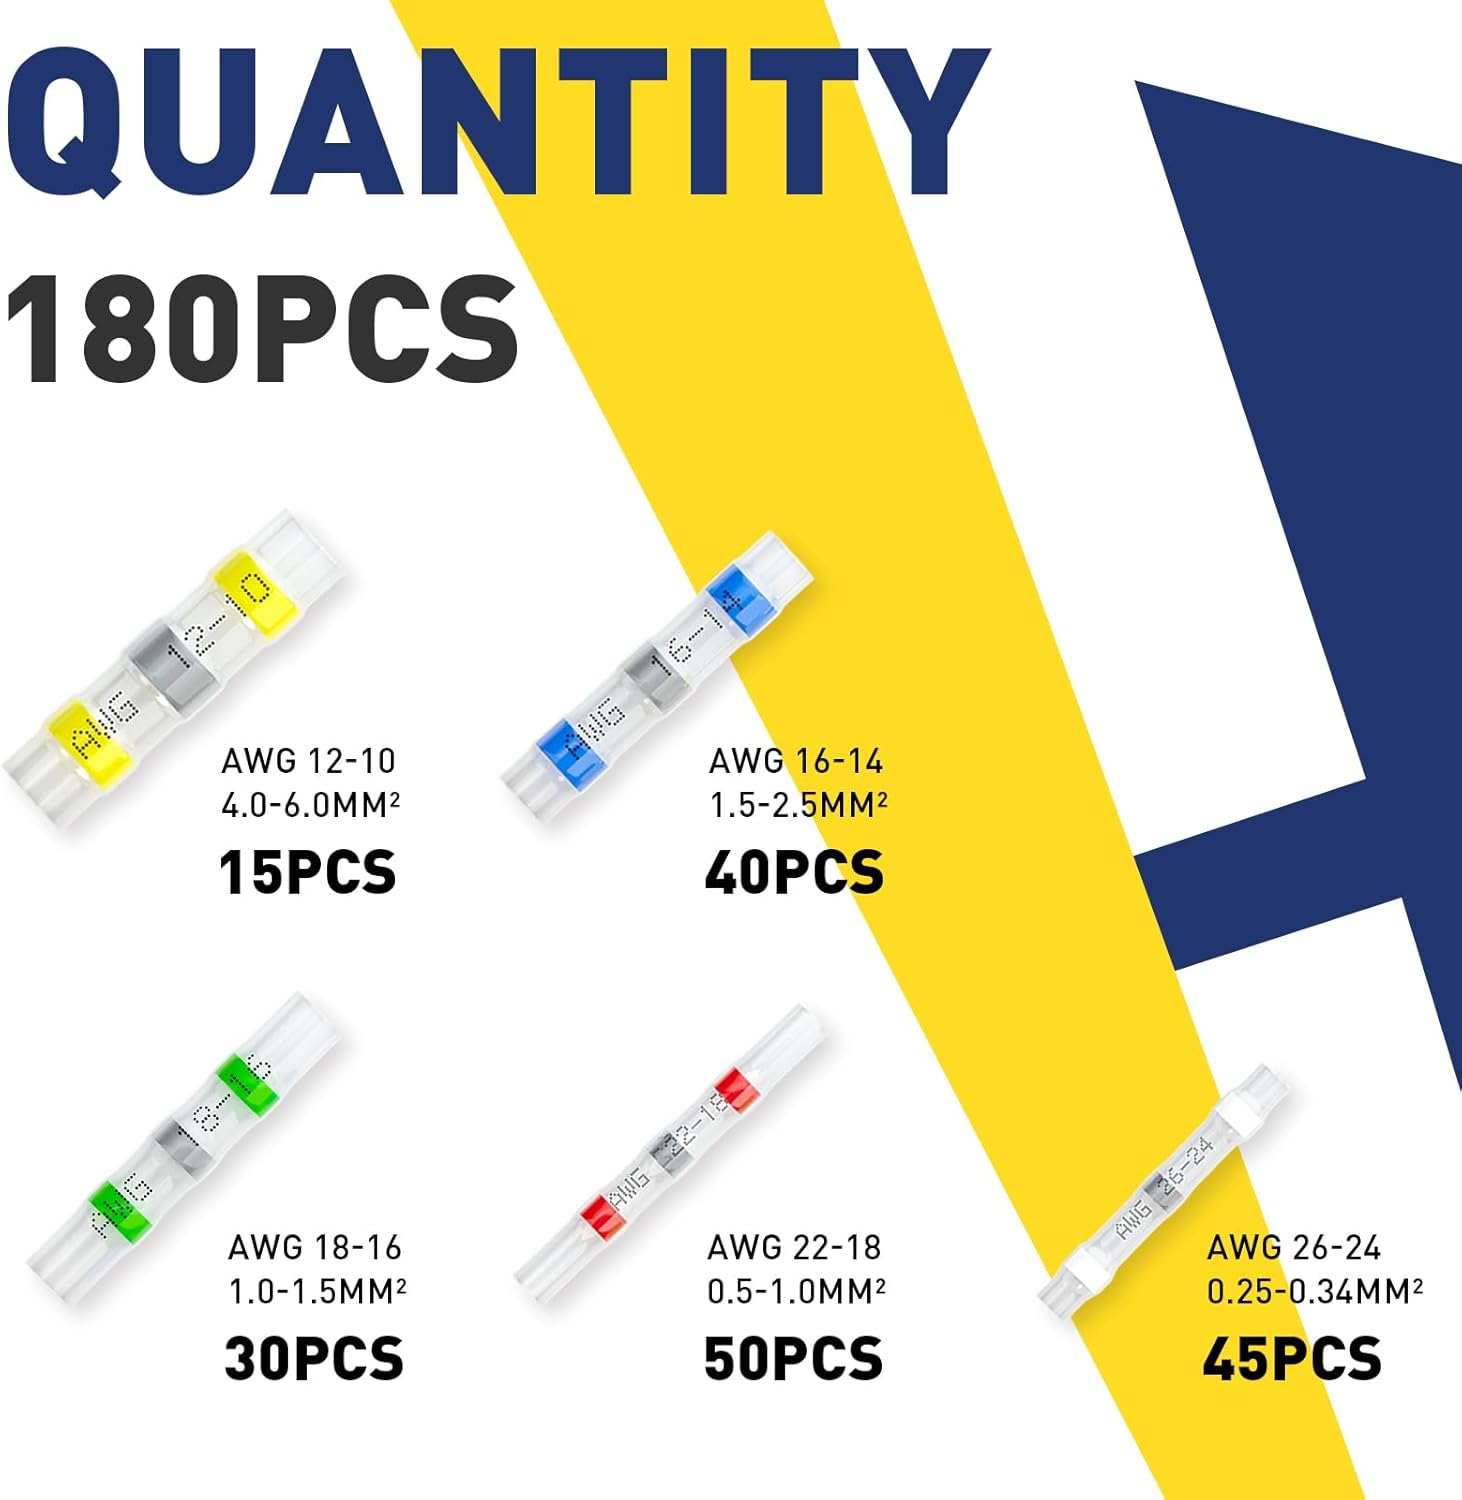
Chaque taille de connecteur de fil à souder correspond à une section de conducteur, et pas seulement à une comparaison entre fils fins et fils épais. En Amérique du Nord, on utilise l'AWG ; dans de nombreux catalogues automobiles et solaires, on utilise le mm². Les deux conviennent, il suffit d'être précis. Les familles de manchons typiques couvrent :
-
Blanc : 26–24 AWG (~0,14–0,25 mm²)
-
Rouge : 22–18 AWG (~0,34–0,75/1,0 mm²)
-
Bleu : 16–14 AWG (~1,5–2,5 mm²)
-
Jaune : 12–10 AWG (~4,0–6,0 mm²)
Ces plages sont courantes chez les marques réputées et correspondent aux pratiques de câblage établies pour les circuits de petit calibre. En cas de doute, choisissez le manchon dont le calibre AWG moyen correspond à votre fil, et non les extrêmes.
2) Vérifiez le diamètre extérieur de l'isolant par rapport au rapport de rétrécissement
Les manchons à souder sont à la fois un connecteur à souder et une gaine thermorétractable. Une bonne adhérence post-rétraction sur l'isolant est essentielle, sinon l'épissure risque de se rompre même après une légère traction. Trois règles simples :
-
Un rapport de rétrécissement de 3:1 est le point idéal pour la plupart des isolants primaires en PVC et réticulés.
-
Le rapport 4:1 est préférable pour les gaines à parois minces ou irrégulières (fils de capteur, fils étamés marins ou lorsqu'une réparation laisse un côté plus mince).
-
Les bandes adhésives doivent visiblement « s'humidifier » et former un cordon à chaque extrémité lorsqu'elles sont chauffées ; c'est votre barrière contre l'humidité.
3) La longueur de chevauchement est importante
Un connecteur de fil à souder correct nécessite un chevauchement de conducteur de 6 à 8 mm (~¼–⅜ po) centré sous la bague de soudure. Un chevauchement faible = joint fragile ; un chevauchement important = point dur volumineux. Dénudez juste assez d'isolant pour que la bague repose directement sur les brins des deux côtés.
4) Tenir compte de l'environnement et du devoir
-
Zones de vibration/flexibilité (boucles de charnière, soufflets de porte) : la soudure crée une section rigide ; en flexion continue, privilégiez une épissure bout à bout sertie et scellée.
-
Chaleur élevée (espaces moteur ou four) : vérifiez la température nominale du manchon ; de nombreux manchons sont plus heureux loin des zones à 105–125 °C soutenues.
-
Humidité/éclaboussures : Les manchons assurent une étanchéité parfaite lorsqu'ils sont correctement chauffés. Pour l'immersion, utilisez un câble à tisser, des colliers et un serre-câble, et pensez aux cosses à sertir homologuées pour les gros calibres.
5) Vérifiez le courant et la jauge
Les manchons sont destinés aux mêmes circuits que ceux pour lesquels on utiliserait des épissures bout à bout standard de même calibre : éclairage, capteurs, dérivations 12 V à courant faible à modéré, petits accessoires, feux de remorque et charges intérieures de camping-car. Pour les gros calibres et les courants élevés (batterie, démarreur, onduleur), utilisez des cosses homologuées ou des épissures bout à bout robustes avec gaine thermorétractable adhésive ; sertissage ou soudure sont alors très efficaces.
Chemin rapide : si votre projet implique des petits calibres mixtes (26–10 AWG), le kit Haisstronica 5-Mixed-AWG vous garantit de toujours avoir la bonne taille à portée de main.

AWG, mm² et codes couleur — connecteur de fil à souder
Si vous travaillez sur des projets automobiles, marins, solaires et de fabrication, vous alternerez entre AWG et mm². Les codes couleur sont utiles, mais il est important de comprendre les chiffres pour pouvoir effectuer des conversions en toute confiance lorsqu'un faisceau ou une fiche technique utilise l'autre système.
La conversion pratique AWG↔mm² (assez fidèle à la taille des manchons)
-
26 AWG ≈ 0,13 mm²
-
24 AWG ≈ 0,20 mm²
-
22 AWG ≈ 0,34 mm²
-
20 AWG ≈ 0,52 mm²
-
18 AWG ≈ 0,82 mm²
-
16 AWG ≈ 1,31 mm²
-
14 AWG ≈ 2,08 mm²
-
12 AWG ≈ 3,31 mm²
-
10 AWG ≈ 5,26 mm²
Ces équivalents correspondent bien à ce que les connecteurs à soudure de qualité sont censés accepter. Inutile de vous disputer : un fil de 1,5 mm² est en bleu (16 AWG) ; un fil de 2,5 mm² est en bleu (14 AWG), et ainsi de suite.
Codes de couleur (pourquoi ils sont importants au-delà de la commodité)
-
Blanc (26–24 AWG) – Câbles d’instrument/signal, pigtails microélectroniques.
-
Rouge (22–18 AWG) – La plupart des éclairages LED, capteurs, petits accessoires 12 V.
-
Bleu (16–14 AWG) – Pompes, ventilateurs, charges 12 V à courant moyen.
-
Jaune (12–10 AWG) – Circuits accessoires plus lourds dans la limite du calibre du manchon.
La cohérence des couleurs vous permet de mélanger les marques avec moins de surprises, en particulier lorsque vous associez des manchons à des connecteurs de câblage à souder déjà installés dans un faisceau ou lors du réapprovisionnement auprès de différents fournisseurs.
Pourquoi le diamètre extérieur de l'isolant et la classe des torons modifient la « sensation »
Deux fils de calibre 16 AWG peuvent se comporter différemment sous l'effet de la chaleur : un fil de cuivre étamé marin à brins fins se compacte facilement et rétrécit plus finement ; un fil primaire automobile à brins grossiers reste plus dense. C'est pourquoi un kit de manchons à souder de qualité utilise des tubes présentant une résistance post-rétraction et une masse adhésive suffisantes pour assurer l'étanchéité des deux boîtiers. Si votre gaine est particulièrement fine (fil de capteur), des manchons thermorétractables 4:1 (toujours bleus) peuvent être la meilleure solution.
Alliage de bague et adhésifs (ce qu'il faut rechercher)
Une soudure et un manchon thermorétractable de qualité nécessitent un anneau de soudure à faible point de fusion et fluxé, que vous pouvez liquéfier avec un simple pistolet thermique et un tube transparent indiquant la fin du flux (anneau brillant et continu) et l'application uniforme de la colle. Si le mouillage est invisible ou si l'anneau paraît granuleux après chauffage, jetez-le et remplacez-le par un connecteur de meilleure qualité : la qualité des connecteurs thermorétractables dépend de leur alliage et de leur tube.
Choix du pro : le kit mixte de Haisstronica utilise un codage couleur standard de l'industrie, des tubes transparents pour un contrôle qualité visuel et des bandes adhésives doubles pour des joints résistants à l'eau solides - voir l' assortiment 5-Mixed-AWG

Mesurez avant d'acheter — connecteur de fil à souder
Les schémas de câblage sont utiles, jusqu'à ce que vous héritiez d'un faisceau de câbles aux marquages effacés ou d'un câble de rechange qui ressemble à du 16 AWG, mais qui n'en est pas un. Voici comment mesurer le fil et l'isolant, puis choisir le connecteur de fil à souder qui assurera l'adhérence, la fluidité et l'étanchéité.
Étape 1 : Identifier la taille du conducteur (trois options)
-
Utilisez une jauge AWG de poche (la plus rapide)
Glissez le conducteur nu dans les fentes de calibre jusqu'à ce qu'il soit bien ajusté. Notez-le. -
Mesurer le diamètre du brin × le nombre de brins (pour un fil toronné)
-
Dénudez soigneusement une extrémité propre (évitez les entailles).
-
Mesurer un brin avec un pied à coulisse (d, en mm).
-
Compter les brins (n).
-
Section transversale ≈ n × π(d²/4). Convertissez les mm² en AWG à l'aide du tableau ci-dessus.
-
-
Peser/mesurer une longueur connue (avancé)
Surpuissant pour le travail sur le terrain mais utile pour les fils spécialisés inconnus.
Étape 2 : Mesurer le diamètre extérieur de l'isolant (déterminer le rapport de rétreint)
-
Utilisez un pied à coulisse pour mesurer le diamètre extérieur de la gaine de chaque côté de l'épissure. Si un côté est beaucoup plus fin (connecteur du capteur au primaire), privilégiez un manchon avec un taux de rétreint plus élevé ou utilisez un manchon à souder de taille adaptée au diamètre extérieur le plus important et ajoutez une petite cale thermorétractable sur le petit côté avant le manchon.
Étape 3 : Confirmez l'impression AWG et la couleur du manchon
Achetez des manchons qui impriment l'AWG/mm² sur le tube ou qui sont livrés avec un tableau détaillé. Plus la cartographie est claire, moins vous risquez de faire des erreurs de connexion. Pour les kits de terrain, c'est là que la gamme Haisstronica se distingue : les tailles et les couleurs sont clairement indiquées dans l'organiseur.
Étape 4 : Montage sans chaleur (facultatif mais intelligent)
Faites glisser le manchon sur un côté isolé et confirmez :
-
L' anneau de soudure sera centré sur le chevauchement prévu du conducteur.
-
Les bandes adhésives se poseront entièrement sur l'isolant et non sur le cuivre nu.
-
Le diamètre intérieur du tube accepte confortablement le diamètre extérieur de l'isolant avant de rétrécir.
Étape 5 : Vérifier le courant et le service
Aucun connecteur à soudure ne modifie l'intensité admissible d'un circuit. Si le joint d'origine supportait 10 A sur un calibre 16 AWG, le remplacement doit être du même calibre ou supérieur. Si vous augmentez la charge (par exemple, pour des lampes plus lumineuses), augmentez la taille du conducteur, et non la couleur du manchon.
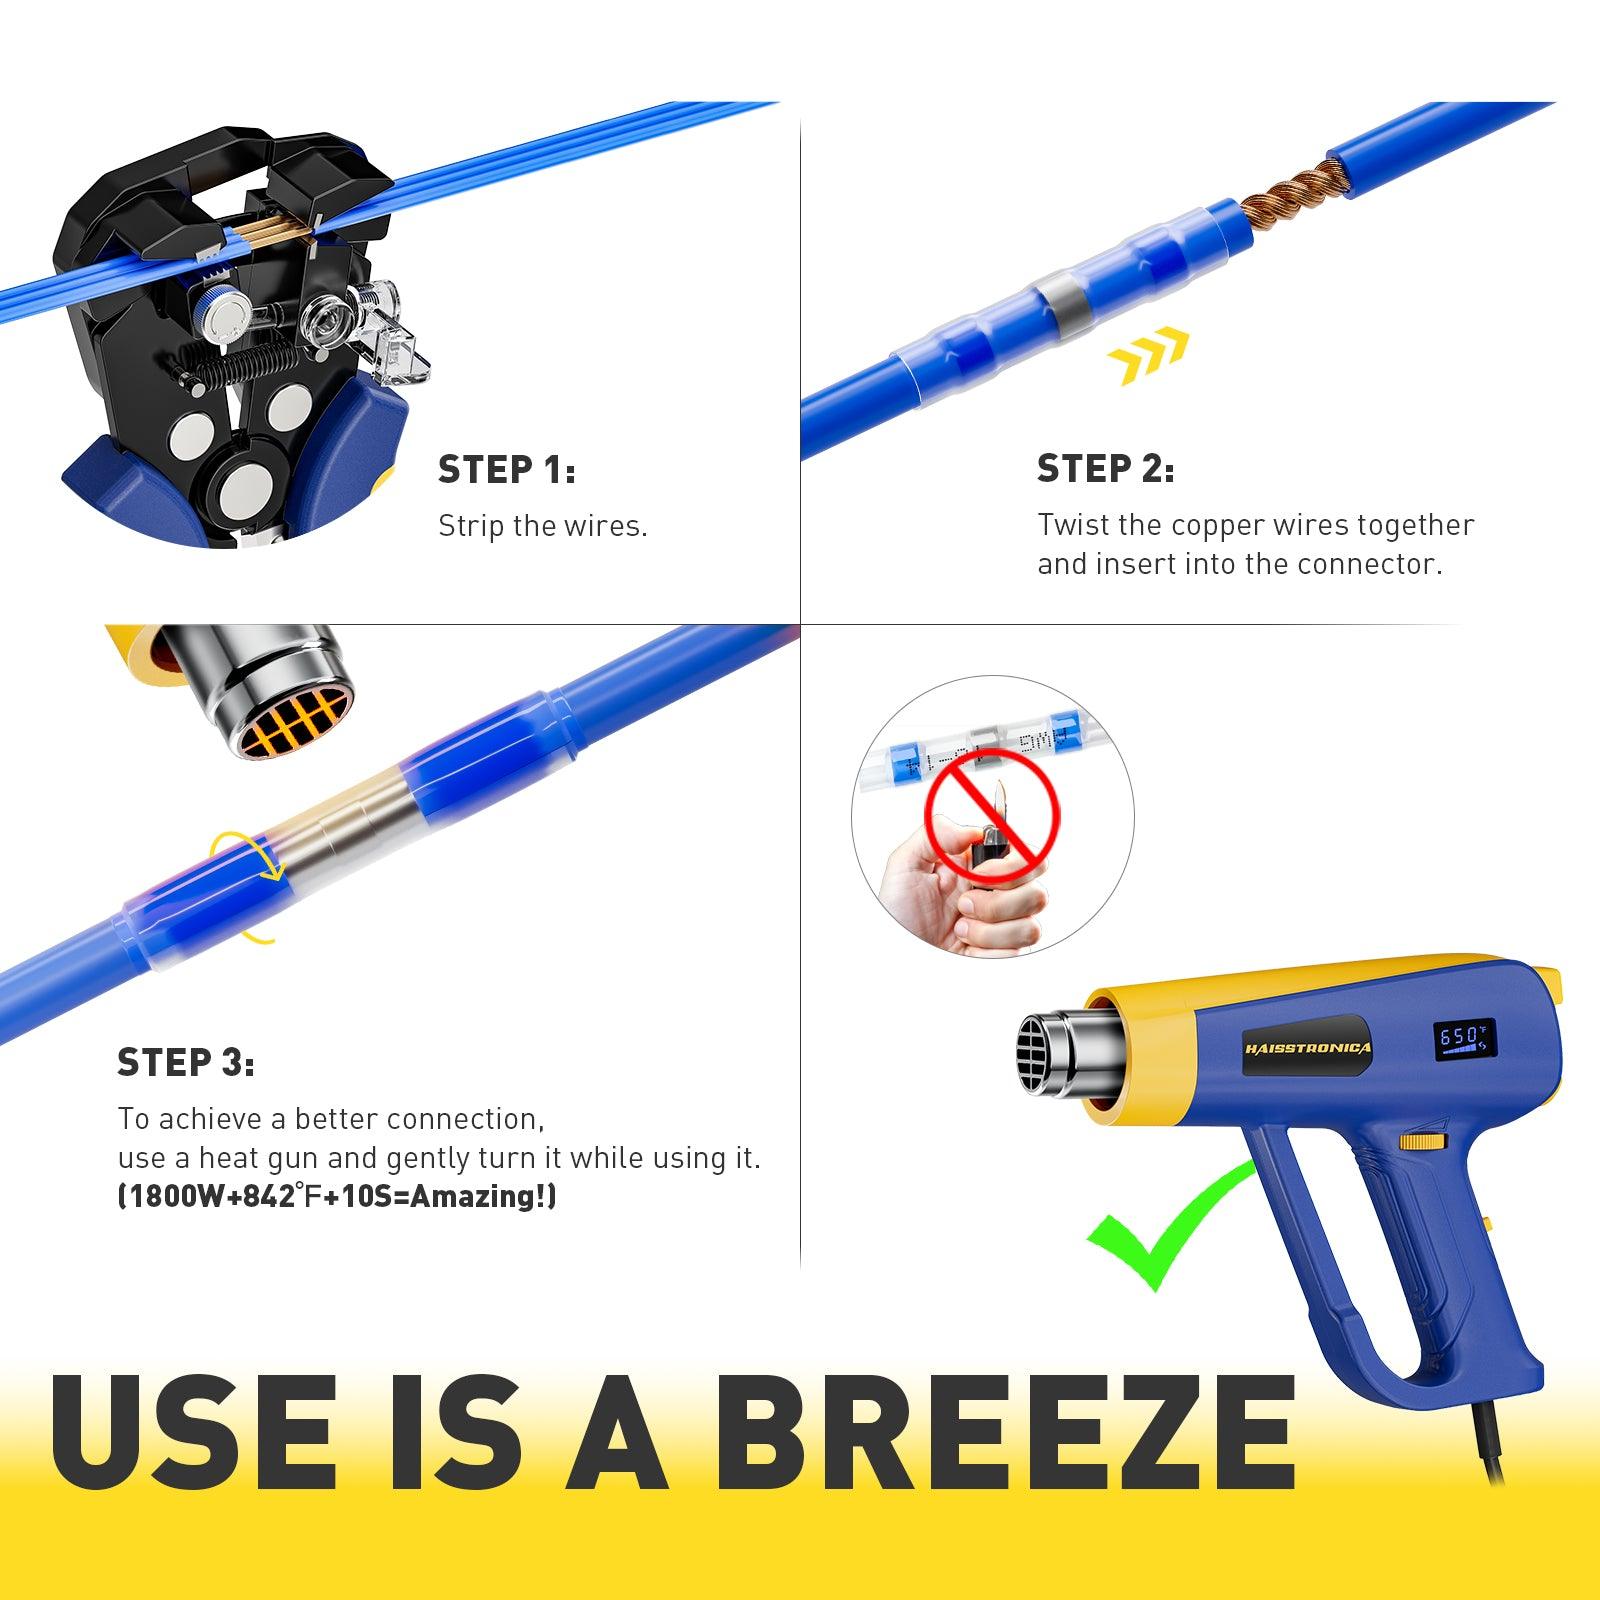
Étape 6 : Séquence de chauffage et contrôle qualité visuel (après l'achat)
-
Chauffez d’abord l’anneau jusqu’à ce qu’il s’effondre complètement et devienne brillant, indiquant une véritable liaison de soudure entre les deux conducteurs.
-
Appliquez de la chaleur sur les bandes adhésives jusqu'à ce que vous voyiez une formation uniforme de cordons aux deux extrémités (c'est votre joint résistant à l'eau).
-
Laisser refroidir, puis effectuer un essai de traction . Un manchon correct fera craquer le fil avant la jonction en cas de tractions légères.
Conseil pour le kit de terrain : Gardez un pistolet thermique compact avec buse réductrice et ce kit Haisstronica de tailles variées dans votre boîte à gants ou votre tiroir à outils. Corps transparents : confirmation visuelle du chevauchement, de l'écoulement de la soudure et de l'étanchéité.

Scénarios de dimensionnement pratiques (pour que vous puissiez « voir » le bon choix)
1) Réparation du feu de gabarit de remorque (deux câbles 20 AWG)
-
Conducteur : ~0,5 mm² chacun → Manchon rouge 22–18 AWG .
-
Environnement : Éclaboussures, vibrations légères → bon candidat pour les manchons.
-
Conseil : échelonnez plusieurs épissures dans le faisceau pour éviter un seul renflement dur.
2) Câble de ventilateur 12 V vers primaire 16 AWG
-
Inadéquation des conducteurs : 22 AWG → 16 AWG.
-
Option A : utilisez un manchon rouge et ajoutez une courte cale thermorétractable sur l'isolation 22 AWG afin que le tube rouge adhère aux deux côtés.
-
Option B : utilisez un manchon bleu 4:1 conçu pour les parois minces ; vérifiez le mouillage de l'adhésif sur le petit côté.
3) Pigtail solaire 2,5 mm² à 2,5 mm² à l'intérieur d'un combinateur
-
Conducteur : 2,5 mm² ≈ 14 AWG → Manchon bleu .
-
Fonction : Boîtier statique et protégé → bon ajustement.
-
Remarque : pour les toitures exposées à la chaleur et aux UV, pensez à utiliser des épissures à sertir doublées d'adhésif à l'intérieur des boîtes de jonction.
4) Alimentation de la pompe à carburant 12 AWG
-
Conducteur : 12 AWG (4,0 mm²).
-
Environnement : Chaleur, vibrations.
-
Recommandation : utilisez un connecteur à sertir homologué avec un film thermorétractable adhésif ; la soudure par rapport au sertissage favorise ici le sertissage.
5) Rallonge de capteur 26 AWG à brin fin vers 24 AWG
-
Conducteur : Manchon blanc (26–24 AWG).
-
Isolation : TPE très fin ; choisissez un manchon avec rétrécissement 4:1 pour une adhérence fiable.
Liste de contrôle de qualité (ce qui distingue les bonnes pochettes des produits similaires bon marché)
-
Tubes transparents pour inspection visuelle. Les tubes opaques cachent les joints froids.
-
Bague de soudure à bas point de fusion , fluxée, qui devient brillante avec un petit pistolet thermique.
-
Bandes adhésives doubles (aux deux extrémités), pas seulement « peut-être coller d’un côté ».
-
Codage couleur précis et AWG/mm² imprimé sur l'emballage.
-
Évaluations honnêtes (température, environnement).
-
Documentation avec conseils de chevauchement et séquence de chauffage.
Nos meilleurs choix conviviaux
La conception de qualité marine de Haisstronica garantit des connexions fiables à chaque fois. Notre système thermofusible dose la colle adéquate, durcit en quelques secondes et résiste à l'eau et à la corrosion. La gaine thermorétractable forme une barrière d'entrée de câble robuste contre l'abrasion et la flexion. Avec leurs marquages AWG pour une identification rapide, ces connecteurs à souder sont plébiscités par les professionnels lorsque les connecteurs à souder doivent résister sans faille au soleil, aux embruns et aux vibrations.
Le kit AWG mixte de Haisstronica vérifie chaque case et garde les tailles triées afin que vous puissiez choisir le bon du premier coup : Connecteurs de fils à souder — 5 AWG mixtes

Conclusion
Un connecteur de fil à souder de taille adaptée vous offre trois avantages en un seul cycle de chauffage : une jonction électrique à faible résistance, une liaison mécaniquement solide sur un chevauchement approprié et un joint étanche aux projections d'eau et aux intempéries. Pour y parvenir, il faut dimensionner les fils de manière scientifique : adapter la section du conducteur (AWG/mm²), vérifier que le taux de rétreint mord le diamètre extérieur de l'isolant, choisir le bon code couleur et vérifier par un essai d'ajustement rapide avant chauffage. Chauffez ensuite la bague, scellez les extrémités et effectuez un essai de traction. Dans les environnements statiques ou à faibles vibrations (branchements d'éclairage, capteurs, accessoires 12 V de cabine) , les manchons à souder sont rapides, propres et fiables. Pour les températures élevées, les câbles flexibles continus ou les câbles de gros calibre/à forte intensité, privilégiez les cosses à sertir homologuées et les épissures bout à bout adhésives.
Si vous préférez éviter les calculs au travail, emportez un assortiment couvrant les calibres 26 à 10 AWG, avec une cartographie claire des couleurs et des matériaux fiables. Votre futur vous remerciera (et votre câblage).
Prêt à choisir la bonne taille à chaque fois ?
Procurez-vous l'assortiment prêt à l'emploi : connecteurs de fils à souder Haisstronica — 5 AWG mixtes
Sources et lectures complémentaires (références de fabrication faisant autorité)
-
IPC/WHMA-A-620 (Exigences et acceptation des assemblages de câbles et de faisceaux de fils)
-
UL 486A-486B (Connecteurs de fils)
-
Dispositifs à manchons de soudure TE Connectivity — Directives d'application
-
ABYC E-11 (Électricité CC marine — pratiques d'étanchéité/de décharge de traction, pertinentes par analogie)