Why Home DIY and Pro Workshops Need Different Things — splice wire
DIY wiring at home is usually high-mix and low-repeat. You might replace a light fixture, repair a tool cord, then install a new outlet—each potentially different wire sizes and insulation types. That’s why DIY struggles often start before you even splice wire: you may not know the wire gauge by feel, and your stripping technique isn’t practiced enough to avoid nicks every time. AWG charts exist because gauge is a standardized specification tied to diameter and fit; guessing gauge is a shortcut that often becomes rework.
Professional workshops demand throughput and repeatability. Pros can strip faster—but they also do far more cycles, so small defects become big costs. A single nicked strand might mean cutting back, re-stripping, and re-terminating, which destroys productivity. Workmanship standards like NASA-STD-8739.4A make the quality baseline clear: insulation remaining after stripping must show no damage (nicks/cuts/crushing/charring), and conductors must not be nicked to exposed base metal.
Both environments also share hidden constraints: fatigue and awkward positioning. DIYers often work overhead or in tight boxes; pros work long batches. Ergonomics guidance from NIOSH/Cal‑OSHA recommends choosing non-powered hand tools that can be used effectively with less force, less repeated movement, and less awkward positioning. Tools that reduce force and reduce “micro-resets” help both groups. Upgrade with Haisstronica and keep your hands steady while you prep and splice wire.

Why “Works on 10–24 AWG” Is Easy to Claim but Hard to Prove — splice wire
A wide range claim hides real-world variability. Two wires of the same gauge can strip differently if insulation hardness differs or if one is solid and the other is fine-stranded. Thin wires (24–20 AWG) are easy to nick; thick wires (12–10 AWG) demand higher force and can tempt over-squeezing. That’s why “one tool” claims must be proven with a mixed-gauge test, not a single-gauge demo.
Cut quality also distorts the result. TE’s wire-preparation guidance explains that diagonal cutters can distort conductors and flatten strand ends, increasing strip force and causing strand splay during stripping. If you don’t control your electrical wire cutter tool step, you’ll blame the stripper for stripping problems caused by a bad cut.
And “works” must be defined. Connector makers define the stripping defects you must avoid. TE warns: do not nick, scrape, or cut conductors during stripping; avoid insulation filaments, especially those extending among bare conductors. A tool that strips fast but leaves filaments or nicks is not “perfect”—it’s a fast way to create unreliable joints when you splice wires.

How the Real-World Test Was Set Up — splice wire
A credible test must measure two outputs: speed and first-pass quality. Here is a realistic protocol suitable for both DIY and pro benches.
Materials:
Select five sizes representative of the 10–24 AWG range: 24, 20, 18, 14, and 10 AWG. Ideally include at least one stranded and one solid sample. Record insulation type if known.
Controlled cutting:
Cut 10 pieces of each gauge to a fixed length using the same method. TE notes that poor cutting can distort conductors and increase stripping difficulty and strand splay. This keeps the test focused on stripping, not cutting variation.
Strip-length target:
Choose one strip length that matches your intended terminations. TE’s crimping guide emphasizes proper wire preparation and strip length as part of achieving reliable crimps. Even if your goal is to splice wire, consistent strip length reduces insertion errors.
Tool setup:
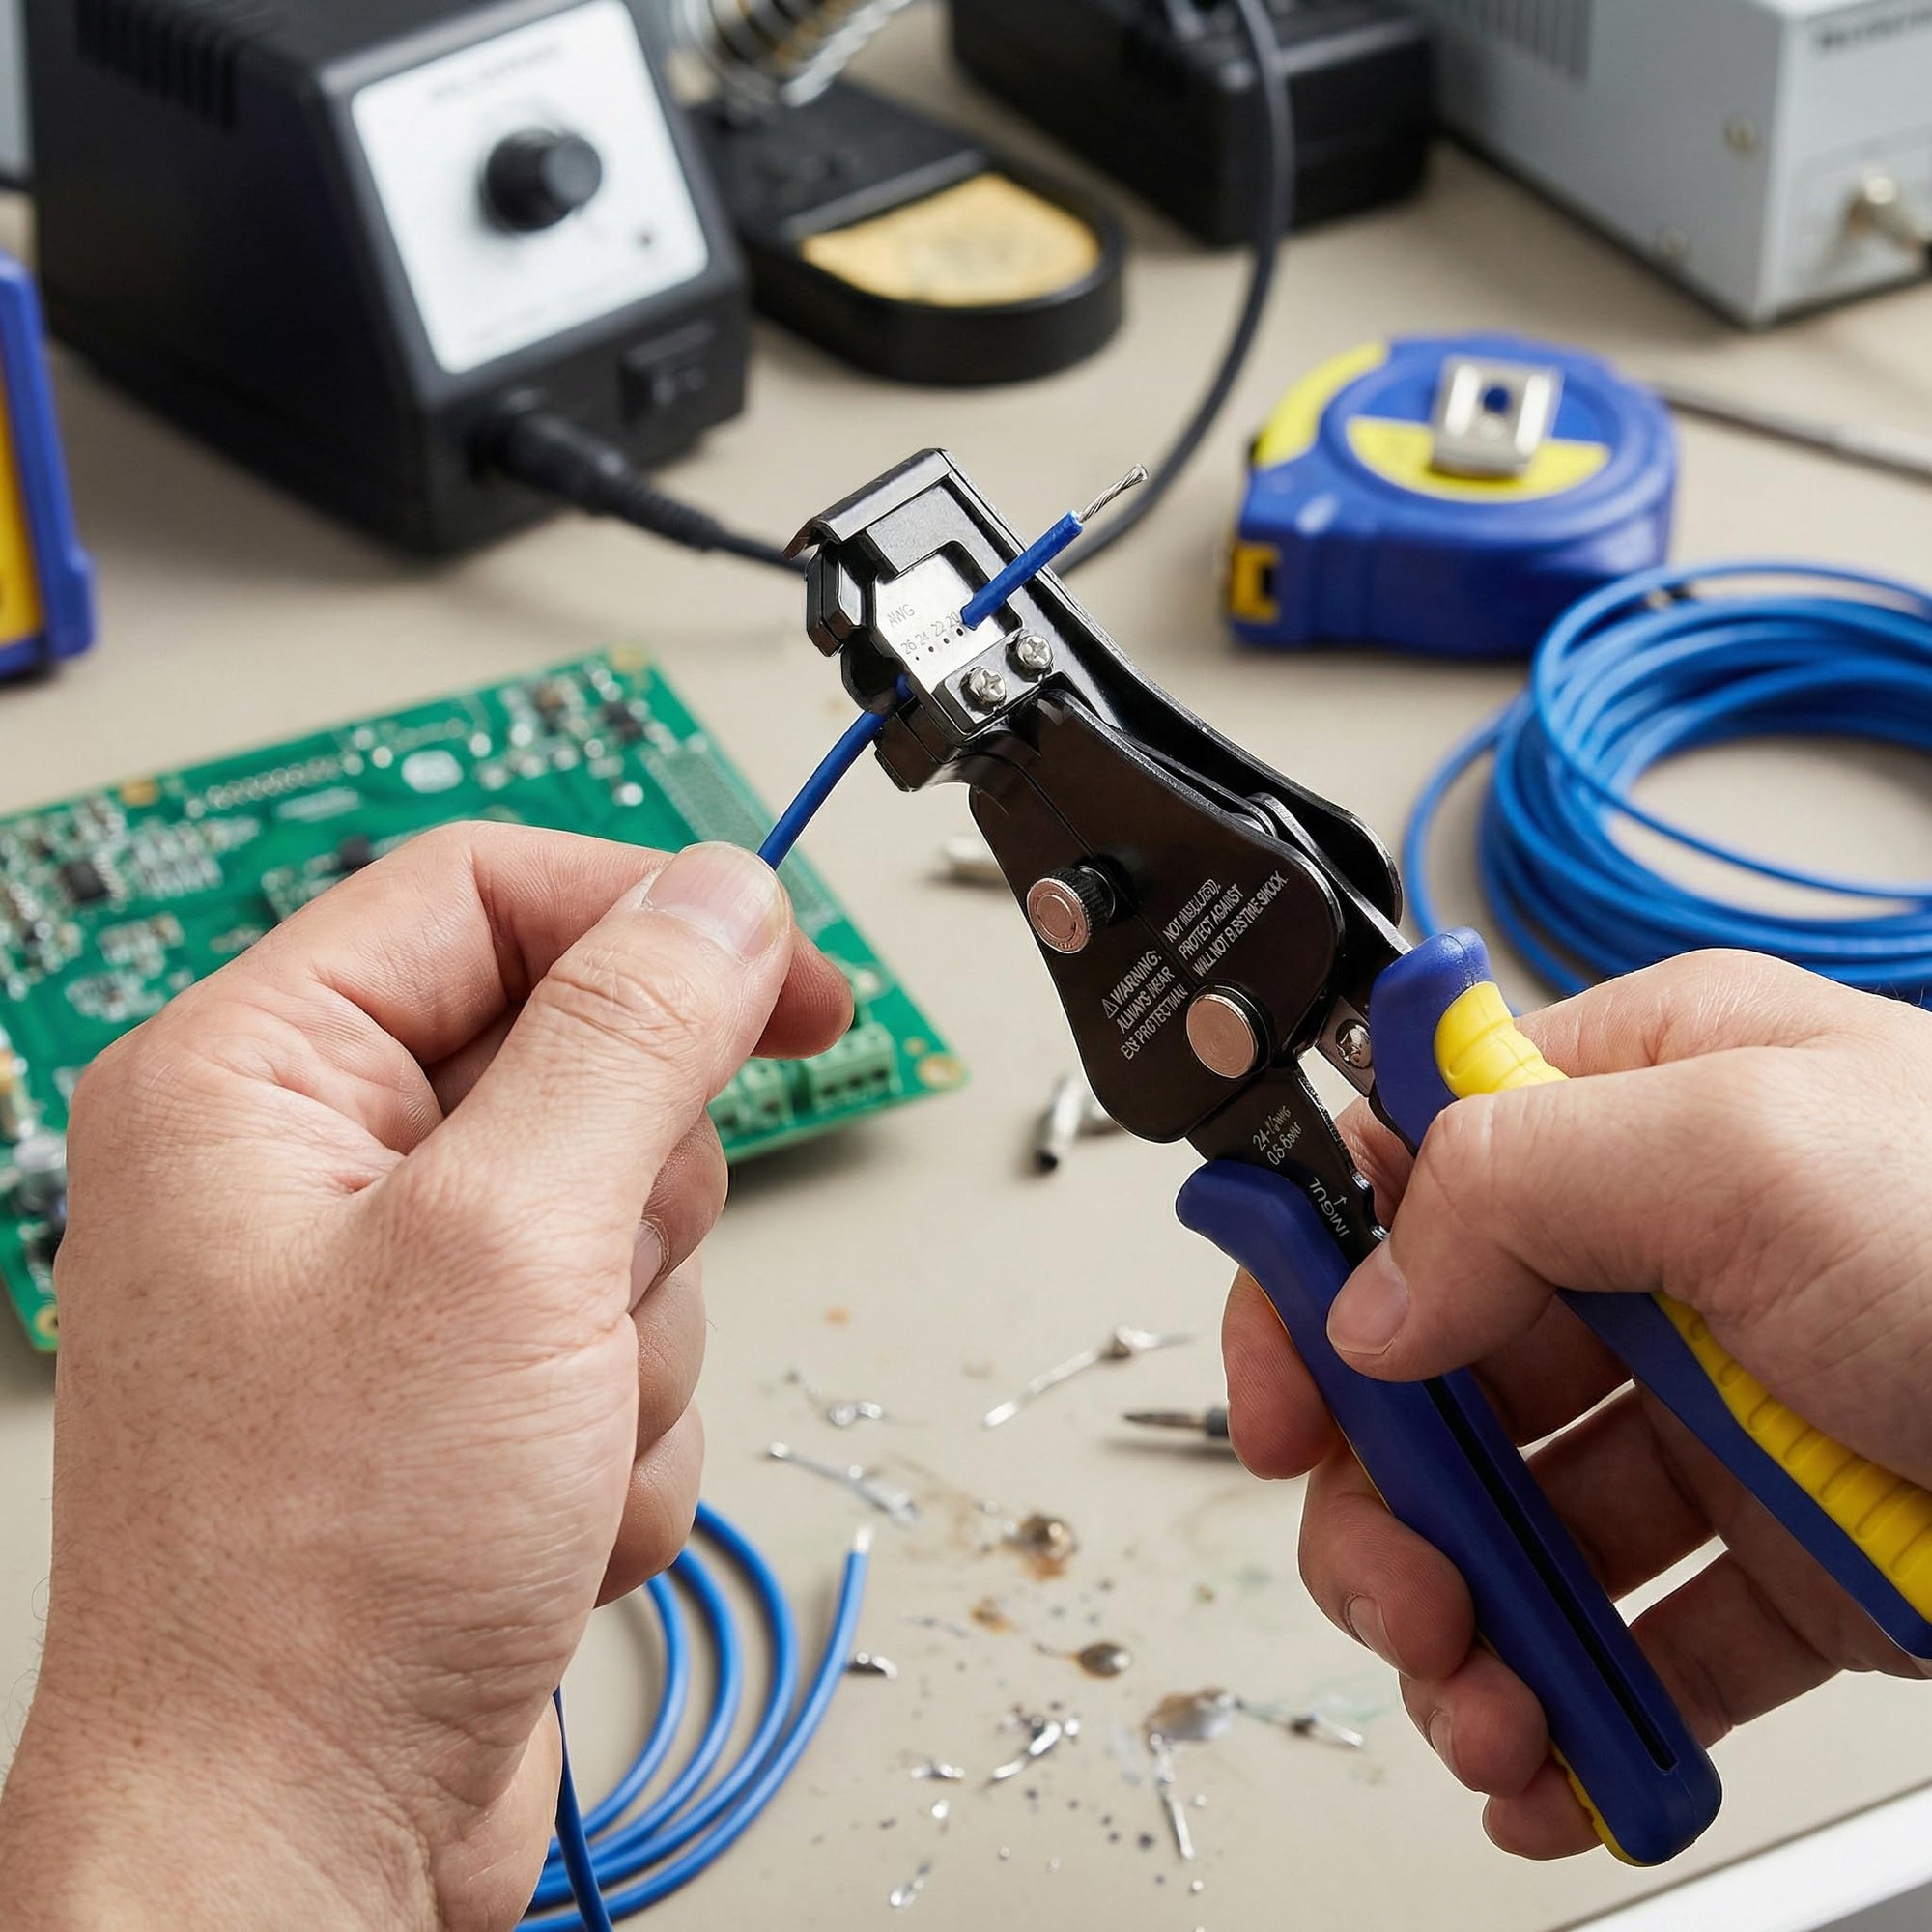
For Haisstronica’s self-adjusting stripper model, set strip length and pressure once before the batch. Haisstronica’s instructions describe using a guide ruler bar for strip length and adjusting a knob to control pressure to prevent wire damage before inserting wire and squeezing to complete stripping.
Pass/fail criteria:
Use workmanship rules (no damaged remaining insulation; no conductor nicks to exposed base metal; consistent length). NASA-STD-8739.4A provides clear criteria about insulation and conductor integrity after stripping.
Workflow extension:
After stripping, perform an actual connection: either crimp (if that’s your workflow) or use a lever connector to splice wires quickly. WAGO lever connectors are designed for quick insertion once conductors are prepared; WAGO describes a “lift lever, insert conductor, close lever” workflow. This adds realism: stripping quality is judged by whether it supports fast, correct connection.

What Makes One Wire Stripper Work Across DIY and Pro Use — splice wire
A single stripper model can succeed in both environments if it reduces decision time, reduces defects, and reduces fatigue.
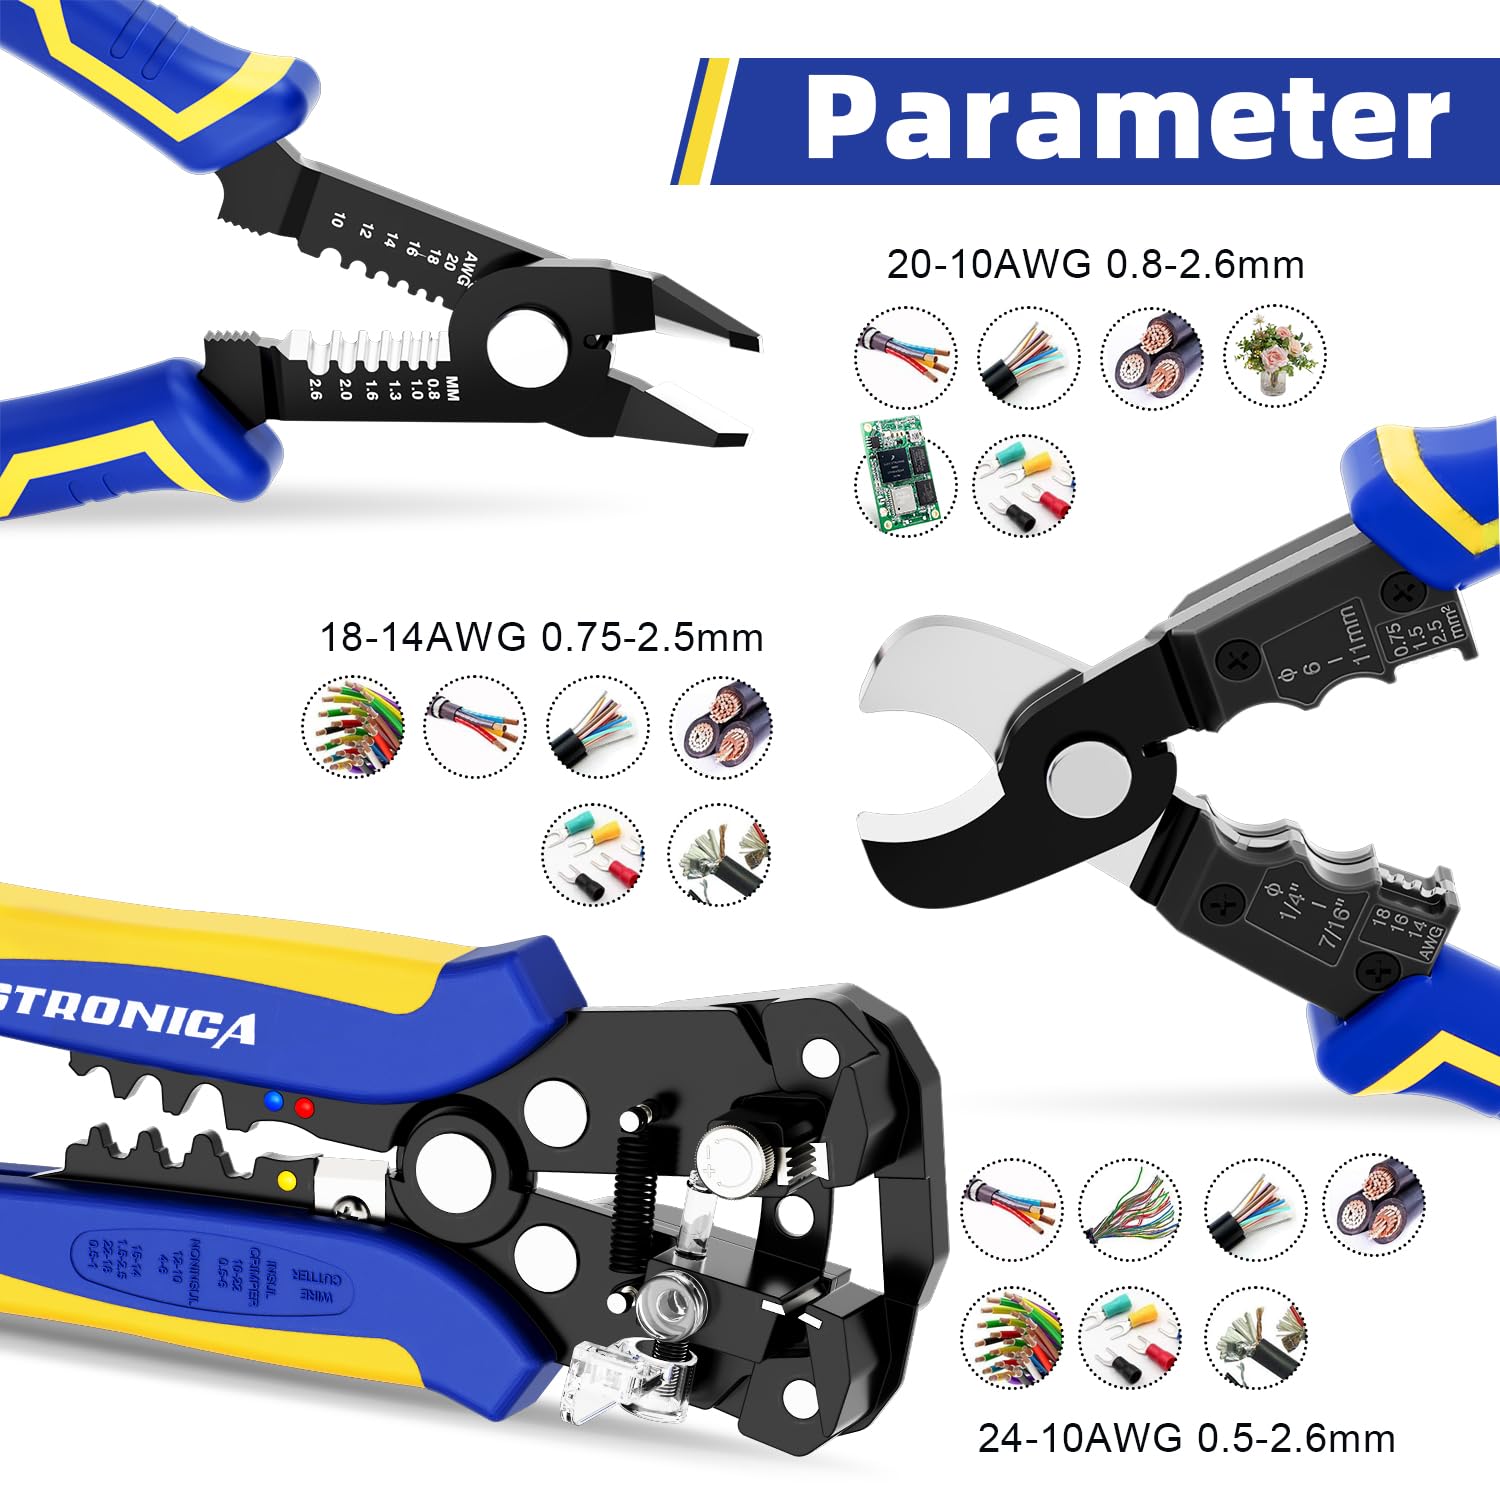
First, multi-gauge adaptability. Haisstronica positions its self-adjusting wire stripper as covering AWG 24–10 and emphasizes stripping without the hassle of changing settings by adjusting itself to wire gauge. In DIY, that means fewer mistakes from choosing the wrong notch. In pro work, it means fewer pauses and fewer resets.
Second, pressure control. Thin wire is easily damaged; thick wire demands more force. A pressure adjustment knob lets you tune the tool to the insulation and the conductor—preventing crushed insulation or nicked strands. Haisstronica’s operating notes explicitly mention adjusting the knob to control pressure and prevent wire damage. This increases first-pass accept rate, which is the real measure of “perfectly” for 10–24 AWG.
Third, strip-length repeatability. Haisstronica’s guide ruler bar supports consistent stripping length. Strip length consistency speeds everything downstream: crimps align, splices insert smoothly, and you stop measuring every end.
Fourth, workflow integration. Many users want a wire stripping and crimping tool or a wire stripper crimper because the real cycle is cut → strip → terminate. Haisstronica positions its tool as a 3‑in‑1 (strip, cut, crimp) solution. Fewer tool swaps means faster cycles and fewer grip changes—good for DIY simplicity and pro productivity.
Fifth, ergonomics for long runs. NIOSH/Cal‑OSHA recommend reducing force and awkward positioning in hand tools. Tools that reduce “micro-corrections” help keep performance stable and reduce fatigue-driven errors that show up late in the day.

Home DIY Benefits: Simplicity, Confidence, and Fewer Mistakes — splice wire
DIY success is mostly about confidence. When you don’t strip every day, the biggest risk is choosing the wrong notch or using the wrong force. A self-adjusting tool reduces that decision load and makes good results more repeatable. Haisstronica emphasizes stripping without changing settings and adapting to wire gauge, which fits the DIY need for fewer adjustments. With a simple “set pressure, set strip length, run” workflow, DIYers can get cleaner wire strips without dozens of practice attempts.
DIY also benefits from safer, less improvised prep. TE’s preparation guidance warns that knives should never be used for wire stripping due to injury and conductor damage risk, and it explains how incorrect cutters distort conductors and increase stripping problems.
Finally, DIY wiring often ends in splicing. Lever connectors make splicing simple once stripping is correct; WAGO describes the lever workflow that saves time during installation. When a tool produces consistent strip length and clean ends, you can confidently splice wires without rework.

Conclusion
One wire stripper can genuinely work from home DIY to pro workshops—but only if it supports correct, repeatable preparation across the full 10–24 AWG range and holds up under real-world variability. “Works on 10–24 AWG” is a claim that must be proven with a realistic test that measures both speed and workmanship quality. NASA’s workmanship standard makes quality requirements explicit: no damaged insulation after stripping, no conductor nicks to exposed base metal. TE’s guidance explains why cutting method affects stripping difficulty and why proper preparation matters for reliable terminations.
Haisstronica’s self-adjusting stripper is positioned for AWG 24–10, supports pressure control to prevent damage, and includes strip-length guidance to keep results consistent—helping both DIYers and pros reduce mistakes and speed up workflows. If your goal is to splice wire faster with fewer defects and less fatigue, the best move is to standardize your process: clean cuts, controlled stripping, consistent strip length, then immediate connection.