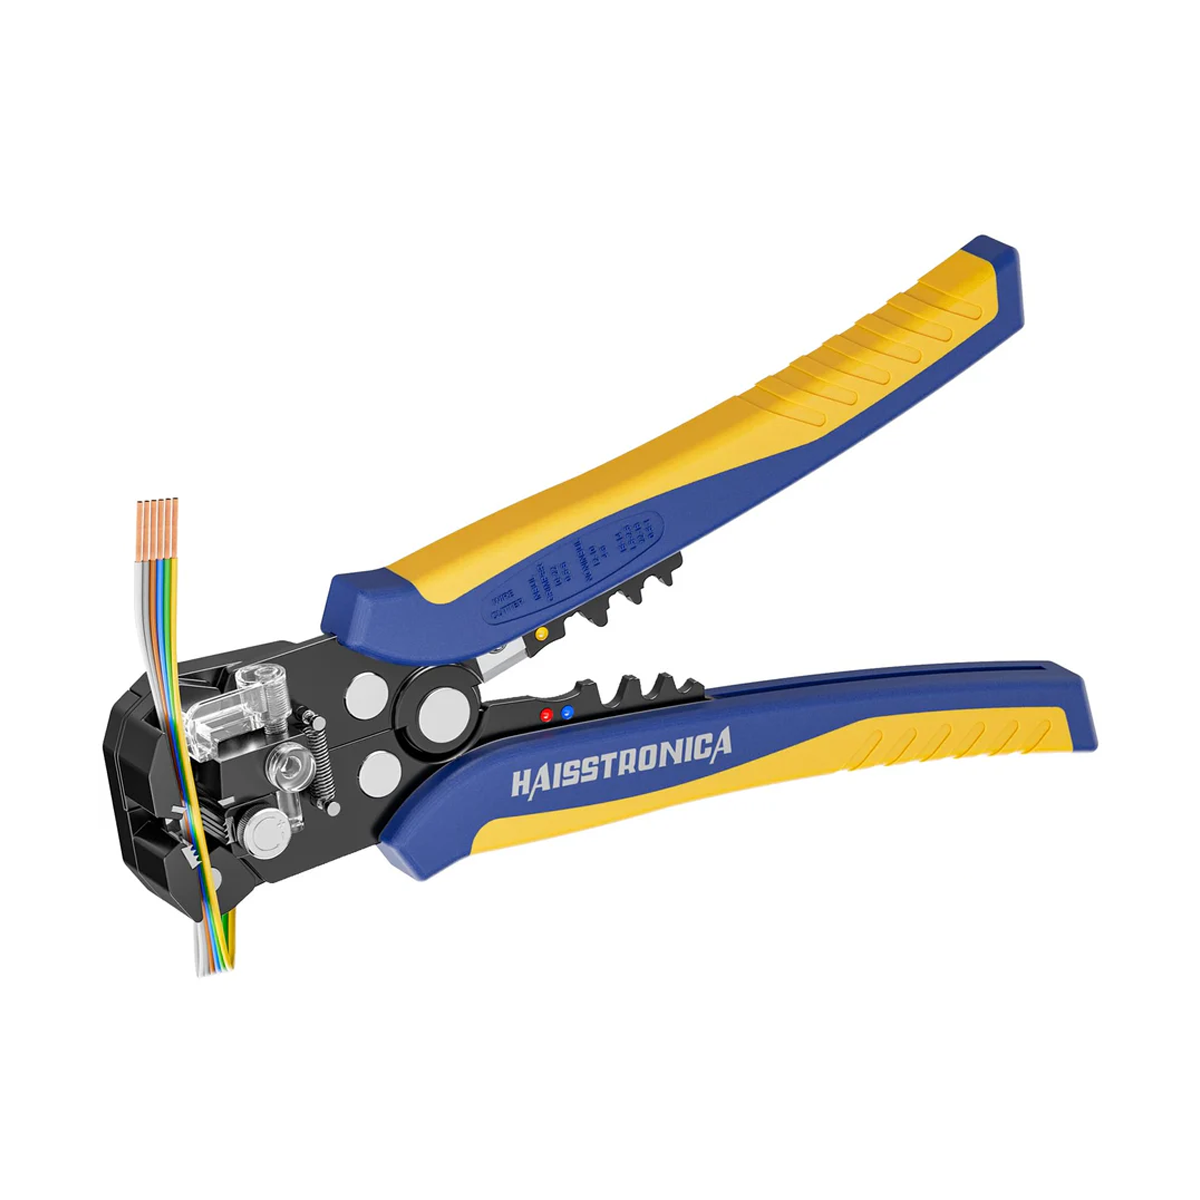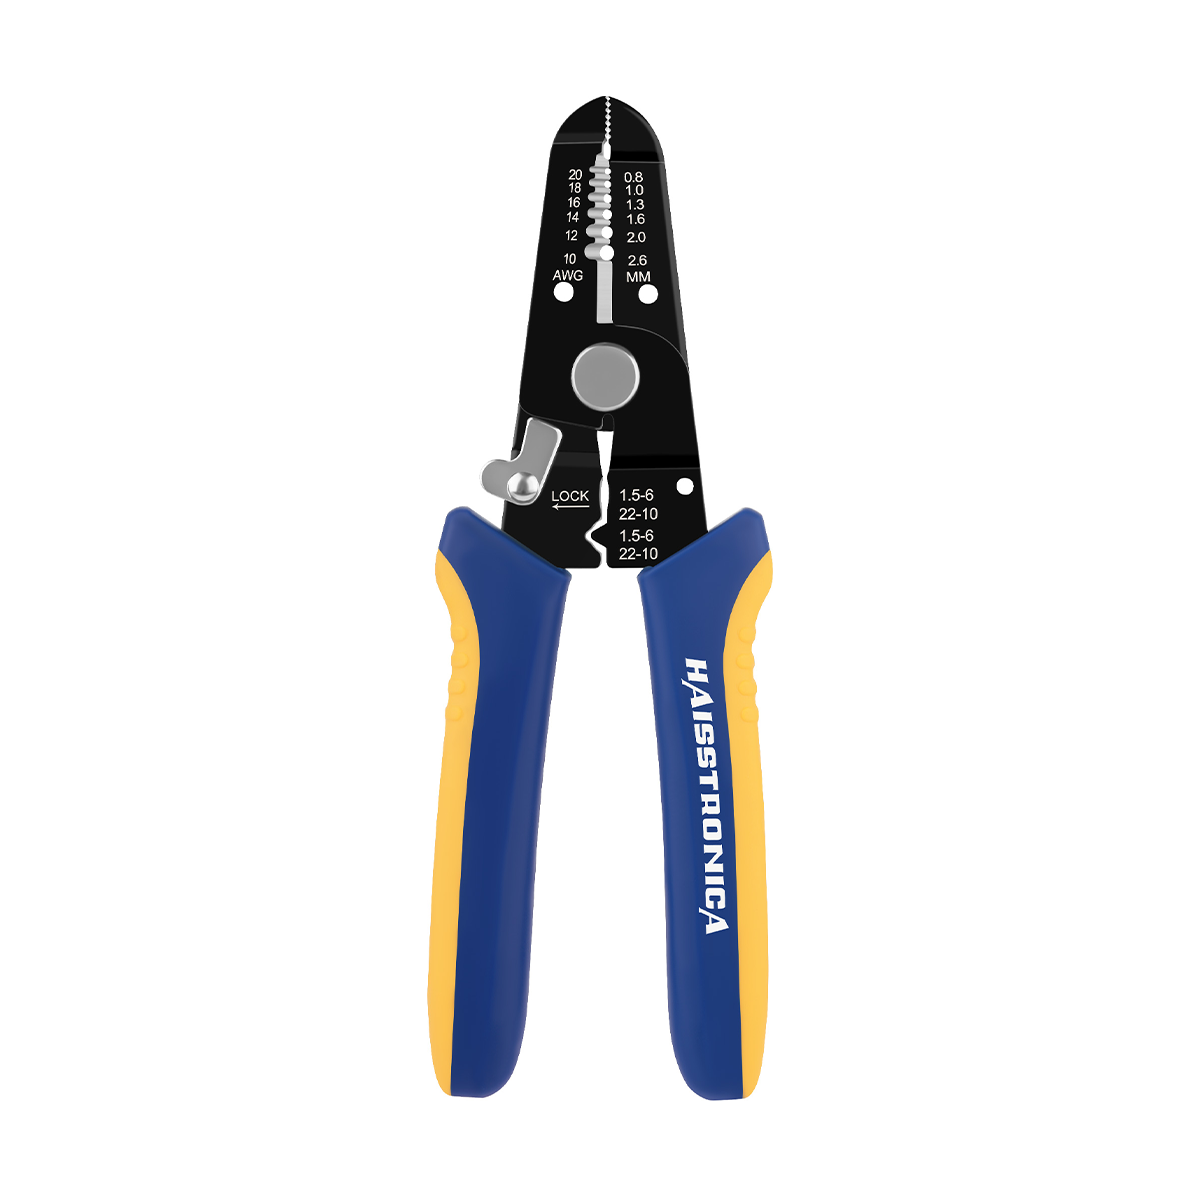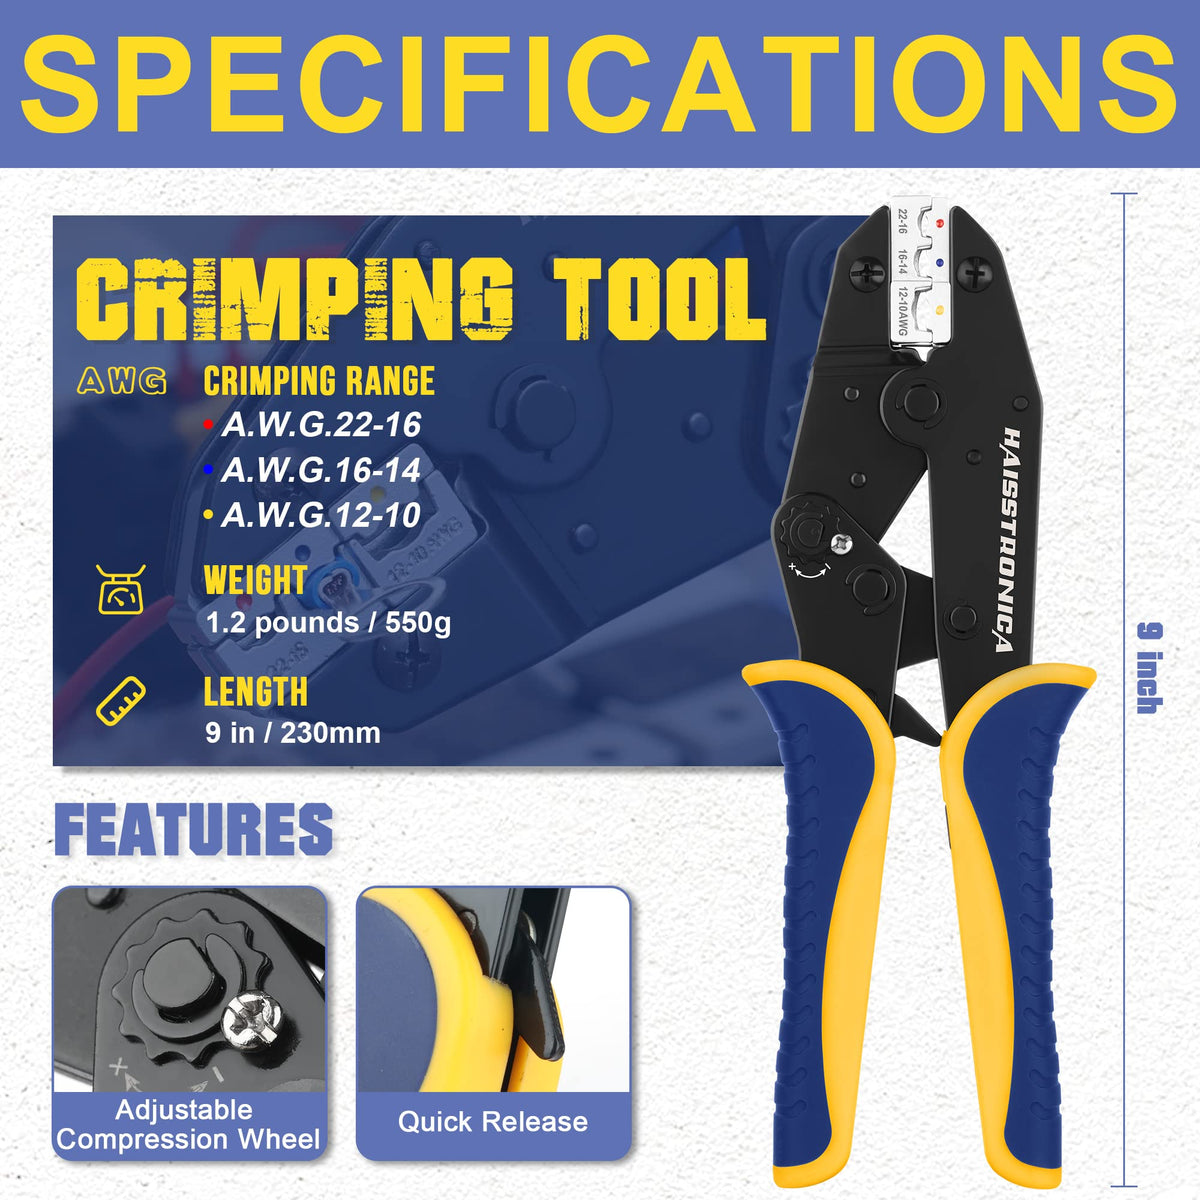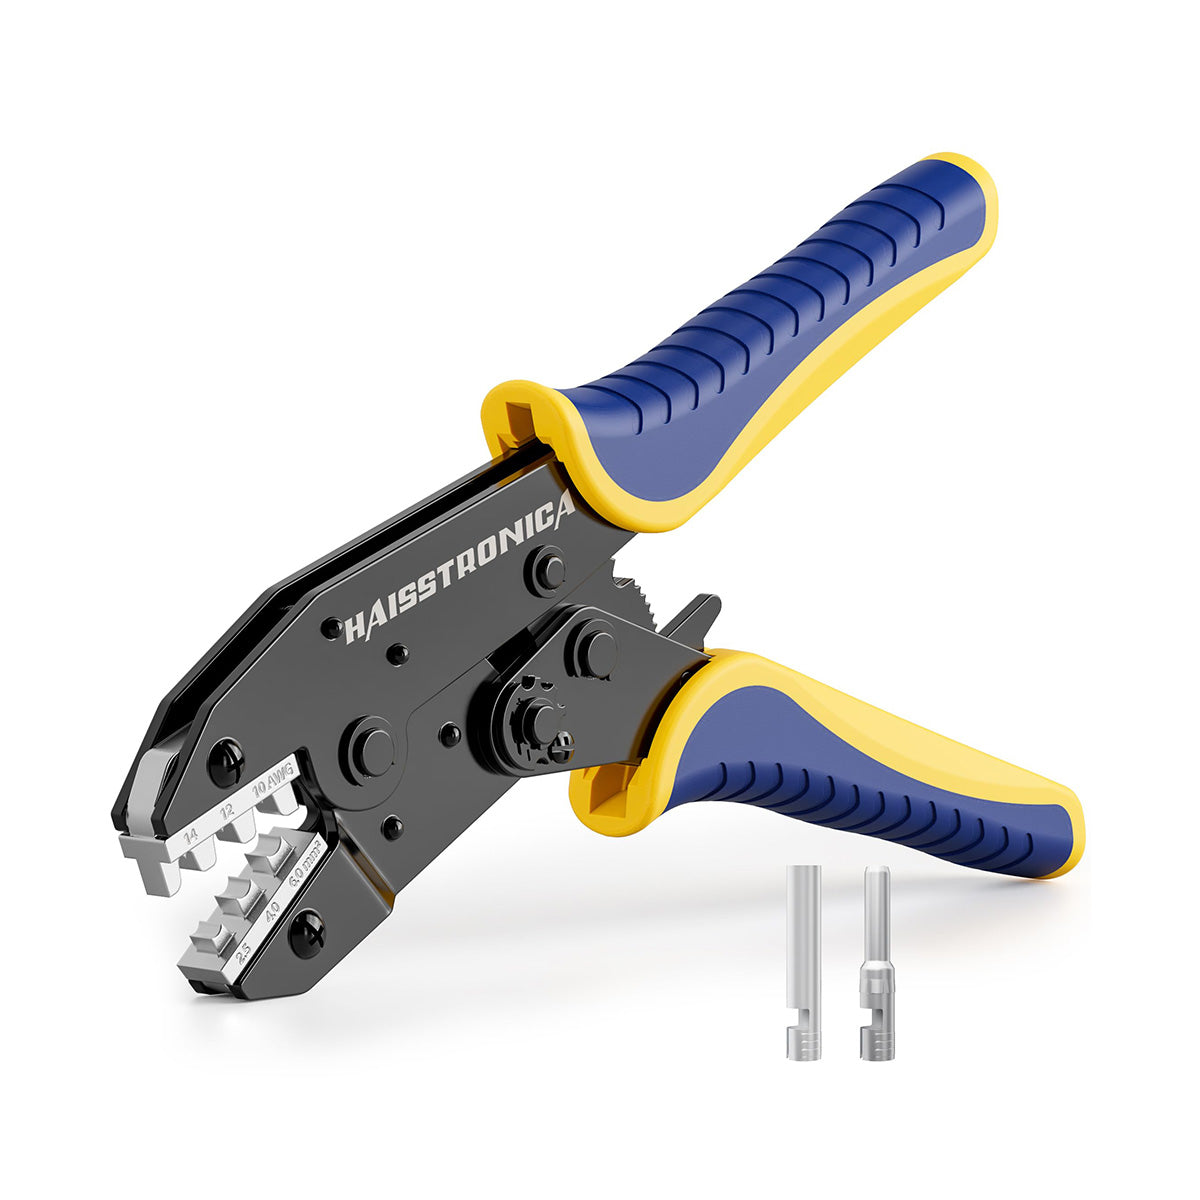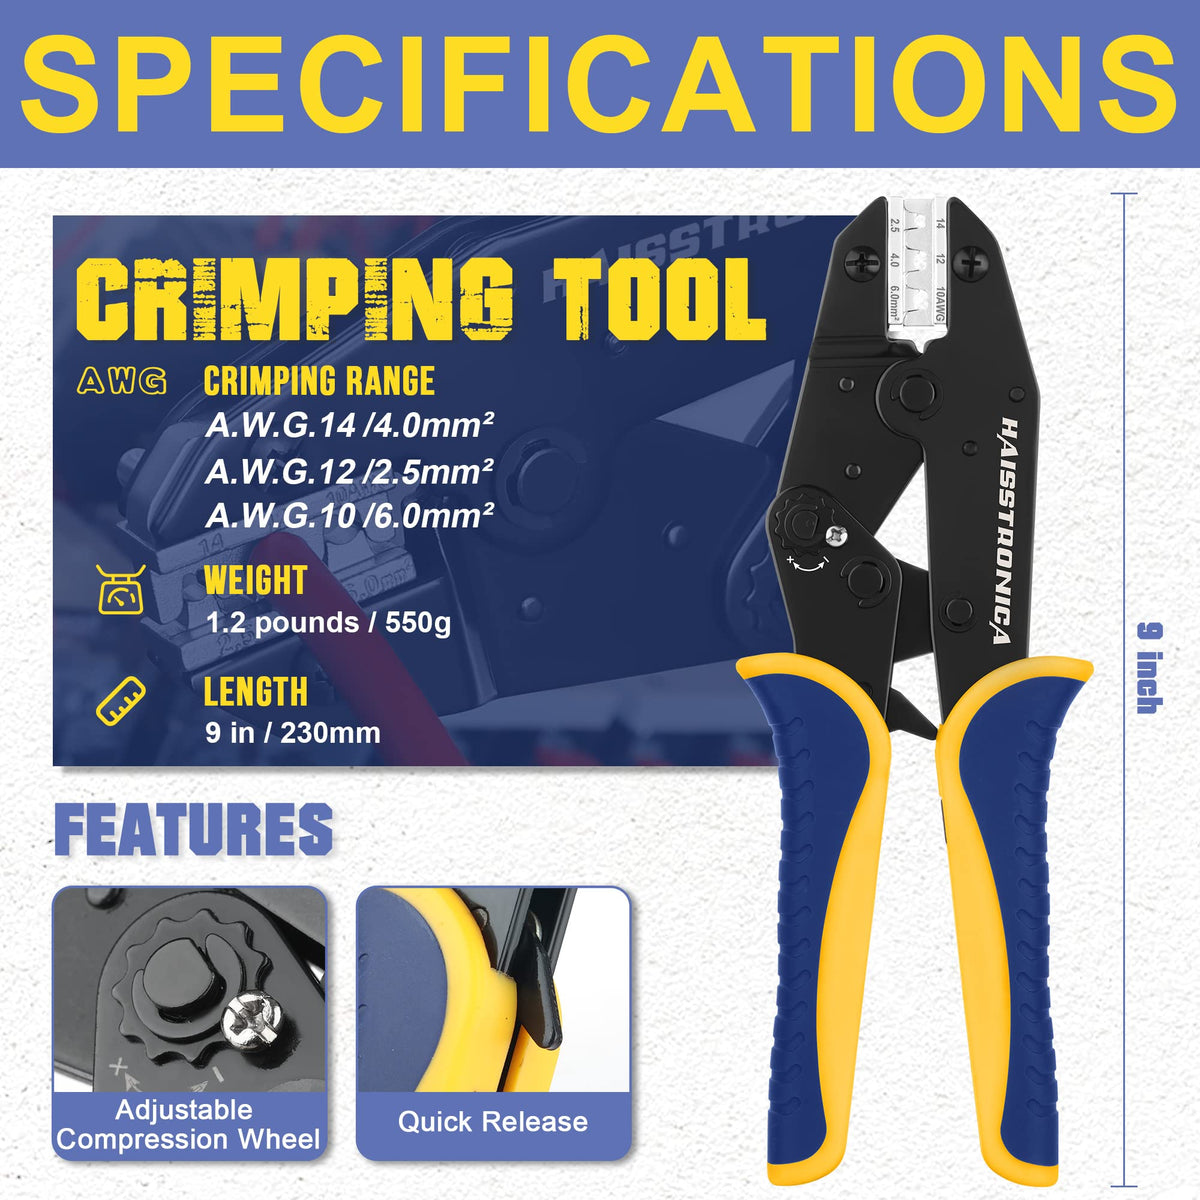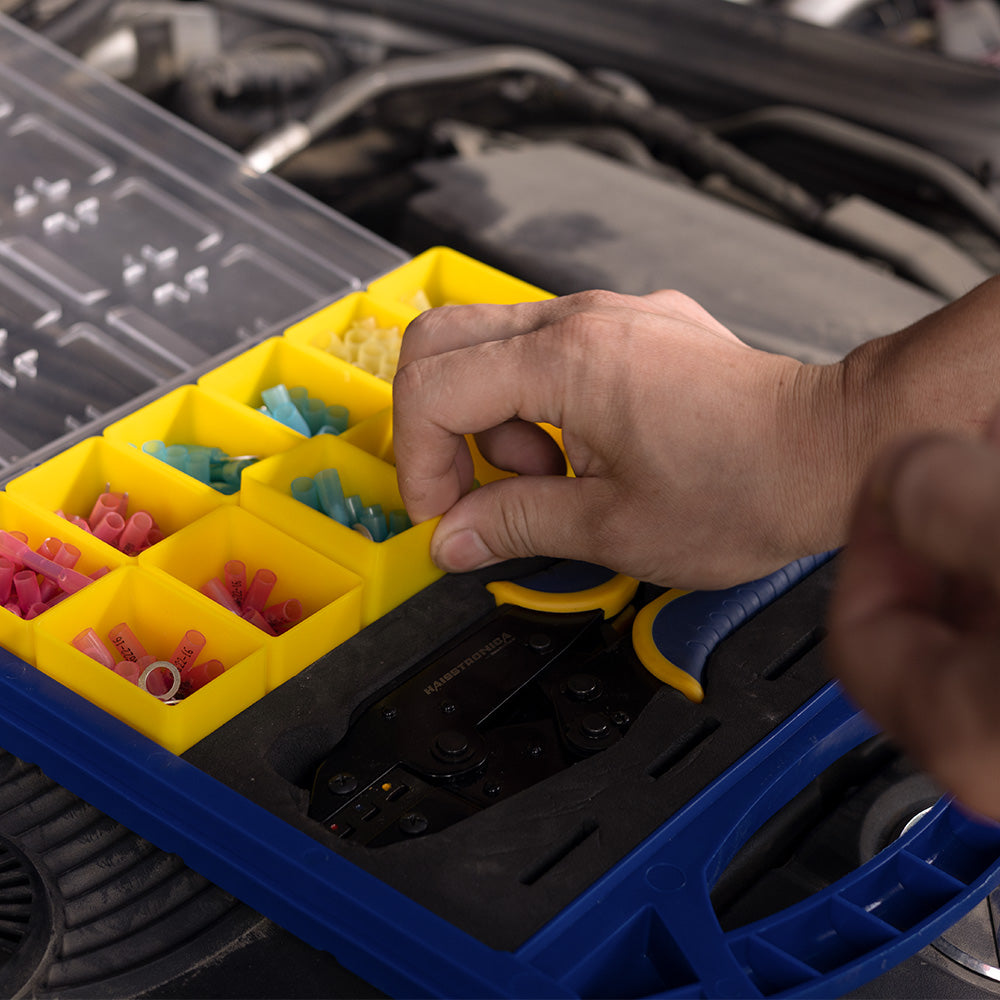


Crimping is the process of joining two conductors (wire or cable) by deforming a metal connector tightly around them. When done correctly, crimping creates a permanent, secure electrical connection that is as reliable as soldering. Proper crimps ensure a consistent current flow and can withstand vibrations and pulling in harsh environments. This is critical for electricians, automotive technicians, and DIYers who need safe, code-compliant wiring. The core of any good crimp job is the right crimping tool matched to the connector type and wire gauge. For example, Haisstronica’s Ratchet Wire Terminal Crimping Tool for AWG 22–10 Heat-Shrink Connectors is an ANSI-compliant, ratcheting crimp tool with adjustable pressure. Its ergonomic handles and ratchet mechanism deliver uniform crimps (image below), and the adjustable compression wheel lets you fine-tune the pressure for different connectors.
Tools and Materials
Before crimping, gather the right tools and connectors. The essential tools include:
-
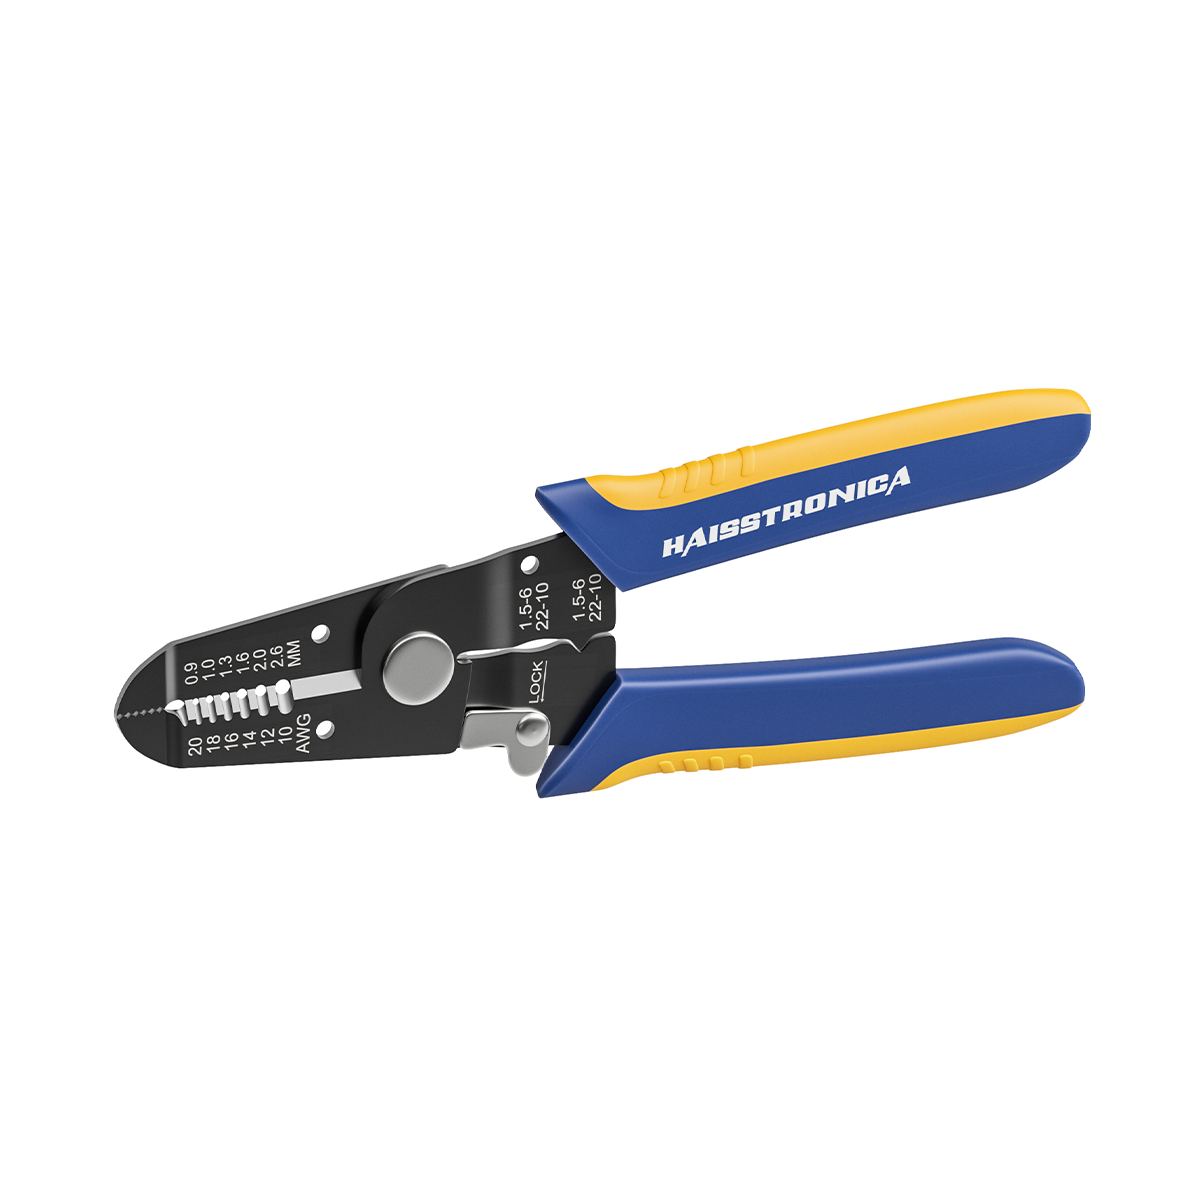
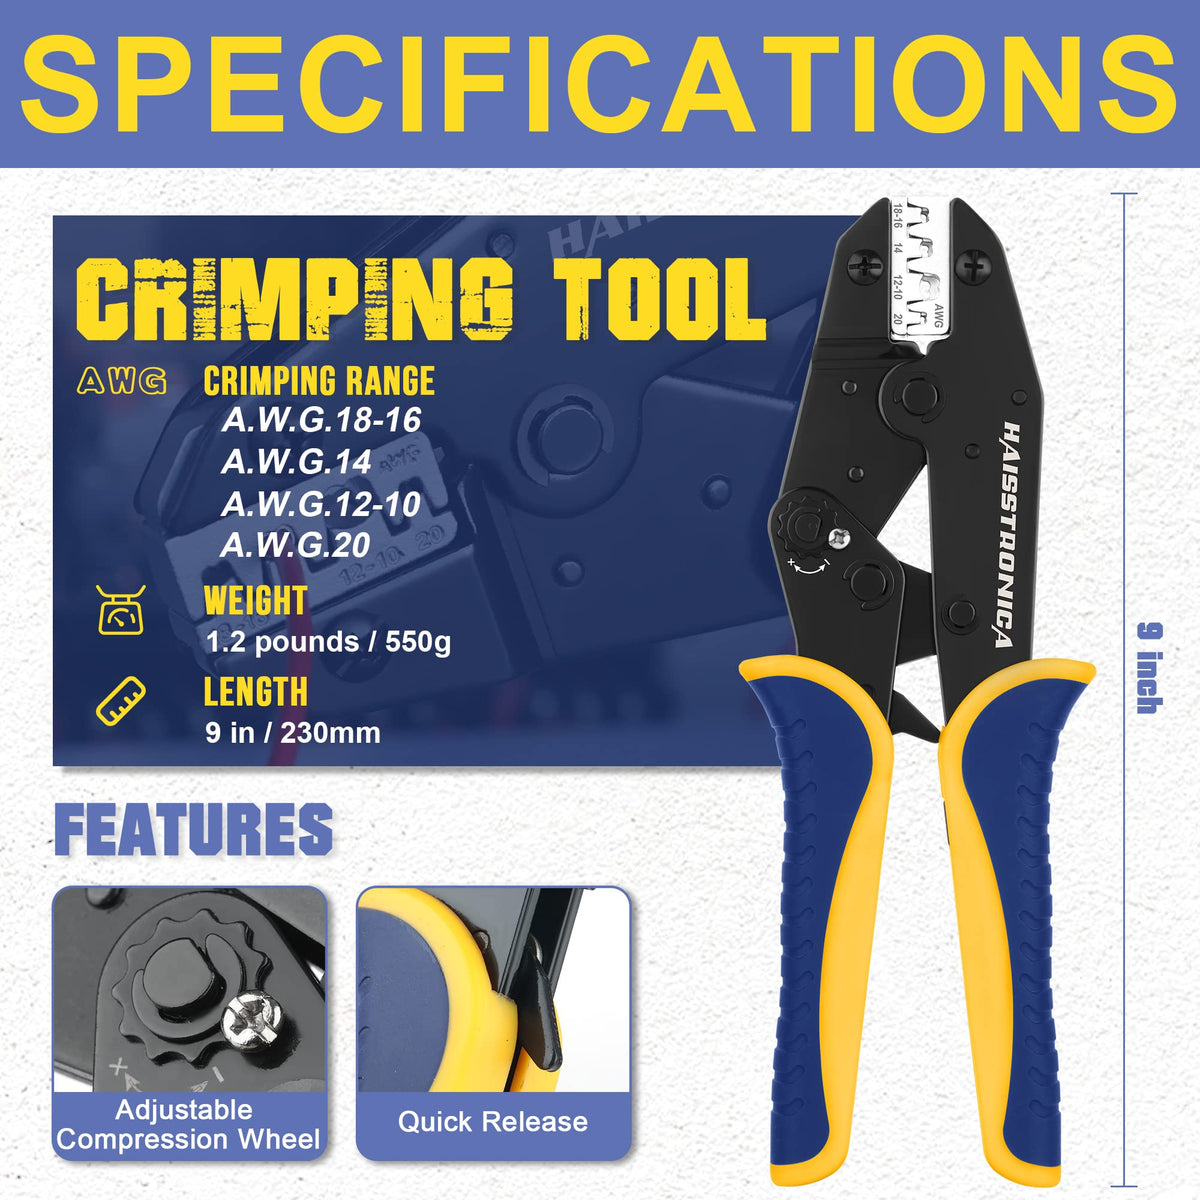
Crimping Tool (Crimp Tool) – a pliers-like device designed specifically to crimp connectors onto wires. High-quality crimp tools have dies shaped to match connector barrels. According to Comms Express, a proper crimping tool “features a die set that matches the type of connector… [for] precise crimps and durability”. Varieties include ratchet crimpers (like Haisstronica’s AWG 22–10 tool), hand-held plier crimpers, hydraulic or battery-powered crimpers for very large cables, and specialized crimpers (e.g. for MC4 solar or terminal lugs). Many call these wire crimper tools, crimper pliers, or simply wire crimpers.
-
Wire Strippers – used to remove insulation without nicking the conductor. Strip the correct length (usually just enough to fill the barrel). As noted, wire strippers “remove insulation cleanly and precisely, without damaging the wire conductors”. A consistent strip length and cleanly cut strands are critical for a good crimp.
-
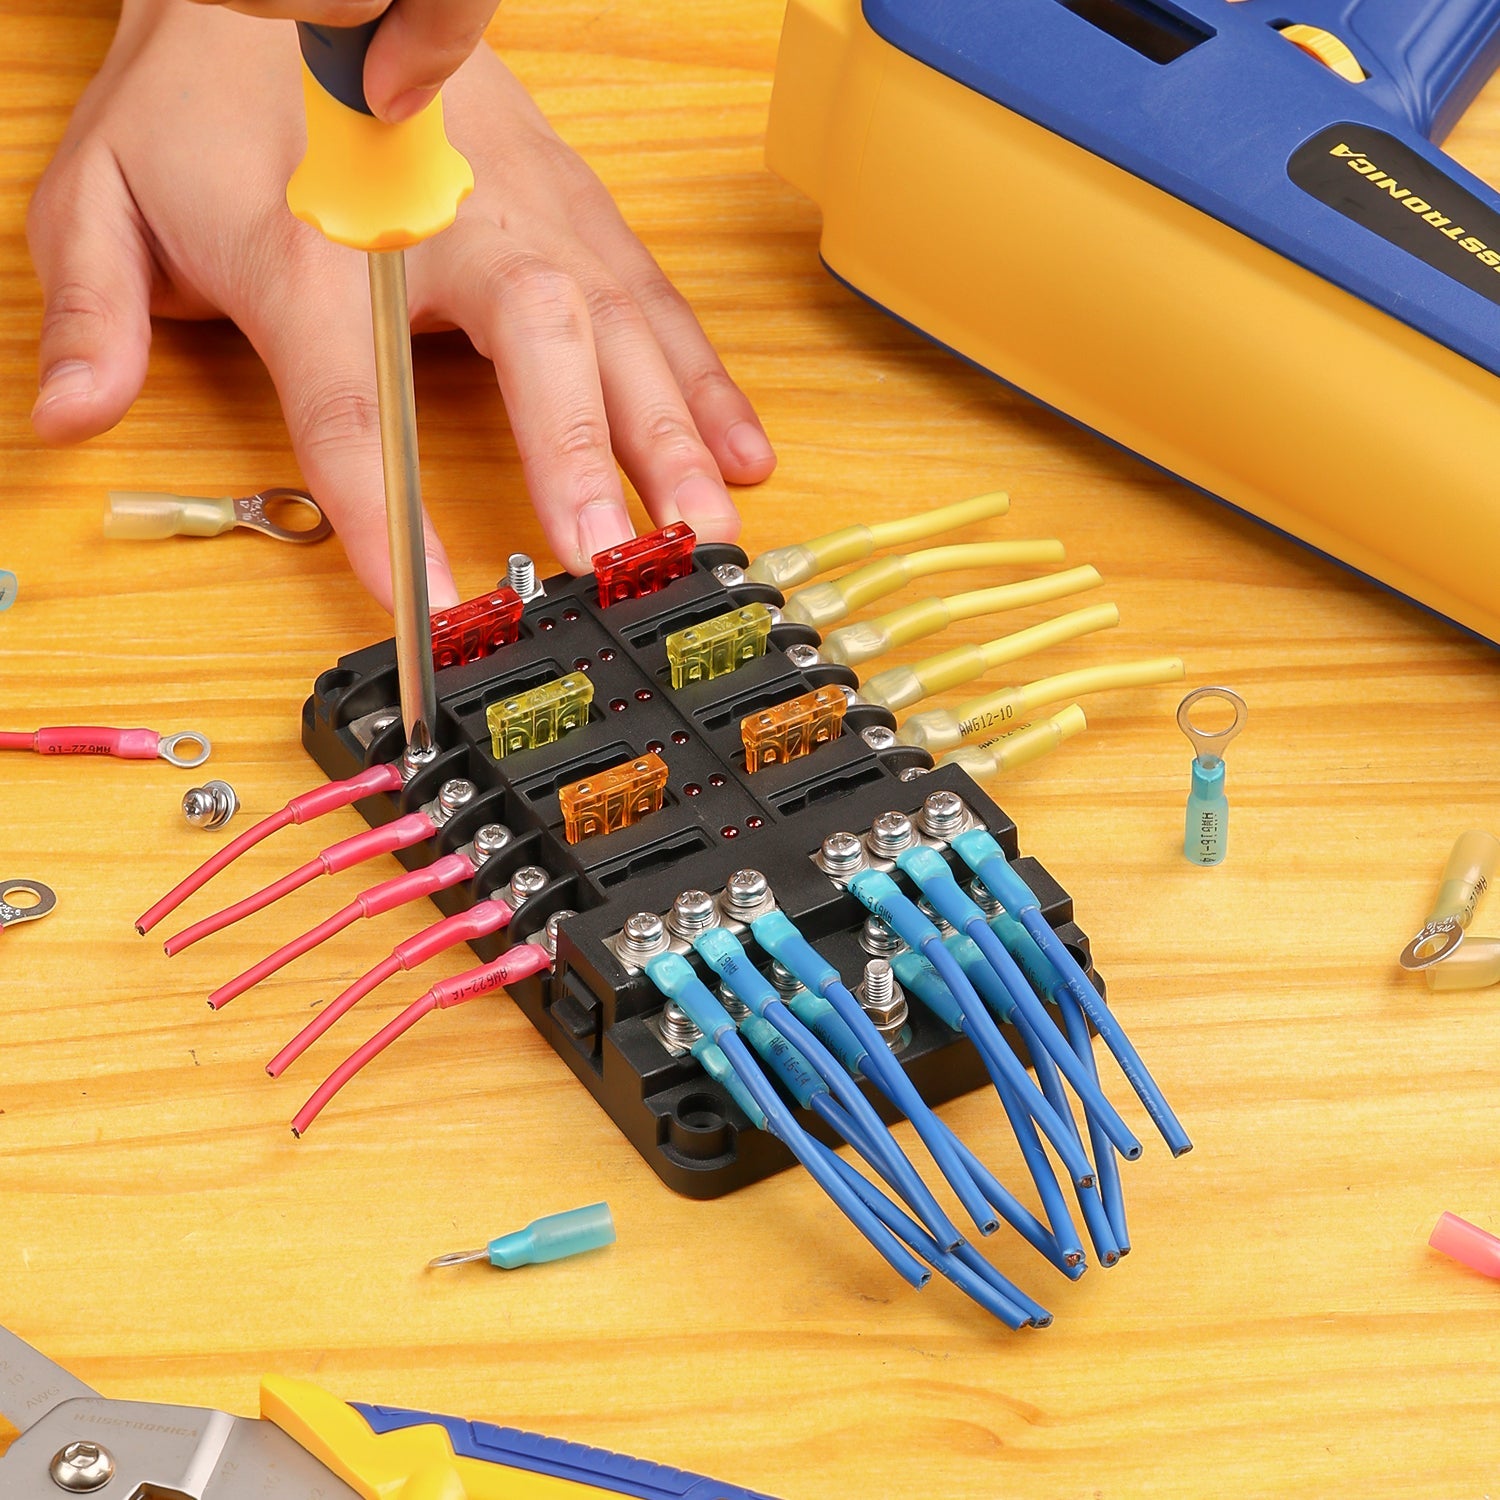
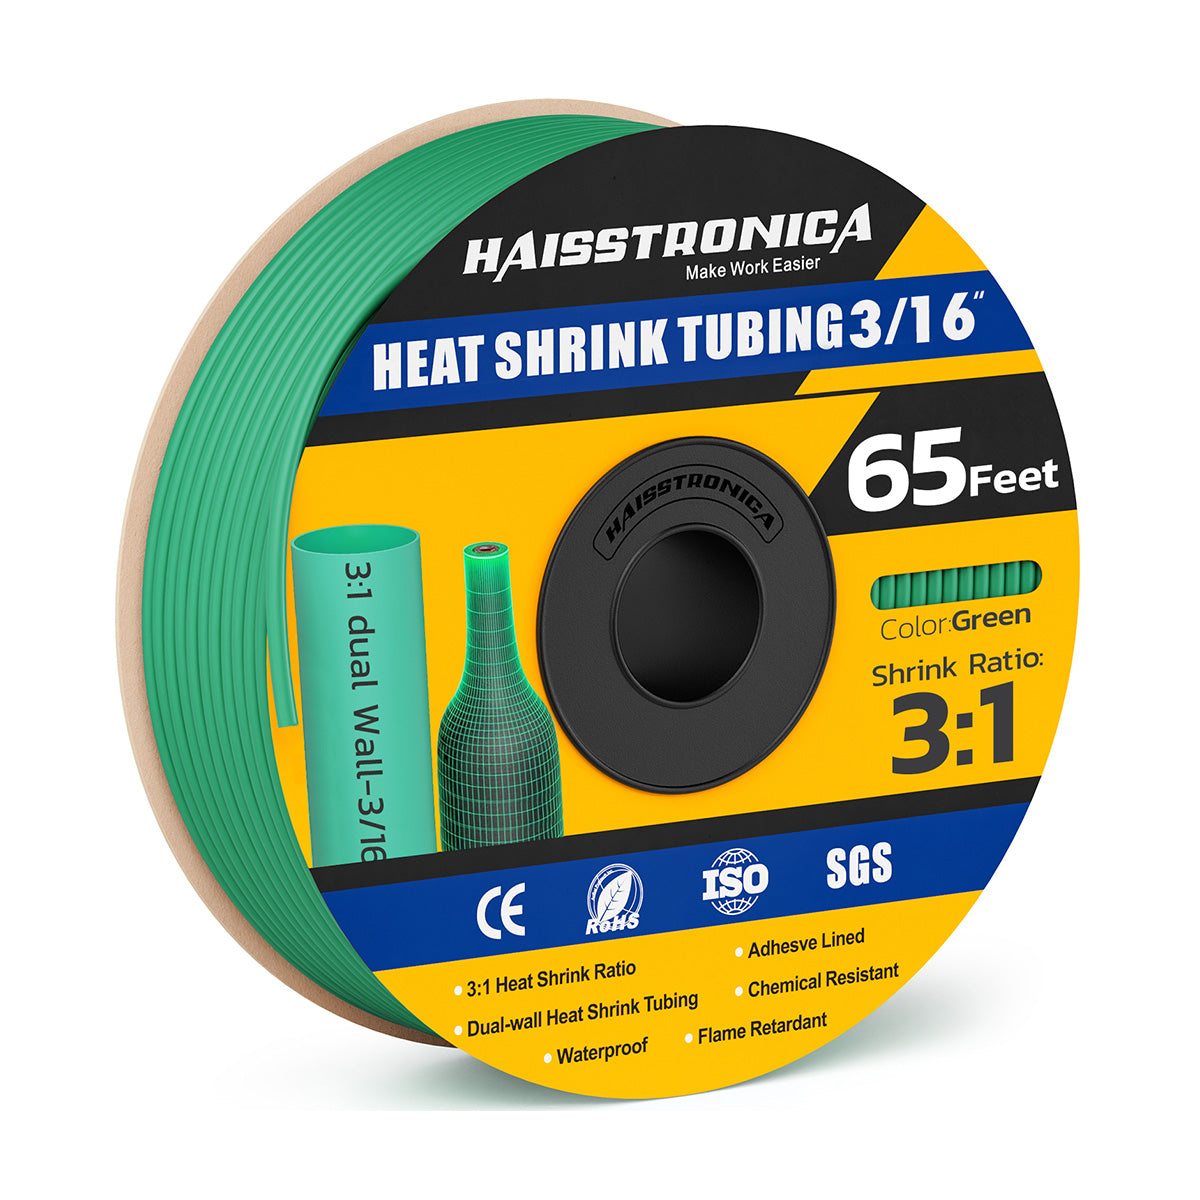
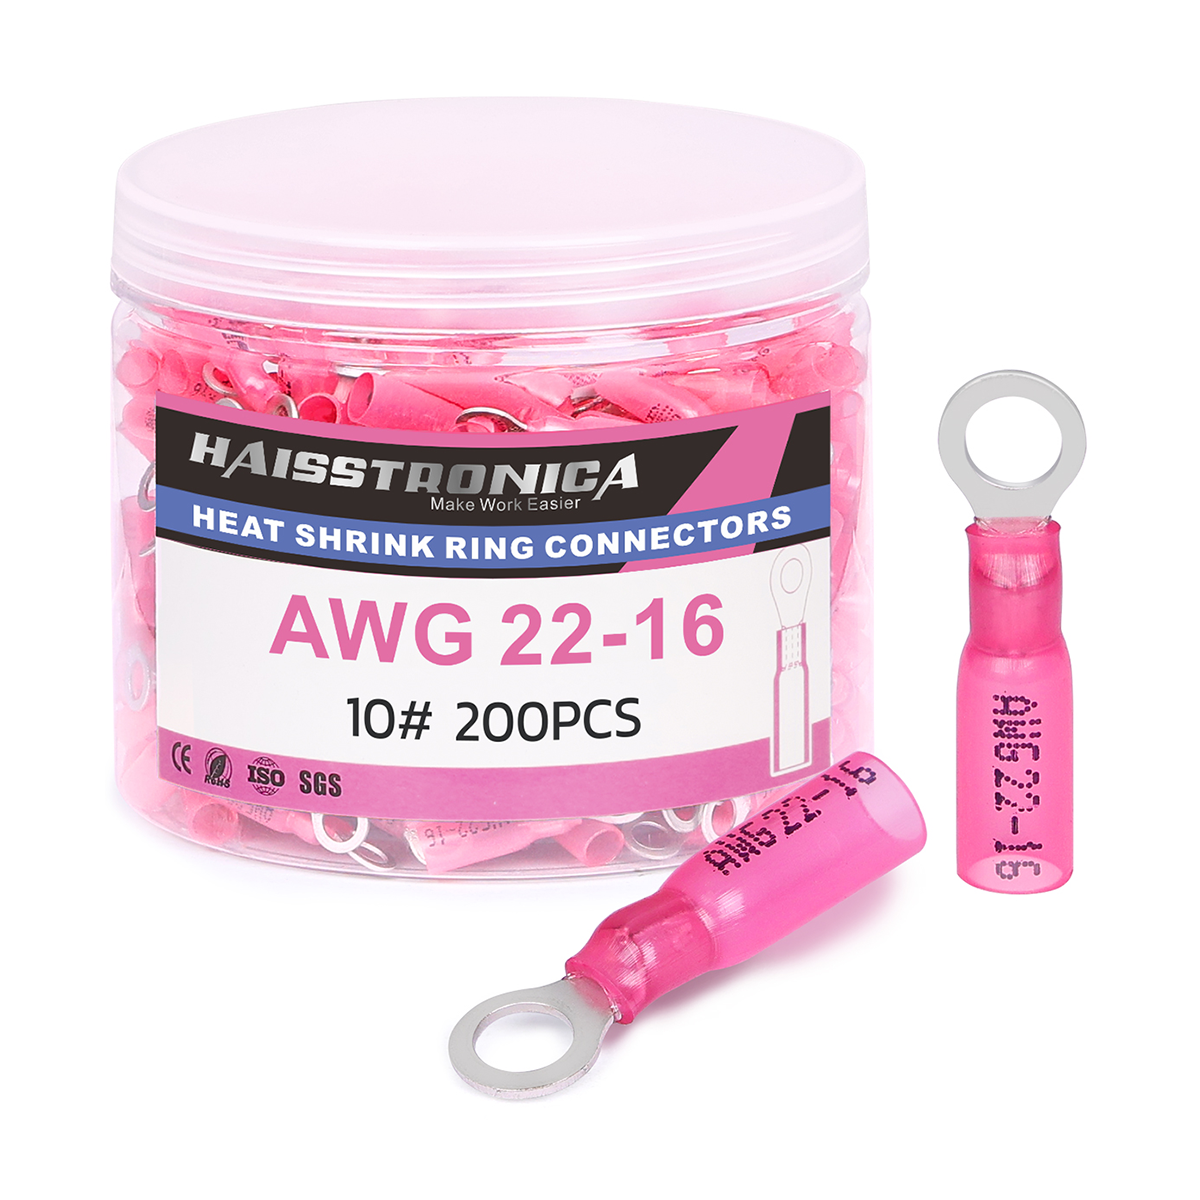
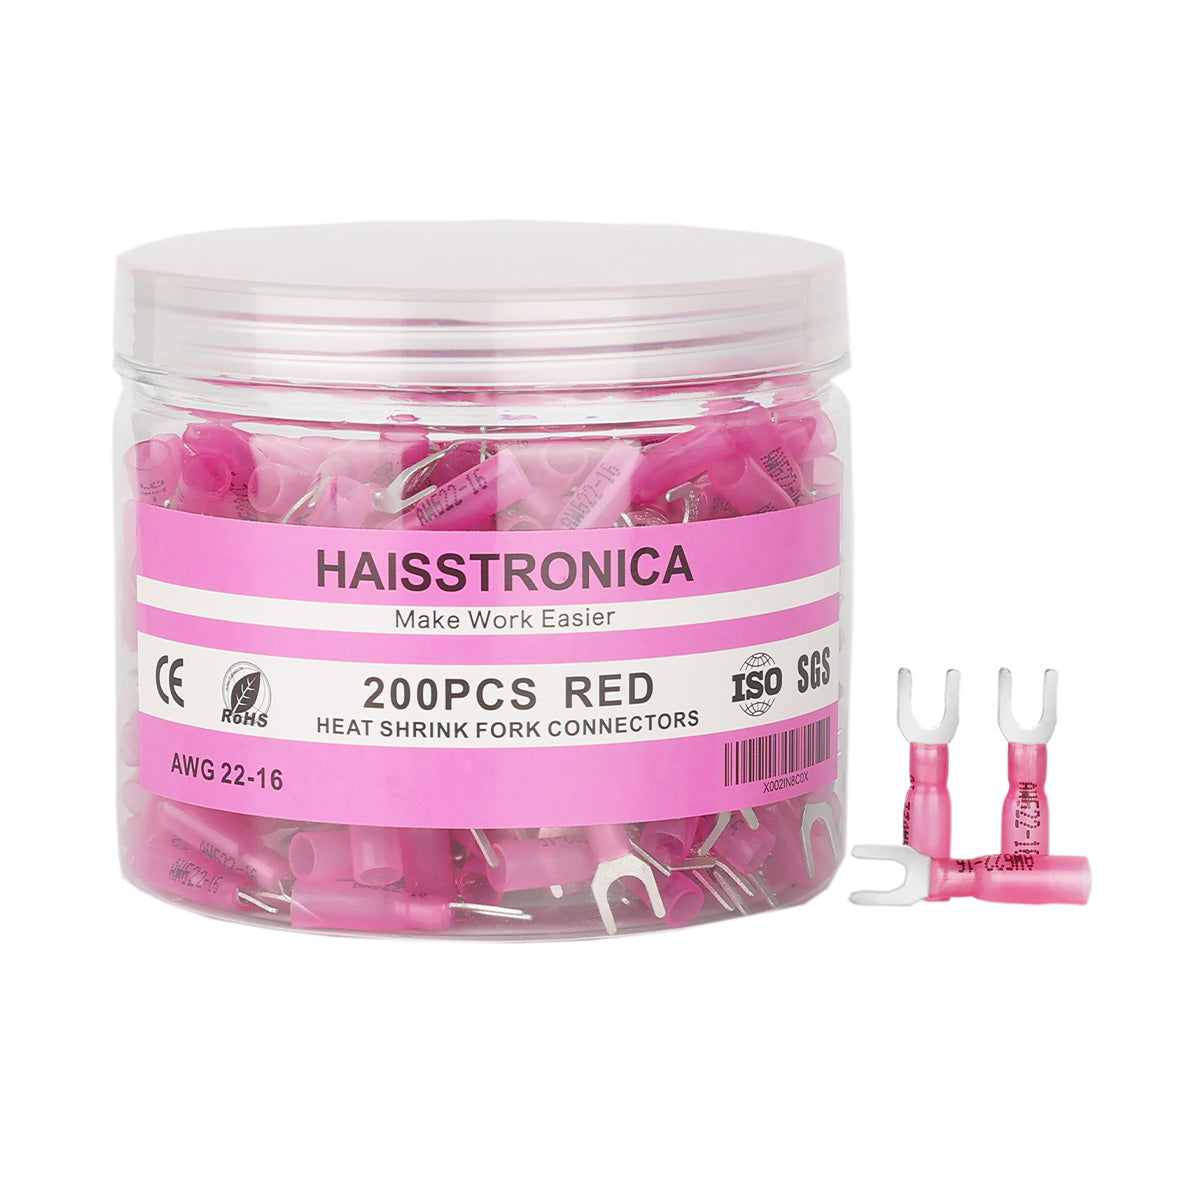
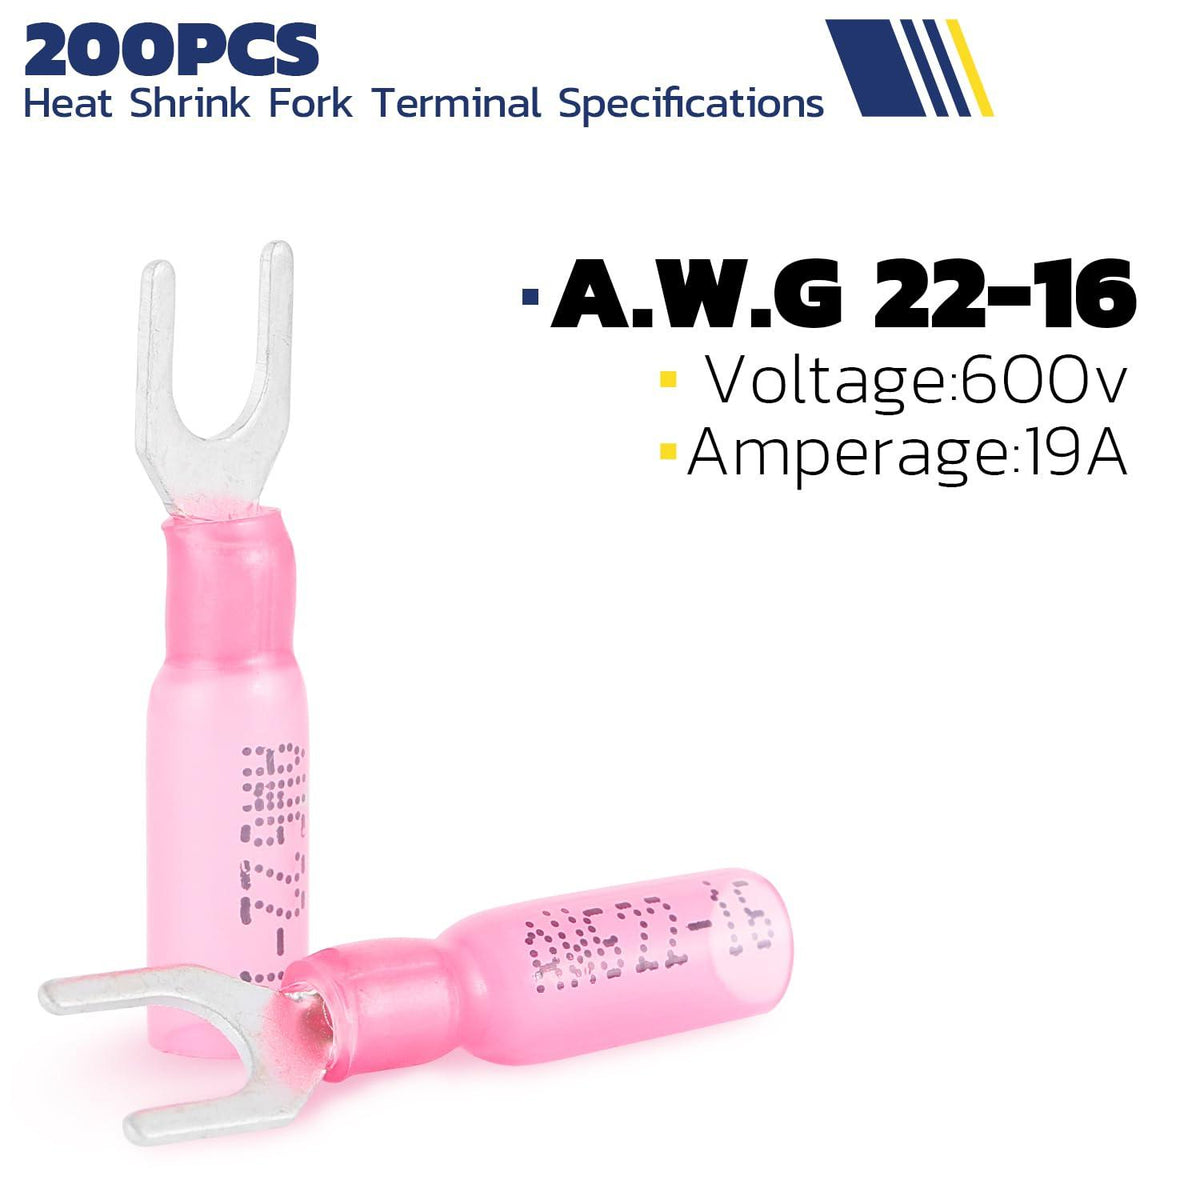
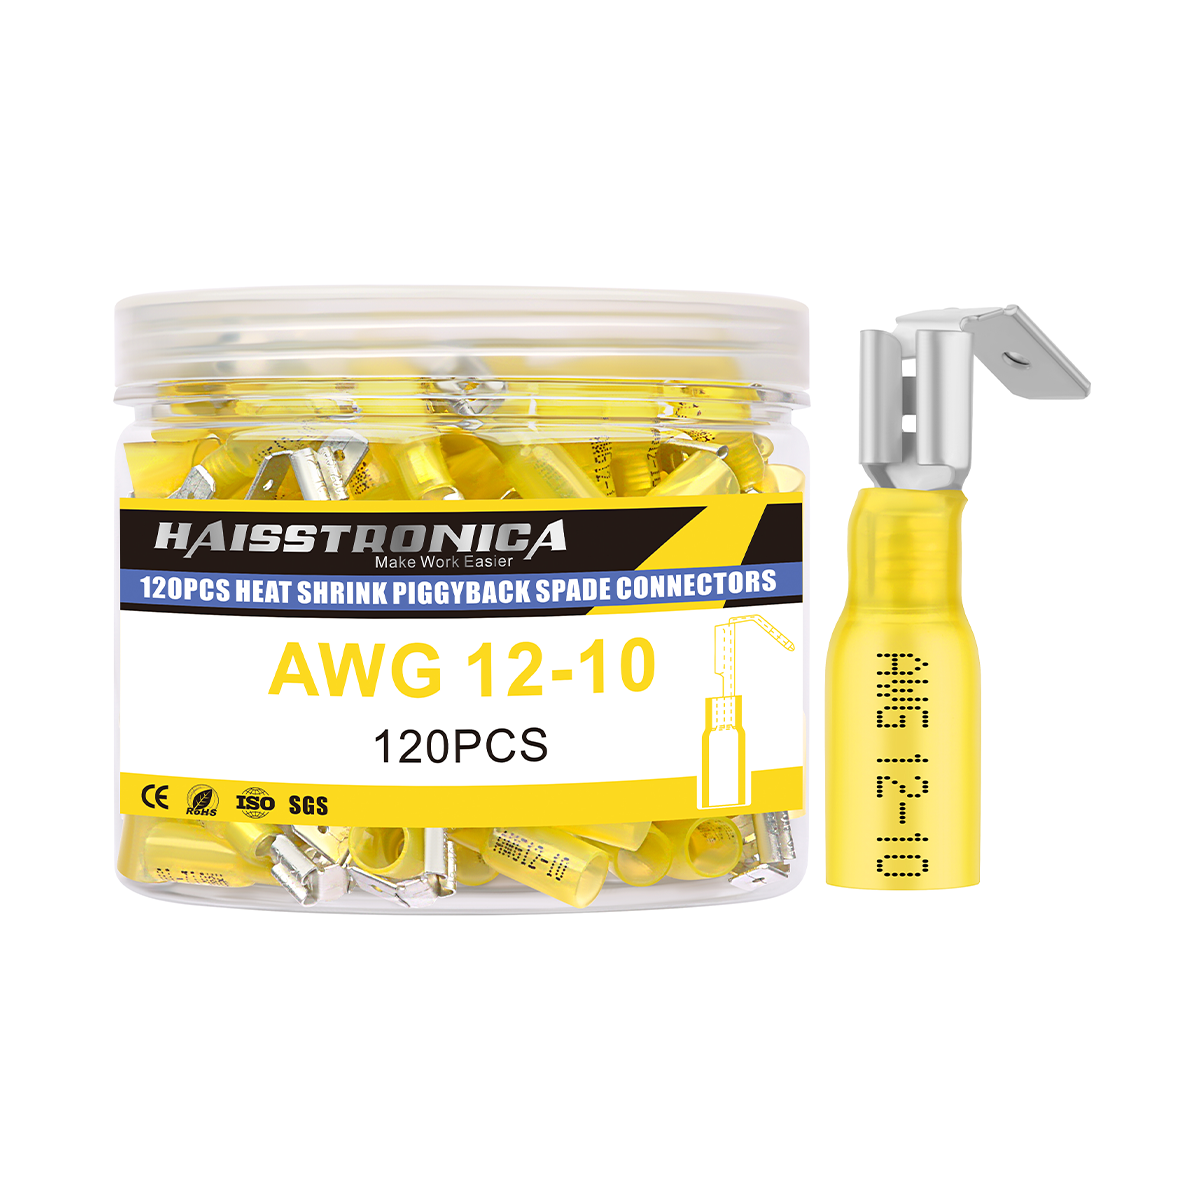
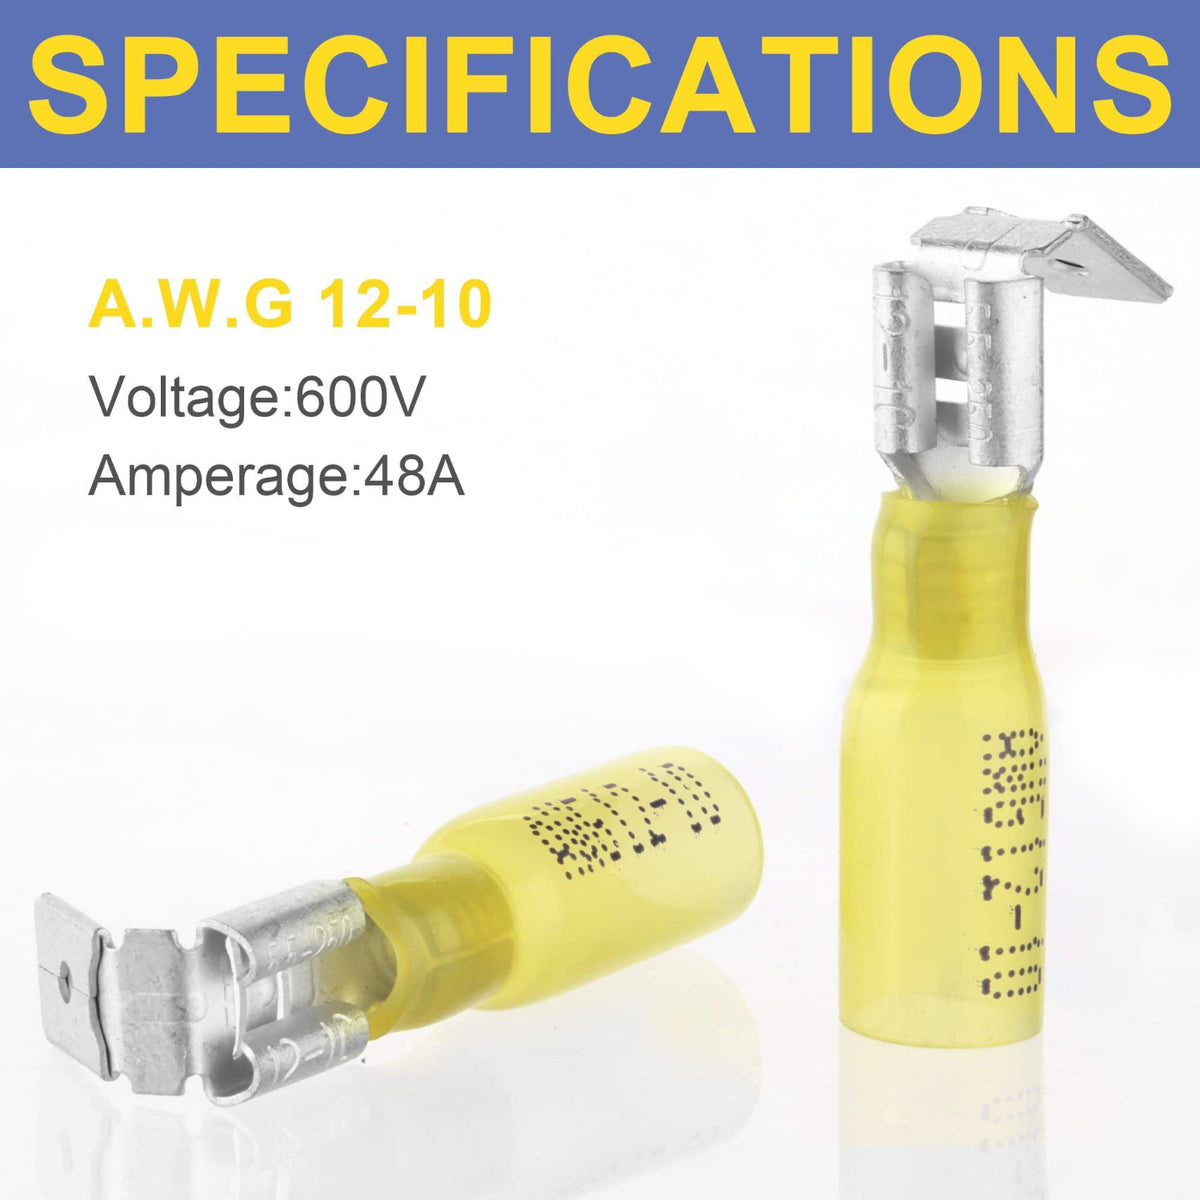
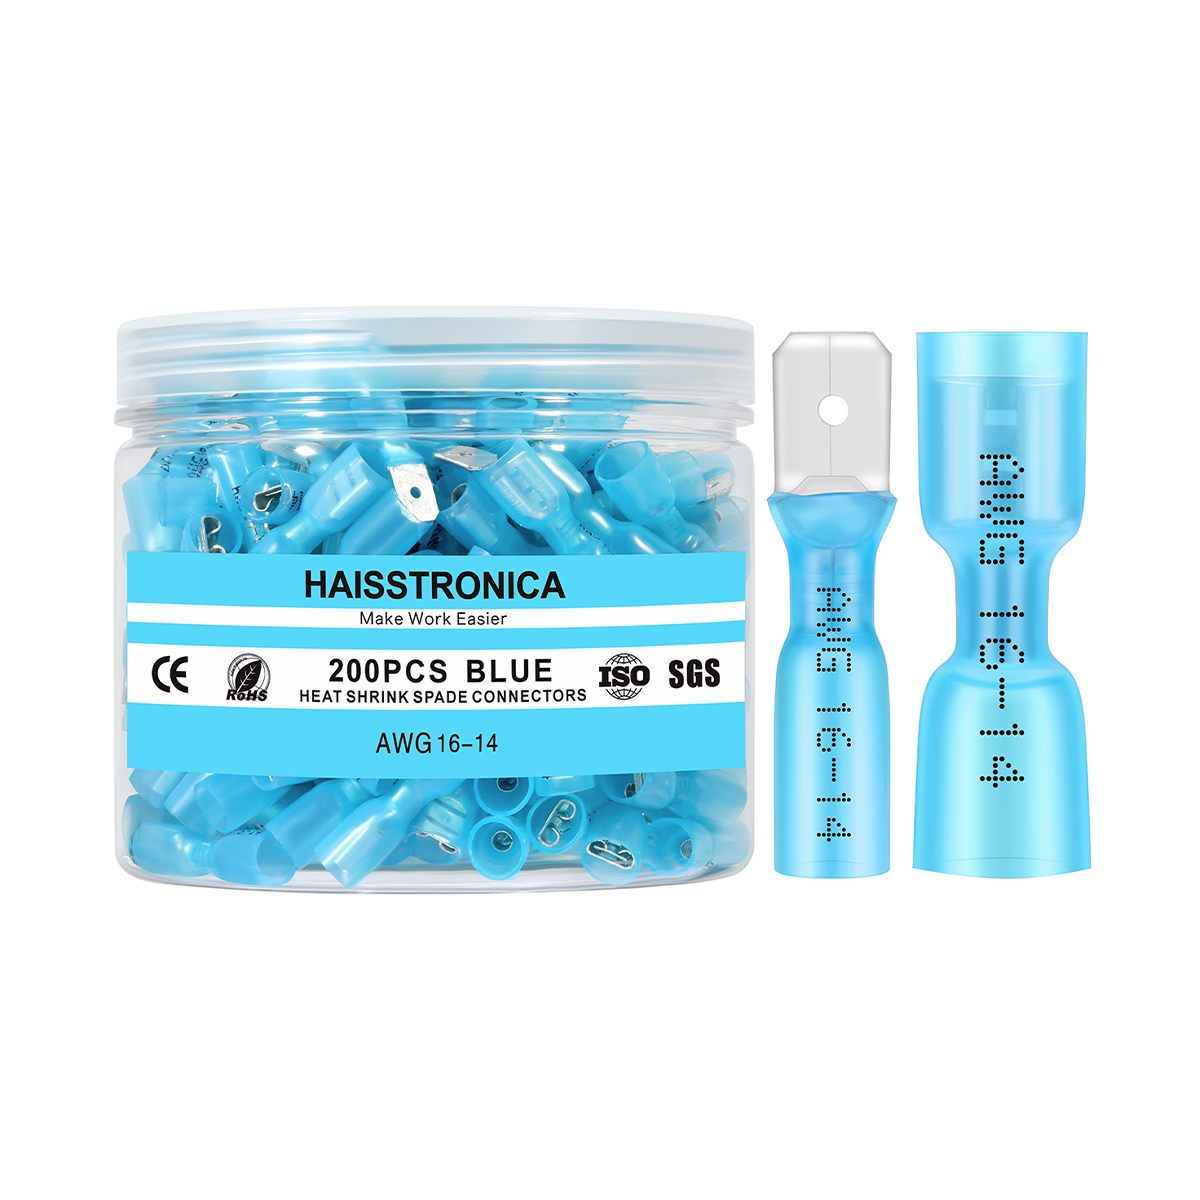
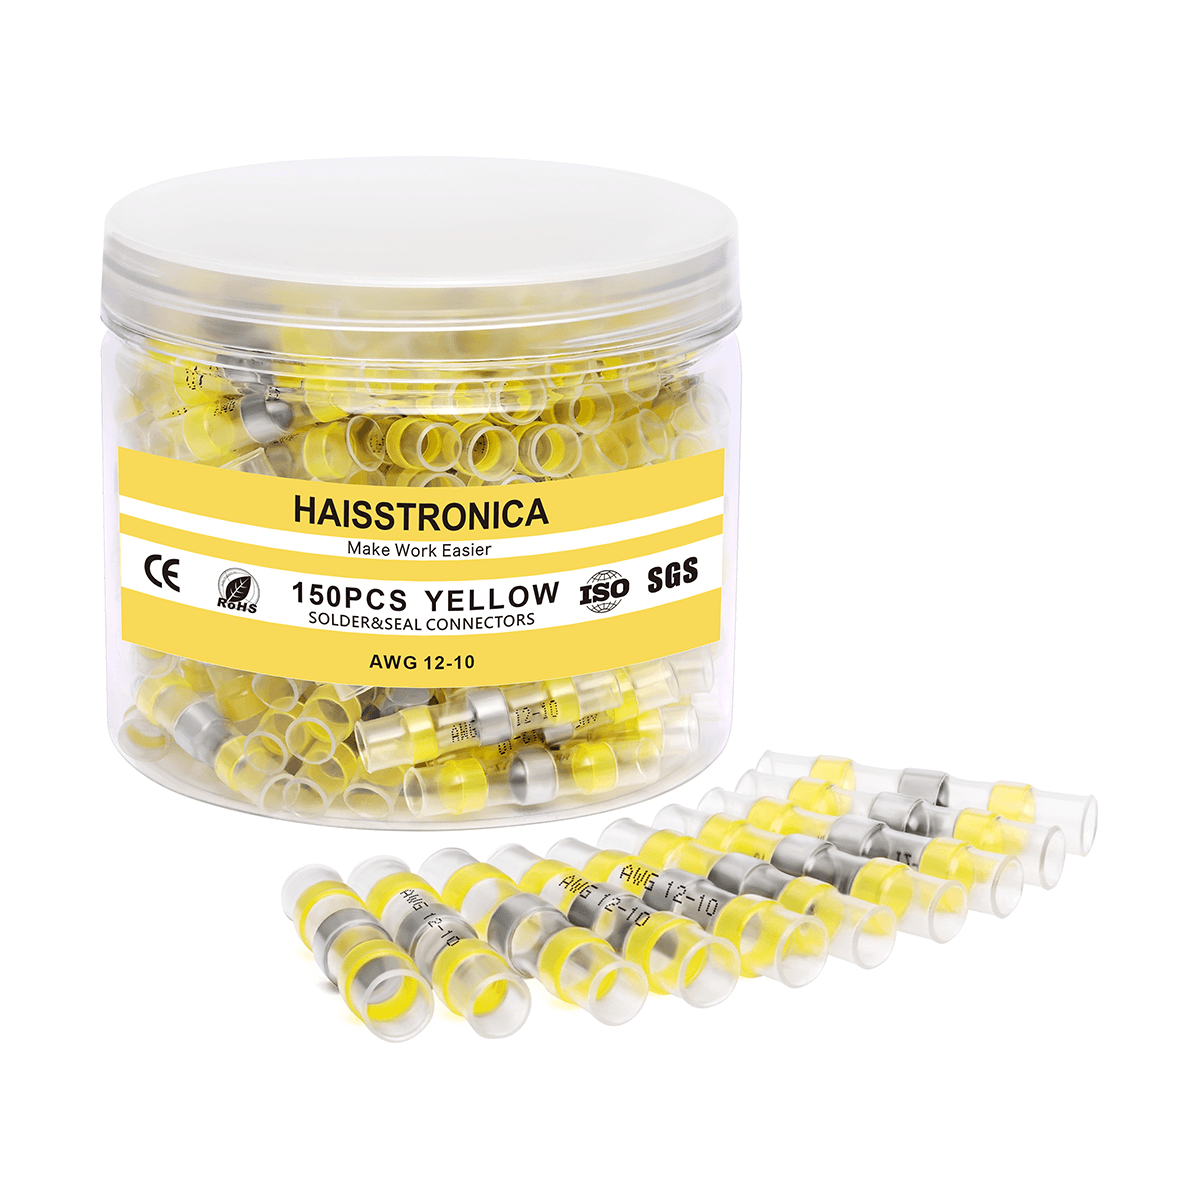
Connectors and Ferrules – select the right connector for the job. Common types are insulated ring/spade terminals, butt connectors (inline splice), bullet/auto terminals, fork terminals, and wire ferrules (sleeve terminals). Choose connectors rated for the wire AWG and application (e.g. heat-shrink insulated for moisture, marine-grade if needed). Use the color-code chart below for heat-shrink butt/ferrule terminals:
Wire Gauge (AWG) Connector Color Typical Use 22–18 Red Small wires (ground wires, signal) 16–14 Blue Medium wires (12–14 AWG splices) 12–10 Yellow Large wires (battery cables, heavy circuits) - Heat Gun or Lighter (for heat-shrink) – to seal insulated connectors after crimping, if using heat-shrink butt connectors or solder-sleeves.
-
Multimeter and Safety Gear – test continuity after crimping and always wear eye protection and gloves when working with electricity.
Types of Crimping Tools
Different crimps call for different tools. Here are common types:
-
Ratchet Crimping Tool – The “gold standard” for reliable crimps. It locks in position and won’t release until the die fully closes, ensuring a full compression. The Haisstronica AWG 22–10 ratchet tool above exemplifies this: once you squeeze the handles, the ratchet mechanism applies even pressure and only opens when the crimp cycle is complete. This prevents under-crimping. Such tools often have interchangeable jaws (for insulated vs. non-insulated, ferrules, etc.) and a comfort grip.
-
Handheld/Plier-Style Crimper – Similar to pliers, these manually compress a connector. They are quicker but less foolproof than ratchet models. They may work for one-off jobs and smaller connectors. However, they require consistent hand pressure; novices may unevenly crimp without a ratchet.
-
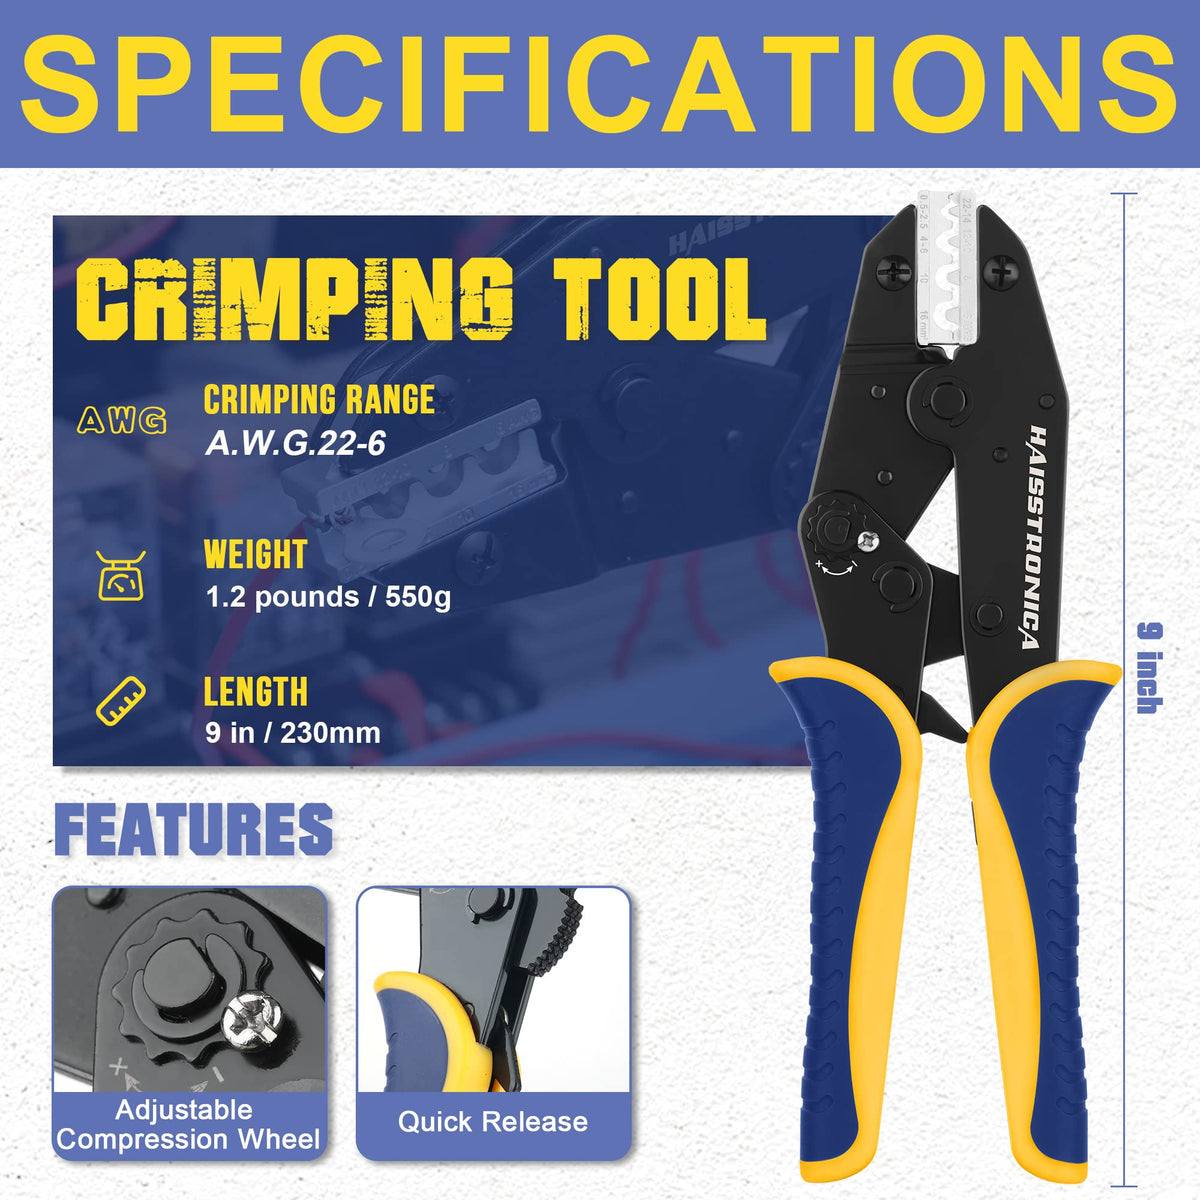
Ferrule Crimpers (Ferrule Crimping Tool) – Specifically designed for crimping wire ferrules (sleeve terminals on multi-stranded wires). A ferrule crimper has a hexagonal die that compresses the ferrule perfectly around the wire end. Haisstronica offers dedicated ferrule crimp kits; their best ferrule crimper “guarantees precise crimps, optimal conductivity, and reduced failure rates”. Terms like “ferrule crimper”, “ferrule crimping tool”, or even misspellings like ferrel crimper all refer to this tool.
-
Butt Connector Crimper – Often interchangeable with insulated-terminal crimpers, butt crimpers may have a shorter jaws for inline splices. Heavy-duty butt connectors (for battery cables, chassis connections) may require larger pliers or bench crimpers.
-
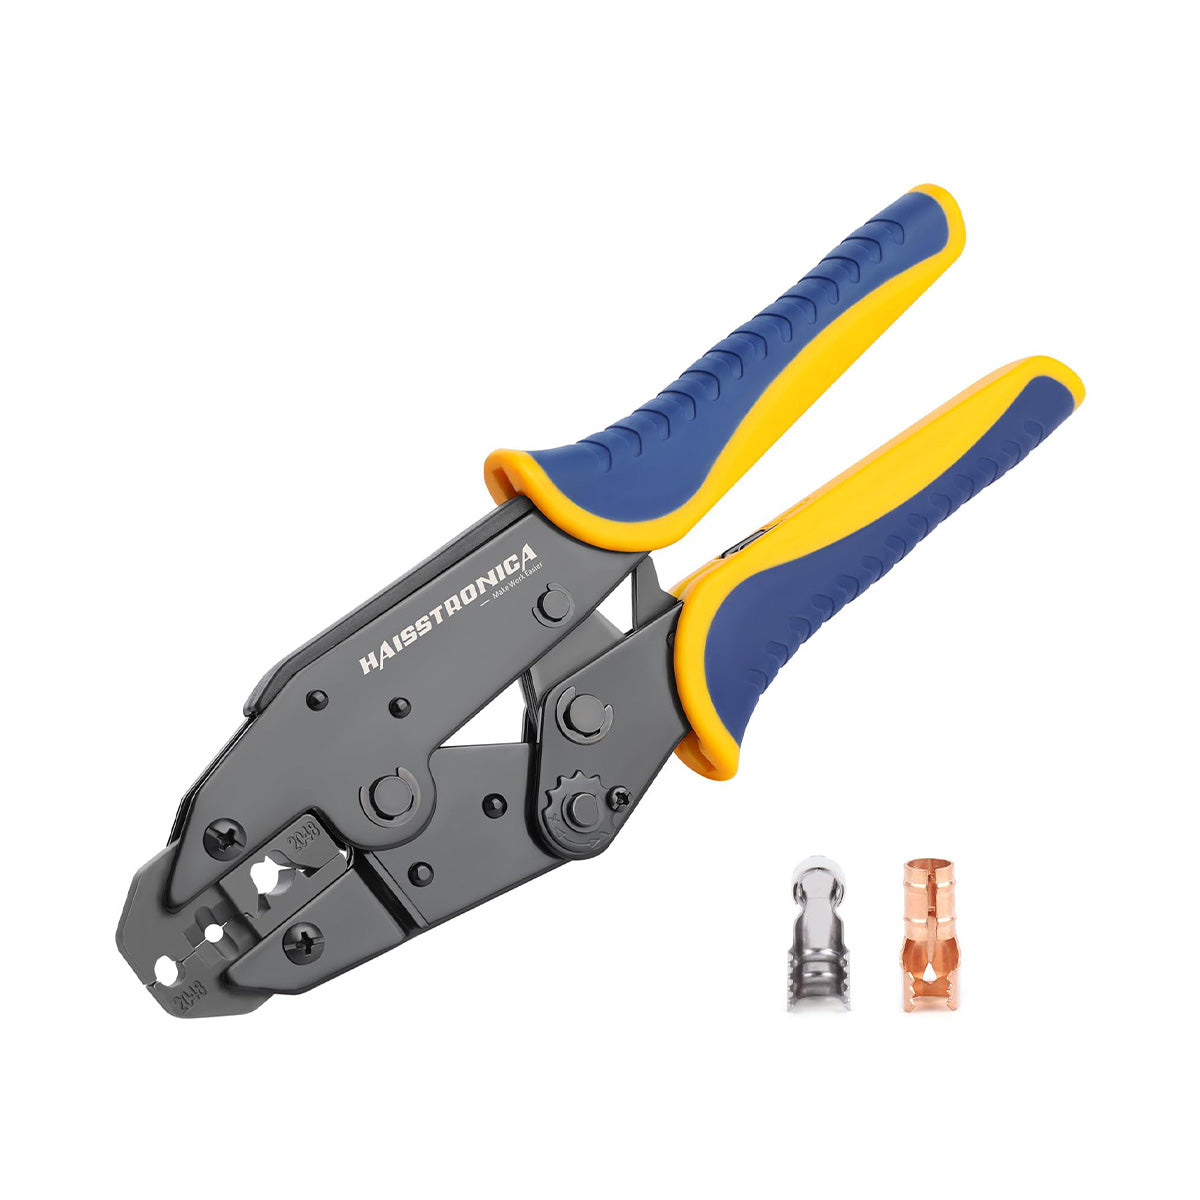
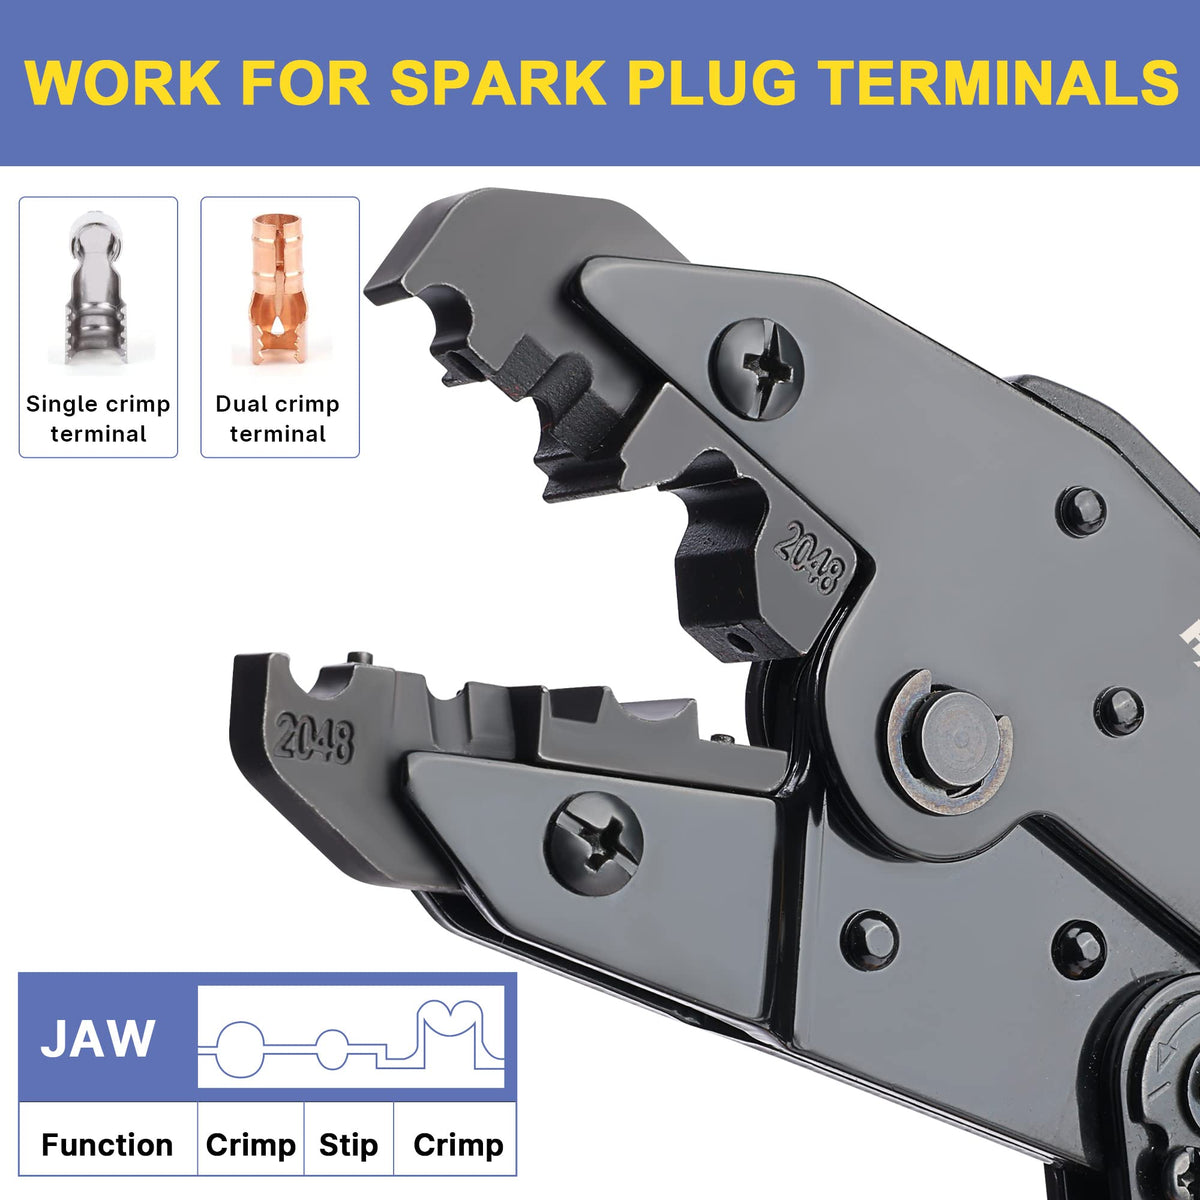
Specialty Crimpers – E.g. an MC4 connector crimper for solar panel PV connectors, or a spark plug wire crimping tool for thick ignition wires. A spark plug wire crimper usually has deep jaws to reach the inner conductor of a heavy cable. For example, MSD and Haisstronica make spark-wire crimper pliers specifically for 8mm/9mm plug wires.
-
Wire Stripper-Crimp Combo Tools – 3-in-1 tools that strip, cut, and crimp up to a certain gauge (e.g. AWG 24–10) can be handy for small jobs. Haisstronica’s AWG 24–10 3-in-1 kit is an example of this integrated solution. These are handy for smaller installers and DIYers.
Choosing the right crimper ensures consistent crimps. Ratchet and hydraulic tools excel in repeatability, while specialized crimpers (for ferrules, battery lugs, etc.) match the connector geometry. Always verify that the tool’s crimp cavity matches the connector: using a die that’s too large or too small results in a bad crimp.

Selecting the Right Connector
Selecting the proper terminal or splice connector is as important as the tool. Key considerations:
-
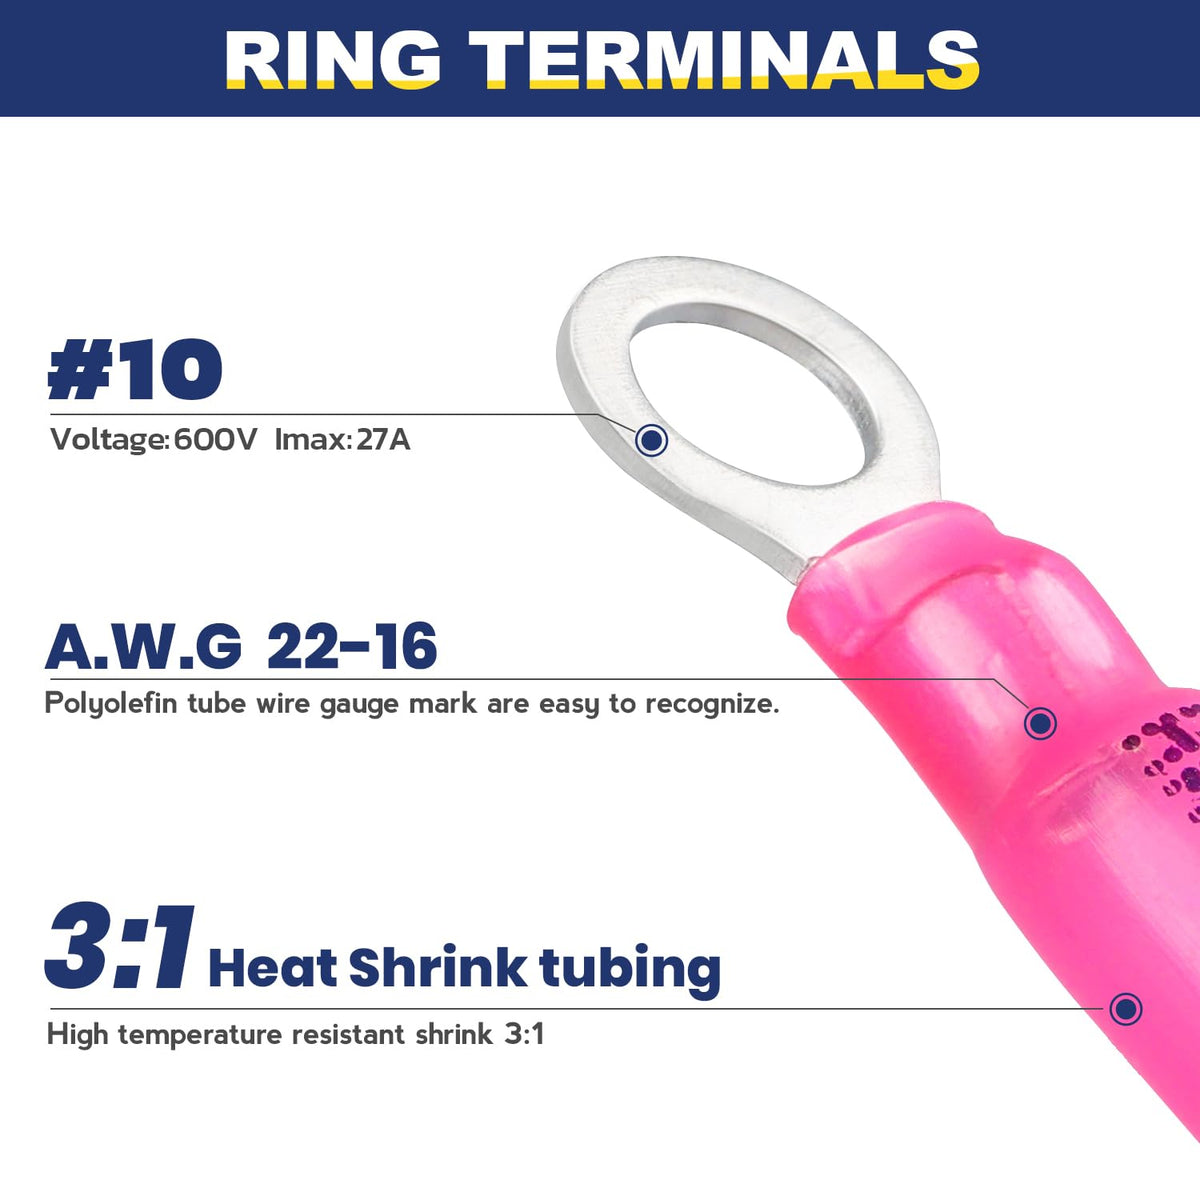
AWG Size Match: Always use a connector sized for your wire gauge. Most heat-shrink and insulated connectors are color-coded (see table above). For example, use red (AWG 22–18) terminals with 22–18 AWG wire. Using the wrong size die (e.g. a yellow die on a red connector) yields an incomplete crimp.
-
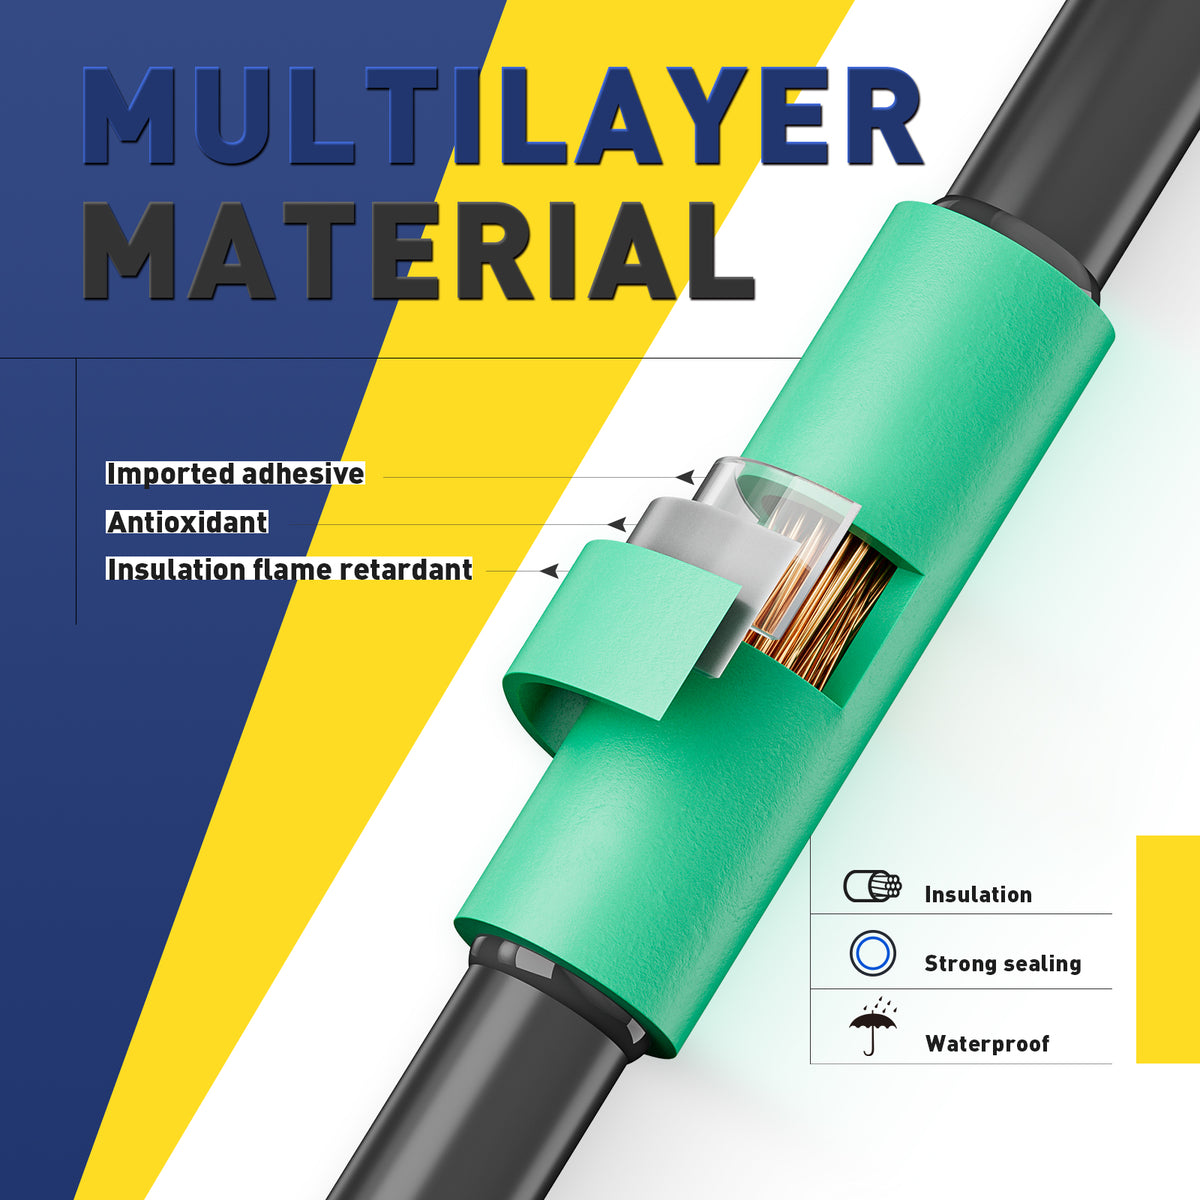
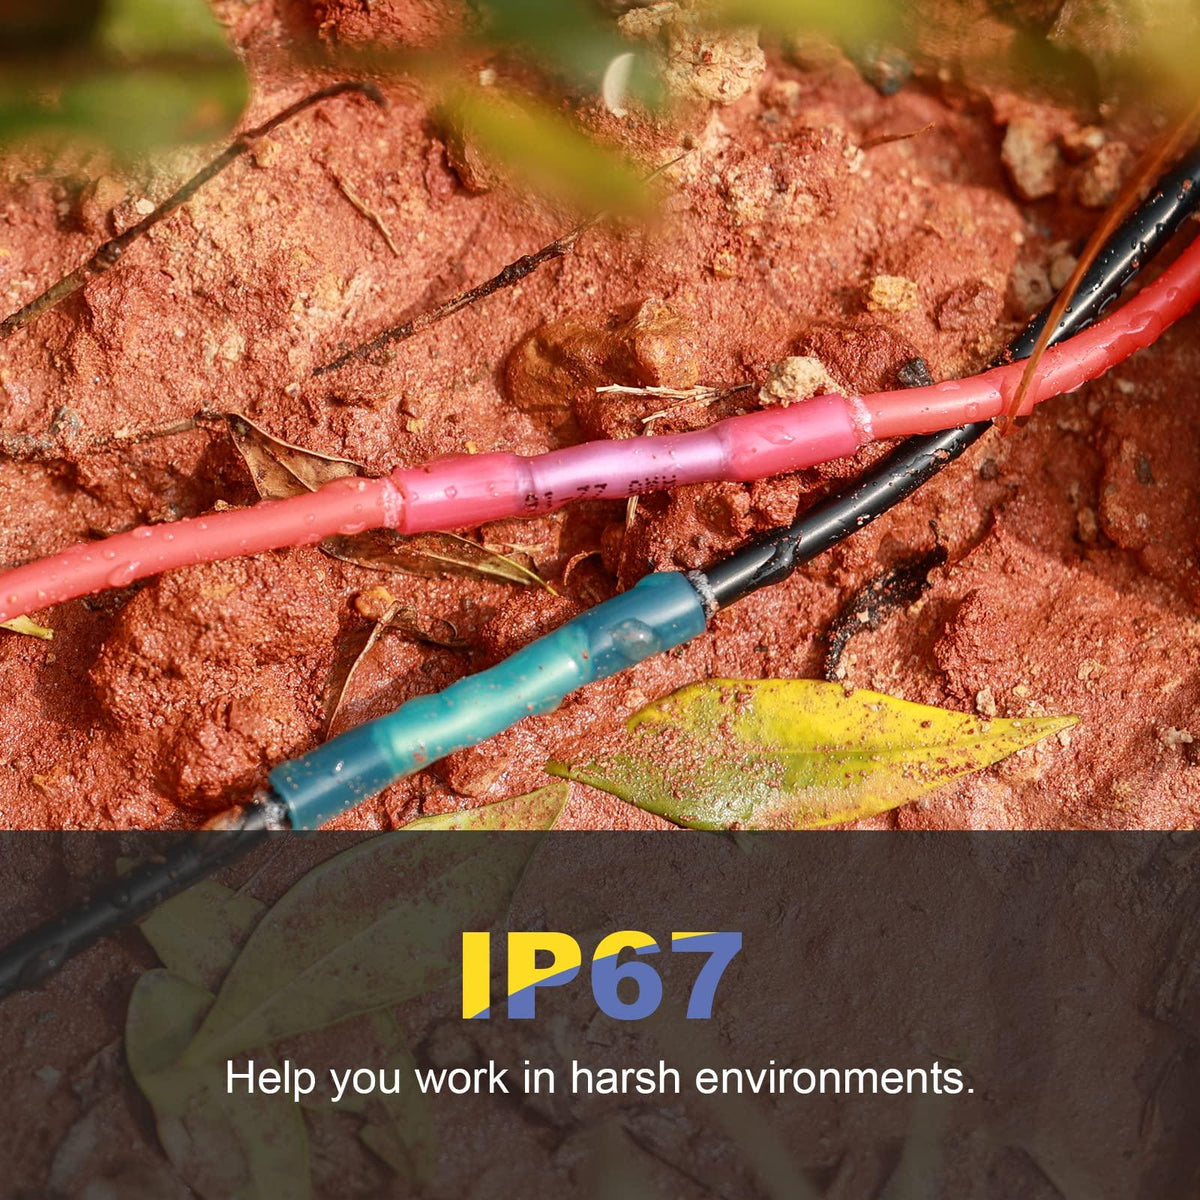
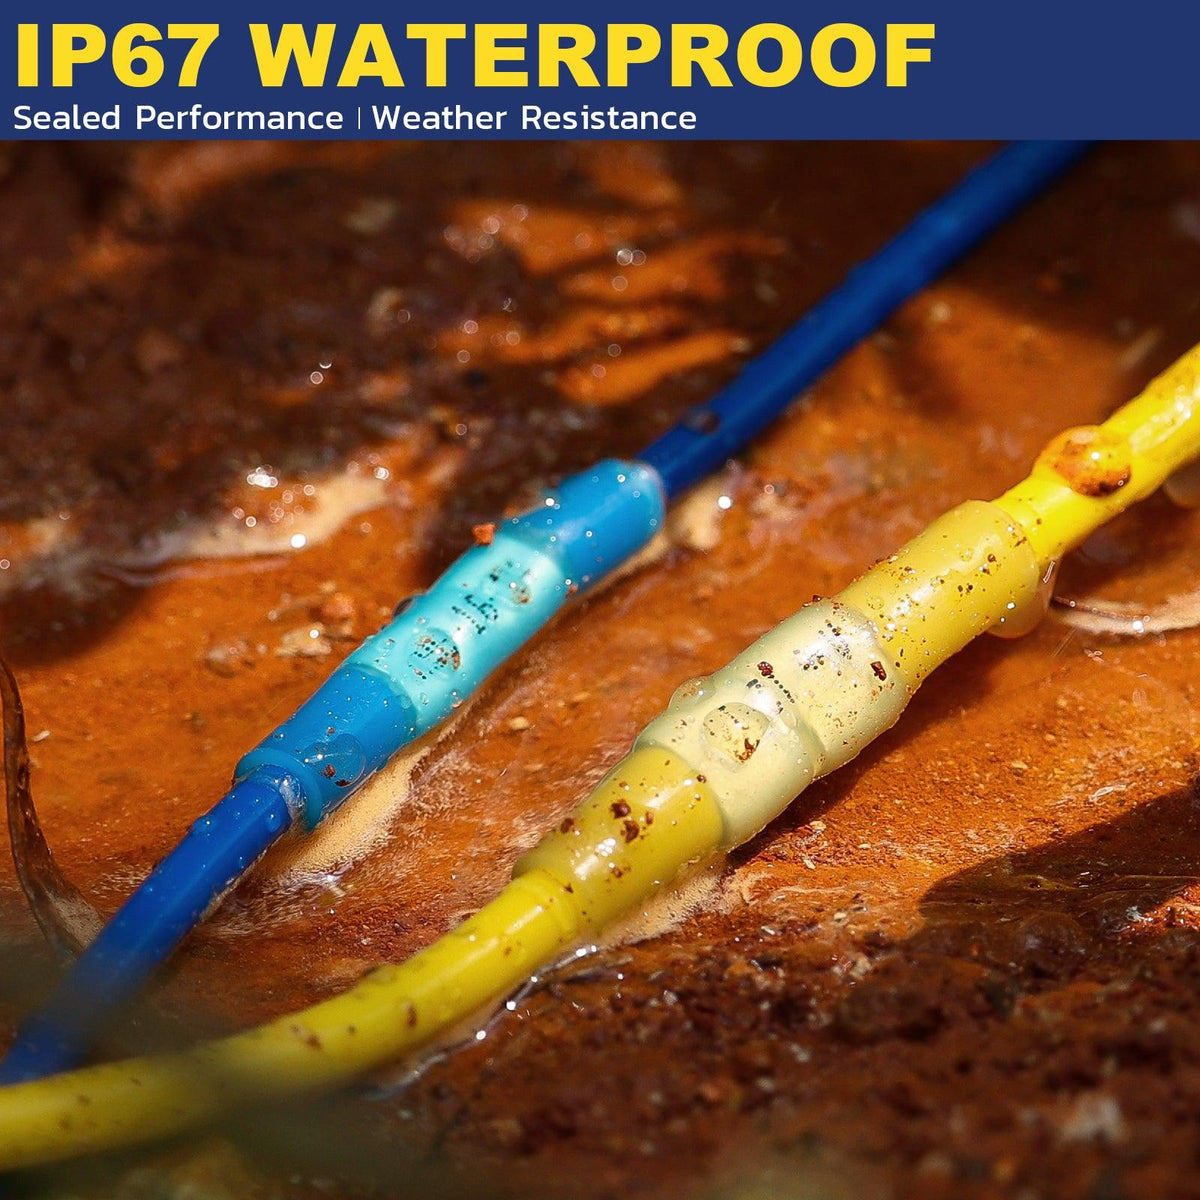
Insulation Type: For exposed wires or low-voltage DC (automotive, marine), insulated connectors (nylon or solder-epoxy with heat shrink) are recommended for moisture protection. In harsh environments, waterproof heat-shrink butt connectors with adhesive liner lock out corrosion. Haisstronica’s butt connector kits feature waterproof, heat-resistant sleeves and typically include silicone-lined adhesive that flows over the crimp seal when heated.
-
Ferrules for Multistranded Wire: When terminating multi-strand wires into screw terminals or terminal blocks, a wire ferrule crimper and ferrules provide a better connection than bare wire. The ferrule’s metal sleeve compresses the strands into a solid cylinder. For example, Haisstronica’s ferrule kit (AWG 23–10, 1200pcs) comes with a ferrule crimper and assorted sleeves. As Haisstronica notes, its ferrule crimper yields precise crimps and ensures full conductor contact.
-
Terminal Type: Ring and spade terminals clamp under a screw/bolt; bullet and butt connectors join wires inline; blade connectors plug into matching connectors. Use open-barrel connectors where appropriate (e.g. shield drain wires). MC4 connectors are specially crimped PV connectors.
-
Code and Listings: Use UL-listed connectors rated for the service (e.g. UL 486A/486B in the U.S.). UL requires that connectors withstand a specified pull force after crimping. Always inspect that connectors have the appropriate temperature and voltage rating, especially for panel/hvac work (NEC 110.14(D) requires torque or rated terminations).
-
Color Coding: Most insulated terminals follow a color chart (red, blue, yellow for ascending AWG). This helps avoid mismatches. The installer should double-check that the crimper die color matches the connector color band.
Crimping Wire: Step-by-Step Guide
Follow these steps for a reliable crimp:
-
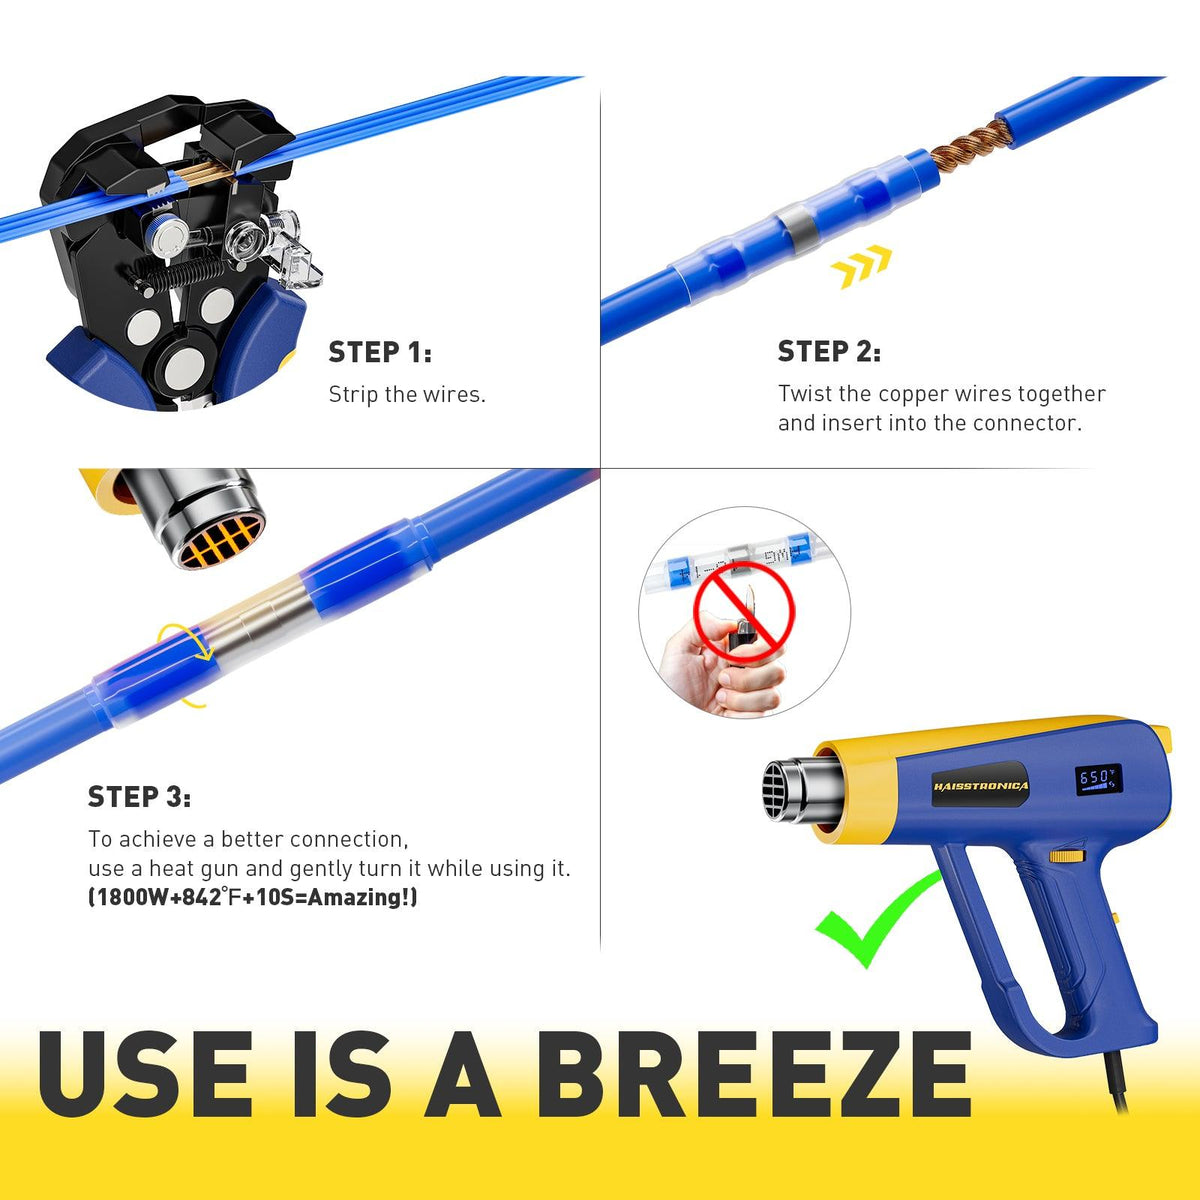
Strip the Wire: Use a wire stripper to remove just enough insulation so the bare conductor fills the metal barrel of the connector. Strip length is usually the length of the barrel plus a few millimeters. Avoid nicking the strands. A clean strip ensures all strands are engaged. (Comms Express emphasizes using wire strippers to “remove insulation cleanly… without damaging the wire conductors”.)
-
Twist the Strands (if needed): If the wire is very fine strand, gently twist it so it stays tight. Insert the entire conductor into the terminal barrel or ferrule until it bottoms out. The insulation may sit against the insulation crimp or heat-shrink sleeve.
-
Position the Connector: Place the connector into the appropriate crimping die. Most crimpers have color-coded or sized cavities. For insulated terminals, align the insulation barrel in one die stage and the conductor (inner) barrel in another. For butt connectors, center the joint in the die. Ensure the connector is straight and fully seated in the die.
-
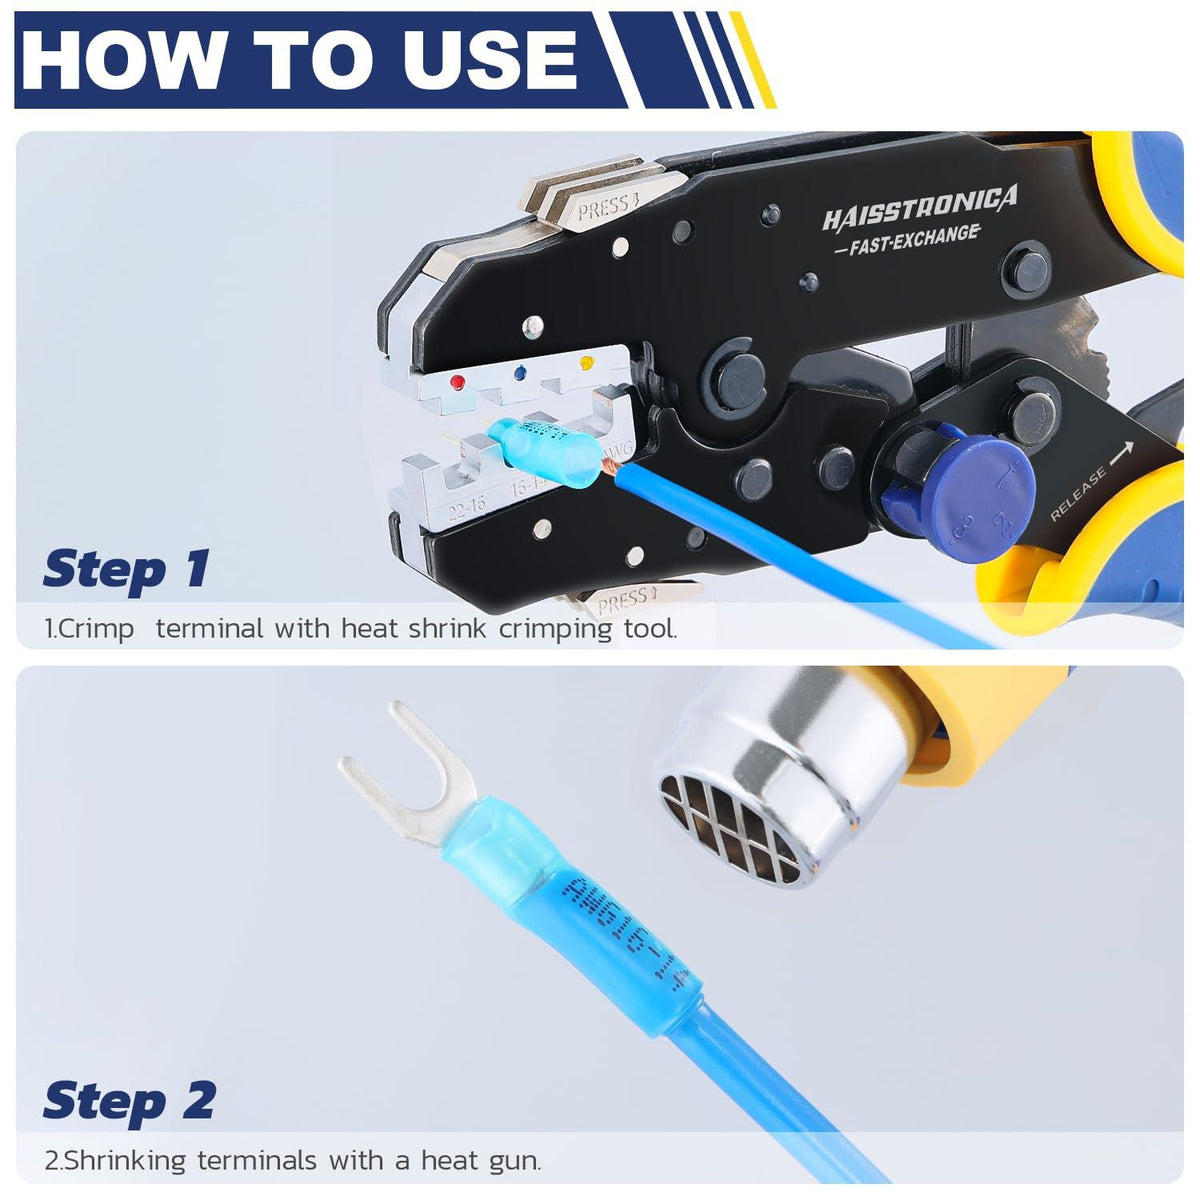
Crimp Firmly: Squeeze the crimper handles fully. If using a ratchet crimper, continue squeezing until the ratchet releases automatically – it won’t let go early. This ensures maximum pressure. The die will deform the barrel around the wire. A correct crimp will show the die’s imprint (often hexagonal for insulated terminals) around the barrel. The connector material flows into the wire. Haisstronica’s ratchet tool, for example, has a dual-stage crimp action that compacts the conductor barrel first, then the insulation sleeve.
-
Inspect the Crimp: Release the crimper and pull the handles apart. Slide the connector out and inspect it. A good crimp should have a smooth, even indent from the die, with no sharp protrusions. The wire strands should be tightly clamped without damage. (Compare good vs. bad: if the die was too large or the connector undersized, the indent might be weak or incomplete. If the die was too small, the connector won’t close fully and strands may bulge.)
-
Test the Connection: Give the crimped wire a firm tug or use pliers to pull the wire. It should not pull out of the connector. This pull-test verifies the mechanical bond. If any slippage occurs, discard that connector and remake the crimp with a new terminal.
-
Seal (if heat-shrink): If using heat-shrink connectors, use a heat gun (or lighter with care) to shrink the tubing. The adhesive liner will flow and seal around the wire insulation, making the splice water-resistant.
-
Final Check: Use a multimeter to test continuity across the crimp. Also ensure there are no shorts (e.g. stray strands outside the barrel). Confirm the crimp meets any specified torque or pull requirements for your application.
Tips and Best Practices
-
One Wire at a Time: Crimp only one wire per barrel (unless using a special multi-wire terminal). Do not overlap wires in a single connector.
-
No Soldering Required: A properly crimped connection rivals solder in strength and conductivity. In fact, pliers alone (twisting wires without a proper crimp) is very dangerous – it yields loose connections and can cause shorts or fires. Always use the correct crimp tool instead of improvised fixes.
-
Correct Tool & Die: Match the connector and wire gauge. The die cavity (color or size) must fit exactly. A match ensures full contact; a mismatch leads to failures.
-
Consistent Pressure: Use the same full squeeze motion for each crimp. Treat each crimp the same – consistency = repeatability. With ratchet crimpers, you will hear/feel the ratchet click when done.
-
Code Compliance: In electrical work, use UL-listed terminals. For example, UL 486A/B covers wire connectors. The NEC (2017/2023) requires terminations to be performed according to instructions (UL-listed crimp connectors are tested). If in doubt, check manufacturer torque specs or UL pull ratings.
-
Maintain Your Tools: Keep jaws clean and free of corrosion. Occasionally apply a drop of oil to the pivot. Replace worn dies. A worn crimper jaw will produce poor crimps. Store tools dry to prevent rust.
Special Connections
Butt Connectors
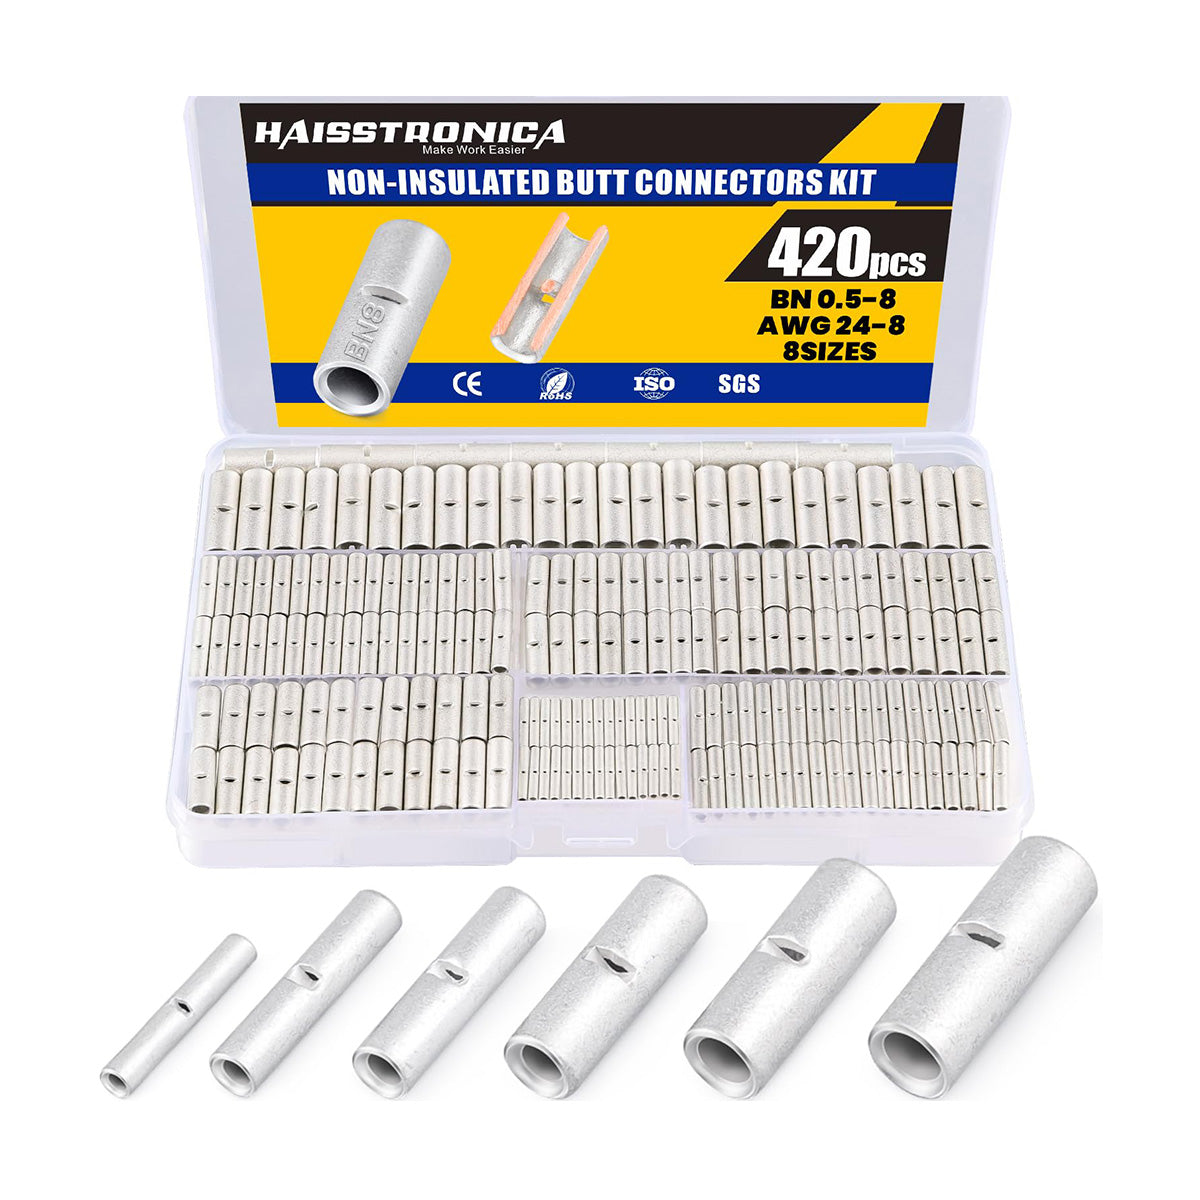
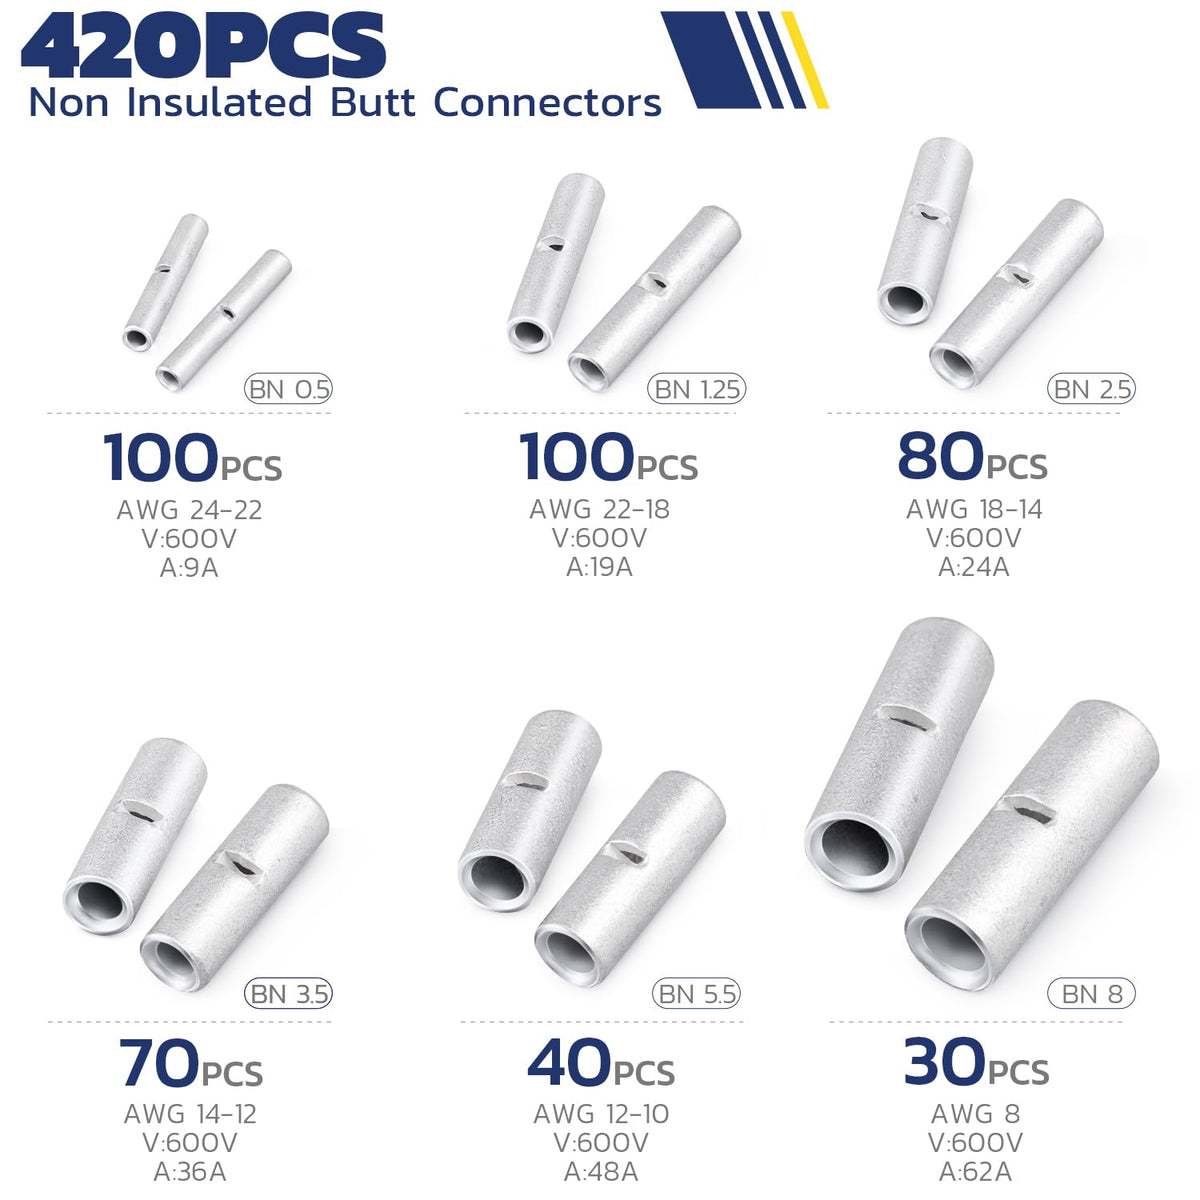
For inline wire splices, butt connectors (also called butt splices) join two wires end-to-end. They come in non-insulated or insulated versions, often heat-shrinkable. Haisstronica sells various butt connector kits – e.g. a 660PCS Heat Shrink Butt Connectors Kit (AWG 22–10) that includes color-coded insulated splices for all common gauges. Crimp each side of the splice onto one wire, then shrink-wrap the splice. This leaves a sealed, strain-relieved joint. Butt connectors are often used in automotive and marine applications. Watch out: use the correct AWG range – for example, don’t use a yellow AWG 12–10 butt on an AWG 18 wire, even if it “fits,” as the copper-to-copper contact area will be poor.
For illustrative guidance, see the video below:
Wire Ferrules
When terminating a stranded wire into a screw terminal (as in control panels or terminal blocks), using a ferrule crimp improves reliability. A ferrule (wire sleeve) slides over the stripped wire and is crimped with a ferrule crimping tool. This prevents stray strands and spreads the wire into a solid column. Proper ferrules save time and ensure uniform torque. Haisstronica’s ferrule kits include a dedicated ferrule crimper with hex dies and packs of ferrules. The process is similar: strip the wire to ferrule length, insert into the ferrule, and crimp the metal tube. The result is a neatly sealed end ready for a screw terminal. See the tutorial below for technique:
Spark Plug and Ignition Wires
High-voltage spark plug wires (often 7mm–10mm thick) require special terminals. A spark plug wire crimping tool is used to install the metal insert inside the boot. These tools grip closer to the crimp point and apply more force. If you make your own ignition wires, follow these steps: cut the wire jacket, strip the inner core, insert it into the terminal, and crimp with a spark wire tool (socket or pliers style). After crimping, fit on the spark boot. Never reuse wires or boots; crimps must be perfect for spark voltages. The video below demonstrates crimping custom spark plug wires:
Battery and Large Gauge Cables
For heavy cables (battery leads, large grounds), use appropriately sized connectors and crimpers. Battery terminal lug crimps (ring lugs) may require a larger ratchet or hydraulic tool. Haisstronica’s AWG 22–10 crimper can handle many battery cable lugs; their product images even show securing car battery terminals. For extremely large cable, use a bench crimping press. Always pick connectors rated for high current and weather exposure (e.g. tin-plated copper lugs). Test each crimp: a battery cable should not wiggle in the lug.
Inspecting Crimps and Compliance
A final check is crucial. Perform a pull test on each crimp: grip the wire near the connector and tug hard. The wire should not pull out. If it does, the crimp is unacceptable. Also inspect the die imprint: it should be full and even. A good crimp (like the rings in the photo above) shows a uniform pattern.
Record any torque requirements or special procedures if required by equipment instructions (per NEC 110.14(D) or manufacturer specs). In critical systems (e.g. solar arrays, aerospace), one may even apply threadlocker or sealant, but for most wiring, a solid mechanical crimp plus heat-shrink is sufficient.
Remember, code compliance means using only listed components and following installer instructions. For example, splicing in the field may not allow soldering on certain insulated wires – crimping is the approved method. Using a recognized brand crimper and connector (like Haisstronica’s UL-rated products) helps ensure compliance and safety.
Maintaining Your Crimping Tools
Keep your crimping tools in top shape:
-
Clean Jaws: Wipe away oxidation or debris. A wire brush can clean die surfaces.
-
Lubricate Pivot: A drop of machine oil at the hinge keeps handles smooth.
-
Inspect for Wear: Crimp dies can wear or misalign after heavy use. Check that the die pattern looks correct and that the tool fully compresses. Replace dies or tools if crimps start to slip.
-
Calibration: Some pro tools offer calibration checks. Compare the crimp height on a scrap connector to factory spec if available.
-
Storage: Store crimpers in a dry toolbox. A protective pouch prevents dust buildup.
-
Safety: Never crimp live circuits. Ensure the wire is de-energized before crimping.
Regular maintenance ensures every crimp is as good as the first. A well-maintained electrical crimping tool will last for many years of professional use.
Conclusion
Crimping wires is a fundamental skill for safe electrical work. By using the right crimping tool, connector, and technique, you create a reliable, durable electrical joint. Haisstronica’s ratchet crimping tool for AWG 22–10 heat-shrink connectors provides professional-grade crimps with adjustable pressure. In addition, Haisstronica offers related kits – for example, the Ferrule Crimping Tool Kit (AWG 23–10, 1200 pieces) for ferrules and the 660PCS Heat Shrink Butt Connectors Kit (AWG 22–10) for inline splices – to cover most wiring needs. (For smaller wire, their AWG 24–10 Wire Stripper & Crimping Tool Kit is a handy all-in-one solution.)
By following proper prep, crimping, and inspection steps (and by referencing how-to videos like those above), electricians and DIYers can ensure each crimp meets code and lasts. Crimped connections, when done right, are as strong and conductive as solder joints, yet far quicker. In short, invest in the right crimp tools and connectors – and your wiring projects will stand the test of time.