


A Haisstronica heat-shrink butt connector kit (AWG 22-10) with tinned copper cores and waterproof seals. Wire connectors are essential components in any electrical project – they join, terminate, or splice wires safely without exposed conductors. Made of flame-retardant plastic and an internal conductive insert (often a spring or metal sleeve), a wire connector is UL-listed to prevent shorts by keeping bare wires separated. In practice, you strip the insulation from each wire, insert them into the connector, and secure them either by twisting or crimping. High-quality connectors (like Haisstronica’s) then seal and insulate the joint against moisture and corrosion. This guide covers common wire connector types, tools, and step-by-step usage – with a focus on Haisstronica products built for DIYers, electricians, and automotive pros.
Why Choose Haisstronica Wire Connectors?
Haisstronica’s wire connectors emphasize durability and reliability. They feature pure tinned copper cores for maximum conductivity and corrosion resistance. The connectors use dual-wall, heat-activated adhesive tubing (or “solder-seal” glue) that shrinks tightly and bonds during heating. This advanced design yields waterproof seals rated IP67 for complete dust- and immersion-resistance, making them ideal for automotive, marine, and outdoor applications【14†】. (Traditional “waterproof” connectors typically rely on silicone gel inside, but Haisstronica’s heat-shrink adhesive provides a similarly watertight finish.) All Haisstronica connectors meet global safety standards (ROHS, ISO 9001, CE, SGS). In short, they offer industrial-grade strength and convenience in compact kits, built to “make work easier”.
Key advantages of Haisstronica connectors include:
-
Waterproof and Vibration-Resistant: Dual-wall tubing with hot-melt adhesive seals out moisture and prevents corrosion.
-
Premium Construction: Thick copper sleeves and PVC insulation withstand strain and mechanical stress.
-
Broad Compatibility: Color-coded kits cover AWG 26–10 (red/white for smaller gauges, blue/yellow for larger) to match US wire sizes.
-
Ease of Use: “Crimp, apply heat, and you have a strong, professional connection in seconds”. No soldering skills required – just strip, insert, crimp, and heat.
By choosing Haisstronica, you get trusted performance in harsh environments – backed by glowing reviews from DIYers and professionals alike. (For example, their IP67-rated connectors are tested underwater and remain fully sealed【14†】.) The 150N pull-strength test images show superior mechanical strength compared to generic connectors. These benefits translate to safer, longer-lasting electrical repairs.
Types of Wire Connectors
Different projects call for different connector styles. The most common wire connector types are twist-on (wire nuts), crimp-on (terminal and butt connectors), push-in, and quick-disconnect. Here we focus on the varieties offered by Haisstronica:
-
Heat-Shrink Butt Connectors (Splice Connectors): Tubular connectors that join two wires end-to-end. Often used in automotive, marine, and solar wiring. To use, strip each wire (about ¼″), insert the ends into the butt connector from opposite sides, and then crimp. After crimping, heat the shrink tubing with a heat gun – the solder inside melts and the tubing shrinks to form a waterproof seal. Haisstronica’s butt connectors are also tinned (non-brass) for corrosion resistance. Example: Haisstronica 660PCS Heat Shrink Butt Connectors Kit AWG 22-10.
-
Solder-Seal Wire Connectors: A specialized butt splice with an inner ring of solder and an outer adhesive. You strip and twist the wires together, insert into the connector, and apply heat. The solder ring permanently bonds the conductors while the tubing shrinks and glues, creating a strong, low-resistance join. These are popular in electronics, vehicles, and marine applications where a sealed, permanent joint is needed. Haisstronica’s solder-seal connectors achieve a factory-quality solder joint without requiring a soldering iron. For example: Haisstronica 1000PCS Heat Shrink Solder Seal Wire Connectors AWG 26-10.
-
Heat-Shrink Terminal (End) Connectors: These are insulated crimp terminals for attaching wires to posts or screw terminals. Types include ring, fork (spade), bullet (male/female), and piggyback terminals. Haisstronica offers all of these in heat-shrink versions. For instance, ring terminals (for connecting to a bolt/stud) come in kits like Heat Shrink Wire Connectors Ring Terminals 120/200/260/600PCS, while spade (fork) terminals (easy slide-on disconnect) and bullet terminals (snap-fit connectors) are also available. These terminals are color-coded by AWG and shrink-tubed for a weatherproof insulation. They are used in panel wiring, speaker/automotive connections, battery cables, and more.
-
Quick-Disconnect (T-tap) and Specialty Connectors: While not a main Haisstronica product line, quick-disconnect tabs and T-tap connectors allow very fast wire connections without tools. (Many electricians prefer crimp/heat-shrink types for durability.) Haisstronica also offers ferrules and lugs for mechanical connections in control cabinets or large conductors.

They require a crimping tool but offer excellent conductivity. By contrast, twist-on wire nuts (not sold by Haisstronica) are reusable and for lighter residential work. For waterproof applications, heat-shrink varieties (like Haisstronica’s) are preferred. The table below summarizes common types:
| Connector Type | Description & Use |
|---|
| Butt (heat-shrink) | Splice two wires end-to-end. Crimp then heat-shrink for waterproof seal. Used in vehicles, solar, marine. |
| Solder-Seal | Has inner solder ring and adhesive tubing. Twist wires, crimp, then heat to melt solder and seal. Ideal for electronics, marine. |
| Ring Terminal | Insulated ring fitting screws or studs. Crimp on wire, then shrink. For battery posts, chassis grounds. |
| Fork (Spade) Terminal | Insulated fork shape for quick slide-on to screw. Crimp and shrink. Used in stereo, automotive panels. |
| Bullet Connector | Male/female snap connectors for quick disconnect. Crimp on each wire side, then slide together. |
| Ferrule (Bootlace) | Solderless crimp ferrules for stranded wires (popular in Europe, toolkits). |
Tools You’ll Need
To work safely and effectively, gather the right tools:
-
Wire Stripper: Adjusts to strip insulation cleanly without nicking the conductor. Aim for ~¼″ insulation removed on most connectors.
-
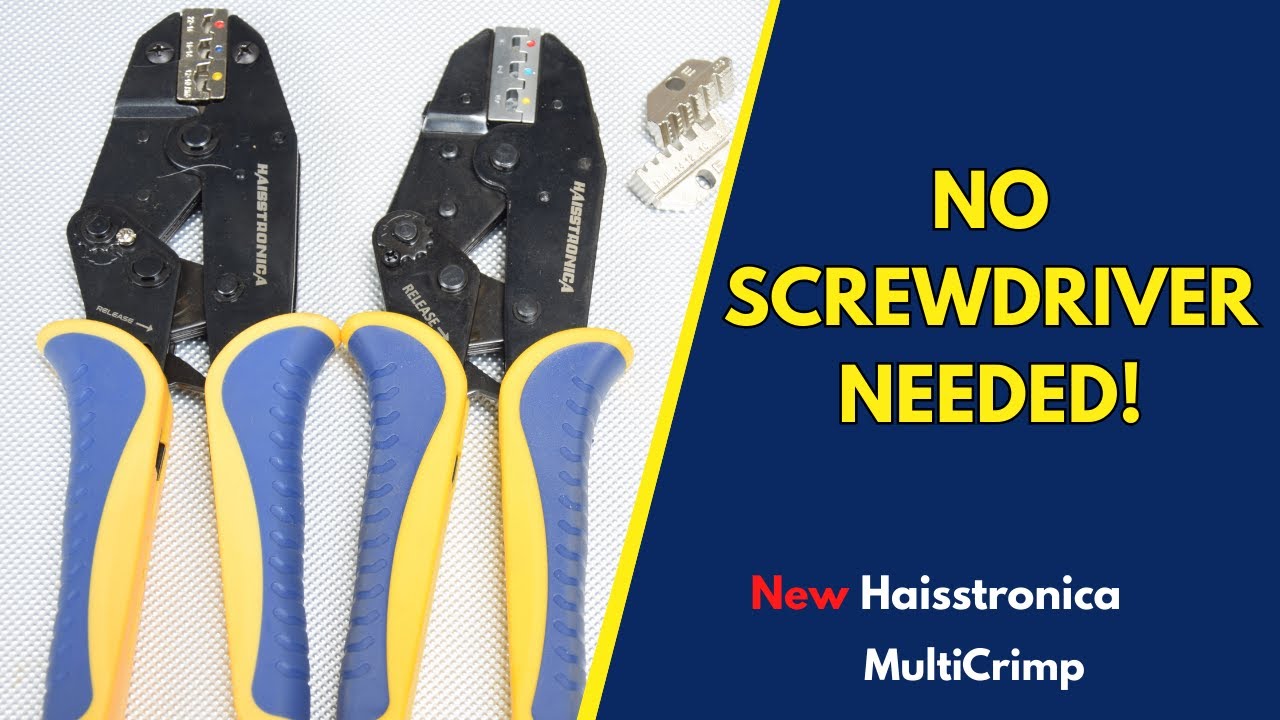
Crimping Tool: A ratcheting crimper sized for your connector AWG range. Haisstronica’s Ratchet Wire Terminal Crimping Tool (AWG 22–10) is ideal, with color-coded jaws to match the connector sizes. (Using the wrong die can result in a weak crimp.)
-
Heat Gun: For heat-shrink connectors, a proper heat gun (not just a lighter or torch) allows even heating. Adjustable temperature and airflow help avoid overheating the tubing. Haisstronica recommends an adjustable heat gun to control shrinkage and prevent burning.
-
Cutting Tool: For trimming wire and any excess tubing. Wire cutters and scissors come in handy for flush trimming after shrinking.
Having the proper tools ensures professional results. For example, a ratchet crimper squeezes the connector reliably – non-ratcheting pliers may slip and under-crimp. Likewise, using the right heat tool prevents insulation damage. Haisstronica even offers tool kits that bundle crimpers and strippers with connectors, so you get all you need in one package (search for Haisstronica Wire Connector Tool Kits).
How to Crimp and Shrink Heat-Shrink Connectors
Here is a step-by-step process (with images and videos) for using a typical heat-shrink butt splice connector:
-
Strip the Wires: Use the wire stripper to remove about ¼″ of insulation from the end of each wire. Key: Do not strip too little – leaving too much insulation will make a poor connection. (Likewise, don’t cut away too much insulation or the conductor will be exposed.)
-
Insert the Wires: Push the stripped ends fully into the butt connector’s barrel. For butt splices, each wire should overlap inside to meet. If using a solder-seal connector, twist the wires together slightly before inserting for a solid joint.
-
Position in the Crimper: Place the connector into the correct crimping die on your tool (match the connector’s color/AWG). Use a ratchet crimper and squeeze firmly until the ratchet releases. A proper crimp makes an indent around the barrel. Avoid “double-crimping” in different spots – one good crimp is enough to deform the sleeve and lock the wire.
-
Inspect the Crimp: Pull gently on the wires to ensure they don’t pull out. Visually confirm the copper conductor is tightly compressed. If the wire slips, redo the crimp or strip and try a fresh connector.
-
Apply Heat: Slide the heat gun nozzle back and forth over the connector’s tubing. Heat until the tubing shrinks completely and you hear the inner adhesive sizzle. The sequence is: strip → insert → apply heat. The shrink action seals the joint and (for solder connectors) melts the solder around the splice. Aim to heat until the colored tubing turns a uniform translucent (indicating full shrink). Maintain a safe distance to avoid scorching – keep moving the gun rather than holding it in one place.

Follow these steps carefully. Common mistakes include insufficient stripping (wire not fully inserted) or too-short tubing coverage. Always leave a bit of tubing extending past the crimp for proper sealing. After heating, let the connector cool a minute before handling. A correctly made connection will be waterproof and mechanically strong. When done properly, a crimped & heated splice is permanent – these connectors are not reusable, so plan accordingly.
How to Use Solder-Seal (Adhesive) Wire Connectors
Solder-seal connectors combine solder and adhesive in one. They are easy to use and create factory-like splices. Here’s the process:
-
Strip and Twist: Strip about ¼″ of insulation off each wire. If desired, twist the wire ends together for extra contact (twisting is optional if the connector has solder).
-
Insert Wires: Push the two wires into the connector from opposite ends, so the solder ring sits at their junction. Ensure no bare wire protrudes beyond the tubing.
-
Heat the Connector: Using a heat gun, apply heat evenly around the solder ring area. The solder will melt and flow into the joint. Then heat the rest of the tubing so it shrinks and the adhesive flows. You should heat long enough that the clear adhesive inside flows into the wires (you often see it ooze slightly)【42†】.
-
Let Cool: Remove heat and let the splice cool. The solder hardens into a solid connection, while the tubing bonds the insulation.
This method yields a permanent, low-resistance bond. One benefit: unlike plain butt connectors, the solder ring makes a distinct joined tip, ensuring electrical contact through solder and crimps. Solder-seal connectors also self-seal against moisture. They are ideal for marine wiring or any use where a rock-solid, corrosion-proof splice is needed. (Once done, these too are not for reuse – they are a one-time joint.)
Tips and Best Practices
-
Use the Right Connector and Size: Always match the connector to the wire gauge. A connector that is too large won’t crimp properly, and one too small won’t fit the wires. Haisstronica kits are color-coded (red=22–16 AWG, blue=16–14 AWG, yellow=12–10 AWG, white=26–24 AWG) to simplify selection. Check the connector’s AWG range before crimping.
-
Strip to the Correct Length: Generally strip about ¼″ of insulation. This ensures maximum contact area. Failing to strip enough (or inserting the wire crooked) causes a weak, unstable connection. Conversely, stripping too much risks bare conductor outside the sleeve – avoid that.
-
Crimp Firmly and Squarely: Use a proper crimper. A loose crimp (under-crimp) can lead to voltage drop or wire pull-out. A properly crimped sleeve should show a visible indent. If unsure, use a pull test: tug the wire to check security.
-
Avoid Overheating: When shrinking, keep the heat gun moving. Overheating can burn the tubing or damage the wire insulation. If the tubing chars, discard the connector and start over.
-
Check Your Work: After cooling, give each splice a gentle pull-test. A correct crimp won’t let the wire slip out. Also inspect that the tubing is fully shrunk and that the joint looks smooth (no gaps or unshrunken sections).
-
Understand Reusability: Most crimp and heat-shrink connectors are permanent once installed. You generally cannot reuse them – if a connection must be undone, you’ll need a new connector. (By contrast, twist-on wire nuts or lever connectors can be reused.) Plan your wiring to minimize rework.
-
Consider Environment: For any outdoors or moisture-prone job (boats, motorcycles, irrigation systems, etc.), use waterproof connectors. Haisstronica’s IP67-rated heat-shrink connectors are made for such use【14†】. For indoor or dry applications, standard insulated connectors may suffice.
-
Safety First: Always disconnect power before working on wires. Double-check that circuits are de-energized. Wear safety glasses when cutting or crimping to guard against flying bits.
Recommended Haisstronica Products
Haisstronica offers kits and individual connectors for every type of connection:
-
Butt Connector Kits: e.g. Haisstronica 660PCS Heat Shrink Butt Connectors Kit (AWG 22-10) includes red, blue, and yellow connectors in a sturdy case. Perfect for general wiring.
-
Solder-Seal Kits: e.g. Haisstronica 1000PCS Heat Shrink Solder Seal Wire Connectors (AWG 26-10, 5 Colors) contains multiple sizes of high-quality solder-seal splices, ideal for automotive or marine harnesses.
-
Terminal (Ring/Fork) Kits: e.g. Haisstronica Heat Shrink Wire Connectors Ring Terminals Kit (various counts) provides insulated ring terminals in 1/4″, 5/16″, 3/8″, etc.. Similar kits are available for spade, fork, piggyback, and bullet terminals.
-
Crimp Tool: The Haisstronica Ratchet Wire Terminal Crimping Tool (AWG 22-10) is engineered specifically for their insulated connectors. It adjusts for each color-coded size, ensuring a solid crimp every time.
-
Heat Gun: For a truly professional finish, use a proper electrical heat gun (with adjustable temperature) rather than a lighter. Haisstronica offers adjustable heat guns that prevent burning connectors.
-
Wire Strippers: A precision stripper makes ¼″ strips cleanly. Haisstronica’s Auto-Adjust Wire Stripper (AWG 24-10) is convenient for most household and auto wiring.
In each case, you can find these on the Haisstronica store site. Product pages often include spec details, videos, and customer reviews to help you choose the right items. (For example, the Haisstronica 660PCS Butt Connectors Kit page shows load-test videos and images of the IP67 test.)
Practical Example: Crimping a Butt Connector
Let’s illustrate a typical application: splicing two automotive wires with a heat-shrink butt connector.
-
Prepare Wires: Say you have two speaker wires, one on a radio and one on a speaker. Strip ¼″ of each wire’s insulation.
-
Insert into Connector: Twist the exposed copper ends together, then insert them into a blue (16–14 AWG) heat-shrink butt connector. Each wire goes in from opposite ends so they meet in the middle.
-
Crimp: Place the connector in the matching AWG-14 slot of a ratchet crimp tool. Squeeze firmly until the tool releases. You should see a crimped barrel.
-
Apply Heat: Move a heat gun around the connector. You’ll notice the tubing shrink and a little adhesive bead may appear. Continue until the tubing is snug.
-
Cool and Test: Allow the splice to cool. Then tug lightly on each wire to confirm the joint holds. Now your splice is sealed against moisture and vibration, making it safe for long-term use.
Watch this process in action:
Video: How to Use Solder-Seal Heat Shrink Butt Connectors (Demonstrates wire splicing with solder-seal connectors step-by-step).
Summary
Wire connectors are fundamental for safe, neat electrical work. By using crimp and heat-shrink connectors properly, you ensure a strong, low-resistance, and waterproof connection. Haisstronica’s products — from butt splices to ring terminals — provide industrial-quality performance for DIYers and professionals alike. Remember to strip wires to the correct length, use the matching crimping die, and apply even heat. Avoid common pitfalls (improper stripping or under-crimping) by following best practices. With the right tools and techniques, you can achieve secure, long-lasting connections on cars, boats, solar arrays, household wiring, and more.
For more technical details and connector selection, see Haisstronica’s resources on connector standards and FAQs. When in doubt, consult the connector’s UL rating and manufacturer guidelines. Equipped with Haisstronica’s high-quality connectors and a bit of practice, you’ll tackle any wiring project with confidence and professional results.