
Que vous soyez bricoleur, technicien automobile ou électricien marin , vous avez peut-être déjà rencontré des connecteurs à souder thermorétractables (aussi appelés connecteurs à souder , manchons à souder ou connecteurs de fils auto-soudables ). Ces connecteurs permettent de raccorder des fils par soudure et de les sceller en une seule étape, sans outil de sertissage ni fer à souder. Ils sont constitués d'une gaine thermorétractable transparente à double paroi, munie d'une bague de soudure à bas point de fusion au milieu et d'une couche adhésive aux extrémités. Sous l'effet de la chaleur, la bague de soudure fond pour souder les fils ensemble , tandis que le tube se rétracte et que l'adhésif interne fond pour sceller la connexion. Le résultat est un connecteur soudé électriquement solide et étanche , alliant la conductivité de la soudure à la décharge de traction d'une gaine thermorétractable collée.
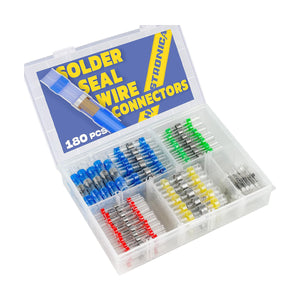
Lors de l'achat de ces connecteurs, un critère clé est leur taux de rétreint , généralement indiqué comme 2:1 ou 3:1 . Par exemple, le kit de 180 connecteurs thermorétractables à souder de Haisstronica (AWG 26-10) , très apprécié, utilise des gaines adhésives de haute qualité avec un taux de rétreint spécifique. Mais que signifie exactement 2:1 ou 3:1 pour vos connexions filaires ? Et comment choisir le connecteur adapté à votre section de fil et à l'épaisseur de l'isolant ? Dans ce guide d'achat, nous allons approfondir la notion de « taux de rétreint », comment dimensionner les connecteurs à souder en fonction du diamètre AWG et du diamètre extérieur de l'isolant , et répondre aux questions fréquentes pour vous aider à choisir la solution de soudure et d'étanchéité la mieux adaptée à vos besoins.
👉 Passez aux connecteurs de fils à souder Haisstronica pour des épissures rapides et étanches.

Que signifie réellement le « taux de rétreint » pour les connecteurs à souder ?
Avant de comparer les rapports 2:1 et 3:1, clarifions le concept de rapport de rétreint . Ce rapport est exprimé par un nombre comme 2:1 ou 3:1, représentant le diamètre initial du tube par rapport à son diamètre rétracté. Par exemple, un rapport de rétreint de 2:1 signifie que le tube se rétracte de moitié sous l'effet de la chaleur, tandis qu'un rapport de 3:1 signifie qu'il se rétracte d' un tiers de son diamètre initial. Autrement dit, un rapport plus élevé indique que le tube peut se rétracter plus fortement.
Pourquoi est-ce important pour les connecteurs à souder ? Le rapport de rétreint détermine la capacité du tube du connecteur à s'enrouler autour de vos fils après chauffage. Un connecteur à souder thermorétractable à rapport 3:1 plus élevé présente initialement un diamètre élargi plus important, puis se rétracte davantage, ce qui lui permet d'accepter une plus grande variété de sections de fils tout en assurant une étanchéité suffisante. En revanche, un connecteur 2:1 ne rétreint que de moitié, ce qui est acceptable si le diamètre de l'isolant de votre fil est déjà proche de celui d'origine du tube, mais offre une marge de manœuvre plus limitée pour gérer les variations.
Pour faire simple, 2:1 contre 3:1 concerne la mesure dans laquelle le tube peut se contracter :
-
Rapport de rétreint 2:1 : Rétrécit jusqu'à 50 % de son diamètre d'origine. Courant dans de nombreux connecteurs à manchon à souder standard ou économiques. Idéal lorsque la taille du fil/gaine correspond étroitement à la taille avant rétreint du connecteur. Ce type de rétreint est généralement plus compact et économique. Cependant, avec un taux de rétreint de seulement 2x, il offre moins de flexibilité en cas de différence de section importante le long de l'épissure : il risque de ne pas se serrer complètement sur les sections très fines et ne peut pas accepter une aussi large gamme de sections de câbles dans un même connecteur.
-
Rapport de rétreint 3:1 : Rétrécit jusqu'à environ 33 % (un tiers) de son diamètre d'origine. Ce rapport plus élevé entraîne une contraction beaucoup plus importante. Un connecteur 3:1 peut être initialement plus grand (pour s'adapter à des connecteurs volumineux ou à une isolation plus épaisse), puis se rétreint beaucoup plus petit, en s'enroulant autour des fils et de l'isolation pour éliminer les vides. C'est idéal pour les formes irrégulières ou les diamètres variables ; par exemple, si vous raccordez un fil à gaine épaisse à un fil plus fin, un 3:1 peut toujours épouser les deux extrémités. Les connecteurs à soudure 3:1 sont considérés comme la solution idéale en termes de polyvalence : ils offrent un ajustement serré et sûr et une étanchéité supérieure. Ils sont largement utilisés dans les applications automobiles, marines et industrielles où une rétreint accrue garantit une étanchéité optimale. Le compromis est une paroi de tube légèrement plus épaisse une fois rétreinte (le rétrécissement accru entraîne une concentration de la paroi et peut devenir légèrement plus rigide).
Pourquoi choisir l'un plutôt que l'autre ? Tout dépend des exigences de l'application :
-
Étanchéité et protection : Un rapport de rétreint plus élevé permet souvent un enroulement plus complet et donc une meilleure étanchéité. En effet, un rapport de rétreint de 3:1 ou supérieur permet une couverture plus complète du conducteur et de l'adhésif, réduisant ainsi le risque d'infiltration d'humidité. Si vous recherchez une connexion soudée parfaitement étanche , un connecteur 3:1 est plus à même d'assurer une étanchéité parfaite sur des fils de différentes tailles. Les connecteurs à souder 2:1 assurent toujours l'isolation, mais la marge d'erreur pour obtenir une étanchéité parfaite est plus faible si le fil ne remplit pas la majeure partie du tube.
-
Gamme de calibres de fils : Avec un rapport 2:1, chaque taille de connecteur couvre une plage de calibres de fils plus étroite. Un connecteur 3:1 peut couvrir une gamme plus large de diamètres, car il est initialement plus grand et se rétracte davantage. Par exemple, supposons que vous ayez un connecteur d'un diamètre intérieur initial de 6 mm : une version 2:1 peut se rétracter jusqu'à environ 3 mm, tandis qu'une version 3:1 peut se rétracter jusqu'à environ 2 mm. Cette différence pourrait permettre de sceller un fil de calibre 16 AWG plutôt que de descendre jusqu'à 20 AWG dans un connecteur de même calibre. Un rapport de rétreint plus élevé offre une plus grande flexibilité pour utiliser une même taille de connecteur pour plusieurs calibres de fils.
-
Ajustement serré : Si l'isolant de votre fil est bien plus petit que le diamètre expansé du connecteur, un manchon thermorétractable 2:1 risque de ne pas suffisamment se rétracter pour assurer une bonne tenue, laissant un ajustement lâche ou des espaces vides. Un manchon thermorétractable 3:1 se rétractera davantage et serrera plus fort, ce qui est particulièrement important pour que la couche adhésive remplisse son rôle (elle doit se comprimer et suinter légèrement pour combler les espaces vides). En pratique, si le diamètre extérieur de la gaine de votre fil est proche du diamètre minimum de rétraction d'un manchon, opter pour un manchon thermorétractable 3:1 garantit que l'adhésif peut réellement se comprimer et assurer l'étanchéité.
-
Coût et matériau : En général, les tubes 2:1 sont très courants et souvent un peu moins chers, tandis que les tubes 3:1 peuvent utiliser davantage de matériaux ou des formulations spéciales (les 3:1 sont souvent à double paroi avec adhésif par défaut). Cela dit, la différence de coût pour les petits connecteurs est généralement minime, et le gain de performance du 3:1 pour les épissures critiques (notamment pour l'automobile et la marine) compense souvent les quelques centimes économisés par connecteur.
👉 Choisissez les connecteurs de fils à souder et à sceller Haisstronica pour des jonctions de qualité marine en une seule étape.

Il est intéressant de noter qu'il existe des rapports encore plus élevés, comme le 4:1 (et Haisstronica propose des connecteurs à souder 4:1 dans des kits spécialisés). Un rapport 4:1 permet de rétrécir jusqu'à 25 % de la valeur d'origine ; c'est une excellente solution pour les différences de taille extrêmes ou les situations inhabituelles (par exemple, si un côté d'une épissure présente une gaine en silicone épaisse ou plusieurs conducteurs). Ils offrent la plus grande plage de rétrécissement et une tolérance maximale si vous choisissez un connecteur légèrement trop grand, mais les connecteurs 4:1 sont moins courants et généralement un peu plus chers. Pour la plupart des utilisateurs, le rapport 3:1 offre le meilleur équilibre entre polyvalence et performances, tandis que le rapport 2:1 convient pour une utilisation standard lorsque les sections de fil sont uniformes.
Le 3:1 présente-t-il des inconvénients ? Peu nombreux, mais quelques points mineurs méritent d'être mentionnés : une fois entièrement rétracté, un tube à rapport de rétraction élevé aura des parois plus épaisses (puisque tout ce matériau supplémentaire doit être intégré). Cela peut rendre l'épissure finale légèrement plus rigide qu'un manchon 2:1. Dans la plupart des cas, cette rigidité accrue est utile pour la réduction des contraintes, mais si une flexibilité maximale est requise dans un espace restreint, un 2:1 peut être légèrement plus souple. De plus, les tubes à rapport de rétraction élevé peuvent nécessiter un chauffage plus régulier : comme ils se rétractent davantage , un chauffage irrégulier peut provoquer le rétrécissement d'un côté et potentiellement une traction ou une déformation avant l'autre (rétraction asymétrique), bien que cela soit rarement un problème si vous faites pivoter l'épissure pendant le chauffage. Globalement, ce sont des considérations mineures ; les connecteurs à souder et thermorétractables 2:1 et 3:1 sont conçus pour être chauffés progressivement et uniformément pour des résultats optimaux.
À retenir : un connecteur à souder 3:1 offre une meilleure étanchéité et une plus grande liberté de dimensionnement, ce qui explique sa préférence pour les connexions critiques ou extérieures. Un connecteur 2:1 convient parfaitement à de nombreux travaux, surtout si les dimensions sont parfaitement adaptées et si vous recherchez une solution compacte et économique. En cas de doute, optez pour un rapport de rétreint plus élevé pour garantir une étanchéité parfaite. Comme le souligne un guide d'ingénierie, un rapport de rétreint plus élevé couvre une plus large gamme de diamètres et offre une protection plus complète contre l'humidité. En résumé, comparer 2:1 et 3:1 n'est pas une question de « bon ou mauvais », mais de choix de l'outil adapté à la tâche.
👉 Faites confiance au connecteur de fil à souder Haisstronica pour un câblage durable et résistant aux vibrations.

Dimensionnement : AWG vs. diamètre extérieur de l'isolant pour les connecteurs à souder et à sceller
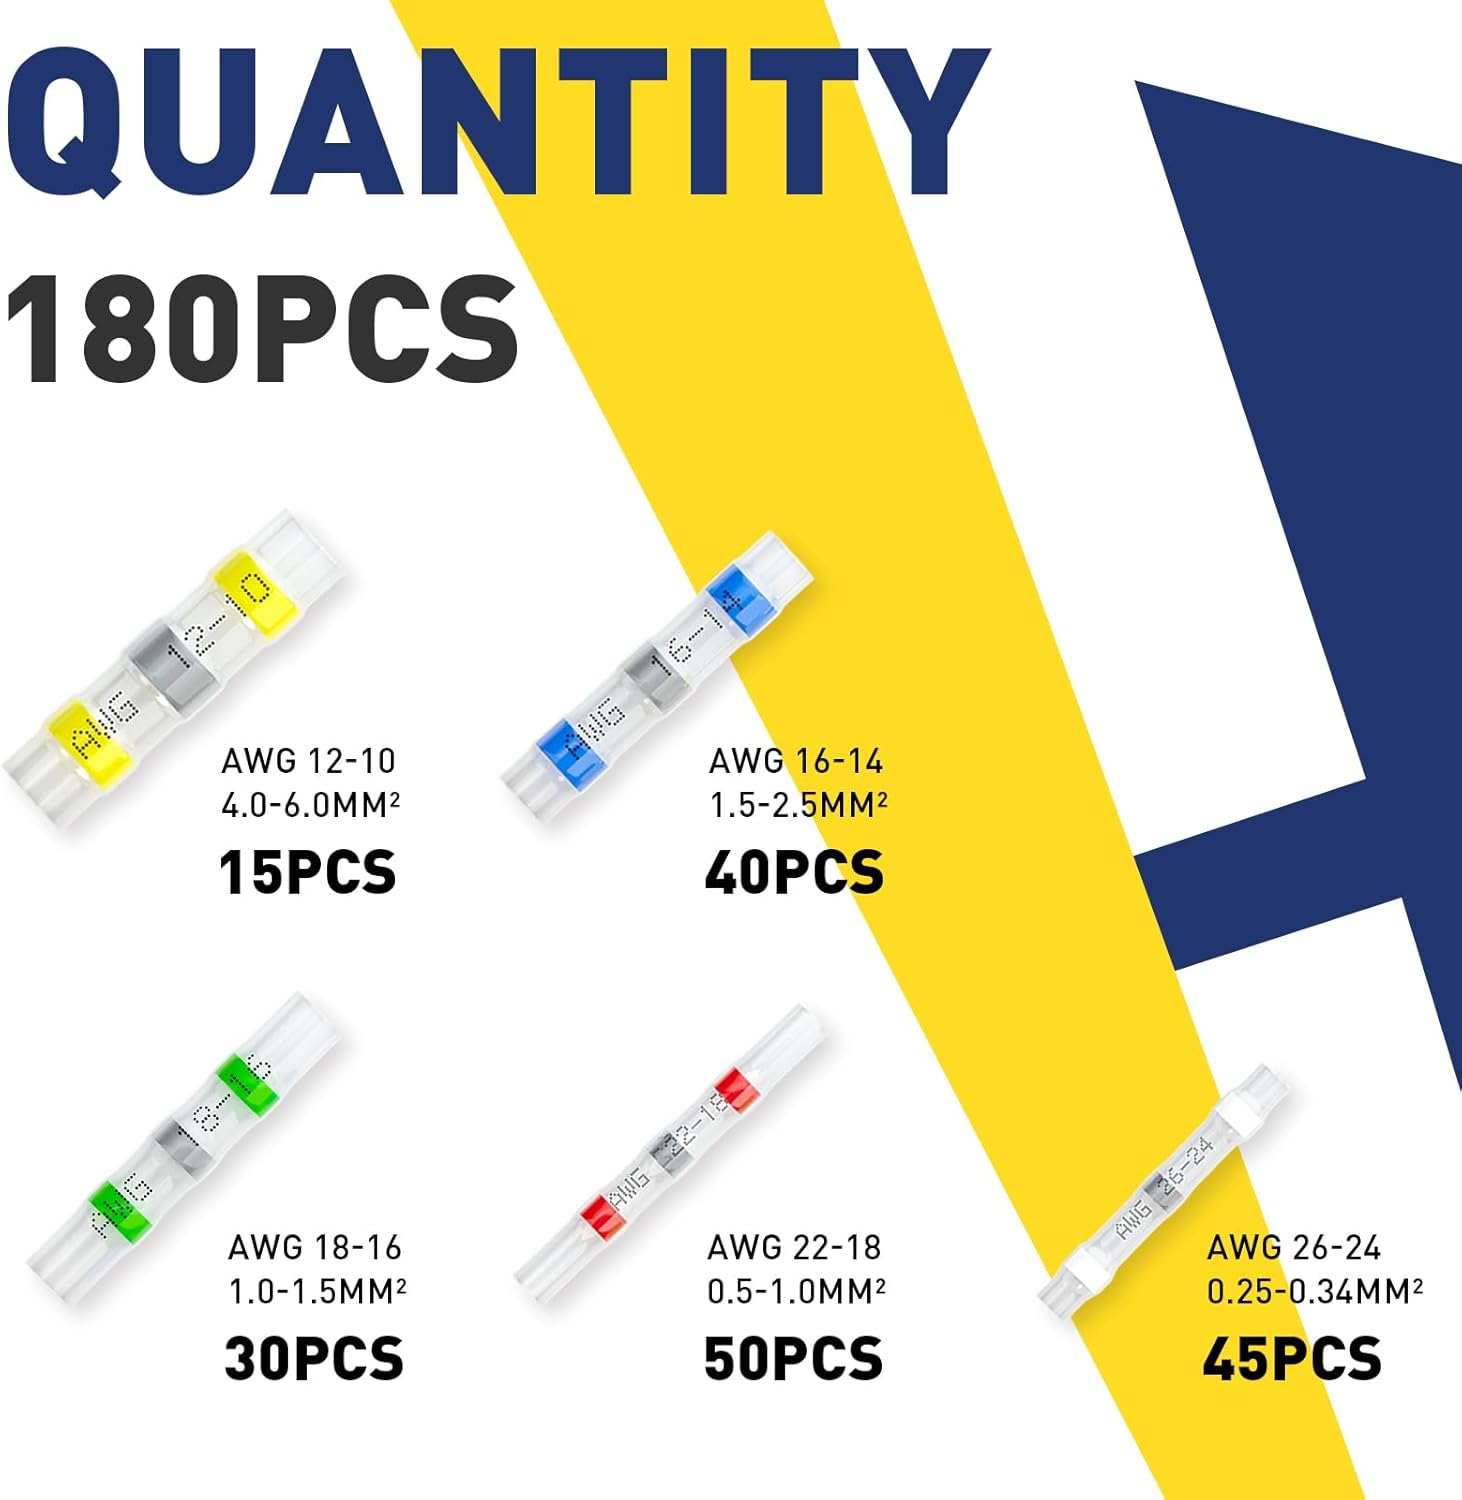
Il est crucial de choisir la taille de connecteur à souder adaptée à vos fils. Ces connecteurs sont généralement vendus dans des tailles et des codes couleur standard correspondant aux calibres de fils (AWG). Par exemple, les codes couleur courants sont : blanc (26-24 AWG), rouge (22-18 AWG), bleu (16-14 AWG) et jaune (12-10 AWG). La bague de soudure interne et la longueur du connecteur sont conçues pour ces calibres de conducteurs en cuivre. Cependant, le calibre AWG ne suffit pas.
Pour garantir une épissure fiable et étanche, vous devez tenir compte à la fois du calibre du conducteur ET du diamètre extérieur (OD) de l'isolant de vos fils :
-
Commencez par le calibre AWG (et le code couleur) : le calibre du fil indique la taille du conducteur en cuivre. Choisissez toujours un connecteur qui couvre le calibre AWG de votre fil. Si vous utilisez un connecteur trop petit sur un fil plus épais, le fil ne rentrera même pas ou le volume de soudure sera insuffisant pour le souder. À l'inverse, utiliser un connecteur conçu pour un calibre beaucoup plus important sur un fil fin risque de ne pas permettre à la bague de soudure de fondre correctement dans les brins fins et à la gaine de se rétracter suffisamment. Par exemple, si vous essayez d'insérer un fil AWG 12 dans un manchon à souder bleu (AWG 16-14), il n'y aura pas assez de soudure pour envelopper complètement les brins plus gros (ce qui fragilisera la jonction). Si vous insérez un fil AWG 20 dans ce même connecteur bleu, le fil est si fin que la gaine thermorétractable ne se rétractera probablement jamais suffisamment pour assurer l'étanchéité ; vous vous retrouverez avec un tube mal ajusté autour de l'isolant. Par conséquent, avant tout, utilisez la bonne couleur/gamme AWG, comme indiqué dans le kit de connecteurs.
-
Vérifiez le diamètre extérieur de l'isolant : c'est là que de nombreuses personnes, surtout les débutants, peuvent se tromper. Deux fils de même calibre peuvent avoir une épaisseur d'isolant très différente selon le type de fil et l'application. Par exemple, un fil de calibre 16 AWG avec une fine isolation en PVC peut avoir un diamètre extérieur d'environ 2,5 mm, tandis qu'un fil en silicone haute température de calibre 16 AWG peut avoir un diamètre extérieur de 3,5 à 4 mm grâce à sa gaine en silicone plus épaisse et plus flexible. Les fils de qualité marine , souvent à brins fins et fortement isolés, peuvent être nettement plus épais qu'un fil automobile en PVC classique de même calibre. Selon un guide de sélection de fils Panduit, un fil isolé de calibre 24 AWG peut avoir un diamètre extérieur compris entre 0,059 pouce et 0,088 pouce, selon le type d'isolant ; soit une différence de près de 50 % ! En termes pratiques, cela signifie qu'un connecteur à souder de calibre 18-22 AWG qui s'adapte parfaitement à un fil de calibre 20 AWG peut être trop serré ou trop lâche sur un autre fil de calibre 20 AWG si l'isolation diffère.
👉 Réparez-le correctement avec un connecteur à souder Haisstronica : chauffez, scellez, c'est fait.

Comment dimensionner selon le diamètre extérieur : Les fabricants de connecteurs de qualité (Haisstronica inclus) publient généralement les dimensions de leurs manchons à souder, notamment le diamètre intérieur (DI) du tube avant rétreint et le DI minimal après rétreint complet . En cas de doute, mesurez le diamètre de l'isolant de votre fil (utilisez un pied à coulisse pour plus de précision) et comparez-le aux spécifications du connecteur. Le DI non rétreint doit être suffisamment grand pour se glisser facilement sur l'isolant du fil, et le DI rétreint suffisamment petit pour bien l'agripper. Les anneaux adhésifs à l'intérieur du connecteur doivent finir par se comprimer sur la gaine du fil.
Si vous ne trouvez pas les spécifications exactes, en règle générale, après rétreint, le tube doit être comprimé uniformément sur la gaine du fil, sans espace important ni point de décollement près de l'adhésif. L'adhésif doit mouiller visiblement la gaine. Si vous constatez des espaces ou si le tube n'adhère pas à l'isolant, le connecteur est probablement trop grand pour ce fil (ou n'a pas été suffisamment chauffé). L'utilisation d'un connecteur à rapport de rétreint plus élevé (par exemple 3:1) peut s'avérer utile dans ces cas limites, car il rétreint davantage et peut ainsi compenser le jeu.
-
Scénarios d'isolation épaisse ou fine : Si vous travaillez avec un fil de silicone à brins fins recouvert d'une épaisse gaine caoutchoutée , ou un câble marin à double isolation, privilégiez les connecteurs avec un rapport de rétreint de 3:1 (voire 4:1). Ceux-ci s'adapteront mieux à un diamètre extérieur plus épais tout en assurant l'étanchéité. Par exemple, pour épisser deux fils isolés en silicone, un connecteur 3:1 permet au tube d'épouser parfaitement la gaine souple et épaisse. En revanche, si vous utilisez un fil à isolation exceptionnellement fine (comme certains fils PTFE-Téflon ou fils de bobinage émaillés), un rapport 2:1 peut suffire, car la gaine est peu rétractable. Soyez toutefois très précis lors de la chauffe pour garantir un rétreint uniforme et éviter les points froids. (En fait, ces fils PTFE fins sont souvent utilisés dans les composants électroniques délicats, où vous pourriez utiliser un type de connecteur totalement différent.)
-
Ne vous fiez pas uniquement à la couleur si vous mélangez les marques : si la plupart des marques respectent la correspondance standard couleur/AWG, il peut y avoir de légères différences dans la taille des tubes ou le nombre de bagues de soudure. Vérifiez toujours l'emballage ou la fiche technique. Par exemple, les connecteurs rouges de Haisstronica couvrent les calibres 22 à 18 AWG, tandis qu'un connecteur rouge d'une autre marque peut afficher des calibres 20 à 16 AWG ; le chevauchement est similaire, mais pas identique. Si possible, utilisez le tableau fourni avec les connecteurs (les kits de meilleure qualité affichent clairement les calibres AWG pour chaque couleur sur le boîtier ).
-
La longueur du dénudage et le chevauchement sont également importants : il ne s'agit pas exactement de la taille du connecteur, mais d'une soudure de qualité. Assurez-vous de dénuder suffisamment d'isolant pour que le fil exposé de chaque côté, une fois inséré, chevauche sous la bague de soudure. Généralement, dénudez environ 6 à 7 mm (1/4 pouce) de chaque côté pour les petits fils rouges/bleus, et environ 8 à 10 mm pour les fils jaunes plus grands, de sorte qu'il y ait environ 3 à 5 mm de fil dénudé chevauchant sous la soudure au milieu. Si vous ne dénudez pas suffisamment, la soudure risque de ne coller que d'un seul côté. Si vous dénudez trop, vous risquez de laisser du cuivre exposé au-delà du tube après rétreint. La plupart des kits vous guideront sur la longueur de dénudage. Une longueur de dénudage adéquate garantit une bonne soudure interne des connecteurs soudés .
En résumé, dimensionnez vos connecteurs à souder en fonction du calibre AWG et du diamètre extérieur du fil. Le calibre AWG garantit un volume de soudure approprié ; le diamètre extérieur garantit l'étanchéité de la gaine thermorétractable. Si l'isolant de votre fil est particulièrement épais pour son calibre, choisissez un connecteur du calibre le plus large ou un connecteur avec un taux de rétreint plus élevé. Si l'isolant est fin, vous pouvez utiliser le calibre le plus petit, mais chauffez avec précaution. Il peut également être judicieux de tester l'ajustement d'un connecteur sur votre fil avant toute intervention importante : glissez le connecteur non rétreint sur l'extrémité dénudée du fil pour vérifier qu'il recouvre l'isolant, et après chauffage, vérifiez que l'adhésif a fondu et qu'il ne reste plus d'espace.
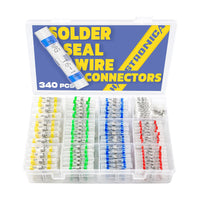
Conseil de pro : Les kits de connecteurs Haisstronica simplifient la tâche en proposant toutes les tailles courantes et en indiquant les plages de calibres AWG sur la boîte. Par exemple, le kit de connecteurs automobiles Haisstronica de 180 ou 340 pièces indique clairement la couleur correspondant à chaque calibre AWG, couvrant ainsi les calibres 26 à 10 AWG. Ainsi, plus besoin de se tromper pour choisir le bon connecteur à souder : il suffit de faire correspondre la couleur à votre calibre de fil, puis de vérifier l'ajustement si l'isolation est inhabituelle. Un kit bien organisé vous permet de toujours avoir le connecteur à souder de la bonne taille en cas de besoin.
👉 Simplifiez les réparations grâce aux connecteurs à souder bout à bout Haisstronica : des joints étanches en quelques secondes.

FAQ sur les connecteurs à souder
Enfin, abordons certaines questions et préoccupations courantes concernant l’utilisation de ces connecteurs thermorétractables à soudure .
Q : Les connecteurs à soudure sont-ils vraiment étanches et fiables pour une utilisation critique ?
R : Correctement installés, les connecteurs à souder et à sceller de qualité créent une épissure étanche et très solide. Le tube à double paroi avec adhésif assure une liaison solide avec l'isolant du fil, et la soudure est encapsulée à l'intérieur. Cela empêche efficacement l'humidité de pénétrer et soulage les tensions. D'ailleurs, ces connecteurs sont souvent commercialisés comme étant de qualité marine pour les bateaux, l'automobile et les câblages extérieurs. Ils peuvent atteindre un indice d'étanchéité proche de IP67 lorsqu'ils sont correctement installés. Des guides indépendants soulignent que la gaine thermorétractable à double paroi avec adhésif est essentielle à l'étanchéité . Concernant la fiabilité électrique et mécanique : pour la plupart des applications de bricolage, automobiles et marines, une épissure soudée de qualité est solide, tant électriquement que physiquement. La résistance à la traction d'une soudure de qualité dans ces connecteurs est généralement similaire à celle d'un sertissage. Ceci dit, aucun connecteur n'est infaillible : une surchauffe (carbonisation du tube) ou une sous-chauffe (soudure non complètement fondue) peut entraîner des pannes.
Dans les environnements soumis à de fortes vibrations ou à des risques de sécurité critiques (par exemple, l'aéronautique, les voitures de course ou les machines industrielles soumises à des mouvements constants), certains experts et normes privilégient les connexions serties aux connexions soudées. En effet, une soudure peut augmenter les contraintes si le fil est soumis à de fortes flexions, ce qui peut entraîner une rupture par fatigue en l' absence de décharge de traction. Cependant, l'avantage des connecteurs à soudure réside dans la gaine thermorétractable qui assure une décharge de traction. Comme le souligne Haltech (un constructeur automobile performant), le risque de fissuration des soudures par vibrations est généralement évitable grâce à une décharge de traction adéquate, notamment en utilisant une gaine thermorétractable adhésive pour soutenir le fil et la connexion. C'est précisément ce que ces connecteurs sont conçus pour faire. De plus, un blog spécialisé souligne que, lorsqu'elle est réalisée correctement, une soudure résiste aux vibrations et aux chocs aussi bien qu'une connexion sertie. En résumé, pour les applications automobiles et marines, les connecteurs à soudure sont très fiables. Assurez-vous simplement de les exécuter correctement : utilisez un connecteur de la bonne taille, faites fondre complètement la soudure et l'adhésif (vous devriez voir un filet de soudure brillant et de l'adhésif suinter aux extrémités), puis laissez refroidir sans toucher pour que la jonction se solidifie. Pour les circuits critiques (capteurs d'airbag, etc.) ou pour respecter des réglementations spécifiques, suivez toujours les directives du fabricant ou de l'industrie ; dans certains cas, un sertissage ou un autre connecteur peut être obligatoire. Cependant, pour la grande majorité des réparations ou projets de câblage , ces connecteurs à soudure étanches sont largement à la hauteur et combinent les avantages de la soudure et du sertissage (une liaison solide et une gaine étanche).
Q : 2 : 1 contre 3 : 1 – quel rapport de rétraction dois-je choisir pour mon application ?
R : Cela dépend de vos priorités. Utilisez des connecteurs à souder thermorétractables 3:1 pour une polyvalence et une étanchéité optimales. Par exemple, si vous réparez un câblage marin ou extérieur , ou si vous manipulez des fils à isolation plus épaisse (comme un fil automobile en silicone premium ou plusieurs fils ensemble), le 3:1 assurera une étanchéité parfaite et vous permettra de l'ajuster aux composants avant de le rétracter complètement. Un 3:1 est également utile si vous n'êtes pas sûr à 100 % du diamètre du fil : il est plus souple et se rétractera parfaitement, même si vous avez surestimé la taille. Utilisez des connecteurs 2:1 pour les travaux plus standard, où les sections de fil sont très uniformes et où vous souhaitez un profil final légèrement plus petit. Ils sont parfaits pour les projets électroniques, les utilisations en intérieur ou pour le remplacement de connecteurs sur un faisceau connu dont les spécifications de fil sont standard (par exemple, des fils isolés en PVC classiques, dont la plage de connecteurs est parfaitement adaptée). En pratique, de nombreux kits de connecteurs automobiles privilégient désormais les rapports 3:1, car les véhicules présentent souvent des épaisseurs d'isolation et une exposition aux intempéries variables. L'étanchéité supplémentaire est donc avantageuse. Si vous possédez déjà un kit de connecteurs 2:1, pas d'inquiétude ; veillez simplement à choisir la bonne taille pour chaque fil (et pensez à ajouter de la gaine thermorétractable adhésive sur la jonction pour renforcer l'étanchéité). Cependant, si vous achetez du neuf, nous recommandons généralement des gaines thermorétractables 3:1 , car elles offrent le meilleur des deux mondes.
Q : Ai-je besoin d’un outil spécial pour chauffer ces connecteurs à souder, ou un briquet fera-t-il l’affaire ?
R : L'outil idéal est un décapeur thermique , de préférence équipé d'une buse concentratrice, afin d'appliquer une chaleur contrôlée et uniforme autour du connecteur. Un décapeur thermique à environ 300 °C (572 °F) peut faire fondre la bague de soudure en 10 à 20 secondes environ, selon la taille du connecteur. Commencez par concentrer la chaleur sur la bague de soudure au milieu jusqu'à ce qu'elle se liquéfie, puis balayez vers les extrémités pour rétracter complètement la gaine et faire fondre l'adhésif. Vous saurez que c'est fait lorsque la soudure coule visiblement dans les brins du fil et que vous verrez de l'adhésif bouillonner sur les bords de la gaine. Utiliser un décapeur thermique approprié permet d'éviter de brûler la gaine. Peut-on utiliser un briquet ou une torche ? En cas de besoin, oui ; beaucoup utilisent avec succès un petit chalumeau au butane ou même la flamme d'un briquet. Mais soyez très prudent ! Une flamme nue présente un risque plus élevé de carboniser la gaine thermorétractable ou de chauffer de manière irrégulière. Si vous optez pour cette solution, maintenez la flamme en mouvement et pas trop près. Il existe également des mini-chalumeaux thermiques spécialement conçus, fonctionnant au butane, qui peuvent être efficaces. N'utilisez jamais de flamme nue à proximité de vapeurs inflammables (essence, etc.) et évitez de l'utiliser dans des espaces confinés. Pour des résultats constants, un décapeur thermique électrique est préférable ; même un modèle basique est relativement peu coûteux. La bonne nouvelle, c'est que vous n'avez pas besoin de fer à souder : la soudure est intégrée ; vous utilisez donc simplement la chaleur pour activer la soudure et faire rétrécir le tube. Ces connecteurs sont donc sans soudure pour l'utilisateur (pas de soudure manuelle), même si la soudure elle-même est une véritable soudure. Investissez donc dans un décapeur thermique de qualité si vous prévoyez d'utiliser régulièrement des connecteurs à souder ; la simplicité et la fiabilité seront au rendez-vous.
Q : Comment les connecteurs à souder se comparent-ils aux connecteurs à sertir ? (Soudure vs sertissage)
R : C'est un débat classique en câblage ! En général, les deux méthodes permettent d'obtenir des connexions fiables si elles sont correctement réalisées, mais chacune présente des avantages et des inconvénients.
-
Un connecteur à sertir (en particulier une épissure bout à bout isolée thermorétractable) repose sur la déformation mécanique d'une ferrule métallique autour des fils. Un sertissage correct, réalisé avec l'outil approprié, crée une jonction solide et étanche au gaz, et ce, très rapidement, sans apport de chaleur. Le sertissage est souvent privilégié en production de masse et dans certaines industries, car il est constant et ne chauffe pas le fil (aucun risque de surchauffe des composants). Les connecteurs à sertir sont de véritables connecteurs de fils sans soudure : un outil de sertissage suffit. Cependant, le sertissage nécessite un connecteur de taille adaptée au fil et une pince à sertir à cliquet de qualité pour obtenir la compression adéquate. Un mauvais sertissage (avec une pince ou une matrice inadaptée) peut entraîner une connexion fragile, susceptible de se détacher ou de se corroder.
-
Souder une connexion (méthode traditionnelle avec fil à souder et fer) assure une excellente liaison électrique et est très compact, mais nécessite plus de compétences et de temps pour les connexions multiples. La soudure peut pénétrer dans le fil et, sans support, la jonction des fils soudés et non soudés peut constituer un point de rupture sous l'effet de la flexion (d'où la nécessité d'un serre-câble). Les connecteurs à souder combinent le meilleur des deux : la faible résistance de la soudure et l'encapsulation et le serre-câble d'une gaine thermorétractable. Ils éliminent le besoin d'outil de sertissage, ce qui les rend très faciles à utiliser pour les bricoleurs et les techniciens sur le terrain.
En termes de performances, pour la plupart des tâches de câblage, les connecteurs à souder (thermorétractables) sont plus pratiques que les connecteurs à sertir et à rétracter. Ils sont particulièrement utiles pour les réparations dans les endroits exigus ou lorsque vous n'avez pas accès à une boîte à outils complète ; il suffit des connecteurs et d'une source de chaleur. De nombreux passionnés d'automobile et de marine les trouvent supérieurs pour les travaux de réparation, car ils garantissent une connexion étanche sans l'encombrement d'une borne à sertir. En revanche, les installateurs professionnels préfèrent les sertissages pour les faisceaux critiques, en raison de leur longue expérience et de leur conformité aux normes. La question « soudure ou sertissage » se résume finalement à une question d'environnement et de mise en œuvre : une soudure mal réalisée est pire qu'un sertissage correct, et inversement. Mais avec les connecteurs à souder, en suivant les instructions, il est très facile d'obtenir une soudure quasi parfaite à chaque fois (la bague de soudure est parfaitement étanche et le manchon transparent permet de contrôler le résultat).
Un point important à prendre en compte : les codes et normes . Dans les secteurs maritime et automobile, ces connecteurs à souder sont généralement acceptés pour les réparations et les nouvelles installations (ils sont largement vendus sous forme de kits de connecteurs étanches pour l'automobile). Pour l'aviation ou les systèmes critiques, la réglementation peut exiger des cosses serties ou vissées plutôt que des épissures à souder. Vérifiez toujours s'il existe des règles spécifiques pour votre projet (par exemple, certaines certifications maritimes peuvent exiger des cosses serties sur les câbles de batterie, etc., mais pour le câblage courant, ces manchons à souder conviennent).
En résumé, sertissage ou soudure ne se résume pas forcément à une question de choix : chacun a sa place. Les connecteurs à soudure permettent d'obtenir une soudure étanche qui, dans de nombreux cas, égale, voire dépasse, les performances d'une soudure sertie. Ils sont particulièrement pratiques pour les réparations ponctuelles et les montages DIY. Si vous disposez d'une pince à sertir et de connecteurs de qualité, le sertissage est également une excellente solution. Si vous n'en avez pas, ou si vous souhaitez une étanchéité supplémentaire, ces connecteurs thermorétractables à soudure sont la solution idéale. Considérez-les comme un outil supplémentaire dans votre boîte à outils. (Anecdote : certains installateurs font même double emploi : ils sertissent une connexion , puis glissent un connecteur à soudure par-dessus sans utiliser la bague de soudure, simplement pour utiliser la gaine thermorétractable et l'adhésif pour assurer l'étanchéité. Ce n'est pas indispensable, mais cela montre l'importance de l'étanchéité.)
Q : Des conseils pour obtenir les meilleurs résultats avec ces connecteurs ?
A : Voici quelques conseils rapides :
-
Préparez correctement le fil : dénudez la longueur adéquate comme indiqué précédemment et n'étamez pas les fils (ne les pré-soudez pas) ; insérez-les propres et secs. Torsadez légèrement le fil toronné pour faciliter son introduction dans le manchon sans effilochage, mais évitez de le tordre excessivement. La soudure du connecteur contient du flux ; vous n'avez donc généralement pas besoin de flux supplémentaire. Assurez-vous simplement que les fils se chevauchent sous la bague de soudure.
-
Positionnement soigné : Centrez la bague de soudure sur le cuivre nu et assurez-vous que les bandes adhésives colorées sont positionnées sur l' isolant de chaque côté (et non sur le cuivre nu). Ainsi, une fois chauffé, l'adhésif adhérera à l'isolant intact de chaque fil, scellant ainsi les extrémités du connecteur.
-
Utilisez la bonne technique de chauffage : comme indiqué précédemment, l'utilisation d'un pistolet thermique est idéale. Commencez à chauffer au milieu de la bague de soudure jusqu'à ce que la soudure fonde et coule complètement. Vous pourriez la voir briller soudainement et être aspirée par les brins du fil ; c'est un bon résultat. Ensuite, déplacez immédiatement la chaleur vers les extrémités pour rétracter le tube et faire fondre l'adhésif. Un peu d'adhésif doit suinter à chaque extrémité du connecteur ; c'est la confirmation d'une bonne étanchéité. Continuez à effectuer un léger mouvement de va-et-vient pour vous assurer que le tube est rétracté uniformément. N'exagérez pas : une fois la soudure fondue, le tube complètement rétracté et l'adhésif visible, arrêtez de chauffer. Une surchauffe peut brûler le tube ou faire bouillir l'adhésif.
-
Laissez refroidir : Ceci est important : une fois la soudure retirée, laissez refroidir l'épissure pendant au moins 10 à 15 secondes avant de la manipuler. La soudure doit se solidifier. Si vous tirez sur les fils encore chauds, vous risquez de désolidariser la soudure ou de créer un point de soudure « froid ». Une fois refroidi, effectuez un test de traction doux sur les fils : une soudure bout à bout correctement réalisée sera très solide ; dans la plupart des cas, le fil devrait se rompre avant la soudure.
-
Maintenez-le au sec jusqu'à la soudure : si vous travaillez dans un environnement humide, évitez toute humidité dans l'épissure pendant le chauffage. C'est rare, mais la présence d'eau à l'intérieur du tube pendant le chauffage peut créer de la vapeur et de la pression. Il est préférable de réaliser les connexions à sec, car une fois scellées, elles peuvent entrer en contact avec l'eau.
-
Entraînez-vous sur un fil de rechange : si vous débutez, utilisez un connecteur supplémentaire sur un fil de récupération pour vous familiariser avec le temps de chauffe et les signaux. C'est simple, mais un peu de pratique ne fait jamais de mal.
En suivant ces conseils, vous vous assurerez que vos connecteurs à souder thermorétractables fonctionnent comme annoncé, vous offrant ainsi une connexion soignée, durable et étanche avec un minimum de tracas.
Nos meilleurs choix conviviaux
La formule thermofusible de Haisstronica associe soudure et gaine thermorétractable pour bloquer l'humidité tout en améliorant la conductivité. Nos connecteurs thermorétractables se répartissent uniformément autour des brins, puis refroidissent pour former un joint rigide. Des connexions de soudure propres et reproductibles réduisent les retours d'information et garantissent une fiabilité à long terme pour les installations marines, automobiles et extérieures.
👉 Accélérez vos installations avec les connecteurs bout à bout à souder Haisstronica — sans devinettes.

Conclusion : Choisir le bon connecteur soudé
Les connecteurs à soudure 2:1 et 3:1 révolutionnent la réalisation d'épissures rapides et solides. Pour conclure, rappelons les points essentiels :
-
Le rapport de rétreint est important : un connecteur 3:1 se rétreint davantage et offre généralement une étanchéité plus parfaite qu'un connecteur 2:1. Si vous utilisez souvent des fils de différentes sections ou recherchez une protection optimale, optez pour des connecteurs 3:1. Privilégiez les connecteurs 2:1 lorsque l'ajustement est déjà parfait et que vous recherchez un profil plus compact ou un coût inférieur pour les travaux courants.
-
Calibre AWG et diamètre extérieur – Vérifiez toujours que la taille (couleur) du connecteur correspond au calibre de votre fil et tenez compte de l'épaisseur de l'isolant. En cas de doute, mesurez le diamètre extérieur du fil et assurez-vous que la zone de rétreint du connecteur le couvre. Cela garantit une bonne adhérence de l'adhésif et une étanchéité parfaite.
-
La qualité des connecteurs est essentielle – Tous les connecteurs à souder ne se valent pas. Privilégiez les marques réputées (comme Haisstronica) qui utilisent un bon alliage de soudure, une bonne quantité d'adhésif et des tubes transparents. Ces derniers sont dotés d'un tube transparent pour une inspection facile du joint et d'indicateurs de taille imprimés ou à code couleur. Un connecteur à souder bon marché peut manquer de soudure ou d'adhésif, ce qui fragilise la connexion.
-
Suivez les bonnes pratiques : utilisez l'outil chauffant adapté, prenez votre temps pour chauffer uniformément et assurez-vous que la soudure fonde complètement. Une soudure bien réalisée sera brillante, la soudure aura coulé dans les fils et l'adhésif scellera visiblement les extrémités. Ce connecteur sera solide, à faible résistance électrique et étanche aux intempéries.
En comprenant la signification du taux de rétreint et en choisissant le connecteur adapté à votre fil, vous réaliserez des épissures de qualité professionnelle et fiables. De nombreux bricoleurs et professionnels ont constaté que ces connecteurs thermorétractables à soudure simplifient leurs projets de câblage, de l'installation d'autoradios et de remorques au câblage de bateaux et aux appareils électroniques domestiques. Grâce à ce guide (et au kit adapté), vous pourrez réparer ou créer en toute confiance des faisceaux de câbles à la fois solides et protégés des intempéries. Bon câblage !
Sources:
Composants RS
Tube à fermeture éclair
HeatShrinkTubing.com
Haltech – Sertissage vs Soudure