Installer un éclairage paysager est un projet DIY enrichissant qui peut considérablement embellir et sécuriser vos espaces extérieurs. Avec le bon câble et un peu de planification, particuliers et amateurs de jardinage peuvent facilement câbler leurs éclairages paysagers et obtenir un résultat professionnel. Dans ce guide complet, nous vous expliquons étape par étape comment installer un éclairage paysager basse tension, du choix du calibre de câble approprié à la réalisation de connexions étanches. Nous mettons également en avant les produits de câblage de haute qualité Haisstronica (marque de confiance en matière de connecteurs et de câblage électriques), vous donnons des conseils utiles pour le câblage paysager et partageons des ressources pertinentes (vidéos et images) pour garantir la réussite de votre installation. Que vous soyez débutant ou que vous souhaitiez moderniser votre installation existante, ce guide vous aidera à câbler vos éclairages paysagers en toute confiance pour une ambiance nocturne époustouflante.
Pourquoi choisir un éclairage paysager basse tension ?
Les systèmes d'éclairage paysager basse tension (généralement 12 volts) sont populaires pour l'éclairage extérieur à faire soi-même en raison de leur sécurité et de leur simplicité. Contrairement au câblage domestique standard (120 V), un système basse tension réduit considérablement les risques de choc électrique et ne nécessite pas de conduit dans la plupart des zones. Cela permet aux particuliers d'installer facilement des éclairages paysagers sans faire appel à un électricien professionnel. Les câbles basse tension peuvent être enterrés directement à faible profondeur (généralement environ 15 cm) dans votre jardin. , et les connexions de câblage sont simples à réaliser.
Les principaux avantages d’un système d’éclairage paysager basse tension comprennent :
-
Sécurité : Le transformateur abaisse le courant domestique standard de 120 V à une plage de tension sûre de 12 à 15 V. Même si le fil d'éclairage extérieur est accidentellement coupé ou exposé, la tension est si faible qu'il est généralement sans danger au toucher. Il est donc idéal pour l'éclairage des jardins et des allées où des enfants ou des animaux domestiques peuvent être présents.
-
Installation facile : La basse tension évite les tranchées profondes ni les conduits métalliques rigides. Le fil d'éclairage paysager peut être directement enterré dans la terre ou le paillis. De nombreux connecteurs sont à pincement ou à vissage, ce qui permet de s'affranchir d'outils complexes. En résumé, c'est un projet très accessible pour un bricoleur.
-
Efficacité énergétique : La plupart des éclairages paysagers modernes utilisent des LED, qui consomment très peu d'énergie. Associé à un câblage en cuivre à faible résistance, un système d'éclairage basse tension peut éclairer un grand jardin avec un impact minimal sur votre facture d'électricité.
-
Flexibilité : Le système est facile à étendre ou à modifier ultérieurement. Vous pouvez raccorder le câblage existant pour ajouter un nouvel appareil ou remplacer des appareils sans travaux majeurs. Les câbles basse tension peuvent être retirés et réenfouis si vous réaménagez votre jardin, contrairement aux lignes haute tension rigides.
-
Résultats professionnels : Avec une planification adéquate, un système basse tension à monter soi-même peut être aussi esthétique qu'un système installé par un professionnel. Vous maîtrisez le placement et l'angle des faisceaux, et pouvez expérimenter pour obtenir une mise en valeur parfaite des arbres, des allées ou des éléments architecturaux.
Conseil : Utilisez toujours un transformateur basse tension conçu pour une utilisation extérieure pour alimenter vos éclairages. Ce transformateur se branche sur une prise extérieure standard protégée par un disjoncteur différentiel et fournit une sortie 12 V à vos câbles d'aménagement paysager. Placez le transformateur à un endroit pratique (par exemple, un mur de garage ou un mur extérieur) en laissant au moins 30 cm de dégagement de chaque côté pour la ventilation. De nombreux transformateurs sont équipés de minuteries ou de cellules photoélectriques intégrées qui allument automatiquement les lumières au crépuscule et les éteignent à l'aube.

Outils et matériaux dont vous aurez besoin
Avant de commencer le câblage, rassemblez tous les outils et matériaux nécessaires. Avoir tout sous la main facilitera le processus. Voici une liste de contrôle :
-
Câble d'éclairage paysager basse tension : Ce câble à deux conducteurs relie tous vos éclairages. Les calibres courants sont 16/2, 14/2, 12/2 et 10/2 (AWG). Nous verrons comment choisir le bon calibre dans la section suivante. Assurez-vous que le câble est homologué pour une utilisation en extérieur et un enfouissement direct . Un câble d'éclairage paysager de haute qualité possède une isolation épaisse, résistante aux UV et à l'eau, pour une longue durée de vie.
-
Luminaires paysagers : Les luminaires (balcons, spots, projecteurs, etc.) sont généralement livrés avec deux fils (souvent de calibre 18 AWG) à connecter au câble principal. Assurez-vous que vos luminaires sont basse tension (12 V).
-
Transformateur basse tension : Un transformateur adapté à la puissance totale de votre système. Calculez la puissance totale de tous vos luminaires et choisissez un transformateur dont la puissance est au moins 20 à 30 % supérieure à celle de votre charge pour éviter toute surcharge. Par exemple, pour des luminaires de 100 W, utilisez un transformateur de 150 W ou plus par sécurité. De nombreux transformateurs d’éclairage paysager sont dotés de plusieurs prises (12 V, 13 V, 15 V) pour compenser les chutes de tension sur les longues distances.
-
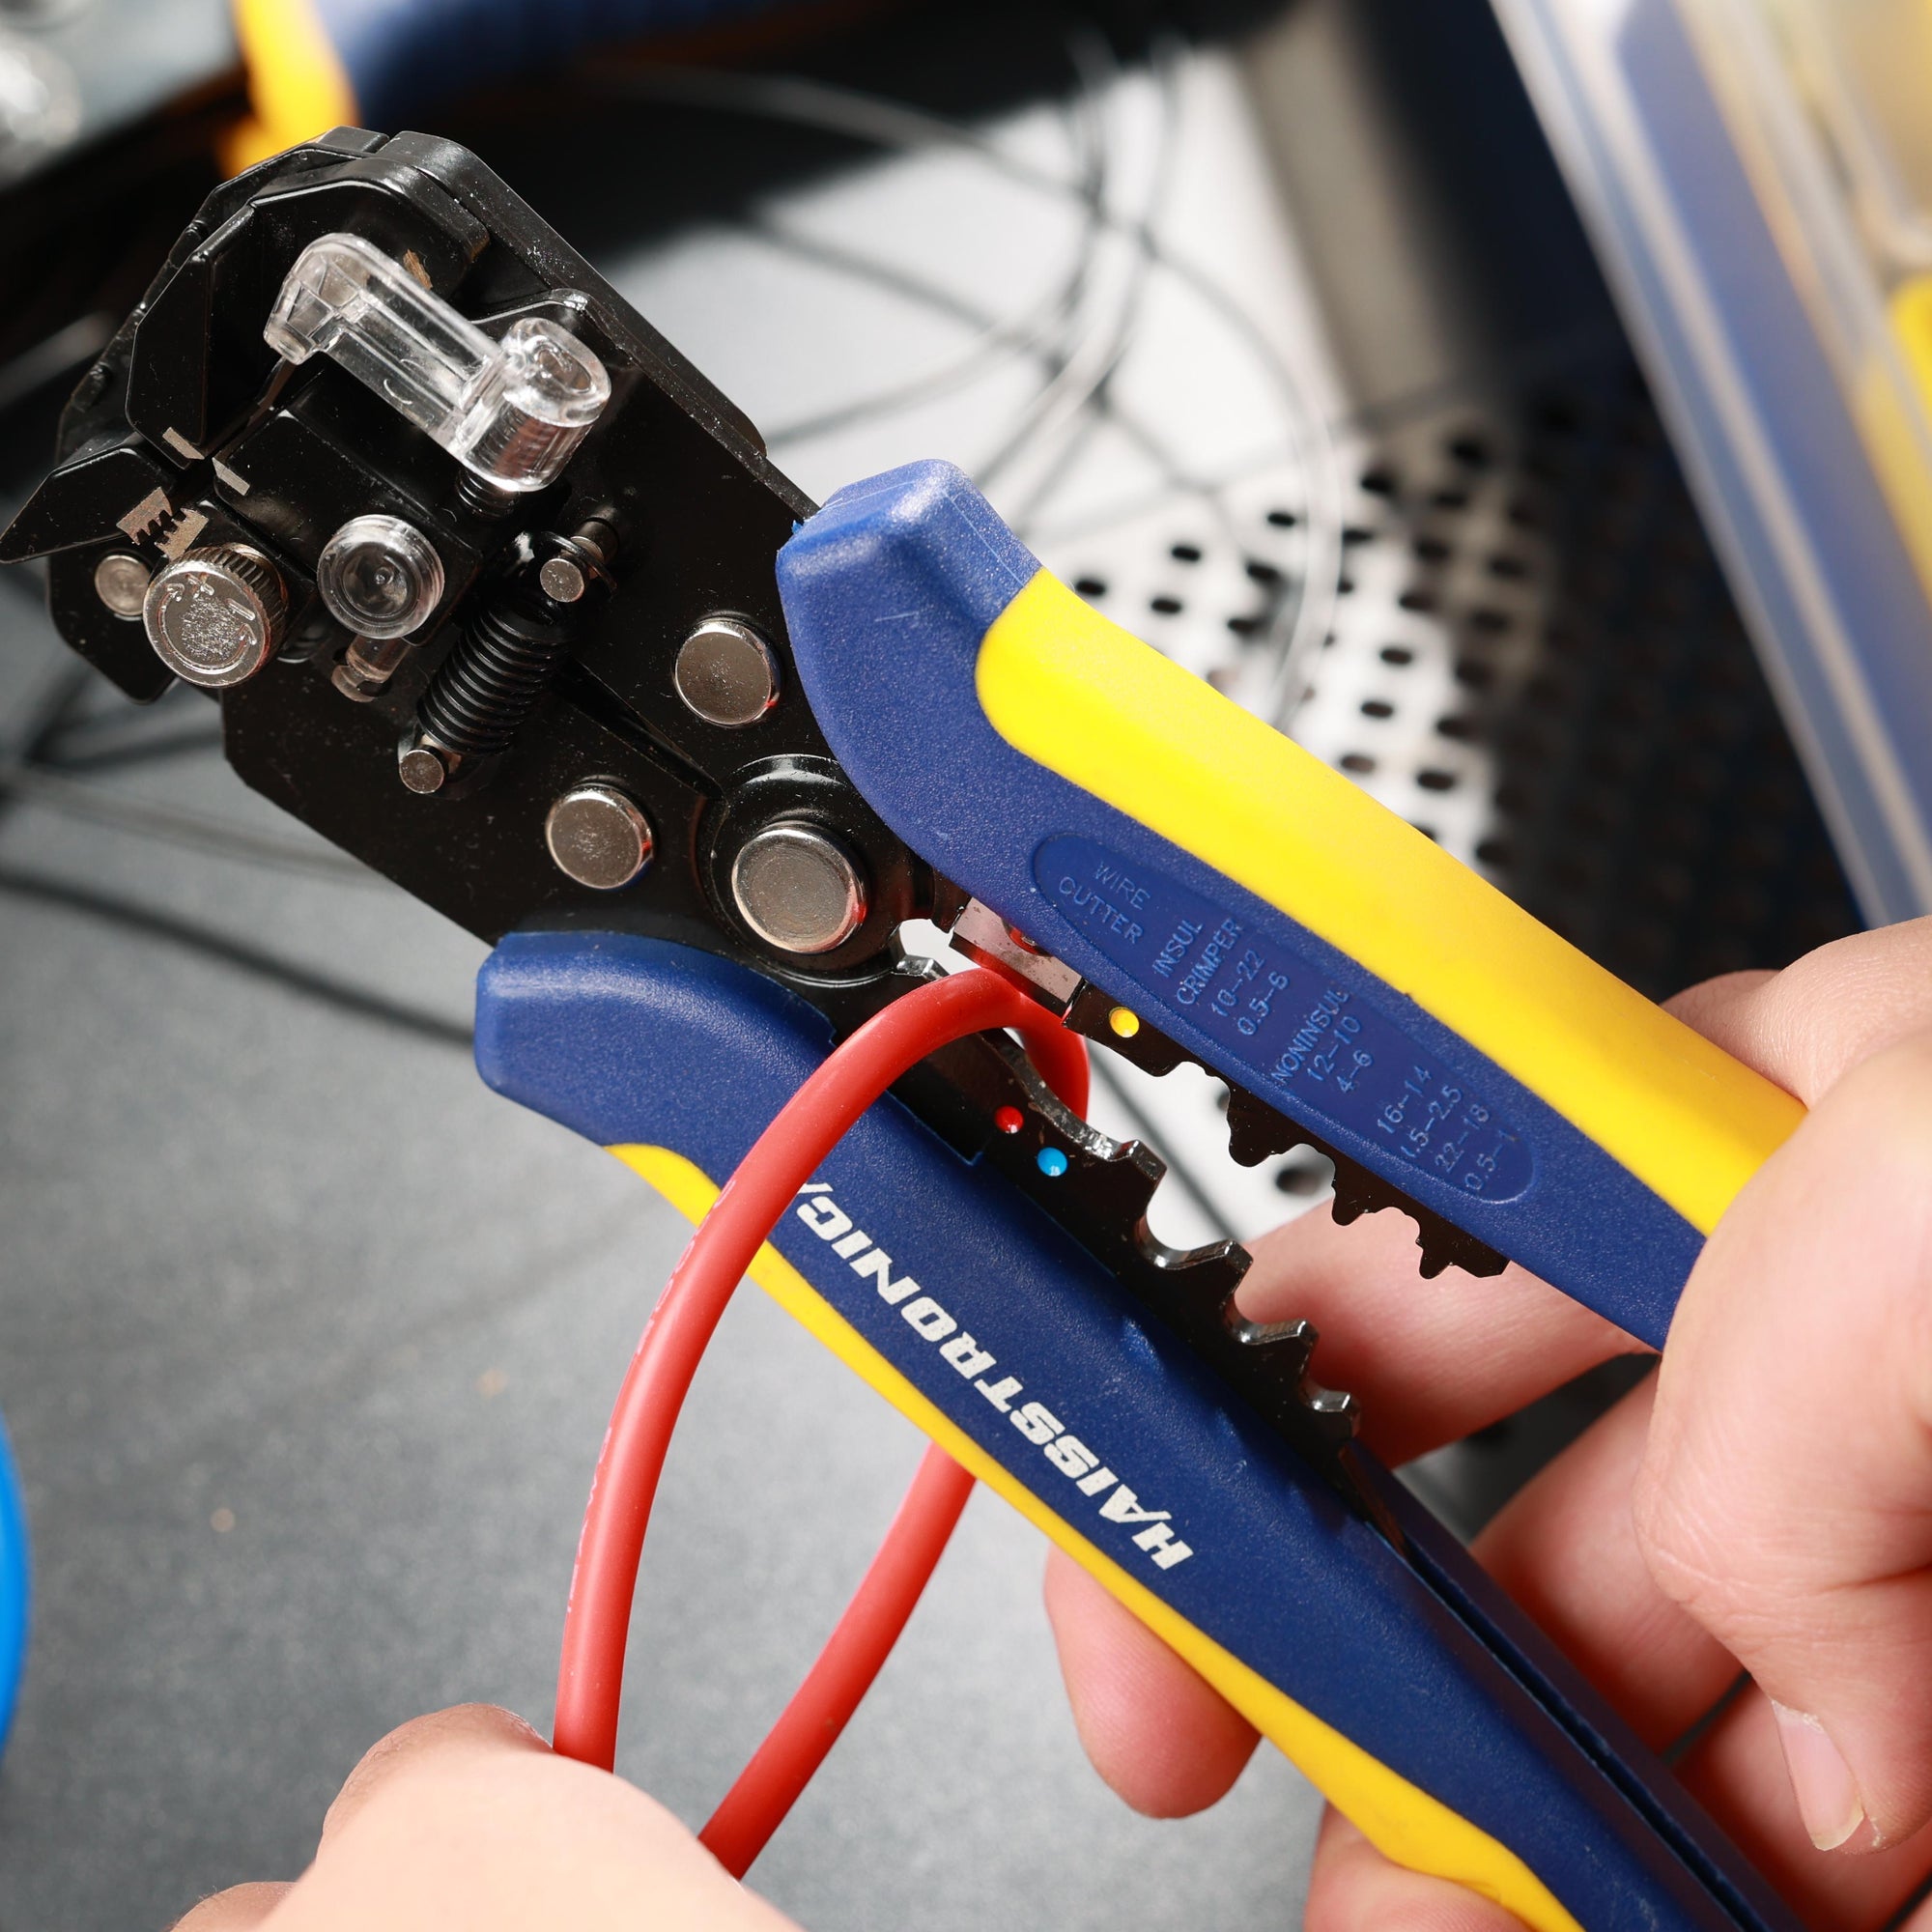
Pince à dénuder/coupe-fil : Vous aurez besoin d'une pince à dénuder pour retirer l'isolant des extrémités du câble. Une pince à dénuder de bonne qualité, adaptée à votre calibre de fil (par exemple, compatible avec les calibres 10 à 18 AWG), est essentielle pour un dénudage net et sans entailles. Munissez-vous également d'une pince coupante ou d'un coupe-câble pour couper le câble à la longueur souhaitée.
-
Pinces à sertir (en option) : Si vous prévoyez d'utiliser des connecteurs ou des cosses à sertir (comme des cosses à œillet pour les bornes à vis du transformateur), une pince à sertir est nécessaire. Haisstronica propose des pinces à sertir fiables, conçues pour les connecteurs électriques, qui garantissent une connexion sertie solide.
-
Tournevis : Un tournevis plat ou cruciforme peut être nécessaire pour fixer les fils au transformateur (selon le type de borne). Certains transformateurs utilisent des bornes à vis, tandis que d’autres utilisent des leviers ou des fiches.
-
Pelle ou outil de tranchée : Pour enterrer les fils, vous pouvez utiliser une pelle à bord plat, une bêche à tranchée ou même un outil de tranchée spécialisé. Comme les fils d'aménagement paysager ne doivent être enterrés qu'à quelques centimètres de profondeur dans la plupart des jardins, creuser une tranchée étroite de 15 cm de profondeur est généralement suffisant. .
-
Connecteurs de fils : Ils sont essentiels pour raccorder les luminaires au câble principal. Pour une utilisation en extérieur, des connecteurs étanches sont indispensables ; les serre-fils d'intérieur standard ne conviennent pas seuls, car l'humidité corrodera la connexion. Voici quelques options :
-
Connecteurs de fils vissés avec gel : Ils ressemblent à des serre-fils classiques, mais sont remplis de silicone ou de graisse. Insérez les extrémités dénudées du fil et vissez le connecteur ; le mastic à l'intérieur empêche l'eau de pénétrer. De nombreux kits d'éclairage extérieur incluent des serre-fils bleus ou orange remplis de gel.
-
Connecteurs à percer ou à serrer : Certains luminaires sont équipés de connecteurs à pince qui mordent le câble principal (connecteurs à perforation d'isolant). Bien que pratiques, ces connecteurs sont souvent moins fiables à long terme qu'un serre-fils ou un sertissage. Si vous en possédez, assurez-vous donc qu'ils sont également graissés pour assurer leur étanchéité.
-
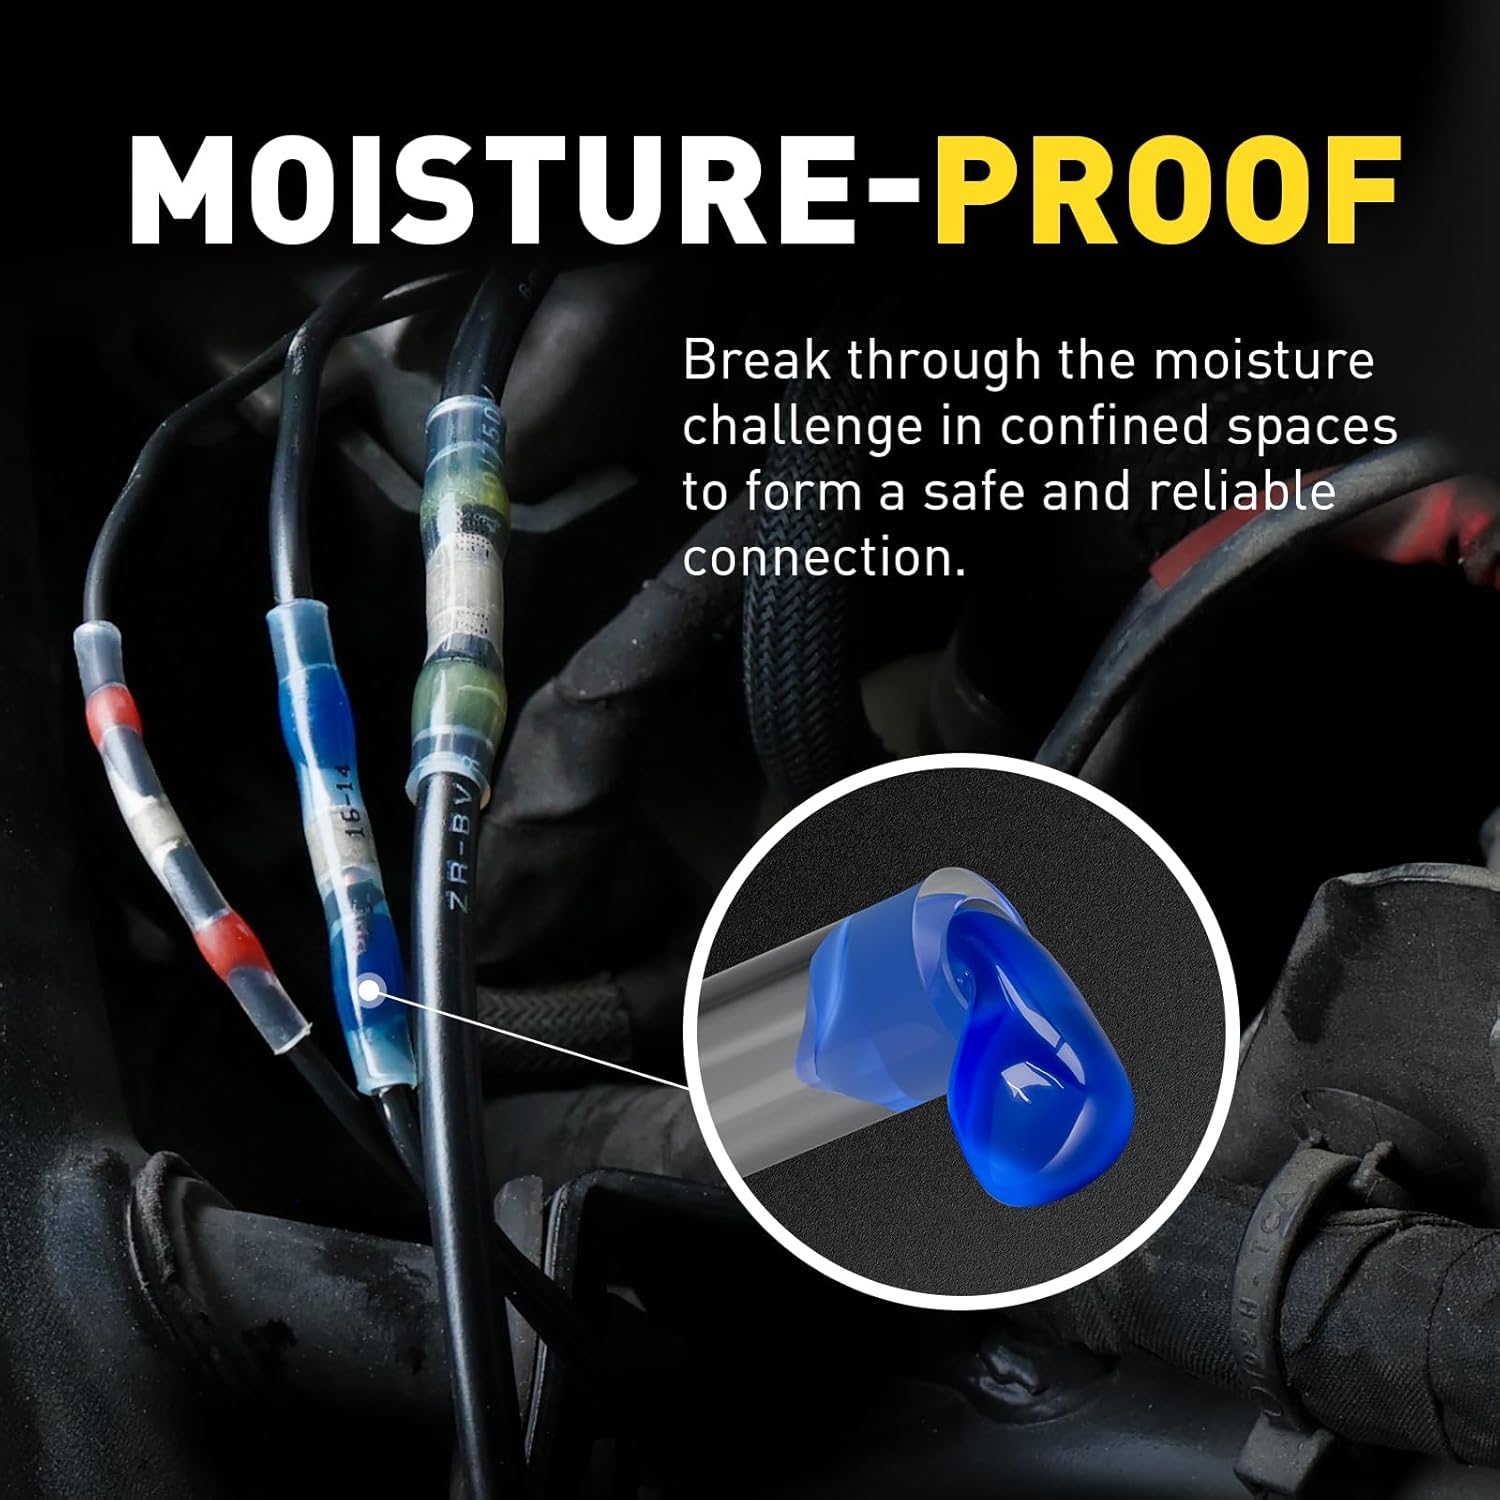
Connecteurs à sertir avec gaine thermorétractable : Vous pouvez également utiliser des connecteurs à épissure bout à bout : insérez les fils à chaque extrémité et sertissez. Idéalement, utilisez des connecteurs à sertir thermorétractables que vous rétractez avec un pistolet thermique ; leur revêtement adhésif fond et protège la connexion de l'humidité.
-
Jonctions de concentrateur : Pour les systèmes plus complexes, vous pouvez utiliser des connecteurs de concentrateur. Il s'agit d'une jonction centrale où plusieurs fils de luminaires sont connectés à la ligne d'alimentation principale en un seul endroit grâce à un connecteur ou un bornier spécialisé. Pour la plupart des projets simples, des connecteurs à visser suffisent.
-
-
Ruban isolant (avec parcimonie) : Vous pouvez utiliser du ruban isolant en vinyle pour envelopper les connecteurs et ainsi renforcer leur protection mécanique ou pour regrouper les fils. Cependant, ne vous fiez pas uniquement au ruban adhésif pour isoler une épissure ; utilisez toujours un connecteur adapté. Le ruban adhésif peut se défaire sous terre avec le temps, tandis qu'un connecteur étanche restera bien fixé.
-
Agrafes ou piquets pour câble : Si vous devez fixer le câble le long d'un tracé précis (notamment avant de l'enterrer ou sous le paillis), des agrafes en plastique ou des piquets de jardin peuvent le fixer. C'est facultatif, mais cela permet de garder les choses bien rangées pendant le travail.
-
Testeur de tension (facultatif) : un multimètre ou un voltmètre basse tension peut être utile pour vérifier que vous avez environ 12 V à l'extrémité de votre câble et pour résoudre tout problème de chute de tension ou de mauvaise connexion.
Équipement de sécurité : Puisque vous travaillerez à l’extérieur et creuserez, portez des gants et des lunettes de protection. Si vous creusez des tranchées plus profondes ou à proximité de zones inconnues, utilisez une pelle à manche en plastique ou en bois pour éviter de couper accidentellement les lignes électriques ou d’arrosage existantes (il est conseillé de marquer les réseaux à l’avance).
Choisir le bon calibre de fil pour votre paysage
L'un des points les plus importants à considérer lors du choix d'un fil pour votre aménagement paysager est le choix du calibre (épaisseur) adapté à votre système d'éclairage. Le calibre du fil détermine la quantité de courant (ampères) qu'il peut transporter en toute sécurité et la chute de tension sur la distance. Utiliser un fil sous-calibré peut engendrer une faible luminosité à l'extrémité du circuit en raison de la chute de tension, tandis qu'un fil surdimensionné est plus coûteux sans présenter de gros inconvénients (hormis une manipulation un peu plus difficile en raison de son épaisseur).
Voici les tailles de fils courantes pour l'éclairage paysager et des instructions sur le moment d'utilisation de chacune d'elles :
-
Fil paysager 16/2 AWG : Diamètre : ~1,29 mm (section du fil ~1,3 mm²) Il s'agit du fil le plus fin couramment utilisé. Un fil de calibre 16 est généralement suffisant pour les courts trajets (moins de 15 mètres) avec seulement quelques luminaires LED. Il peut supporter environ 13 ampères maximum, soit environ 156 watts à 12 V, mais en pratique, il en utilisera beaucoup moins pour minimiser les chutes de tension. Utilisez du calibre 16/2 pour les petits éclairages de terrasse ou de patio avec une puissance minimale. Limitez les trajets – environ 15 mètres ou moins – pour maintenir la luminosité. Grâce à son diamètre plus petit, le calibre 16/2 est facile à dissimuler et à plier, mais sa résistance par mètre est supérieure à celle des calibres plus épais.
-
Fil d'éclairage paysager calibre 14/2 AWG : Diamètre : environ 1,63 mm (section : environ 2,08 mm²). Ce calibre polyvalent est très courant et souvent privilégié pour les installations d'éclairage de taille moyenne. Un fil d'éclairage paysager de calibre 14 peut supporter environ 15 A en toute sécurité. (jusqu'à environ 180 watts à 12 V). Recommandé pour les câbles jusqu'à environ 30 mètres supportant une charge maximale de 90 watts. Par exemple, si vous disposez de 8 à 10 éclairages d'allée LED de 5 W chacun (environ 50 W au total), le calibre 14 AWG fonctionnera parfaitement jusqu'à 30 mètres ou plus. De nombreuses installations d'éclairage paysager utilisent le calibre 14/2 pour son équilibre entre flexibilité et capacité.
-
Fil de jardin AWG 12/2 : Diamètre : environ 2,05 mm (section : environ 3,3 mm²). Ce calibre plus épais peut supporter environ 20 A. (jusqu'à 240 watts à 12 V). Un fil de calibre 12 est idéal pour les longs trajets ou les installations à forte puissance. Si vous prévoyez des trajets de 30 à 45 mètres ou plus, ou si vous avez un grand nombre de luminaires (par exemple, plus de 15 luminaires LED ou certains luminaires halogènes) sur une même ligne, l'utilisation de fil de calibre 12/2 minimisera les chutes de tension. En fait, le fil de jardin de calibre 12/2 est le calibre le plus courant pour les installations d'éclairage extérieur professionnel, car il offre une marge de sécurité en termes de puissance et de distance. Légèrement plus épais et plus rigide que le calibre 14/2, il reste relativement facile à utiliser. Utilisez du calibre 12 AWG si votre puissance totale dépasse environ 100 W ou si chaque longueur de câble approche les 30 mètres. C'est également un bon choix si vous prévoyez d'agrandir votre système : il vous permettra d'ajouter des luminaires ultérieurement sans avoir à tirer de nouveaux câbles.
-
Fil d'éclairage paysager 10/2 AWG : Diamètre : environ 2,59 mm (section : environ 5,3 mm²). Ce calibre très élevé supporte jusqu'à environ 30 ampères, soit bien plus que la plupart des systèmes d'éclairage paysager (soit 360 watts en 12 V !). Le fil d'éclairage paysager de calibre 10 est parfois utilisé pour les lignes principales d'une grande propriété ou d'une installation commerciale. Par exemple, vous pouvez faire passer un câble 10/2 sur 60 mètres à travers un domaine, puis le diviser en lignes de dérivation plus courtes de calibre 12/2 ou 14/2 pour alimenter des groupes d'éclairage. Le fil 10/2, plus épais, minimise les chutes de tension sur le long tronçon principal (richmediahouse.com ). Pour une utilisation domestique classique, le calibre 10 AWG n'est généralement pas nécessaire, sauf si vous disposez d'un tronçon exceptionnellement long (plus de 60 mètres) ou d'une charge très élevée. Son épaisseur le rend plus difficile à dénuder et à dissimuler. Cependant, si vous en avez besoin, Haisstronica propose du fil paysager basse tension 10/2 dans des longueurs telles que 100 pieds, 200 pieds et 250 pieds qui sont parfaites pour les grands projets (plus d'informations sur les options de produits plus tard).

Calibre du fil, distance et puissance : Le rapport entre calibre, distance et puissance est crucial. Lorsqu'un long câble circule, l'électricité subit une chute de tension, ce qui signifie que la tension à l'extrémité est plus faible qu'au niveau du transformateur, surtout sous charge. Un fil plus épais (de calibre AWG inférieur) présente une résistance moindre, et donc une chute de tension moindre. En règle générale, choisissez le calibre de votre fil en fonction de la longueur du câble et de sa puissance totale. Par exemple, pour un câble de 15 mètres (50 pieds) délivrant 50 W, un calibre 16 AWG peut convenir ; pour un câble de 15 mètres (50 pieds) délivrant 150 W, il est conseillé d'utiliser un calibre 12 AWG, voire de diviser la longueur. De nombreux fabricants proposent des tableaux (comme celui ci-dessous) qui recommandent un calibre en fonction de la puissance et de la longueur :
Par exemple, en utilisant un graphique typique :
-
Si vous disposez d'un câble 14 AWG de 100 pieds, il peut supporter environ 90 watts avec une chute de tension acceptable.
-
La même course de 100 pieds avec 150 watts nécessiterait 12 AWG pour maintenir la luminosité.
-
Les longueurs extrêmement longues (plus de 200 pieds) sont généralement réalisées avec du 10 AWG ou en utilisant plusieurs longueurs à partir du transformateur pour répartir la charge.
Câble d'éclairage paysager 12/2 ou 14/2 : On se demande souvent s'il faut choisir un câble de calibre 12 ou 14. En termes de sécurité, les deux sont basse tension et transportent la même tension de 12 V, il n'y a donc aucune différence en termes de risque de choc électrique (les deux sont sûrs). La principale différence réside dans la capacité et la chute de tension. Utilisez un câble 12/2 pour une installation durable ou sur de plus longues distances : il peut gérer plus de lumières et fournir de l'énergie sur de plus grandes distances avec une perte de tension moindre. Privilégiez le câble 14/2 pour les installations plus petites et confinées, où la puissance totale et les distances sont modérées. En cas de doute, opter pour le câble 12/2, plus épais, est une bonne idée (la différence de prix n'est pas énorme pour les longueurs de bricolage). Assurez-vous simplement que vos connecteurs et votre transformateur sont compatibles avec le calibre 12 AWG, car certains connecteurs à pince ou petites bornes de transformateur ne sont dimensionnés que pour un calibre 14 AWG. La plupart des équipements modernes fonctionnent avec du calibre 12 AWG, mais il arrive parfois qu'un connecteur à insertion soit trop serré sur un fil plus gros.
Conseil : Vous pouvez mélanger les calibres de fils dans un même système (par exemple, commencer par du 10 AWG pour une longue ligne et bifurquer vers du 14 AWG pour chaque éclairage), mais évitez autant que possible d'épisser des calibres différents au milieu d'une ligne continue. Mélanger les calibres peut compliquer les calculs de chute de tension et nécessite l'utilisation de connecteurs adaptés aux deux sections de fils. Si vous devez passer d'une ligne principale plus épaisse à des lignes secondaires plus fines, effectuez-le au niveau d'un concentrateur ou d'une jonction permettant de fixer correctement les différents fils. Ne mélangez jamais des calibres de fils dans un même connecteur, sauf si celui-ci est conçu pour ces combinaisons spécifiques ; en cas de doute, consultez les tableaux du fabricant du connecteur.
Étape par étape : comment câbler vos éclairages paysagers
Passons maintenant à l'installation. Nous aborderons la planification, la disposition des câbles, les connexions et les tests finaux/l'enfouissement. À titre d'exemple, prenons un scénario simple : plusieurs luminaires d'allée connectés en chaîne (configuration en guirlande) à un transformateur. Les mêmes étapes s'appliquent si vous avez plusieurs lignes alimentées par un même transformateur ou différents types de luminaires, comme des spots.
1. Planifiez votre disposition et vos câbles
Prenez le temps de planifier l'emplacement de chaque luminaire et le cheminement du câblage. Dessinez un plan simple de votre cour ou de votre jardin et marquez l'emplacement des luminaires. Déterminez ensuite le cheminement des fils entre le transformateur et chaque luminaire. Voici quelques schémas de câblage courants :
-
Guirlande (linéaire) : Un seul câble part du transformateur et se connecte au premier luminaire, puis au suivant, et ainsi de suite. C'est simple, mais attention aux chutes de tension : les luminaires les plus éloignés du transformateur peuvent être moins lumineux si plusieurs luminaires sont en ligne. L'utilisation d'un câble plus épais ou d'une guirlande plus courte peut atténuer ce problème.
-
Connexions en T : Le câble se prolonge jusqu'à un point, puis se divise en deux ou plusieurs directions (en forme de « T » ou de « Y ») pour atteindre différents groupes de luminaires. Vous devrez réaliser une épissure au point de division pour relier plusieurs segments de câble. Assurez-vous que votre connecteur peut gérer le nombre de fils (par exemple, connecter un câble entrant et deux câbles sortants signifie trois fils dans un seul connecteur).
-
En étoile : Une ligne principale de plus gros calibre se termine par une jonction (concentrateur). De ce concentrateur, des fils de plus petit calibre sont reliés à chaque luminaire ou groupe de luminaires. Cette configuration en étoile permet une distribution de tension plus uniforme, mais nécessite davantage de fils. Elle est souvent utilisée dans les projets professionnels de grands aménagements paysagers.
-
Boucle : Il arrive parfois que l'on installe une boucle (circuit) partant du transformateur et traversant tous les luminaires, puis retournant au transformateur. Cela peut contribuer à égaliser la tension, mais ce n'est généralement pas nécessaire pour les systèmes LED et le dépannage peut être plus complexe. Il est généralement plus simple de s'en tenir à l'une des méthodes ci-dessus, sauf si vous avez une raison particulière.
Marquez les emplacements prévus pour le passage du câble. S'il traverse une pelouse ou un jardin, prévoyez un tracé de tranchée qui évite les grosses racines et ne risque pas d'être touché par de futurs travaux de terrassement. Tenez également compte des aménagements paysagers (allées, allées). Si vous devez faire passer des câbles sous un trottoir ou une allée, vous pouvez installer un manchon en PVC sous ceux-ci avant de procéder au câblage (ou utiliser un joint de dilatation existant). Par exemple, si vous coulez une terrasse en béton, placez un conduit en dessous pour les futurs câbles d'éclairage : c'est une assurance économique d'éviter d'avoir des câbles encastrés directement dans le béton, inaccessibles ou impossibles à remplacer. .
Conseil de pro : Si votre jardin est équipé d'un système d'irrigation ou d'autres réseaux enterrés, signalez-les ou localisez-les afin d'éviter de les couper pendant le creusement de la tranchée. Veillez également à maintenir les câbles d'aménagement paysager à quelques mètres des câbles ou tuyaux parallèles afin d'éviter tout enchevêtrement et toute interférence.
2. Choisissez et mesurez vos câbles
En fonction de l'agencement, déterminez le calibre de fil d'éclairage paysager approprié (voir la section précédente). Pour plus de simplicité, il est souvent préférable d'utiliser un seul calibre. Par exemple, de nombreux bricoleurs choisissent du 12/2 AWG pour l'ensemble du projet afin de couvrir tous les besoins. Pour une installation très petite (par exemple, 3 LED à 6 mètres du transformateur), vous pouvez économiser un peu en utilisant du 14/2 ou du 16/2. Mais n'oubliez pas : un fil plus épais entraîne une chute de tension moindre et une plus grande marge de dilatation.
Mesurez maintenant les longueurs approximatives nécessaires. Il est conseillé d' ajouter une longueur supplémentaire à chaque section pour compenser le jeu et les ajustements. Il est conseillé d'ajouter au moins 1,5 m de jeu à l'extrémité d'une section et 30 à 60 cm à chaque boucle de luminaire. Ce jeu vous permettra de repositionner les luminaires ou de dénuder et reconnecter les fils ultérieurement si nécessaire.
Le fil d'aménagement paysager est généralement vendu en rouleaux ou bobines de longueurs courantes : 15,2 m, 30,5 m, 61,7 m, 76,5 m, 152,5 m , etc. Il est généralement plus économique d'acheter une longueur légèrement supérieure à vos besoins, plutôt que de manquer de fil. Haisstronica propose des bobines de fil d'aménagement paysager de différentes longueurs pour s'adapter à des projets de toutes tailles, par exemple :
-
Le fil d'aménagement paysager basse tension 14/2 est disponible en longueurs de 30, 60, 76 et 152 mètres. Si votre projet prévoit environ 55 mètres de fil 14 AWG, la bobine de 60 mètres est idéale.
-
Pour des trajets plus longs ou des besoins en courant plus élevés, le fil paysager basse tension 12/2 (12 AWG) est disponible en longueurs de 100 pieds (et Haisstronica propose également des longueurs de 250 pieds et 500 pieds de 12 AWG dans son catalogue).
-
Si vous avez besoin d'un calibre encore plus important, pensez au câble basse tension pour paysagement 10/2 , vendu par Haisstronica jusqu'à 76 m de longueur. Ce câble 10 AWG est idéal pour les longueurs de plus de 60 m ou pour minimiser les chutes de tension dans les grands systèmes.
-
Un calibre plus fin pour les courts trajets peut permettre de réduire les coûts ; par exemple, un fil de paysage basse tension 16/2 (16 AWG) en bobines de 200 ou 250 pieds peut être utilisé pour connecter seulement quelques petits appareils sur une courte distance.
Coupez votre câble à la longueur souhaitée après avoir vérifié son acheminement. Il est souvent plus simple de dérouler la bobine et de poser le fil le long du tracé prévu dans le jardin, puis de couper l'excédent plutôt que de mesurer avec un ruban. N'oubliez pas d'étiqueter ou de noter l'extrémité du câble reliée à chaque tronçon si vous avez plusieurs tronçons partant du transformateur.
3. Placez les luminaires et disposez le fil
Maintenant, installez vos luminaires à leur emplacement approximatif. Si les luminaires sont équipés de piquets, vous pouvez les planter dans le sol à l'endroit souhaité (vous devrez peut-être les assembler au préalable s'ils sont livrés en pièces détachées). Laissez-les hors tension pour le moment ; nous effectuerons le câblage dans les étapes suivantes.
Ensuite, posez le câble le long du trajet prévu, en passant devant chaque appareil à connecter. Maintenez le câble libre et hors sol à ce stade afin de faciliter les connexions et les réglages. Assurez-vous que le câble passe suffisamment près des fils de chaque appareil pour qu'ils puissent se connecter. Si un appareil est hors ligne principale, vous pouvez couper un court tronçon de câble pour l'atteindre (formant une jonction en T).
Si vous avez du mou au niveau d'un luminaire, c'est une bonne chose : vous pouvez enrouler un peu de câble supplémentaire et l'enfouir sous la terre ou pailler près de la base du luminaire. Ce enroulement supplémentaire facilite l'entretien ultérieur (par exemple, si vous devez dénuder le fil ou déplacer légèrement le luminaire). Comme indiqué précédemment, il est également recommandé de laisser quelques mètres de mou au niveau du transformateur et à l'extrémité des câbles.
À ce stade, vérifiez l'espacement et l'emplacement. Allumez temporairement les lumières (s'il s'agit de lampes solaires ou si vous avez une lampe de poche) pour simuler l'effet et voir si leur emplacement offre la couverture souhaitée. Il est plus facile de déplacer un luminaire maintenant, avant que tout soit enterré et connecté.
4. Connectez les luminaires au câble
Cette étape consiste à connecter les éclairages paysagers au câble principal. Votre câble paysager comporte deux fils, généralement moulés ensemble pour former une forme plate. Pour les identifier facilement, un côté de l'isolant est souvent marqué ou nervuré, tandis que l'autre est lisse. Dans un système basse tension, peu importe quel côté de la paire est connecté à quel fil de luminaire, tant que la cohérence est respectée (chaque luminaire se connecte simplement aux deux conducteurs, en parallèle avec les autres).
Pour chaque luminaire, vous effectuerez deux connexions : une de chacun des fils conducteurs du luminaire aux deux côtés du câble principal.
Voici la procédure pour un connecteur étanche à visser typique (écrou de fil rempli de gel) :
-
Séparer le câble : À l'aide d'un couteau ou de vos doigts, séparez délicatement les deux conducteurs joints du câble d'aménagement paysager sur quelques centimètres. L'isolant est généralement conçu pour se détacher. Veillez à ne pas couper trop profondément et à ne pas endommager l'isolant.
-
Dénudez l'isolant : À l'aide de votre pince à dénuder, dénudez environ 1,27 cm d'isolant à l'extrémité du conducteur du câble. Répétez cette opération pour les deux conducteurs où vous prévoyez de fixer le luminaire. Dénudez également les extrémités des fils du luminaire s'ils ne sont pas pré-dénudés (la plupart sont pré-dénudés sur environ 1,27 cm). Vous devriez maintenant avoir du cuivre exposé sur le câble principal et les fils du luminaire.
-
Raccorder les fils avec un connecteur : Prenez un fil de luminaire et une extrémité du câble principal (extrémités en cuivre exposées) et torsadez-les ensemble dans le sens des aiguilles d’une montre à la main. Si vous avez plusieurs raccords de luminaire ou de câble au même endroit (par exemple, une jonction en T où deux câbles et un fil de luminaire se rejoignent), torsadez-les tous les trois ensemble. Protégez immédiatement les fils torsadés avec votre connecteur étanche : enfoncez les fils dans le connecteur et tournez-le dans le sens des aiguilles d’une montre jusqu’à ce qu’il soit bien serré. Avec un connecteur de taille appropriée, vous sentirez qu’il serre fermement les fils ; un excès de mastic peut s’écouler, ce qui est normal.
-
Répétez l'opération pour l'autre conducteur : connectez le deuxième fil du luminaire à l'autre conducteur du câble de la même manière. Important : ne connectez pas les deux fils du luminaire au même côté du câble ; chaque fil doit être relié à un conducteur différent, l'un au + et l'autre au – (bien que dans les systèmes basse tension CA, ils ne soient pas polarisés, ce ne sont que deux moitiés du circuit).
-
Vérification de la connexion : Tirez doucement sur chaque connecteur pour vous assurer qu'il est bien fixé et qu'aucun fil ne glisse. Le cuivre doit être entièrement enrobé dans le joint du connecteur et invisible à l'extérieur.
Si vous utilisez un autre type de connecteur (comme des connecteurs à pince ou des épissures à sertir), suivez les instructions du produit. Par exemple, pour un connecteur à pince, il suffit d'insérer les fils dans un boîtier et d'abaisser un levier pour les verrouiller. Pour une épissure à sertir, il suffit de sertir le connecteur bout à bout sur les fils, puis de le chauffer s'il s'agit d'un connecteur thermorétractable.
Plusieurs fils dans un même connecteur : Un connecteur comporte souvent deux fils (un fil de luminaire et un conducteur de câble principal). Un dédoublement en T peut comporter trois fils (le câble d'entrée, le câble de sortie et le fil de luminaire, tous reliés ensemble). Assurez-vous que votre connecteur est adapté au nombre de fils et au calibre. Par exemple, un connecteur jaune à visser classique peut accueillir deux ou trois fils de calibre 12-14 AWG. Si vous devez raccorder des fils de calibre 10 AWG, vous aurez probablement besoin d'un connecteur rouge plus grand (conçu pour les calibres 18 à 6 AWG). Évitez de surcharger un petit connecteur avec trop de fils épais, car cela peut entraîner une mauvaise connexion. Dans ce cas, utilisez un connecteur de taille appropriée ou divisez-le en deux points de connexion (comme un câble en queue de cochon court pour relier deux connecteurs).
Une fois les deux fils de chaque luminaire connectés au câble principal (un fil pour chaque conducteur), le luminaire est câblé en parallèle avec les autres. Répétez cette opération pour tous les luminaires du système. Il peut être utile de maintenir les connecteurs hors du sol pendant les travaux (vous pouvez les laisser pendre ou les poser sur un rocher) afin d'éviter que la saleté n'obstrue immédiatement le mastic.
Étanchéité : Assurez-vous d'utiliser des connecteurs étanches ou adaptés à l'enfouissement direct . Ils empêcheront l'humidité de pénétrer dans l'épissure et préviendront la corrosion. Si vous ne disposez que de serre-fils standard pour emplacement sec, vous devriez au moins envelopper soigneusement la connexion de ruban adhésif silicone ou caoutchouc, puis de ruban isolant ; cette solution est à utiliser en dernier recours. Il est fortement recommandé d'utiliser des connecteurs d'extérieur spécialement conçus (par exemple, King Innovation propose des connecteurs remplis de gel « DryConn », et 3M propose des tubes de graisse pour serre-fils appelés connecteurs DBR/Y, qui permettent d'insérer un serre-fil classique dans un tube rempli de gel). De nombreux kits d'éclairage paysager sont fournis avec des connecteurs étanches.
5. Connectez les fils au transformateur
Une fois tous les luminaires raccordés au câble, vous devez disposer d'au moins une extrémité libre du câble principal qui doit être reliée au transformateur (si votre installation est à un seul tronçon), voire de plusieurs extrémités libres si vous avez installé plusieurs tronçons de câbles distincts à partir d'un même transformateur. C'est au transformateur que tous les tronçons aboutiront.
Bornes de transformateur : Les transformateurs basse tension sont généralement équipés de bornes à vis ou de connecteurs à pince étiquetés « COM » (commun) et « 12 V », « 13 V », « 15 V », etc. Le commun est d'un côté du circuit et la prise de tension de l'autre. S'il y a plusieurs prises, vous pouvez les utiliser pour différentes longueurs si nécessaire (par exemple, une longueur plus longue peut être raccordée à la prise 15 V pour compenser la chute de tension, tandis qu'une longueur plus courte est raccordée à la prise 12 V). Pour plus de simplicité, commencez par utiliser la prise 12 V pour toutes les longueurs, sauf si vous savez qu'une longueur particulière est très longue et faible ; dans ce cas, vous pouvez déplacer le fil de cette longueur sur 13 V ou 15 V, selon le cas. Consultez toujours le manuel de votre transformateur pour savoir comment raccorder correctement les fils.
Pour se connecter :
-
Assurez-vous que le transformateur n'est pas encore sous tension (débranchez-le si vous l'aviez branché pour tester).
-
Dénudez environ 1/2 pouce d’isolant de l’extrémité libre de chaque conducteur de câble.
-
Si le transformateur est équipé d'une pince ou d'un levier, soulevez-le/ouvrez-le. S'il est équipé d'une vis, desserrez-la pour ouvrir le trou/la pince.
-
Insérez un conducteur dans la borne COM et l'autre dans la borne 12 V (ou tension appropriée). Pour les circuits multiples, tous les conducteurs communs sont généralement branchés sur la borne commune (certains transformateurs en possèdent plusieurs pour plus de commodité) et la phase de chaque circuit est branchée sur une borne 12 V (ou 15 V). De nombreux transformateurs possèdent deux vis communes et deux vis 12 V pour faciliter le raccordement de deux jeux de fils.
-
Serrez fermement la vis ou fermez la pince pour fixer le fil. Tirez légèrement dessus pour vous assurer qu'il est bien serré.
-
Si vous utilisez un fil de très gros calibre (10 AWG) qui ne rentre pas dans la borne, vous pouvez fixer un câble court en queue de cochon d'un fil légèrement plus petit ou utiliser une cosse à œillet (cosse à anneau) . Par exemple, vous pouvez sertir une cosse à anneau sur le fil de 10 AWG et la fixer sous la vis du transformateur si celui-ci est équipé d'une borne à vis. Cependant, la plupart des transformateurs modernes acceptent jusqu'à 8 ou 10 AWG directement sous une vis ou une pince.
Assurez-vous qu'aucun brin de cuivre ne dépasse et ne risque de toucher quoi que ce soit. Les connexions à l'intérieur du transformateur doivent être propres et ne pas créer de court-circuit. De nombreux câbles sont en cuivre toronné, ce qui offre une grande flexibilité ; il suffit de bien torsader les brins avant de les insérer dans la borne pour éviter qu'ils ne s'étalent.
Après le branchement, vous pouvez monter le transformateur (si ce n'est pas déjà fait). Installez-le conformément aux instructions du fabricant : généralement à au moins 30 cm du sol, à la verticale et sous un couvercle résistant aux intempéries s'il est installé à l'extérieur (certains modèles sont conçus pour une exposition complète). Pensez également à brancher le transformateur sur une prise GFCI et à utiliser un couvercle à bulles sur la prise pour plus de sécurité, surtout en cas d'exposition à la pluie.
6. Test du système
Avant d'enterrer des fils, il est essentiel de tester que tout fonctionne comme prévu :
-
Mise sous tension : Branchez ou allumez le transformateur pour alimenter le système. De nombreux transformateurs sont équipés d'un interrupteur (Arrêt/Auto/Marche). Placez-le sur Marche pour le test afin qu'il fournisse du courant quelles que soient les conditions d'éclairage.
-
Vérifiez toutes les lumières : Promenez-vous dans votre jardin et vérifiez que chaque luminaire est allumé. Idéalement, effectuez ce test au crépuscule pour bien voir les lumières. Si certaines ne s'allument pas ou sont nettement plus faibles que d'autres, vous devrez résoudre le problème :
-
Si aucun n'est allumé, revérifiez la sortie du transformateur : il est branché et sous tension (et la prise est alimentée). Vérifiez également les connexions du câble principal au niveau du transformateur (commun et prise de tension).
-
Si un seul luminaire est éteint, inspectez ses deux connexions. Il est possible que l'une des connexions soit desserrée ou que le fil ne soit pas en contact avec le connecteur. Retirez, dénudez à nouveau le fil et reconnectez l'épissure. Vérifiez également l'ampoule du luminaire (si elle est remplaçable) ou le câblage interne du luminaire, si accessible.
-
Si une section de lumières (par exemple plusieurs d'affilée) est éteinte, il se peut que la connexion soit défectueuse là où le segment de câble alimente cette section. Vérifiez l'épissure ou le point de raccordement de cette branche à la ligne principale.
-
Pour tout éclairage faible à l'extrémité, mesurez la tension aux fils de ce luminaire si vous disposez d'un multimètre. Si elle est nettement inférieure à 11 volts, vous avez un problème de chute de tension. Solutions possibles : utiliser une tension plus élevée (15 V) pour ce tronçon, raccourcir la longueur ou réduire la puissance, ou opter pour un câble de section plus épaisse pour ce segment. La plupart des ampoules LED tolèrent une tension inférieure à 9-10 V, mais leur intensité diminue avec la chute de tension.
-
-
Ajuster l'orientation : Profitez de l'éclairage pour ajuster l'angle des luminaires (s'il s'agit de spots ou d'éclairages directionnels). Orientez-les de manière à mettre en valeur l'élément souhaité (arbre, façade, allée) et veillez à ne pas éblouir. Les éclairages d'allée éclairent généralement vers le bas ; veillez simplement à ce qu'ils soient droits et dégagés.
-
Vérification de la synchronisation : Si votre transformateur est équipé d'une minuterie ou de commandes intelligentes, configurez-les dès maintenant. Pour les minuteries mécaniques, réglez l'heure actuelle et les heures de marche/arrêt. Pour les cellules photoélectriques, couvrez-les pour simuler l'obscurité et voir si les lumières s'allument.
Quelle satisfaction de voir tout briller comme prévu ! Prenez le temps de vérifier que l'effet est bien celui souhaité. Il est plus facile d'apporter des modifications maintenant (déplacer un luminaire de quelques centimètres, ajouter une autre lumière, etc.) avant l'enterrement définitif. Si vous ajoutez une autre lumière, n'oubliez pas de calculer si la puissance du transformateur est toujours suffisante. Sinon, vous aurez peut-être besoin d'un transformateur plus puissant, de répartir la charge entre deux transformateurs ou d'installer des LED pour réduire la puissance.
7. Enterrez les câbles
Une fois l'emplacement et le fonctionnement satisfaisants, vous pouvez enterrer les câbles. Cette étape permettra de dissimuler et de protéger les câbles. Suivez ces conseils pour un enfouissement correct :
-
Profondeur de tranchée : Une profondeur d’environ 15 cm est généralement recommandée pour les câbles paysagers basse tension. Dans la plupart des juridictions, la profondeur d’enfouissement requise est minimale en raison de la basse tension (le code NEC recommande 15 cm pour les câbles d’éclairage paysager dans les jardins résidentiels). Un enfouissement plus profond (45 cm et plus) n’est requis que pour les lignes haute tension ou sous les allées, où une protection supplémentaire est nécessaire. Prévoyez donc une profondeur d’environ 15 cm dans le sol ou les massifs. Si vous travaillez souvent le sol ou creusez, un peu plus profond ne fera pas de mal.
-
Technique : Pour les pelouses en gazon, il suffit souvent de creuser une fente dans le gazon à l'aide d'une pelle plate, d'y enfoncer le câble et de tasser l'herbe. Inutile d'enlever de larges sections de gazon. Dans la terre ou le paillis, creusez une tranchée étroite avec une bêche ou une pelle à tranchée. Posez le câble et remblayer avec la terre en tassant légèrement. Retirez les pierres coupantes de la tranchée qui pourraient s'enfoncer dans le câble.
-
Traversée d'aménagements paysagers : Si vous n'avez pas installé de conduit sous un chemin, vous pouvez souvent insérer le câble dans une fissure ou le long du bord du chemin. Pour un chemin en béton coulé sans conduit, il est parfois possible de s'en sortir en insérant le câble dans l'espace de dilatation entre les dalles (à l'aide d'une lame plate). Sinon, il peut être nécessaire de contourner le chemin pour traverser une section plus fine (ou de faire appel à un professionnel pour la découpe d'une fente). Idéalement, prévoyez ces traversées avec conduit à l'avance, comme indiqué dans la planification.
-
Étiquette ou plan : Vous pourriez oublier avec le temps le cheminement exact des fils. Pensez à dessiner un croquis final de vos chemins de câbles et à le conserver avec votre transformateur ou votre tableau électrique. Vous pouvez également prendre des photos des tranchées avant de les recouvrir. Cela vous évitera de les déterrer par accident ou vous aidera à localiser une éventuelle rupture.
-
Laissez l'accès au connecteur : Les épissures de fils à proximité de chaque luminaire peuvent également être enterrées, mais il est conseillé de ne pas les enterrer trop profondément. Souvent, on place le connecteur à quelques centimètres sous terre, voire juste sous le paillis. Ainsi, vous pourrez le récupérer si vous devez remplacer un luminaire ou recâbler quelque chose. Si vous avez utilisé des serre-fils remplis de gel, ils sont étanches et peuvent donc être enfoncés dans le sol en toute sécurité. Certains installateurs choisissent de placer un petit boîtier ou un tube en plastique autour des épissures (en particulier aux emplacements de concentrateur comportant de nombreuses épissures) pour faciliter l'entretien, mais pour une connexion classique à un seul luminaire, ce n'est généralement pas nécessaire.
-
Nettoyage final : Replacez le gazon, le paillis ou les pierres qui ont été déplacés. Enroulez et attachez soigneusement tout fil supplémentaire au niveau du transformateur (évitez de laisser un gros enchevêtrement de fils au sol ; vous pouvez utiliser un serre-câble ou un crochet pour suspendre une bobine). Assurez-vous que tous les piquets des luminaires sont bien ancrés dans le sol et que les lumières sont droites.
8. Profitez de votre nouvel éclairage paysager
Une fois le câblage terminé et dissimulé, vous pouvez désormais profiter de l'ambiance de vos nouveaux éclairages paysagers . Votre espace extérieur devrait prendre un tout autre aspect le soir venu : des éclairages chaleureux pour les allées guident vos invités, des spots pour mettre en valeur les arbres ou des appliques murales pour souligner l'architecture de votre maison.
L'éclairage basse tension nécessite généralement très peu d'entretien. Cependant, gardez ces points à l'esprit lors de l'utilisation de votre système :
-
Remplacement des ampoules : Si vous utilisez des luminaires LED, leur durée de vie est longue. En revanche, si vous utilisez des ampoules halogènes, prévoyez de les changer tous les 1 à 2 ans. Remplacez toujours les ampoules par des ampoules de puissance et de type adaptés pour éviter de surcharger le système.
-
Vérification des connexions : C’est rare, mais si une lumière cesse de fonctionner, la première chose à vérifier est ses connecteurs. Il arrive qu’une connexion se desserre (surtout si elle n’est pas correctement serrée au départ ou si elle est perturbée par des animaux fouisseurs). Coupez l’alimentation, reconnectez et testez à nouveau. Les connecteurs étanches préservent généralement les connexions de la corrosion pendant longtemps.
-
État du câble : Inspectez régulièrement tout câble visible ou légèrement enfoui pour détecter tout dommage. Les causes courantes de dommages sont : une coupure accidentelle avec une pelle, des rongeurs qui le rongent ou des aérateurs de pelouse qui l’entaillent. Si vous trouvez une section endommagée, il est relativement facile de la réparer en y ajoutant un nouveau morceau de câble avec des connecteurs (comme pour ajouter un autre éclairage). En cas de dommages importants, le remplacement de ce segment de câble peut être plus propre.
-
Ajustements : Les plantes poussent ! Ce petit arbuste bien éclairé peut devenir un buisson envahissant qui obstrue l'éclairage d'un chemin. Préparez-vous à déplacer les luminaires ou à tailler l'aménagement paysager pour conserver l'effet souhaité. Heureusement, grâce au jeu et au câble flexible, déplacer un luminaire de quelques mètres ou en ajouter un nouveau ultérieurement est très simple.
-
Moderniser le transformateur pour l'agrandissement : Si vous décidez d'ajouter plus de lumières que votre transformateur ne peut en gérer, deux options s'offrent à vous : (1) remplacer le transformateur par un modèle plus puissant (par exemple, passer d'un transformateur de 100 W à un transformateur de 300 W), ou (2) ajouter un second transformateur pour alimenter les nouvelles lumières sur un circuit séparé. La méthode dépend de la configuration de votre jardin et de l'accès aux prises. Il est souvent plus simple de moderniser le transformateur ; il est donc judicieux d'en acheter un un peu plus grand que nécessaire initialement si vous prévoyez des agrandissements.
Pour des conseils ou des idées supplémentaires, de nombreuses ressources et vidéos sont disponibles. Par exemple, la chaîne YouTube de Haven Lighting propose une vidéo « Comment câbler facilement des éclairages paysagers » qui illustre le processus d'installation dans un jardin réel (recherchez ce titre sur YouTube ou consultez le lien ci-dessous). The Lighting Doctor propose également une excellente vidéo pour débutants sur l'installation d'éclairages paysagers basse tension, avec des conseils de câblage et d'agencement. Ces guides visuels peuvent compléter ce que vous avez appris ici :
N'hésitez pas à les consulter si vous souhaitez voir le processus en action.
Pleins feux sur le produit : câbles paysagers basse tension Haisstronica
Lorsqu'il s'agit de choisir le meilleur fil pour votre éclairage extérieur, la qualité est primordiale. Un câble bon marché ou de qualité inférieure peut entraîner de mauvaises performances (chute de tension excessive, surchauffe) ou une défaillance prématurée (fissuration de l'isolant, corrosion). Haisstronica est spécialisé dans les connecteurs et fils électriques de haute qualité et propose une gamme de fils basse tension pour l'aménagement paysager , idéale pour les particuliers en quête de fiabilité. Voici pourquoi les fils d'aménagement paysager Haisstronica sont un excellent choix pour votre projet :
-
Conducteurs en cuivre pur : Tous les câbles d'éclairage paysager Haisstronica sont composés à 100 % de brins de cuivre nu pur, et non d'aluminium cuivré (CCA). Le cuivre pur offre une conductivité supérieure et une résistance inférieure à celle du CCA, ce qui se traduit par une chute de tension moindre et une capacité de transport de courant plus importante en toute sécurité. Il est également plus durable : les fils en cuivre pur se cassent moins facilement à l'installation et sont plus résistants à la fatigue. Bien que les fils CCA soient des fils d'éclairage paysager 12/2 bon marché , ils peuvent chauffer davantage et atténuer l'intensité lumineuse. L'engagement de Haisstronica à utiliser du cuivre de haute qualité vous garantit un fil d'éclairage paysager basse tension 12/2 de haute qualité, digne de votre système d'éclairage.
-
Isolation pour enfouissement direct : L'isolation de ces câbles est en PVC épais et résistant aux UV, conçu pour une utilisation souterraine. Elle résiste à l'humidité, au rayonnement solaire et aux températures extrêmes. De plus, le câble est homologué UL et testé pour sa durabilité en extérieur, notamment en termes de résistance aux flammes VW-1 et de normes environnementales RoHS. Vous pouvez l'enfouir en toute confiance, sachant qu'il ne se détériorera ni ne se fissurera avec le temps. La gaine isolante est également flexible, ce qui facilite le dénudage et le passage autour des éléments du jardin. Que vous ayez besoin d'un câble pour enfouissement direct 14/2 ou de toute autre section, les câbles Haisstronica sont conçus pour l'utiliser.
-
Plusieurs calibres et longueurs : Haisstronica propose des fils électriques pour l'aménagement paysager dans toutes les tailles courantes : 16/2, 14/2, 12/2 et 10/2 AWG, chacun disponible en différentes longueurs. Vous trouverez ainsi exactement ce qui convient à votre projet. Par exemple :
-
Si vous avez besoin d'une grande longueur pour un grand jardin, la bobine de fil 14/2 de 152 m offre une longueur suffisante (et souvent un meilleur prix au pied pour le gros volume) – voir le fil basse tension 14/2 de 152 m . Des fils 14/2 de 76 m et 61 m sont également disponibles pour les travaux de taille moyenne.
-
Pour les applications intensives, nous proposons du fil d'éclairage paysager 10/2 de 30,5 m et plus. Un rouleau de fil 10/2 de 76,7 m permet de réaliser des travaux extrêmement longs tout en conservant une luminosité optimale.
-
Le fil d'aménagement paysager 12/2 est souvent utilisé par défaut. Le fil Haisstronica de calibre 12 AWG est disponible en bobines pratiques de 30 mètres pour les petites installations, et jusqu'à 76 ou 152 mètres pour les installations plus importantes. En comparaison, vous constaterez qu'il s'agit de l'un des meilleurs fils d'aménagement paysager basse tension 12/2 du marché en termes de qualité de fabrication.
-
Même le fil 16/2 plus fin est disponible pour les besoins plus simples ou pour éclairer un chemin court de manière économique.
-
-
Facile à utiliser : La conception flexible et l'isolation lisse du câble facilitent la préparation des fils lors de l'installation. Vous pouvez facilement séparer les deux conducteurs en dénudant l'isolant sans risque de tassement ni d'effilochage du cuivre. C'est le signe d'un câble de qualité qui ne vous gênera pas lors de la connexion de votre système.
-
Nombre élevé de brins : Les conducteurs sont toronnés (contrairement aux conducteurs monobrins). Par exemple, le calibre 14 AWG comporte 41 brins de cuivre et le calibre 10 AWG 65 (comme illustré sur les images du produit). Un nombre élevé de brins pour un fil toronné augmente la flexibilité. Vous pouvez facilement plier et acheminer le câble autour des massifs de fleurs ou des arbres, et cela permet également un meilleur contact lors du sertissage ou du serrage, car le fil épouse la forme du fil. Le cuivre pur à nombre élevé de brins assure également une conductivité élevée pour un transfert de puissance efficace.
-
Certification de sécurité : Tous les produits sont certifiés UL et répondent aux normes de sécurité en vigueur, ce qui signifie que leurs performances électriques ont été testées en toute sécurité. Ils sont également conformes à la réglementation environnementale (RoHS), ce qui signifie qu'aucune substance dangereuse n'est présente dans l'isolation. La sécurité est primordiale, et utiliser un produit certifié vous assure d'installer un système d'éclairage sûr. .
-
Garantie et assistance : Haisstronica garantit ses produits avec des garanties solides (comme indiqué, ses câbles bénéficient souvent de garanties prolongées). L'entreprise propose également un service client pour toute question. En tant qu'entreprise spécialisée dans les solutions de câblage électrique, elle comprend les besoins des installateurs amateurs comme des professionnels.
En bref, si vous cherchez à acheter du fil électrique paysager basse tension 12/2 ou de toute autre taille, choisir un fournisseur de fils électriques paysagers réputé comme Haisstronica est un choix judicieux. Le léger investissement supplémentaire dans un fil extérieur de haute qualité sera rentable en termes de performance et de longévité. Vous ne voudriez pas avoir à déterrer et recâbler votre jardin parce qu'un fil bon marché a rouillé ou est tombé en panne quelques années plus tard. Les fils Haisstronica sont également proposés à des prix compétitifs, vous permettant souvent de bénéficier de réductions sur les fils paysagers basse tension 12/2 lors des soldes (surveillez leurs soldes de printemps ou leurs promotions de fin d'année pour profiter d'un bon prix ). Ils proposent également des remises quantitatives, permettant aux entrepreneurs ou aux projets d'envergure de bénéficier de meilleurs prix au mètre carré grâce aux commandes groupées.
Vous pouvez découvrir la gamme complète de câbles d'éclairage paysager Haisstronica sur leur site web, dans la section « Collection de câbles d'éclairage paysager » . Que vous ayez besoin d'un petit rouleau de 30 mètres pour un projet DIY du week-end ou d'un câble d'éclairage extérieur 12/2 en gros pour une installation de grande envergure, ils sont là pour vous. La page de la collection présente également tous les produits d'éclairage extérieur 14/2 et les câbles d'éclairage paysager basse tension 12/2 disponibles, ainsi que leurs spécifications et les avis clients. Le site est convivial et vous permet de comparer facilement les câbles 12/2 et 14/2 ou de poser vos questions si besoin.
Haisstronica propose également une variété de connecteurs. Le câblage des éclairages paysagers nécessitant souvent des épissures sécurisées, n'hésitez pas à consulter leurs connecteurs bout à bout thermorétractables ou autres connecteurs de câbles extérieurs . Ils sont réputés pour la qualité de leurs connecteurs, garantissant une étanchéité parfaite. L'utilisation de connecteurs et de câbles Haisstronica adaptés garantit un système fiable de bout en bout.
Foire aux questions (FAQ)
Q : Combien d’éclairages paysagers puis-je connecter sur un seul câble ?
R : Cela dépend du calibre du fil et de la puissance de vos luminaires. L'essentiel est de ne pas dépasser l'intensité du fil ni celle du transformateur. Par exemple, un fil d'aménagement paysager 12/2 peut supporter environ 20 ampères (soit 240 watts à 12 V), mais vous ne le chargeriez pas à 20 A. En pratique, avec des LED de 4 watts chacune en moyenne, même 20 luminaires ne consomment qu'environ 80 W, ce qui est suffisant sur une longueur moyenne de 12 AWG. Pour des raisons de chute de tension, si vous avez plus de 15 luminaires, vous pouvez les diviser en deux sections pour réduire la longueur de chaque section. Calculez toujours la puissance totale et laissez une marge (utilisez au maximum 80 % de la capacité du transformateur et du câble). C'est souvent la luminosité qui est un facteur limitant : trop de luminaires en série à grande distance peuvent devenir faibles ; diviser la section permet donc d'obtenir une luminosité plus uniforme.
Q : Quelle est la différence entre un fil 12/2 et 12/3 ?
R : Un câble 12/3 comporte trois conducteurs, tandis qu'un câble 12/2 en comporte deux. Pour l'éclairage paysager, deux conducteurs seulement (positif et négatif/commun) sont nécessaires, d'où l'utilisation d'un câble 12/2. Un câble 12/3 peut être utilisé dans d'autres applications (par exemple, pour faire fonctionner deux circuits ou un circuit avec neutre et terre dans une maison). Pour les aménagements paysagers basse tension, privilégiez le câble à deux conducteurs. Le conducteur supplémentaire du 12/3 n'est pas nécessaire pour les systèmes 12 V standard. .
Q : Dois-je placer les fils d’aménagement paysager dans un conduit ?
R : Non , pas pour les installations de jardin typiques – le fil d’éclairage paysager basse tension est conçu pour un enfouissement direct , ce qui signifie qu’il peut être placé dans le sol sans conduit L'isolant est conçu pour le contact avec la terre et l'humidité. En fait, la plupart des normes n'exigent pas de conduit pour les câbles ≤ 30 V, sauf circonstances exceptionnelles. Cependant, vous pouvez parfois choisir d'utiliser un conduit : pour la protection physique sous les allées ou les aménagements paysagers, ou pour faire passer des câbles le long d'une structure (afin de les protéger des dommages). Conseil de professionnels : il est judicieux de placer un manchon ou un conduit en PVC de rechange sous tout nouvel ouvrage en béton (comme une dalle ou une allée) afin de pouvoir remplacer ou ajouter des câbles ultérieurement. . Mais dans une cour ou un jardin ouvert, n'hésitez pas à enterrer le câble à enfouissement direct directement dans le sol.
Q : À quelle profondeur dois-je enterrer le câble ?
R : Une profondeur d'environ 15 cm est généralement recommandée dans la plupart des endroits. Cette profondeur est suffisante pour protéger le câble des activités extérieures (comme le ratissage ou les griffures d'un chien). À 15 cm ou plus, vous êtes généralement sous le niveau des racines de l'herbe, ce qui réduit le risque de déterrage. Si vous passez sous une pelouse, une profondeur de 15 cm permet d'aérer la pelouse sans toucher le câble (la plupart des aérateurs à noyau ont une profondeur de 5 à 7,6 cm). Certains installateurs n'enfouissent que 7,6 à 10 cm dans les zones de paillage, mais une profondeur plus importante est préférable si possible. Consultez toujours les réglementations locales, mais le tableau 300.5 du code NEC prévoit une couverture de 15 cm pour les câbles d'aménagement paysager basse tension résidentiels, et plus (45 à 60 cm) pour les allées ou les zones de circulation de véhicules commerciaux. .
Q : Puis-je connecter des fils de calibres différents ensemble ?
R : Oui, vous pouvez connecter, par exemple, une ligne principale de calibre 12 AWG à une dérivation de calibre 14 AWG menant à un luminaire, mais vous devez utiliser un connecteur qui s'adapte parfaitement aux deux et qui soit bien fixé. Assurez-vous que le plus petit calibre soit toujours adapté à la charge de ce segment. Ne dépassez jamais l'intensité du plus petit fil. Il est généralement plus simple de rester cohérent, mais si vous mélangez les calibres (par exemple, en utilisant un câble court de calibre 16 AWG fourni avec un luminaire pour le connecter à votre câble de calibre 12 AWG), c'est tout à fait normal : les câbles du luminaire sont souvent de calibre plus petit. L'essentiel est que le courant total sur ce petit câble corresponde uniquement au courant du luminaire, ce qui est faible. Évitez simplement de faire fonctionner dix luminaires sur une petite chaîne de calibre 18 AWG, au risque de rencontrer des problèmes.
Q : Mes lumières sont faibles ou certaines sont plus lumineuses que d’autres. Qu’ai-je fait de mal ?
R : Cela ressemble à un problème de chute de tension ou de surcharge. Vérifiez la puissance totale et la longueur du câble ; vous essayez peut-être de faire passer trop de courant dans un fil long et fin. Les solutions incluent : raccourcir le trajet (rapprocher le transformateur ou le diviser en deux), utiliser un fil de section plus épaisse ou, si possible, utiliser une prise de tension plus élevée (par exemple, passer de 12 V à 15 V pour ce trajet, ce qui augmentera légèrement la tension des lumières éloignées). Assurez-vous également que toutes les connexions sont solides ; une épissure desserrée ou corrodée peut créer une résistance et atténuer la tension de cette branche. Pour un éclairage uniforme, essayez d'équilibrer la charge afin qu'un seul trajet ne soit pas chargé de tout. Par exemple, au lieu d'un trajet de 12 lumières et un autre de 2 lumières, réalisez deux trajets de 7 lumières chacun si possible. Cela équilibre la chute de tension. Les ampoules LED tolèrent mieux les chutes de tension que les anciennes ampoules à incandescence, mais leur intensité diminue si la tension chute trop.
Q : Puis-je utiliser du ruban électrique ordinaire pour imperméabiliser les connexions ?
R : Le ruban isolant classique n'est pas une solution d'étanchéité fiable à lui seul. Avec le temps, l'adhésif peut se détériorer et l'eau peut s'infiltrer. Vous pouvez utiliser du ruban adhésif comme couche extérieure supplémentaire, mais l'étanchéité principale doit provenir d'un connecteur approprié (écrou rempli de gel, gaine thermorétractable, etc.). En cas de besoin, un ruban silicone auto-fusionnant (qui s'étire et se fusionne sur lui-même) peut assurer une étanchéité correcte autour d'une épissure, meilleure que le ruban vinyle. Mais idéalement, choisissez les bons connecteurs ; cela vous évitera des soucis plus tard. Les connecteurs étanches sont peu coûteux et spécialement conçus à cet effet.
Q : Est-il possible de laisser le câble supplémentaire enroulé ?
R : Oui, laisser une petite bobine de câble supplémentaire (parfois appelée « boucle de branchement ») à certains endroits est acceptable. Cela n'entraîne aucun dommage, hormis une résistance supplémentaire négligeable. Évitez simplement de laisser, par exemple, 30 mètres de câble enroulé inutilisé ; ce serait du gaspillage et affecterait légèrement la tension. Quelques mètres ici et là sont toutefois une bonne pratique. Enroulez-le soigneusement et enterrez-le. Ainsi, si vous devez déplacer un appareil ou réparer une coupure dans le câble, vous aurez du mou pour le faire. Si vous avez beaucoup de surplus suite à l'achat d'un grand rouleau, il est préférable de le couper à la longueur souhaitée plutôt que d'enterrer une énorme bobine.
Q : Puis-je ajouter un variateur ou utiliser des commandes intelligentes sur des lumières basse tension ?
R : Les transformateurs basse tension traditionnels ne permettent souvent pas de régler l'intensité lumineuse (et les luminaires LED peuvent ne pas bien s'adapter à une réduction de tension). Cependant, il existe des transformateurs et des contrôleurs intelligents qui s'intègrent aux systèmes (par exemple, les transformateurs Wi-Fi ou Bluetooth qui permettent de programmer et de régler l'intensité lumineuse). Certains systèmes d'éclairage paysager LED récents (comme Haven Lighting ou d'autres) intègrent un contrôle intelligent par luminaire. Pour un contrôle par zone simple, vous pouvez installer un variateur enfichable avant le transformateur, côté 120 V, mais il doit être compatible avec les transformateurs magnétiques (si votre transformateur est à bobine magnétique). Vous pouvez également envisager de remplacer le transformateur par un transformateur intelligent ou d'utiliser des ampoules connectées si elles sont disponibles pour votre type de luminaire. Vérifiez toujours la compatibilité, car toutes les LED ne sont pas gradables dans les installations basse tension.

Conclusion
Le câblage d'éclairage paysager est un projet qui, avec un peu d'effort, donne de magnifiques résultats dont vous pourrez profiter chaque soir. En comprenant comment choisir le bon câble d'éclairage paysager et en suivant les meilleures pratiques d'installation, même un bricoleur novice peut mettre en place un système d'éclairage sûr et efficace. Nous avons expliqué comment planifier votre plan d'éclairage, choisir le calibre de fil approprié (par exemple, 12/2 ou 14/2), réaliser des connexions étanches et éviter les pièges courants comme les chutes de tension. Grâce à des matériaux de qualité, comme le câble paysager basse tension en cuivre pur de Haisstronica, votre installation est conçue pour durer.
Désormais, vos allées s'illuminent doucement, vos arbres brillent d'un éclairage spectaculaire et votre terrasse se transforme en un havre de paix nocturne. Non seulement cela améliore l'attrait extérieur, mais cela renforce aussi la sécurité en éclairant les marches et en dissuadant les intrus. Et vous avez tout fait vous-même !
En admirant votre travail, n'oubliez pas que Haisstronica est là pour répondre à vos besoins futurs, qu'il s'agisse de connecteurs supplémentaires, de câbles paysagers 12/2 supplémentaires pour une extension, ou même de conseils (ils partagent souvent des tutoriels et des astuces sur leur blog). Continuez à expérimenter avec les effets lumineux et profitez de la nouvelle ambiance de votre espace extérieur. Le câblage des éclairages paysagers est plus facile que jamais grâce aux systèmes basse tension modernes ; et grâce à ces connaissances, vous pouvez également aider vos amis ou voisins à égayer leur jardin après la tombée de la nuit.
Bon éclairage !