Dénuder un fil peut paraître simple, mais utiliser la bonne technique et le bon outil est crucial pour la sécurité et la qualité. Si vous avez déjà essayé de dénuder un fil avec un canif ou un outil bon marché, vous savez combien il est facile d'entailler le conducteur métallique ou de se blesser. La meilleure façon de dénuder un fil est d'utiliser une pince à dénuder adaptée à cette tâche. Dans ce guide détaillé, nous expliquerons pourquoi les pinces à dénuder sont la solution idéale, comparerons différentes méthodes (des couteaux classiques aux appareils automatiques sophistiqués) et vous montrerons comment dénuder des fils proprement comme un pro. À la fin, vous comprendrez comment un bon outil à dénuder peut vous faire gagner du temps et vous éviter des frustrations, et même quelles sont les caractéristiques à rechercher pour l' outil de dénudage le plus adapté à vos besoins.
Nous avons effectué des recherches approfondies pour vous, incluant les avis d'électriciens et d'experts en outils. Vous y trouverez des conseils pour éviter les erreurs courantes (comme entailler des fils ou laisser trop d'isolant), des recommandations pour les outils de dénudage automatique des câbles et des conseils pour des tâches spécifiques (comme les pinces à dénuder pour les projets automobiles ou les pinces à dénuder de précision pour l'électronique). Nous avons également inclus quelques liens vidéo et images YouTube pertinents pour illustrer les points clés. Que vous soyez bricoleur, technicien automobile ou électricien professionnel, ce guide vous aidera à dénuder vos fils efficacement et en toute sécurité , la meilleure méthode .
Pourquoi un dénudage correct des fils est important
Dénuder un fil consiste à retirer l'isolant protecteur pour exposer le conducteur métallique situé en dessous, afin de pouvoir le connecter (par soudure, sertissage, etc.). Une bonne exécution de cette opération est essentielle pour plusieurs raisons :
-
Sécurité : Endommager le conducteur peut entraîner des points chauds, une résistance électrique, voire un incendie. Utiliser l’outil et la technique appropriés permet d’éviter d’entailler ou de couper l’âme métallique du fil. Comme le souligne un expert en électricité, il est conseillé d ’« utiliser l’outil adapté à la tâche, comme un outil à dénuder de bonne qualité (ou un couteau pour les conducteurs plus gros), et de veiller à ne pas entailler ou endommager le fil » . Une entaille dans le cuivre crée un point faible qui peut se rompre ou surchauffer sous charge. .
-
Connexions fiables : Des fils bien dénudés garantissent des connexions électriques sûres. Si vous laissez des morceaux d'isolant effilochés ou si vous coupez accidentellement des brins, la connexion (que ce soit sous une borne à vis ou à l'intérieur d'un connecteur à sertir) sera plus fragile. De nombreux problèmes électriques sont ensuite dus à des fils mal dénudés ou à des brins cassés. Un dénudage correct garantit l'intégrité du conducteur pour une conductivité maximale.
-
Rapidité et efficacité : Utiliser le bon outil à dénuder peut considérablement accélérer le travail. Bien qu'il soit possible de dénuder des fils avec un couteau ou d'autres méthodes improvisées, c'est loin d'être optimal. En fait, « utiliser une bonne pince à dénuder est environ huit fois plus rapide et plus sûr pour les fils » qu'avec un couteau. Si vous avez plusieurs fils à dénuder, une bonne pince à dénuder vous fera gagner un temps précieux.
-
Prévention des dommages : Des débris d'isolant ou des rayures sur le fil peuvent également affecter l'ajustement des connecteurs ou des gaines thermorétractables. Un dénudage correct permet une coupe nette sur l'isolant. Par exemple, les outils de dénudage thermique (voir plus loin) permettent de réaliser des coupes très nettes sur l'isolant sans force mécanique, éliminant ainsi les entailles.
En résumé, dénuder les câbles correctement garantit la sécurité et le professionnalisme de votre projet électrique. Comparons maintenant les méthodes et outils courants pour dénuder les fils afin de déterminer lequel est le plus efficace.

Méthodes courantes pour dénuder les fils
Il existe plusieurs façons de dénuder les fils, des méthodes rudimentaires aux machines spécialisées. Passons en revue les méthodes les plus courantes et évaluons leurs avantages et inconvénients :
Dénuder un fil avec un couteau ou une lame (méthode à l'ancienne)
Avant la généralisation des outils dédiés, beaucoup de gens dénudaient les fils avec un cutter, une lame de rasoir, voire leurs dents (non recommandé !). Le principe est de découper l'isolant autour du fil, puis de le retirer. Par exemple, on peut découper légèrement l'isolant en anneau autour du fil, puis plier le fil jusqu'à ce que l'isolant se rompe au niveau de la découpe, puis le retirer. Cela peut fonctionner pour un travail rapide, mais cela nécessite des compétences.
Inconvénients : L'utilisation d'un couteau exige une grande sûreté de main. Il est facile de couper trop profondément et d'entailler le fil , ou pas assez profondément et d'avoir du mal à retirer l'isolant. Une entaille, même légère, crée un point faible qui peut se rompre en cas de pliage du fil ou augmenter la résistance et la chaleur. De plus, l'utilisation d'un couteau est plus lente – comme indiqué, bien plus lente qu'avec une pince à dénuder classique. Le risque de se couper ou de couper l'isolant du fil de manière irrégulière est également élevé.
Quand l'utiliser : En général, l'utilisation d'un couteau n'est pas recommandée, sauf en cas de besoin urgent ou pour les câbles très gros, pour lesquels les dénudeurs standards ne conviennent pas. Par exemple, certains électriciens utilisent un couteau pour les câbles de gros calibre (câbles de batterie, gros fils de service), nécessitant une pince à dénuder ou une coupe-câbles spécialisée. Même dans ce cas, il faut être extrêmement prudent. En résumé : un couteau peut dénuder des fils, mais ce n'est pas la méthode la plus efficace ni la plus sûre dans la plupart des situations.
(Pour une démonstration visuelle des risques liés à l'utilisation d'un couteau, consultez la vidéo YouTube « Proper Technique for Stripping Wire or Cable: Never Nick the Wire », qui montre comment un fil entaillé peut se casser facilement. La vidéo souligne l'importance d'utiliser un trou de calibre correct sur une pince à dénuder pour éviter tout dommage.)
Utilisation de pinces à dénuder manuelles (outils de dénudage portatifs de base)
Un outil à dénuder manuel classique doté de plusieurs encoches de calibre. Chaque trou correspond à un calibre de fil spécifique et, lorsqu'il est utilisé correctement, ne coupe que l'isolant.
La pince à dénuder la plus courante est un petit outil portatif ressemblant à une pince ou à des ciseaux. Elle est généralement dotée d'une série d'encoches de différentes tailles pour différents calibres de fil. Pour l'utiliser, insérez le fil dans l'encoche correspondant à son calibre, pressez les poignées pour que les tranchants entaillent l'isolant, puis retirez l'extrémité coupée. L'encoche doit être de la taille idéale pour couper autour de l'isolant sans couper le conducteur métallique.
Il existe plusieurs styles de décapants manuels :
-
Pinces à dénuder de type américain : elles sont dotées de plusieurs trous de taille fixe pour des calibres spécifiques (par exemple, 10 AWG, 12 AWG, 14 AWG, etc.). Elles sont faciles à utiliser si vous connaissez le calibre de votre fil. Les électriciens utilisent souvent ce type de pince de base ; c'est un outil indispensable pour les projets de câblage domestique.
-
Dénudeurs réglables de style européen : Certains dénudeurs manuels sont dotés d'un mécanisme à vis réglable au lieu de plusieurs trous fixes. Le réglage de la vis en fonction de la section du fil ou de l'épaisseur de l'isolant détermine ensuite la distance de fermeture des lames. Ce type de dénudeur est ainsi réglable pour différentes tailles de fil , mais il faut le réajuster lors du changement de section.
Avantages : Les dénudeurs manuels sont économiques, légers et efficaces. Utilisés correctement, ils offrent une bonne précision , chaque encoche étant dimensionnée pour un calibre spécifique. Ils intègrent souvent des fonctions supplémentaires, comme un coupe-fil et un coupe-vis, ce qui les rend indispensables aux dénudeurs et coupe-fils multifonctions. Autre avantage : la simplicité ; les risques de pannes mécaniques sont minimes.
Inconvénients : L’utilisateur doit choisir l’encoche adaptée au calibre du fil. Une encoche trop petite risque de couper le conducteur. Une encoche trop grande ne coupera pas l’isolant. De plus, le dénudage peut être un peu plus lent avec ces outils si vous avez plusieurs fils de différentes sections, car il faut trouver le bon trou à chaque fois. Enfin, ils peuvent ne pas fonctionner correctement si vous ne connaissez pas le calibre du fil ou si l’épaisseur de l’isolant n’est pas standard (par exemple, certains fils ont une isolation plus épaisse pour un même calibre, ce qui peut rendre le dénudage difficile dans une encoche fixe).
Utilisations recommandées : Les pinces à dénuder manuelles à encoche sont idéales pour les travaux électriques généraux, notamment pour les applications domestiques ou commerciales légères, où l’on travaille avec des fils de section courante. De nombreuses pinces à dénuder pour électriciens sont de ce type. Elles sont particulièrement efficaces lorsque l’on a plusieurs fils de même section à dénuder : on prend le rythme avec l’encoche appropriée et on travaille rapidement. Veillez simplement à utiliser le bon trou et à éviter de trop tordre, pour un dénudage impeccable à chaque fois. Inspectez toujours le conducteur exposé après le dénudage ; il doit être lisse et sans entaille. Si vous constatez des coupures dans le cuivre, coupez la section et réessayez, car un conducteur entaillé peut se rompre ou se transformer en fusible (un fil fortement entaillé a une section réduite, ce qui peut entraîner un échauffement sous charge).

Utilisation de pinces à dénuder automatiques (outils à réglage automatique)
Exemple de dénudeur de fils automatique à réglage automatique. Ces outils saisissent le fil d'une mâchoire tandis que l'autre dénude l'isolant, le tout en une seule pression. Ils s'adaptent automatiquement à la taille du fil, ce qui en fait un outil de dénudage universel pour une large gamme de calibres de fil.
Les pinces à dénuder automatiques sont souvent considérées comme la meilleure solution pour dénuder les fils , car elles sont rapides et faciles à utiliser. Ces outils sont parfois appelés pinces à dénuder auto-ajustables , car elles permettent de dénuder des fils de différentes tailles sans avoir à se soucier de sélectionner des encoches ou des réglages pour chaque fil.
Fonctionnement : Une pince à dénuder automatique classique possède un mécanisme à mâchoires en deux parties. Lorsque vous serrez les poignées, un côté de la mâchoire saisit fermement le fil sur l'isolant, tandis que l'autre côté referme une lame autour de l'isolant et le retire. Cela se fait en un seul mouvement : saisir, couper et dénuder. Les bonnes pinces à dénuder automatiques retirent l'isolant proprement, puis s'arrêtent, sans entraîner le fil dénudé. Il n'est pas nécessaire de connaître le calibre exact (dans la plage de mesure de l'outil) : il suffit d'insérer le fil et de serrer.
Les pinces à dénuder automatiques existent en plusieurs modèles, mais un modèle courant (comme celui illustré ci-dessus) possède des mâchoires en forme de bec. De nombreux modèles sont également dotés d'une molette de réglage permettant d'ajuster la tension ou la profondeur de coupe si nécessaire, et intègrent souvent un coupe-fil intégré et parfois une section de sertissage pour les cosses, ce qui en fait des pinces à dénuder et à sertir polyvalentes.
Avantages : Leur principal avantage est leur praticité. Les dénudeurs automatiques sont globalement les plus faciles à utiliser , surtout pour les débutants ou pour dénuder de nombreux fils de différentes sections. Inutile de régler un calibre précis ; l'outil s'ajuste automatiquement à l'épaisseur de chaque fil. Cela accélère considérablement le travail : il suffit d'avancer et de serrer à plusieurs reprises. Ils réduisent également les erreurs ; le risque de coupure est bien moindre, car le mécanisme est conçu pour couper uniquement l'isolant. Ils fonctionnent aussi bien sur les fils pleins que sur les fils multibrins. Si vous avez un projet mixte (par exemple, le câblage d'un autoradio avec des fils d'enceintes de calibre 22 AWG et des fils d'alimentation de calibre 12 AWG), un dénudeur auto-ajustable gère tout sans problème. C'est un outil de dénudage universel pour la gamme de câbles prise en charge.
Inconvénients : Les dénudeurs automatiques peuvent être un peu plus chers que les simples dénudeurs manuels (bien que leur prix reste abordable, généralement entre 15 et 30 $ pour un bon modèle). Ils sont également plus encombrants, ce qui peut compliquer le dénudage des fils dans des espaces très restreints, comme à l'intérieur d'un coffret électrique rempli de fils. Les fils très fins (plus fins que la plage de l'outil, par exemple 30 AWG ou moins) risquent de ne pas bien se dénuder, car l'outil risque de ne pas les saisir fermement. À l'inverse, les câbles très épais, dépassant la capacité de l'outil, ne passeront pas non plus ; dans ce cas, vous pourriez avoir besoin d'une dénudeuse robuste ou d'une autre approche. Certains utilisateurs constatent que les dénudeurs automatiques peuvent parfois tirer légèrement sur les extrémités de fils très courts ou très souples. Un peu de pratique permet donc de positionner correctement le fil. Globalement, ces inconvénients sont mineurs comparés aux avantages pour la plupart des tâches.
Utilisations optimales : Les pinces à dénuder automatiques ou auto-ajustables sont idéales pour les travaux d'électricité générale, le prototypage électronique, la réparation d'appareils électroménagers, le câblage automobile – bref, pour pratiquement tous les scénarios impliquant des fils de différentes tailles. Par exemple, dans le secteur automobile, vous pouvez dénuder des fils de tous types, des fils de capteurs de petit calibre aux fils d'allumage ou d'éclairage de calibre moyen. Une pince à dénuder automobile de qualité, auto-ajustable, vous permettra de réaliser toutes ces opérations sans changer d'outil. Elles sont également idéales dans un atelier personnel pour éviter de vérifier constamment les calibres. De nombreux professionnels disposent d'une pince à dénuder automatique pour plus d'efficacité, même s'ils possèdent également une pince manuelle pour certaines tâches de précision.

Un exemple très apprécié est la pince à dénuder auto-ajustable Haisstronica (capacité AWG 10-24). Cet outil couvre les sections de fil allant d'environ 24 AWG (0,2 mm²) à 10 AWG (6 mm²), couvrant ainsi la plupart des besoins de câblage courants. Il s'adapte automatiquement à chaque fil et comprend également une pince coupante et une pince à sertir, ce qui en fait un outil de dénudage 3-en-1. Les utilisateurs apprécient l' absence de manipulations ni de réglages manuels : il suffit d'insérer le fil et de presser. Grâce à son auto-ajustable, il est à la fois un outil de précision pour les fils fins et une pince à dénuder robuste pour les fils moyens. Sa qualité de fabrication (lames en acier allié traité thermiquement) lui assure un tranchant et une durabilité optimaux. Des outils comme celui-ci démontrent pourquoi les dénudeurs automatiques sont souvent considérés comme le meilleur moyen de dénuder rapidement les fils tout en protégeant le conducteur.
Autres outils de dénudage de fils spécialisés (thermique, laser, etc.)
Pour la plupart des gens, une pince à dénuder portative (manuelle ou automatique) suffit. Cependant, il existe des outils et des machines spécialisés pour dénuder les fils, utilisés dans des situations spécifiques :
-
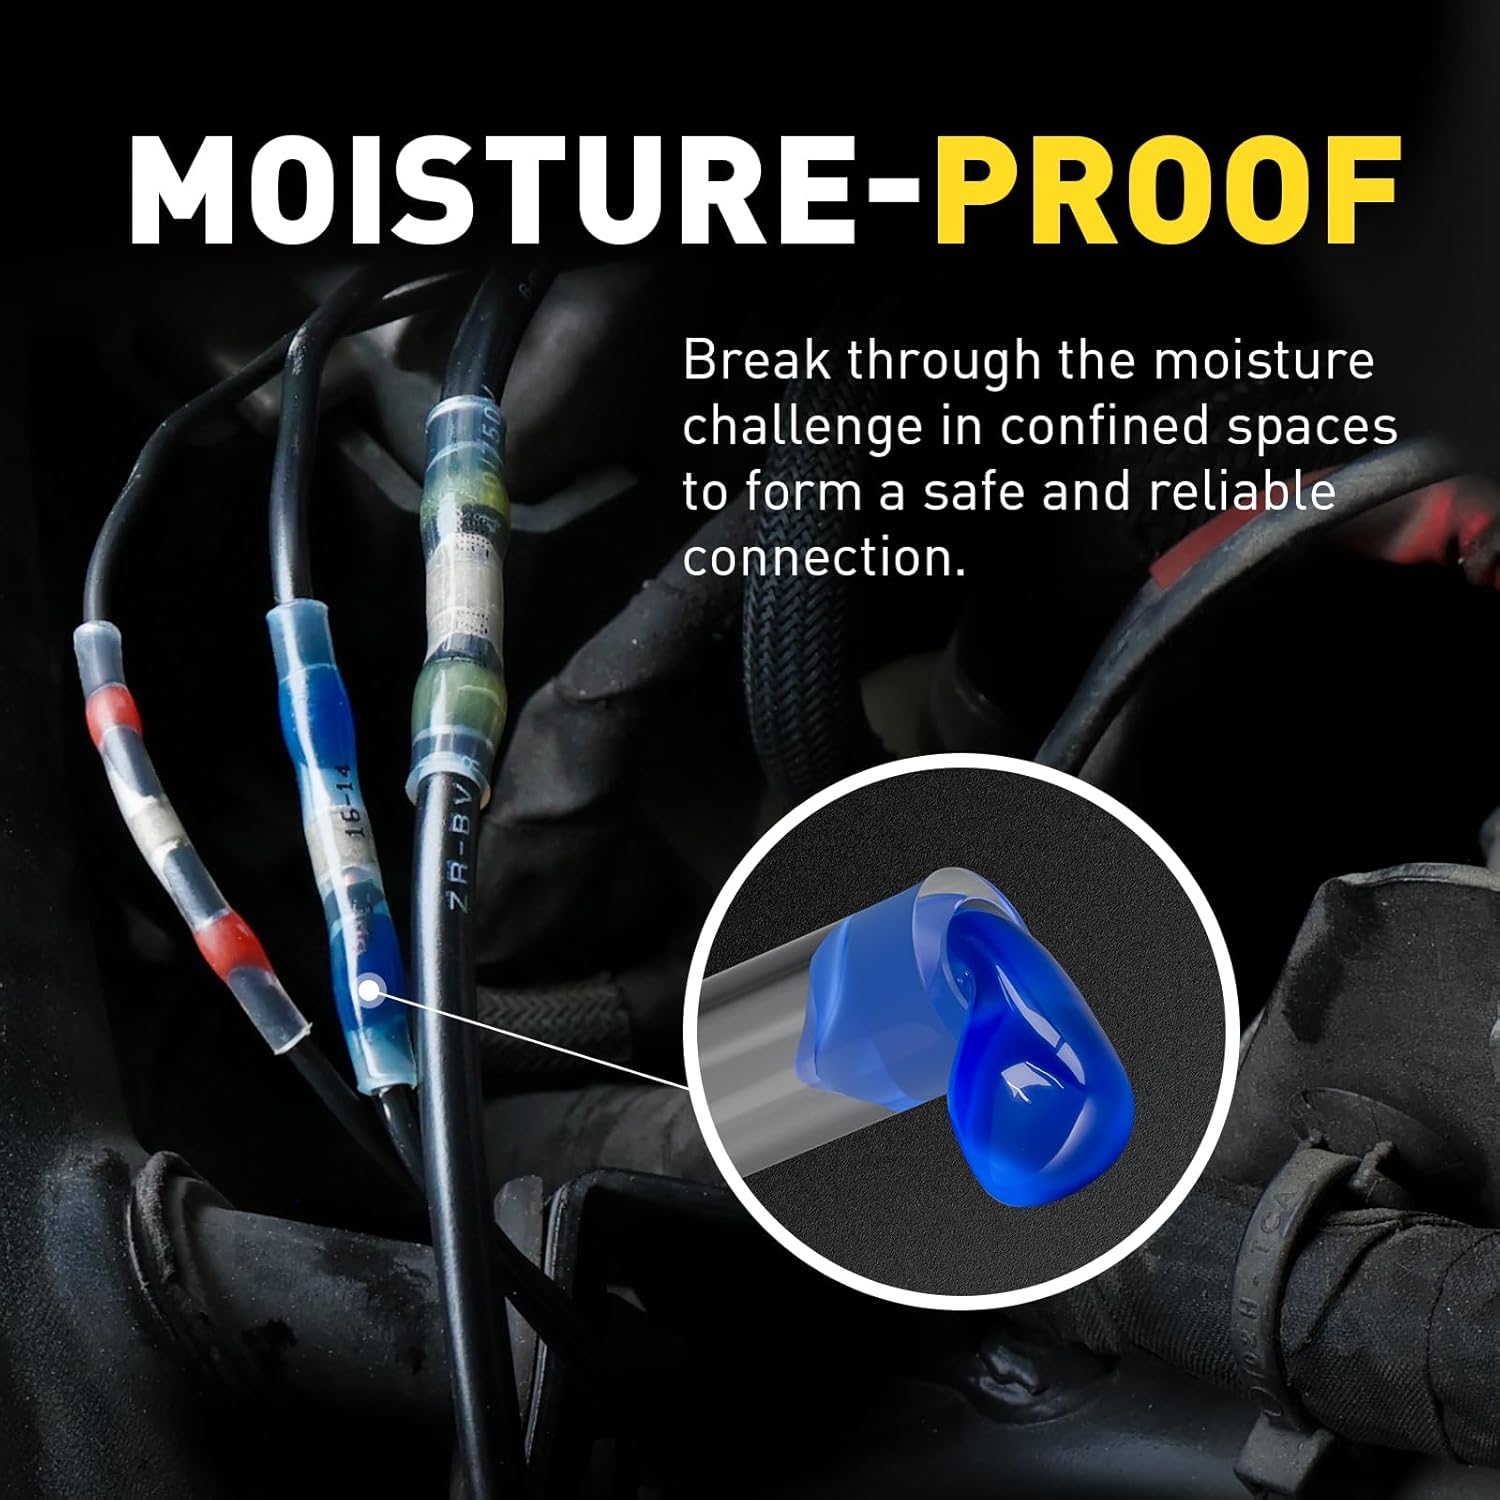
Pinces à dénuder thermiques (à fil chaud) : Elles utilisent la chaleur pour faire fondre ou vaporiser l'isolant au lieu de le couper mécaniquement. Une pince à dénuder thermique est généralement équipée de lames ou d'éléments chauffants que l'on appuie sur l'isolant ; la chaleur coupe l'isolant proprement sans exercer de force sur le conducteur. Cette méthode est extrêmement utile pour les fils très fins (calibre élevé) ou les isolants difficiles à couper mécaniquement (comme l'isolant Téflon® utilisé dans les fils aérospatiaux). Les pinces à dénuder thermiques peuvent être portatives, ressemblant à une pince à épiler ou à une pince avec élément chauffant, ou être des machines d'établi plus grandes. L'avantage est la précision et l'absence de contrainte mécanique sur le fil. Comme le souligne Hakko (fabricant de pinces à dénuder thermiques), l'utilisation de la chaleur permet « un dénudage de l'isolant de meilleure qualité tout en réduisant le risque d'entaille du conducteur interne » . Par exemple, un modèle de pince à dénuder thermique dénude proprement les fils AWG 38 (fils très fins) sans aucune entaille. , un résultat difficile à obtenir avec des dénudeurs classiques. L'inconvénient est que ces outils sont plus coûteux et nécessitent de l'énergie pour chauffer. Ils sont généralement utilisés par les professionnels en laboratoire, en production ou par les amateurs travaillant avec des fils fragiles. Un outil de dénudage chauffant est probablement superflu pour les câblages domestiques, mais il est bon de savoir que de tels outils thermiques existent pour des besoins spécifiques. (Le terme « dénudeur à fil chaud » désigne la même chose : le dénudage via un élément chauffant, à ne pas confondre avec un coupe- fil chaud utilisé pour la découpe de mousse, qui est un outil totalement différent.)
-
Machines à dénuder les fils laser : Dans la fabrication de haute technologie, les machines à dénuder les fils laser permettent un dénudage extrêmement précis. Un laser brûle l'isolant de manière très contrôlée. Ce procédé est souvent utilisé pour les câbles micro-coaxiaux ou les fils des dispositifs médicaux, etc., où la moindre entaille peut endommager le conducteur. Un laser peut ablater l'isolant sans toucher le conducteur. Ces machines sont contrôlées par ordinateur et peuvent coûter des dizaines de milliers de dollars ; vous ne les verrez donc pas en dehors des environnements industriels. Elles peuvent dénuder des fils de toutes tailles avec les bons réglages, mais sont particulièrement performantes pour les fils ultra-fins. Pour les besoins de notre discussion (la meilleure façon de dénuder un fil en atelier ou en bricolage), les lasers sont une solution intéressante, mais peu pratique.
-
Machines à dénuder mécaniques : Il existe également des machines à dénuder à manivelle ou motorisées, principalement utilisées pour dénuder les fils électriques hors d'usage (pour recycler le cuivre) ou pour la production en grande série. Par exemple, vous trouverez une machine à dénuder automatique de table capable de dénuder rapidement l'isolant de l'extrémité des fils, voire de les couper à longueur et de les dénuder (fréquemment utilisée dans les usines d'assemblage de câbles). Certains bricoleurs qui recyclent le cuivre des vieux câbles utilisent des machines ou des perceuses qui fendent l'isolant pour en extraire le cuivre ; par exemple, la machine à dénuder SpeedStrip ou VEVOR, qui fait passer les fils à travers une lame via une manivelle ou une perceuse. Ces machines sont idéales pour le dénudage de câbles en vrac (par exemple, lorsque vous avez des centaines de mètres de câbles à recycler), mais pour les tâches de câblage ponctuelles, un outil de dénudage portatif est plus pratique. Des appareils comme la Sanrico SpeedStrip Pro™ entrent dans cette catégorie : il s'agit essentiellement de mini- machines à dénuder conçues pour dénuder rapidement les fils hors d'usage (elles sont présentées comme un moyen efficace d'extraire le cuivre des fils isolés). Bien que ces outils aient leur utilité, ils ne sont pas vraiment destinés aux projets de câblage électrique où l'on ne dénude généralement qu'une courte extrémité d'un fil pour établir une connexion. Ils servent plutôt à dénuder toute la longueur d'un fil pour le recyclage ou la préparation industrielle.
En résumé, pour la plupart des utilisateurs, les outils spécialisés ne sont pas la meilleure solution, mais plutôt la solution spécialisée pour des tâches spécifiques. Ils illustrent l'étendue des technologies de dénudage de fils (du simple couteau au laser haut de gamme). Mais d'un point de vue pratique, une pince à dénuder automatique portative ou manuelle de bonne qualité répondra à 99 % de vos besoins pour la maison, l'automobile ou les loisirs. Nous verrons ensuite pourquoi la pince à dénuder automatique à réglage automatique est souvent le premier choix.
Pourquoi les pinces à dénuder automatiques (auto-ajustables) sont le meilleur choix
Nous avons examiné différentes méthodes, répondons donc clairement à la question principale : quelle est la meilleure façon de dénuder un fil ? Pour la plupart des utilisateurs et des applications, la réponse est : utilisez un outil de dénudage dédié, en particulier une pince à dénuder automatique (auto-ajustable) de bonne qualité. Voici pourquoi :
-
Rapidité et praticité : Comme mentionné précédemment, utiliser une pince à dénuder appropriée est nettement plus rapide qu'un couteau ou des méthodes improvisées. De plus, parmi les pinces à dénuder, celle à réglage automatique est la plus rapide, car vous ne perdez pas de temps à choisir les trous ni à ajuster les réglages pour chaque fil. Il suffit d'insérer et de serrer. Si vous avez de nombreux fils à dénuder (ce qui est courant pour le câblage des panneaux, les installations audio de voiture, etc.), une pince à dénuder automatique vous fera gagner des minutes sur chaque fil, ce qui représente des heures de gain sur un gros projet.
-
Polyvalence : Une pince à dénuder auto-ajustable peut dénuder des fils de différentes tailles, souvent avec un seul outil. Par exemple, la pince à dénuder auto-ajustable Haisstronica gère les fils de calibre 24 à 10 AWG en un seul outil, couvrant ainsi les fils les plus fins pour l'électronique jusqu'aux fils assez épais utilisés dans les circuits automobiles et domestiques. Cette polyvalence fait de cet outil un outil de dénudage universel pour de nombreuses tâches. Besoin de dénuder un fil de signal délicat de calibre 24 AWG ? Il le fait sans l'arracher. Besoin de dénuder un fil toronné de calibre 12 AWG pour une prise ? Aucun problème. L'outil s'adapte automatiquement. C'est un avantage considérable par rapport aux pinces à dénuder manuelles à encoche fixe, qui peuvent ne pas avoir l'encoche exacte pour une section inhabituelle ou ne pas convenir aux fils très épais ou très fins. Même dans le secteur automobile, un seul outil auto-ajustable peut servir de pince à dénuder pour le câblage général ou de pince à dénuder les fils de bougie (pour la gaine extérieure des câbles de bougie), s'il est à portée de main.
-
Sécurité du fil : Les dénudeurs automatiques réduisent considérablement les risques d'entaille ou d'endommagement du conducteur. La conception des mâchoires permet de couper et d'arracher uniquement l'isolant. Un mauvais usage de l'outil reste possible, mais le mécanisme d'auto-ajustement est généralement efficace. Ainsi, vos fils dénudés conservent toute leur résistance et leur conductivité. N'oubliez pas qu'un conducteur entaillé peut agir comme un fusible : sa section est plus petite et il peut surchauffer. L'utilisation d'un dénudeur adapté vous évite presque totalement ce risque. En termes techniques, il préserve l'intégrité du fil, ce qui est important pour les performances électriques et le respect des normes de sécurité.
-
Cohérence : Pour un travail soigné et uniforme (par exemple, pour le câblage d'un tableau électrique ou la création d'un faisceau de câbles), une dénudeuse automatique est souvent équipée d'une butée réglable pour que chaque dénudage ait la même longueur. Même sans butée intégrée, sa simplicité d'utilisation permet de dénuder juste ce dont vous avez besoin sans couper trop de fil par inadvertance. Des longueurs de dénudage uniformes sont particulièrement importantes pour le sertissage de cosses ou lorsqu'une longueur de dénudage spécifique est requise pour un connecteur. Votre projet sera non seulement plus performant, mais aussi plus professionnel – un détail important pour de nombreux électriciens et bricoleurs soucieux du détail.
-
Fonctions supplémentaires : Comme indiqué précédemment, de nombreuses pinces à dénuder automatiques sont des outils multifonctions. Elles incluent souvent un coupe-fil pour couper les fils à la longueur souhaitée et une pince à sertir pour sertir les connecteurs (cosses isolées, cosses bout à bout, embouts, etc.). Par exemple, le modèle Haisstronica intègre un coupe-fil et une mâchoire de sertissage pour cosses isolées et non isolées. Votre pince à dénuder se transforme ainsi en mini- kit de dénudage ou kit de dénudage : un seul outil permet de dénuder, couper et sertir. Cela simplifie votre boîte à outils, ce qui est particulièrement pratique si vous travaillez sur le terrain ou sur une échelle et que vous ne souhaitez pas transporter plusieurs outils. Certains kits incluent même une pince à dénuder avec un jeu de connecteurs ( kit de dénudage avec cosses assorties, etc.), vous offrant ainsi tout le nécessaire pour vos travaux de câblage.
-
Ergonomie : Les bonnes pinces à dénuder automatiques offrent une prise en main confortable et nécessitent une force manuelle relativement faible grâce à leur mécanisme à cliquet. Si vous dénudez beaucoup de fils, la fatigue des mains peut être un problème avec les outils manuels (ou si vous avez une faible force de préhension). Le mécanisme auto-ajustable de la pince à dénuder assure une grande partie du travail. Comme l’a noté un utilisateur d’une pince à sertir/dénuder à cliquet : « J’ai remarqué que je n’ai plus la même force de sertissage qu’avant… cette pince à cliquet utilise un avantage mécanique pour obtenir des sertissages ultra-résistants. » Le même principe s'applique au dénudage : l'effet de levier de l'outil ménage vos mains. Si vous avez des centaines de fils à dénuder (par exemple, le câblage d'une maison neuve avec ses prises électriques ou l'assemblage d'un faisceau de câbles complexe), une pince à dénuder automatique est bien plus douce pour vos mains. Nombre d'entre elles sont dotées de poignées ergonomiques caoutchoutées pour un confort accru.
Compte tenu de tous ces facteurs, la pince à dénuder auto-ajustable s'impose clairement comme la solution la plus polyvalente. C'est pourquoi nous (et de nombreux professionnels) ne jurons que par les pinces à dénuder auto-ajustables pour presque tous les travaux de câblage. Dans une vidéo YouTube judicieusement intitulée « Pourquoi je ne jure que par les pinces à dénuder auto-ajustables » , un électronicien amateur montre comment ces outils rendent le dénudage des fils rapide, facile et sans erreur par rapport aux autres méthodes. Le sentiment est largement partagé : une fois qu'on utilise une bonne pince à dénuder automatique, on a rarement envie de revenir à autre chose.
Bien sûr, il est judicieux de posséder une pince à dénuder manuelle simple en cas de besoin, ou dans les rares cas où elle pourrait s'avérer nécessaire (par exemple, dans un espace extrêmement restreint ou avec un contrôle très précis). Mais si vous devez en choisir une, la pince à dénuder automatique à réglage automatique est généralement la meilleure solution pour dénuder les fils , en termes de rapidité, de sécurité et de commodité.
Maintenant que nous avons établi la supériorité de l'utilisation d'outils appropriés (en particulier les décapants automatiques), abordons quelques conseils sur la façon de les utiliser correctement et discutons du choix d'un modèle ou d'un type spécifique à vos besoins.

Comment utiliser un outil de dénudage de fils (conseils étape par étape)
Utiliser une pince à dénuder est simple, mais quelques conseils vous permettront d'obtenir des résultats parfaits à chaque fois. Voici un guide rapide, étape par étape, applicable à la plupart des outils de dénudage :
-
Préparez le fil : si vous dénudez l'extrémité d'un long câble, coupez-le d'abord à la longueur nécessaire. Si le fil fait partie d'un câble à plusieurs conducteurs (comme un cordon ou un câble gainé), vous devrez d'abord dénuder la gaine extérieure à l'aide d'un couteau ou d'une pince à dénuder spécialisée, puis traiter les fils intérieurs individuellement. (Par exemple, pour dénuder un cordon de lampe, vous inciserez la gaine extérieure en plastique pour exposer les deux fils isolés à l'intérieur, puis les dénuderez avec votre outil.)
-
Choisissez l'outil ou le réglage approprié : si vous utilisez une pince à dénuder manuelle , identifiez l'encoche correspondant au calibre du fil. La plupart des pinces à dénuder ont les calibres indiqués à côté des trous. En cas de doute, privilégiez une encoche plus grande ; si elle ne coupe pas l'isolant, vous pouvez choisir une taille inférieure. Si vous utilisez une pince à dénuder automatique , assurez-vous que le bouton de tension de l'outil (le cas échéant) est correctement réglé (commencez par un réglage moyen). La plupart des pinces à dénuder auto-réglables ne nécessitent aucun réglage pour les fils standard ; le réglage par défaut fonctionne bien. (Certaines pinces sont équipées d'une molette permettant d'augmenter ou de diminuer la force de serrage, que vous pouvez ajuster pour dénuder des fils toronnés très fins plutôt que des isolants épais, etc.)
-
Insérer le fil : Glissez le fil dans la fente/le trou de dénudage jusqu'à atteindre la longueur d'isolant à dénuder. De nombreux outils sont dotés d'une petite butée ou de repères pour faciliter la mesure de la longueur de dénudage. La longueur de dénudage courante pour les bornes à vis est d'environ 12 mm (1/2 pouce), mais respectez toujours les exigences du connecteur. Si votre outil est doté d'une butée de longueur réglable, réglez-la pour plus de régularité, ce qui est particulièrement utile si vous réalisez des dizaines de dénudages identiques.
-
Dénuder le fil : Pour une pince à dénuder manuelle, serrez fermement les poignées pour couper l’isolant, puis, tout en maintenant la pression, tirez l’outil vers l’extrémité du fil. L’isolant devrait glisser. Pour une pince à dénuder automatique, serrez simplement les poignées ; l’outil saisira, coupera et retirera l’isolant d’un seul mouvement. Vous sentirez une légère résistance lors du dénudage, puis il devrait se libérer. Relâchez les poignées pour permettre à l’outil de se réarmer (sur certains modèles automatiques, les mâchoires s’ouvrent brusquement et libèrent le morceau d’isolant retiré).
-
Inspectez le fil dénudé : vérifiez l'extrémité dénudée. Le métal doit être complètement exempt d'isolant pour la longueur souhaitée et les brins doivent être intacts (s'il s'agit d'un fil toronné). Aucun brin de cuivre ne doit être coupé ou manquant ; si c'est le cas, vous avez probablement utilisé une encoche trop petite ou pressé trop fort. Dans ce cas, coupez cette extrémité et dénudez à nouveau correctement. Le conducteur dénudé doit également être propre ; s'il reste de l'isolant ou du revêtement, vous devrez peut-être ajuster votre outil ou, dans de rares cas, utiliser une autre méthode (certains isolants résistants peuvent ne pas bien couper si l'outil est émoussé). Assurez-vous également de ne pas avoir accidentellement dénudé plus de longueur que nécessaire, ce qui pourrait laisser un fil dénudé excessif au-delà d'un connecteur. Si c'est le cas, coupez le fil et réessayez.
-
Torsader les fils toronnés (si nécessaire) : Après avoir dénudé un fil toronné, il est souvent utile de tordre délicatement les brins avec les doigts pour les maintenir ensemble. Certaines pinces à dénuder automatiques agrippent suffisamment bien les brins pour qu'ils ressortent torsadés proprement, tandis que d'autres les laissent évasés. La torsion facilite l'insertion du fil dans les connecteurs ou les bornes et garantit la prise en main de tous les brins. (N'étamez pas le fil avec de la soudure si vous utilisez une borne à vis, car cela peut entraîner une mauvaise connexion à long terme. Pour les travaux électriques en courant alternatif, il est préférable d'utiliser des connecteurs à sertir ou de placer directement le fil nu sous les vis.)
-
Connecter le fil : Le fil est maintenant prêt à être serti sur une cosse, inséré dans un connecteur ou soudé selon les besoins de votre projet. Si vous utilisez un outil combiné dénudeur-sertisseuse , vous pouvez passer au sertissage sans utiliser d'outil supplémentaire. Placez la cosse dans la mâchoire de sertissage, insérez le fil dénudé et pressez pour sertir (en suivant les instructions de positionnement de l'outil). Le fait de regrouper le dénudage et le sertissage dans un seul outil (comme dans une trousse à dénuder à cliquet ) accélère le processus et garantit un flux de travail efficace.
-
Répétez l'opération si nécessaire : continuez à dénuder tous les fils nécessaires. Si vous remarquez que l'outil commence à s'émousser ou à dénuder moins proprement (cela prend généralement du temps, sauf si vous travaillez avec un isolant très abrasif), vous devrez peut-être le remplacer ou affûter les lames si possible. Les dénudeurs de bonne qualité durent longtemps en utilisation normale.
En suivant ces étapes, vous dénuderez vos fils proprement et uniformément. Travaillez toujours dans un endroit bien éclairé pour bien voir ce que vous faites, surtout avec les petits fils. Et jetez les petits anneaux d'isolant qui se détachent : ils ont tendance à se disperser sur votre plan de travail ou à s'accrocher aux fils et peuvent devenir gênants ou salissants s'ils ne sont pas gérés correctement.
Choisir la pince à dénuder adaptée à vos besoins
Il est désormais évident qu'une pince à dénuder de qualité est essentielle. Mais laquelle choisir ? La réponse dépend du type de travail que vous envisagez. Voici quelques considérations et recommandations, utilisant plusieurs des termes que nous avons abordés :
-
Bricolage et travaux électriques à domicile : Si vous effectuez des tâches courantes comme le remplacement de luminaires, l'installation de prises ou le raccordement d'appareils électroménagers, vous utiliserez principalement des fils de calibre moyen (généralement 14 et 12 AWG pour le câblage domestique, pouvant aller jusqu'à 10 AWG pour certains appareils ou jusqu'à 18 AWG pour les sonnettes et les thermostats). Un bon outil à dénuder universel à réglage automatique est idéal. Il couvre toutes ces tailles et accélère le travail. La pince à dénuder à réglage automatique Haisstronica (AWG 10-24) est un excellent choix pour les particuliers, grâce à sa portée et à ses fonctionnalités supplémentaires. Son design bleu (poignées bleues confortables) est facile à repérer dans la boîte à outils, et elle est même disponible en rose si vous souhaitez une couleur différente – même fonctionnalité, juste une couleur différente selon vos préférences. Les propriétaires et les électriciens apprécient les outils fiables ; La pince à dénuder Haisstronica, par exemple, offre une poignée ergonomique et une construction robuste, ce qui est idéal pour dénuder des dizaines de fils lors d'une rénovation. Si votre budget est très serré ou que vous effectuez peu de travaux électriques, une pince à dénuder manuelle basique (comme une pince à dénuder à encoche de marque Klein ou Irwin) peut suffire, mais n'oubliez pas que vous perdrez le confort du réglage automatique. Compte tenu de la faible différence de prix, de nombreux bricoleurs optent pour l'outil automatique sans jamais le regretter.
-
Câblage automobile et véhicule : Pour une utilisation automobile, on rencontre souvent une grande variété de sections de fils et d'isolants résistants (les fils automobiles sont généralement dotés d'une isolation épaisse et résistante à l'huile). Vous pourriez également être amené à dénuder des fils dans des endroits difficiles d'accès sous le tableau de bord. Une pince à dénuder auto-ajustable est un atout précieux, car elle s'adapte instantanément aux petits fils radio (20 AWG et plus) comme aux fils plus gros pour les phares ou les amplificateurs (~10-12 AWG). Privilégiez une pince à dénuder à mâchoire pointue pour accéder aux espaces restreints. Parfois, des pinces à dénuder réglables à bec plus fin sont utiles si l'espace est limité. Les techniciens automobiles utilisent également souvent des pinces à dénuder et à sertir combinées, car ils doivent souvent sertir des cosses (par exemple, des cosses à œil pour les batteries de voiture ou des cosses plates pour les haut-parleurs). Un outil qui dénude puis sertit les connecteurs est très efficace. Si vous travaillez sur des câbles automobiles spéciaux, comme des fils d'allumage pour bougies, sachez qu'il s'agit souvent de câbles de 7 ou 8 mm, dotés d'une épaisse gaine en silicone et d'une âme en carbone ou spiralée. Dénuder des fils de bougie sans les endommager requiert une technique précise ou l'utilisation d'une pince à dénuder spéciale fournie avec un kit de dénudage (ces kits comprennent un outil permettant de dénuder précisément la gaine extérieure du câble d'allumage sans couper l'âme fragile). Le kit d'outils de sertissage Haisstronica pour fils de bougie (mentionné dans leurs tests vidéo) comprend une pince à dénuder compatible. Si vous prévoyez de fabriquer vos propres fils de bougie, pensez à utiliser un kit de pinces à dénuder dédié. Pour les applications automobiles classiques, la pince à dénuder auto-ajustable standard convient à la plupart des fils du véhicule. Il est conseillé d'utiliser des pinces à dénuder robustes si vous prévoyez de dénuder des câbles plus volumineux, comme des câbles de batterie ou de remorque. Leur calibre peut dépasser AWG 10 (par exemple, des câbles AWG 6 ou 4). Dans ce cas, vous pourriez avoir besoin d'une pince à dénuder robuste ressemblant davantage à un coupe-câble avec une encoche, ou simplement d'un couteau bien aiguisé pour dénuder délicatement l'isolant (car les gros calibres présentent des torons épais plus difficiles à couper). Il existe des pinces à dénuder à cliquet capables de gérer les gros calibres grâce à un système pince-lame et un mécanisme à cliquet pour faire levier. Ces pinces sont plus spécialisées et se trouvent souvent dans les catalogues d'outils industriels. Cependant, pour la plupart des câbles de voiture ou de moto (généralement de calibre 8 AWG et inférieur), une pince à dénuder automatique classique fera parfaitement l'affaire.
-
Électronique et travaux de précision : Si vous travaillez sur des projets électroniques, des platines d'expérimentation, des Arduinos, etc., vous manipulerez souvent des fils fins (20 à 30 AWG) et des composants délicats. La précision est ici essentielle. Un grand outil auto-ajustable permet de dénuder les fils fins, mais les électroniciens amateurs préfèrent parfois une pince à dénuder de précision dédiée. Les pinces à dénuder de précision sont généralement des outils manuels ressemblant à des ciseaux, voire à une pince crantée, conçus pour les fils très fins (par exemple, le célèbre « Ideal Stripmaster » ou le « Thermal Wire Stripper FT-802 », comme indiqué précédemment). Elles garantissent le dénudage sans dommage des fils les plus fins. Si vous travaillez souvent avec des câbles plats, des câbles réseau Cat5/Cat6 ou des câbles coaxiaux pour antennes, vous pourriez avoir besoin de pinces à dénuder spéciales : par exemple, une pince à dénuder pour câbles coaxiaux qui dénude plusieurs couches (gaine extérieure, blindage, diélectrique) en une seule opération, ou une pince à dénuder modulaire pour câbles Ethernet. Ces outils sont spécialisés, mais méritent d'être pris en compte si vos projets les nécessitent. Pour les applications électroniques courantes où vous ne dénudez que des conducteurs isolés, une pince à dénuder automatique de petit calibre ou une pince manuelle de haute qualité avec des encoches jusqu'à 30 AWG est idéale. Certains kits d'outils de dénudage universels sont équipés de lames interchangeables pour différentes tâches (par exemple, un outil multifonction capable de dénuder des fils ordinaires et un accessoire pour câbles coaxiaux). Évaluez votre travail : s'il s'agit de souder des fils sur un circuit imprimé, une simple pince à dénuder de précision convient. S'il s'agit de sertir de nombreux connecteurs Dupont ou des câbles de servomoteur (fréquents en électronique amateur), une pince à dénuder automatique fine peut accélérer le processus.
-
Usage industriel et professionnel : Les professionnels qui dénudent des fils au quotidien (comme les tableautiers, les assembleurs de faisceaux de câbles, etc.) investissent souvent dans des outils haut de gamme, voire des équipements automatisés. Si vous faites partie de cette catégorie, vous connaissez probablement déjà vos préférences. Des marques comme Klein, Knipex, Ideal, etc., proposent des dénudeurs de qualité professionnelle très durables. Par exemple, le dénudeur de fils auto-ajustable Knipex est un outil haut de gamme réputé pour sa longévité et sa précision. Les professionnels utilisent aussi parfois des dénudeurs à cliquet ou des dénudeurs pneumatiques raccordés à des compresseurs d'air pour dénuder les fils très rapidement. Pour le sertissage en grande quantité, vous pouvez même utiliser une machine combinée dénudage/sertissage. Mais cela dépasse les besoins de la plupart des utilisateurs. La conformité et les normes sont un élément important à prendre en compte : pour le câblage aérospatial ou militaire, seules certaines méthodes (comme le dénudage thermique) sont parfois approuvées pour éviter toute entaille. Dans ce cas, utilisez la méthode préconisée par la spécification (même si elle est plus lente), car la fiabilité est primordiale. Mais pour les travaux commerciaux généraux, une décapeuse manuelle de qualité suffit.
-
Outils multifonctions vs outils mono-usage : Il existe des outils multifonctions intéressants combinant de nombreuses fonctions. Par exemple, vous avez peut-être déjà vu une pince d'électricien 8 en 1 ou 5 en 1 prétendant couper, dénuder, sertir, couper des boulons, etc. La pince 8 en 1 Sanrico est l'un de ces outils (l'entreprise propose des fonctions de dénudage, de coupe, de tirage, etc. en un seul outil). Bien que ces outils multifonctions puissent être pratiques pour les travaux légers, ils ne dénudent souvent pas aussi bien qu'une pince à dénuder dédiée, surtout sur différents calibres. Les trous de dénudage d'un outil multifonction peuvent être limités ou ne pas être auto-ajustables. Ils conviennent en cas de besoin ou pour un technicien de maintenance souhaitant un seul outil pour tout, mais si vous effectuez de nombreuses connexions sur un établi, une pince à dénuder dédiée sera plus pratique et efficace. Par conséquent, si vous voyez un « kit de dénudage de fils » comprenant une pince multiprise et éventuellement un coupe-fil séparé, sachez que les performances peuvent être un compromis. D'un autre côté, un kit comme un kit de dénudage de fils d'une marque peut inclure une pince à dénuder autonome ainsi qu'un outil de sertissage séparé et peut-être quelques connecteurs - ce type d'ensemble est en fait très utile, vous offrant des outils spécialisés dans un seul ensemble.
-
Budget vs Qualité : Inutile de dépenser une fortune pour une bonne pince à dénuder. De nombreuses pinces à dénuder automatiques très bien notées coûtent entre 15 et 25 $ (par exemple, Irwin Vise-Grip, Haisstronica, Neiko, etc.). Un peu plus (par exemple, 40 $) peut vous permettre d'obtenir un outil de marque plus robuste. Des pinces à dénuder sans marque très bon marché (celles que vous trouverez pour, disons, 5 $) peuvent faire l'affaire, mais ont souvent des tolérances faibles ou des lames émoussées, ce qui peut être source de frustration. Investir dans un bon outil est généralement judicieux compte tenu de sa fréquence d'utilisation pour tout projet de câblage. La description de la pince à dénuder , sur l'emballage ou en ligne, indique le calibre et les fonctions ; assurez-vous qu'elle couvre les fils dont vous avez besoin. Consultez également les avis et les spécifications pour des critères tels que le confort et la durabilité. Si vous prévoyez de dénuder des milliers de fils, un outil professionnel résistant à l'usure est un choix judicieux. Pour un bricolage occasionnel, un outil milieu de gamme fera parfaitement l'affaire. Haisstronica, par exemple, privilégie un équilibre entre qualité et prix abordable, ce qui fait de sa décapeuse un excellent rapport qualité-prix pour un usage quotidien.
Conclusion
Dénuder des fils est une compétence fondamentale pour quiconque travaille sur des projets électriques ou électroniques. Comme nous l'avons vu, la meilleure façon de dénuder des fils est d'utiliser un outil à dénuder spécialement conçu, plutôt que d'improviser avec des couteaux ou autres gadgets. Parmi les options, les pinces à dénuder automatiques à réglage automatique se distinguent par leur facilité d'utilisation, leur rapidité et la fiabilité de leurs résultats. Elles simplifient le dénudage des fils et réduisent considérablement les risques d'endommagement, pour des connexions plus sûres et plus durables.
Si vous utilisez encore un cutter ou une vieille paire de ciseaux pour dénuder les fils, pensez à moderniser votre boîte à outils. Une pince à dénuder de qualité vous sera d'une grande aide dès le premier instant pour éviter un accident ou gagner du temps sur un projet. Comme le dit avec humour une source : « Prenez-en une si vous avez plusieurs fils à dénuder » – c'est bien mieux que de se battre sans le bon outil. Que vous choisissiez une pince à dénuder classique à encoche, une pince à dénuder automatique ou un kit de dénudage multifonction, assurez-vous qu'elle soit adaptée aux fils que vous manipulez et qu'elle soit agréable à tenir.
Pour une recommandation polyvalente et polyvalente, la pince à dénuder auto-ajustable de Haisstronica (AWG 10-24) est un choix éprouvé. Elle réunit les qualités essentielles que vous recherchez : rapide, auto-ajustable à différentes sections de fil, capable de couper et de sertir, et conçue pour durer. De nombreux électriciens et bricoleurs en ont fait un outil incontournable pour leurs travaux de câblage, et pour cause. Elle simplifie votre travail et améliore la qualité de vos résultats.
Enfin, n'oubliez jamais les bases d'une bonne technique de dénudage : utilisez l'outil adapté à la section du fil, soyez délicat pour éviter les entailles dans le conducteur et vérifiez votre travail à deux reprises. Avec l'outil et la méthode appropriés, dénuder des fils devient une tâche rapide, propre et même satisfaisante, plutôt qu'une corvée. En commençant chaque connexion avec un fil correctement dénudé, vous mettrez toutes les chances de votre côté pour réussir vos travaux électriques.
La meilleure façon de dénuder un fil est d'utiliser un outil de dénudage adapté – de préférence une pince à dénuder automatique à réglage automatique – qui retirera l'isolant rapidement et proprement sans endommager le conducteur. C'est un investissement en matière de sécurité, d'efficacité et de qualité professionnelle pour tous vos projets de câblage. Bon dénudage !