Introduction
« Faut-il torsader les fils avant de les sertir ? » est une question fréquente chez les bricoleurs et les électriciens. La réponse est simple : en général, non . Il ne faut pas torsader les brins d'un fil avant de le sertir. Les connexions à sertir sont conçues pour comprimer les brins tels quels, et une torsion excessive peut fragiliser le sertissage. Torsader le fil peut augmenter son diamètre de manière inégale et entraîner un mauvais contact électrique, voire endommager les brins. Privilégiez plutôt l'utilisation d'un outil de sertissage adapté (souvent appelé pince à sertir ) et d'une technique de sertissage adaptée pour obtenir une connexion solide. Dans cet article, nous expliquerons ce qu'est le sertissage, détaillerons les étapes à suivre, expliquerons quand et pourquoi utiliser des connecteurs à sertir, fournirons un guide d'achat pour les outils et connecteurs de sertissage et répondrons aux questions fréquentes.
👉 Choisissez les performances du connecteur à sertir Haisstronica pour des bornes impeccables.

Qu'est-ce que le sertissage des fils ?
Connecteurs à deux cosses à anneau : à gauche, un fil inséré avant sertissage, et à droite, le connecteur après sertissage. Le sertissage de fils consiste à raccorder des fils électriques à des bornes ou des connecteurs en déformant un manchon métallique (le connecteur) autour des brins nus du fil afin de former une liaison mécanique et électrique solide. Cette méthode crée une connexion sans soudure , résistante aux vibrations et aux tiraillements lorsqu'elle est correctement réalisée. Les connecteurs à sertir courants (parfois appelés cosses à anneau ou connecteurs de fils ) comprennent les cosses à anneau, les cosses à fourche, les connecteurs à cosses rondes et les connecteurs à épissure bout à bout utilisés pour raccorder des fils bout à bout. Chaque connecteur est conçu pour un calibre de fil (taille) et une application spécifiques. Pour sertir ces connecteurs, on utilise une pince à sertir , également appelée pince à sertir , qui exerce une pression concentrée pour « sertir » (comprimer) le connecteur sur le fil. Le résultat est une connexion rapide et fiable, sans soudure. Il est important de ne pas tordre ni déformer volontairement les brins lors de la préparation du fil toronné pour le sertissage ; il suffit de les redresser ou de les rassembler légèrement afin qu'ils pénètrent tous dans le corps du connecteur. Un sertissage correct comprime fermement tous les brins, créant ainsi une connexion étanche au gaz à l'intérieur de la borne sertie .
Comment sertir correctement les fils (étape par étape)
Utilisez une pince à sertir à cliquet pour sertir un connecteur d'épissure bout à bout isolé rouge sur un fil. Le sertissage des fils est simple si vous suivez les étapes appropriées. Utiliser une technique et des outils adaptés (comme des pinces à sertir de qualité) vous garantira des connexions serties sûres à chaque fois. Suivez ces étapes pour sertir correctement un connecteur de fil :
-
Dénuder le fil : Retirez la longueur d’isolant appropriée à l’extrémité du fil (généralement environ 5 à 7 mm, selon le connecteur). Veillez à ne pas entailler ni couper les brins. S’il s’agit d’un fil toronné, ne le torsadez pas excessivement ; redressez-le juste suffisamment pour qu’il reste ensemble lors de l’insertion (une légère torsion d’usine suffit généralement). Conseil : Pour les brins très fins qui s’effilochent, une légère torsion avec les doigts peut aider à les maintenir, mais évitez toute torsion excessive qui déformerait le fil.
-
Choisissez le bon connecteur : Choisissez un connecteur à sertir adapté au type et au calibre de votre fil. Par exemple, utilisez un connecteur bout à bout de taille appropriée pour joindre deux fils, ou une cosse à œillet/fourche pour la fixation à une borne à vis. Les connecteurs sont souvent codés par couleur (rouge, bleu, jaune) selon le calibre des fils. Veillez à utiliser un connecteur à sertir isolé si vous avez besoin d'une isolation supplémentaire, ou un connecteur à sertir non isolé si vous prévoyez de le recouvrir de gaine thermorétractable ultérieurement. Un connecteur de taille appropriée s'ajustera parfaitement au fil dénudé sans avoir à le plier ou le doubler.
-
Insérer le fil dans le connecteur : Insérez complètement le fil dénudé dans le corps du connecteur. Tous les brins doivent être insérés à l'intérieur, sans laisser de brins de cuivre dépasser. L'isolant du fil doit être en contact avec l'extrémité du connecteur, sans passer sous la zone de sertissage. (Pour un sertissage bout à bout , insérez les fils par les deux extrémités.) Ne pré-étamez pas le fil (soudez-le) ; le sertissage ne fonctionne que sur des fils nus et toronnés. Et comme indiqué, ne torsadez pas plusieurs fils ensemble avant de sertir ; si vous devez joindre deux fils sur une même borne, insérez-les parallèlement côte à côte dans le corps du connecteur plutôt que de les torsader ensemble.
-
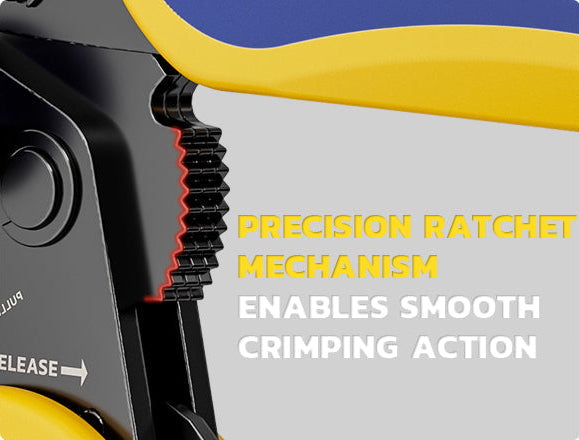
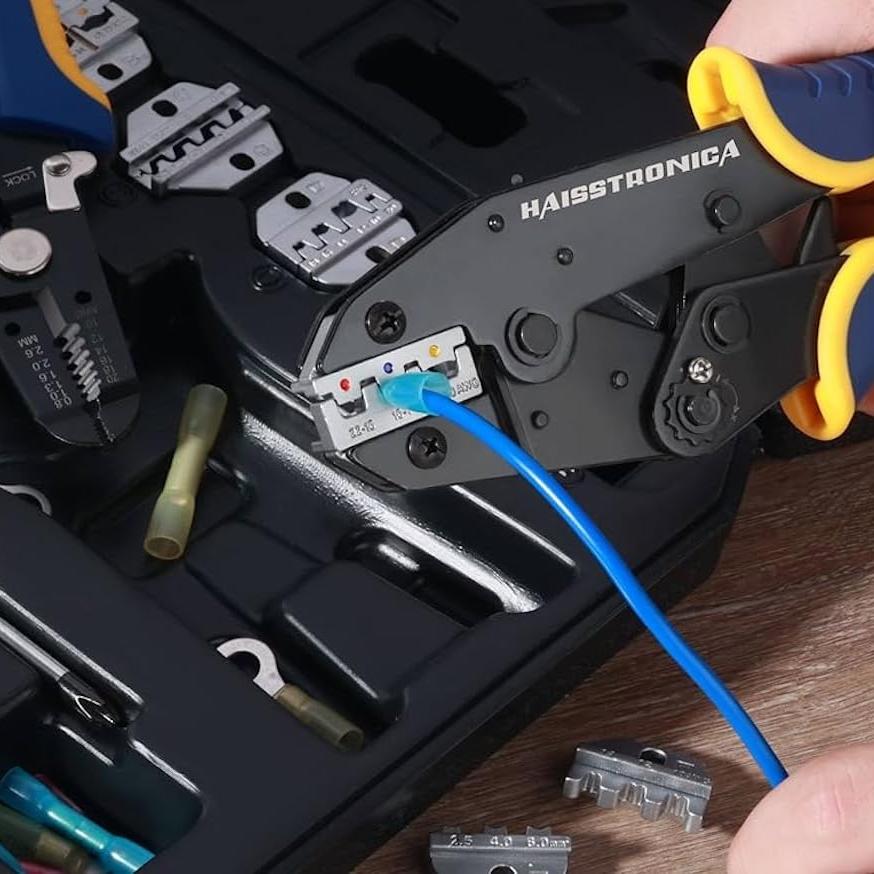
Positionnement du connecteur dans la pince à sertir : Placez le connecteur (avec le fil à l'intérieur) dans la fente de la pince à sertir. La plupart des pinces à sertir pour connecteurs électriques proposent plusieurs tailles de pinces correspondant à la couleur ou au calibre du connecteur. Pour les cosses isolées, utilisez la pince étiquetée pour connecteurs isolés ; pour les cosses non isolées, utilisez la section appropriée. Une pince à sertir à cliquet de qualité est recommandée : elle exerce une pression uniforme et ne se relâche qu'une fois le sertissage terminé, garantissant ainsi un sertissage uniforme à chaque fois. Serrez les poignées à fond jusqu'à ce que le mécanisme à cliquet se relâche. Le corps du connecteur est alors comprimé fermement autour du fil.
-
Inspectez et testez le sertissage : ouvrez l’outil et retirez la connexion sertie. Vérifiez que le fil est bien fixé : vous devriez voir une légère empreinte de la pince à sertir sur le connecteur, et vous pourriez même apercevoir le contour des brins à travers l’isolant translucide. Tirez légèrement sur le fil ; il ne doit pas se détacher du connecteur. Si vous avez utilisé un connecteur thermorétractable isolé (souvent appelé connecteur étanche ), appliquez de la chaleur (avec un pistolet thermique) pour rétrécir le tube et sceller la connexion. Le sertissage final doit être serré et résistant aux vibrations, sans brins apparents.
Utilisations courantes des connexions à sertir
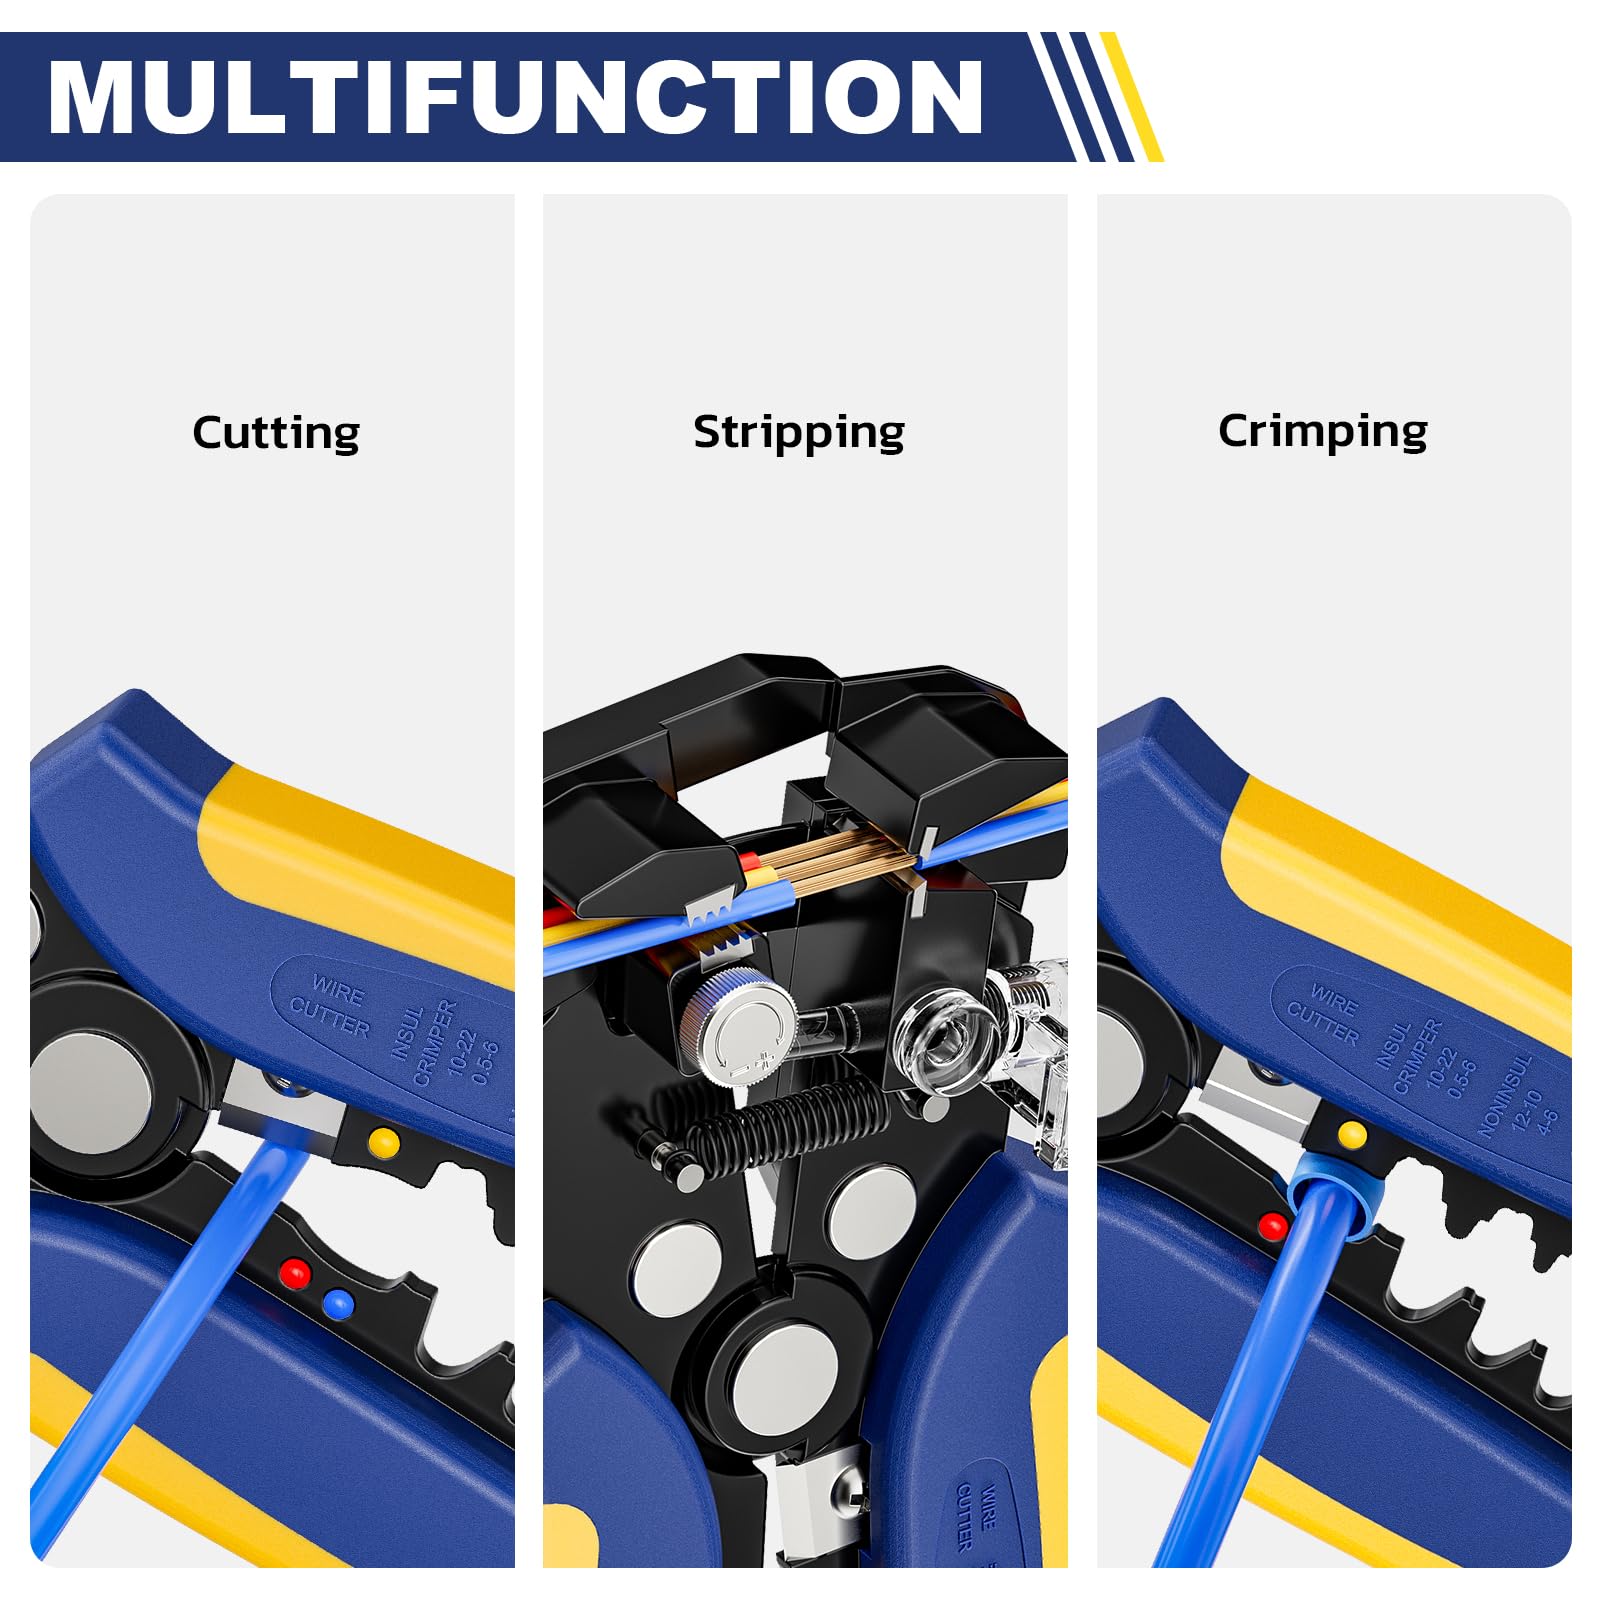
Le sertissage est utilisé dans de nombreuses applications électriques car il est rapide, fiable et nécessite un équipement minimal. Voici quelques exemples de situations et de types de connecteurs courants :
-
Câblage automobile et marin : Les connecteurs à sertir sont la solution idéale pour le câblage des véhicules et des bateaux. Les connecteurs bout à bout relient les fils neufs ou cassés, les connecteurs à sertir à anneau fixent les fils aux bornes de batterie ou aux plots de masse, et les connecteurs à cosses permettent une déconnexion rapide des accessoires. Ces environnements sont soumis à des vibrations et parfois à l'humidité ; un sertissage de qualité (souvent thermorétractable) est donc préférable à une soudure. Par exemple, la réparation des feux arrière, l'installation d'autoradios et le câblage du compartiment moteur nécessitent tous un sertissage de qualité. Les câbles de batterie de gros calibre utilisent des cosses serties à l'aide d'une pince à sertir spéciale ou d'une pince à sertir hydraulique.
-
Électricité domestique (câblage domestique) : Dans le câblage résidentiel, les bornes à vis et les connecteurs à visser (serre-fils) sont les plus courants, mais les connexions à sertir ont aussi leur place. Les électriciens utilisent parfois des manchons ou des capuchons de sertissage en cuivre pour connecter les fils de manière permanente (notamment lors de rénovations ou de réparations). Cela consiste à placer un capuchon métallique sur les fils dénudés et à le sertir à l'aide d'une pince à sertir conçue pour les sertissages d'épissures . Ces connecteurs à sertir pour le câblage domestique doivent être utilisés conformément à la réglementation locale. En général, les connecteurs à sertir sont plus fréquents dans les câblages basse tension ou les câblages d'appareils électroménagers que dans les câblages muraux, mais ils sont également utilisés pour des éléments tels que les luminaires, les ventilateurs de plafond ou les connexions CVC.
-
Électronique et électroménager : À l’intérieur des appareils électroménagers, de l’instrumentation ou des panneaux de commande, vous trouverez de nombreuses cosses serties. Les cosses à fourche (connecteurs femelles à sertir) se connectent aux interrupteurs, relais et haut-parleurs ; les cosses à fourche ou à anneau se connectent aux bornes à vis des circuits imprimés ou des jeux de barres. Pour les fils multibrins très fins destinés aux bornes à vis (comme dans les armoires de commande industrielles ou les équipements audio), des embouts de sertissage sont souvent sertis aux extrémités des fils. Un embout offre une finition soignée, semblable à celle d’une emboutie, en enfermant les brins dans un petit tube métallique serti. Cela évite les brins parasites et améliore la fiabilité sous les vis. (L’utilisation d’embouts nécessite une pince à sertir dédiée qui réalise un sertissage carré ou hexagonal.)
-
Applications spécialisées : Il existe de nombreux types de connecteurs et d'outils de sertissage pour des applications spécifiques. Par exemple, les cosses à corps ouvert (présentes dans de nombreux connecteurs automobiles et fiches informatiques) nécessitent une pince à sertir à corps ouvert qui replie les languettes de la cosse sur le fil et l'isolant. Les câbles coaxiaux (pour antennes, vidéosurveillance, etc.) utilisent des connecteurs à sertir de type BNC ou F, qui nécessitent des outils et des matrices de sertissage précis. Même les câbles réseau (fiches RJ45) sont sertis avec une pince à sertir modulaire. En résumé, des fils de signal les plus petits aux gros câbles d'alimentation, il existe une solution de sertissage.
👉 Connecteurs de bornes de sertissage bien rangés avec l'action à cliquet calibrée de Haisstronica .

Comment choisir les bons outils de sertissage et connecteurs (Guide d'achat)
Choisir des outils et des connecteurs de qualité est crucial pour un sertissage optimal. Voici quelques conseils pour vous guider dans votre achat et votre sélection :
-
Investissez dans un bon outil de sertissage : une pince à sertir fiable est indispensable pour tout câblage. Les pinces à sertir en métal estampé bon marché (celles qui dénudent les vis et coupent les boulons) peuvent être utiles en cas de besoin, mais produisent souvent des sertissages de qualité inférieure. Une pince à sertir à cliquet (avec matrices interchangeables pour différents types de connecteurs) est fortement recommandée pour une pression constante et une utilisation facile. Ces outils garantissent une compression complète du sertissage avant de le relâcher, réduisant ainsi les risques de connexion lâche. De nombreuses marques proposent des pinces à sertir à cliquet ; par exemple, vous trouverez un ensemble d'outils de sertissage à cliquet Craftsman ou des kits similaires comprenant une sélection de matrices. Recherchez des outils adaptés aux connecteurs que vous utilisez le plus (pince à sertir pour cosses isolées, sertisseuse pour embouts, sertisseuse pour cosses à fût ouvert, etc.). Si vous travaillez fréquemment sur des projets automobiles ou marins, une pince à sertir robuste (ou même une pince à sertir hydraulique pour cosses de batterie) peut être un atout.
-
Choisissez des connecteurs de haute qualité : Tous les connecteurs à sertir ne se valent pas. Assurez-vous d'acheter des connecteurs de la taille (calibre) et du type adaptés à votre projet. Les connecteurs à sertir isolés sont dotés d'une isolation en vinyle, en nylon ou thermorétractable. Ces derniers sont parfaits pour une utilisation automobile et extérieure, car ils isolent de l'humidité après le sertissage.
-
Matrices et compatibilité : Si votre outil de sertissage est équipé de matrices interchangeables, assurez-vous d'utiliser la matrice adaptée au connecteur. L'utilisation d'une matrice de taille ou d'un type incorrect peut entraîner un sertissage lâche ou une coupe trop profonde du connecteur. De nombreux kits d'outils de sertissage électriques sont fournis avec un tableau des matrices ou des marquages (par exemple, des points rouges, bleus et jaunes correspondant aux couleurs des connecteurs). Suivez les recommandations du fabricant de l'outil. Pour le sertissage des embouts , vous aurez besoin d'une matrice spécifique (généralement carrée). Pour les fiches coaxiales ou modulaires , vous aurez besoin de ces mêmes matrices ou d'outils dédiés.
-
Outils supplémentaires : Pensez à avoir une bonne pince à dénuder/coupe-fils à portée de main (de nombreuses pinces à sertir sont équipées d'une pince à dénuder, mais une pince dédiée peut être plus facile à utiliser pour plus de précision). Si vous prévoyez de réaliser de nombreux sertissages lourds (par exemple, du calibre 8 AWG et plus), vous pouvez envisager une pince à sertir à marteau ou une presse hydraulique pour les cosses, car une pince à sertir manuelle classique risque de ne pas générer suffisamment de force. De plus, si vous effectuez fréquemment des câblages, un kit d'outils de sertissage de cosses comprenant des centaines de connecteurs et une pince à sertir de qualité peut vous faire économiser de l'argent et vous assurer de toujours avoir le bon connecteur sous la main.
En choisissant la bonne combinaison d' outils de sertissage et de connecteurs, vos projets de sertissage seront beaucoup plus faciles et fiables. Des sertissages de haute qualité durent non seulement plus longtemps, mais conservent également une faible résistance électrique et une résistance élevée à l'arrachement. En résumé, utilisez la meilleure sertisseuse disponible et privilégiez les marques ou kits de connecteurs fiables. Vous aurez ainsi l'assurance que chaque sertissage, qu'il s'agisse d'un petit fil d'enceinte ou d'un épais câble de batterie, tiendra le coup dans le temps.
👉 Connecteurs à sertir électriques fiables — utilisez Haisstronica pour une compression uniforme.

FAQ
Q : Dois-je tordre le fil avant de le sertir ?
R : Non, il ne faut pas tordre excessivement les brins d'un fil toronné avant le sertissage. Les normes industrielles recommandent d'insérer les brins directement dans le connecteur, sans les tordre ni les déformer . La torsion peut agrandir ou déformer la section du fil, ce qui peut entraîner un mauvais ajustement dans le connecteur et un sertissage plus faible. Une légère torsion naturelle (lorsque le fil sort de la bobine) est acceptable, et vous pouvez redresser délicatement les brins ou les tordre juste assez pour les insérer dans le connecteur. Mais ne les tordez pas et ne les enroulez pas trop serrés. Le sertissage rassemblera et comprimera correctement les brins. En bref, laissez la pince à sertir fixer les brins. La torsion n'est pertinente que pour joindre deux fils dans un même connecteur ; dans ce cas, ne torsadez pas les fils ensemble ; insérez-les côte à côte afin que chaque fil soit serti indépendamment par le cylindre. Cela garantit une terminaison sûre pour chaque fil.
Q : Puis-je utiliser une pince au lieu d’un outil de sertissage ?
R : Ce n'est pas recommandé. En cas de besoin urgent, on peut essayer d'écraser un connecteur avec une pince ou un étau, mais cela entraîne souvent un mauvais sertissage. Un outil de sertissage approprié est conçu pour appliquer la pression et la forme appropriées au connecteur. Les pinces ou les méthodes improvisées ne compriment pas le sertissage uniformément et risquent de ne pincer qu'une petite zone, fragilisant la connexion ou la rendant susceptible de se desserrer. En effet, un mauvais sertissage réalisé avec une pince peut se défaire d'un léger coup sec ou provoquer un contact électrique intermittent (un risque important pour les câblages critiques). Les outils de sertissage (en particulier les pinces à cliquet) entourent le connecteur et appliquent une pression uniforme sur tout le corps, créant ainsi un sertissage solide. Leur profil permet également de former le métal sans le couper. Pour des résultats fiables, utilisez l' outil de sertissage adapté aux connecteurs. Si vous n'en possédez pas, de nombreux kits d'outils de sertissage sont abordables et valent vraiment le coup pour la sécurité et la longévité de vos réparations électriques. N'oubliez pas qu'utiliser l'outil approprié fait partie intégrante d'une bonne technique de sertissage et permet d'éviter les pannes.
Q : Est-il préférable de sertir ou de souder les fils ?
R : Pour la plupart des raccordements de connecteurs , le sertissage est préférable à la soudure, notamment dans les environnements automobiles ou soumis à de fortes vibrations. Un sertissage réussi soude à froid le fil à la borne, créant ainsi une liaison solide et étanche aux gaz. Souder un fil dans une sertissure ou sur une borne peut le rigidifier au point de connexion et le rendre susceptible de se fissurer sous l'effet des mouvements ou des vibrations. (Il existe également des connecteurs à souder bout à bout sur le marché ; ils utilisent une soudure à bas point de fusion et une gaine thermorétractable ; ils peuvent fonctionner, mais nécessitent une chauffe prudente et ne sont généralement pas utilisés par les professionnels pour les applications critiques.) Le sertissage est la norme pour les connexions automobiles, aérospatiales et industrielles, car il est rapide et fiable lorsqu'il est réalisé correctement. Cela dit, pour les épissures ou les réparations de câbles, dans certains cas, la soudure et la gaine thermorétractable constituent une autre méthode. Cependant, il ne faut jamais souder avant le sertissage (par exemple, n'étamez pas un fil avant de sertir une borne ; cette méthode est expressément interdite par la plupart des normes car elle peut desserrer la connexion). En résumé : utilisez un sertissage de qualité pour vos connecteurs et vous obtiendrez une connexion durable. La soudure est idéale pour les travaux sur circuits imprimés ou l'épissure de petits fils, mais pour fixer des bornes, le sertissage est généralement la meilleure solution.
Q : Que sont les embouts et quand dois-je les utiliser ?
R : Les embouts (aussi appelés embouts en lacet) sont de petits tubes métalliques que l'on sertit aux extrémités des fils toronnés. On les utilise souvent dans les tableaux de commande, les machines ou toute autre situation où un fil toronné doit être inséré dans une borne à vis (comme un bornier, un relais ou une fiche de connecteur). L'embout regroupe soigneusement les brins et les empêche de s'écarter ou de se casser lors du serrage de la vis. Pour utiliser des embouts, vous aurez besoin d'une pince à sertir (une pince spécialisée qui réalise généralement un sertissage carré ou hexagonal). Il suffit de glisser l'embout sur l'extrémité dénudée du fil, puis de le sertir, formant ainsi une broche solide pouvant être serrée solidement. Les embouts sont des connecteurs à sertir isolés (ils sont souvent dotés d'une bague en plastique colorée pour l'isolation et l'indication de la taille). Ils sont disponibles en différentes tailles pour s'adapter aux calibres des fils. Utilisez des embouts pour des applications telles que le câblage d'automates programmables, de disjoncteurs ou d'équipements audio, partout où vous souhaitez une connexion propre et fiable pour des fils fins. Elles ne sont généralement pas utilisées pour les épissures fil à fil (c'est-à-dire pour les connecteurs bout à bout ou autres cosses à sertir), mais plutôt pour les connexions fil à cosse. En résumé, les embouts améliorent les connexions des bornes à vis/pince et sont un élément clé des travaux de câblage professionnels (normes européennes courantes). Si vous utilisez ce type d'équipement, l'investissement dans une pince à sertir et un kit d'embouts peut s'avérer très rentable.
Nos meilleurs choix conviviaux
Attaquez-vous à vos bateaux, voitures et appareils électroménagers avec une pince à sertir de précision qui mord une fois et maintient fermement. Les mâchoires renforcées s'adaptent parfaitement aux matrices de sertissage interchangeables pour différentes cosses, et le cliquet souple vous offre un contrôle optimal. Gardez vos outils de sertissage de cosses organisés et prêts pour tous vos travaux de câblage.
👉 Perfectionnez chaque connecteur à sertir avec l'outil AWG 22–10 de Haisstronica .